


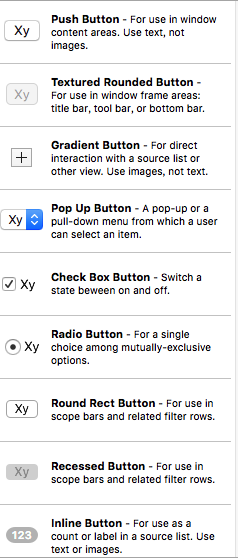
在Cocoa框架中,所有的按钮都是基于NSButton,系统提供了多钟按钮,下面显示部分:
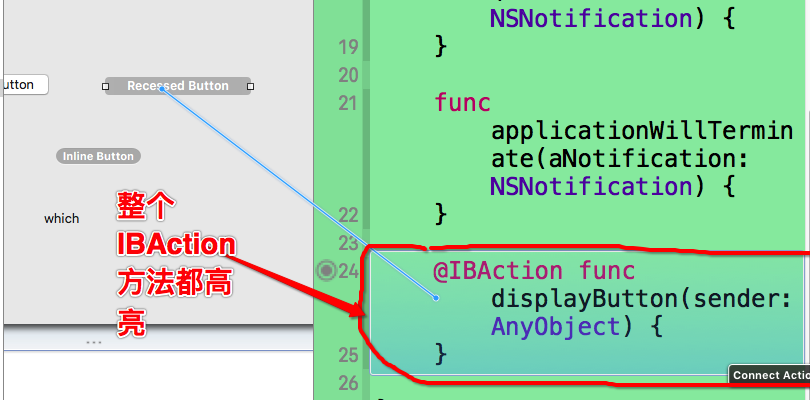
将多个用户界面子项与一个IBAction连接起来:
首先,利用一个子项创建一个IBAction方法,然后选中另一个子项,按住Ctrl键,将鼠标拖到刚刚创建的IBAction方法上,直到整个方法高亮再松开即可:
代码如下:
AppDelegate.swift代码
import Cocoa

@NSApplicationMain
class AppDelegate: NSObject, NSApplicationDelegate {

    @IBOutlet weak var window: NSWindow!

    @IBOutlet weak var displayLabel: NSTextField!

    func applicationDidFinishLaunching(aNotification: NSNotification) {
    }

    func applicationWillTerminate(aNotification: NSNotification) {
    }

    @IBAction func displayButton(sender: AnyObject) {

        if sender is NSButton {
            let whichObject=sender as! NSButton
            switch whichObject.tag {
            case 0:
                displayLabel.stringValue="Push Button"
            case 1:
                displayLabel.stringValue="Recessed Button"
            case 2:
                displayLabel.stringValue="Inline Button"
            default:
                displayLabel.stringValue="Unknow"
            }
        }

    }

}
学习Pop-Up按钮
1.修改Pop-Up菜单项
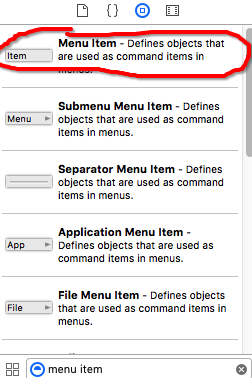
在用户界面上双击pop-up按钮,便会出现菜单项目,添加菜单项的方法:在对象库中找到Menu Item,将其拖到Pop-Up菜单项列表中即可:
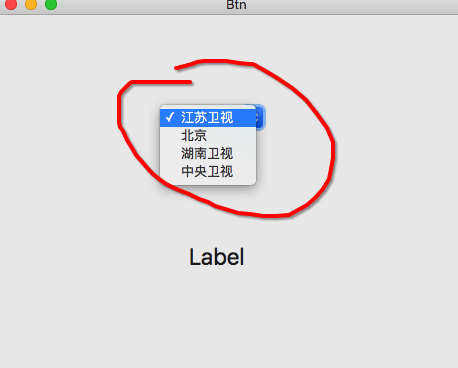
效果图:
当然,可以通过代码来添加Pop-Up菜单项,使用myPopUp.addItemWithTitle("东方卫视")或者myPopUp.addItemsWithTitles(["浙江卫视","辽宁卫视"])
代码如下:
AppDelegate.swift文件:
import Cocoa

@NSApplicationMain
class AppDelegate: NSObject, NSApplicationDelegate {

    @IBOutlet weak var window: NSWindow!

    @IBOutlet weak var myPopUp: NSPopUpButton!
    @IBOutlet weak var infoInput: NSTextField!
    func applicationDidFinishLaunching(aNotification: NSNotification) {
    }

    func applicationWillTerminate(aNotification: NSNotification) {
    }


    @IBAction func showChoice(sender: NSPopUpButton) {
            print("\(sender.titleOfSelectedItem!)")

    }

    @IBAction func addMenu(sender: AnyObject) {

        myPopUp.addItemWithTitle(infoInput.stringValue)

    }


    @IBAction func deleteMenu(sender: AnyObject) {

        myPopUp.removeItemAtIndex(0)

    }

}
效果图:


 1332
1332

 被折叠的 条评论
为什么被折叠?
被折叠的 条评论
为什么被折叠?
 到【灌水乐园】发言


