


文章目录
前言
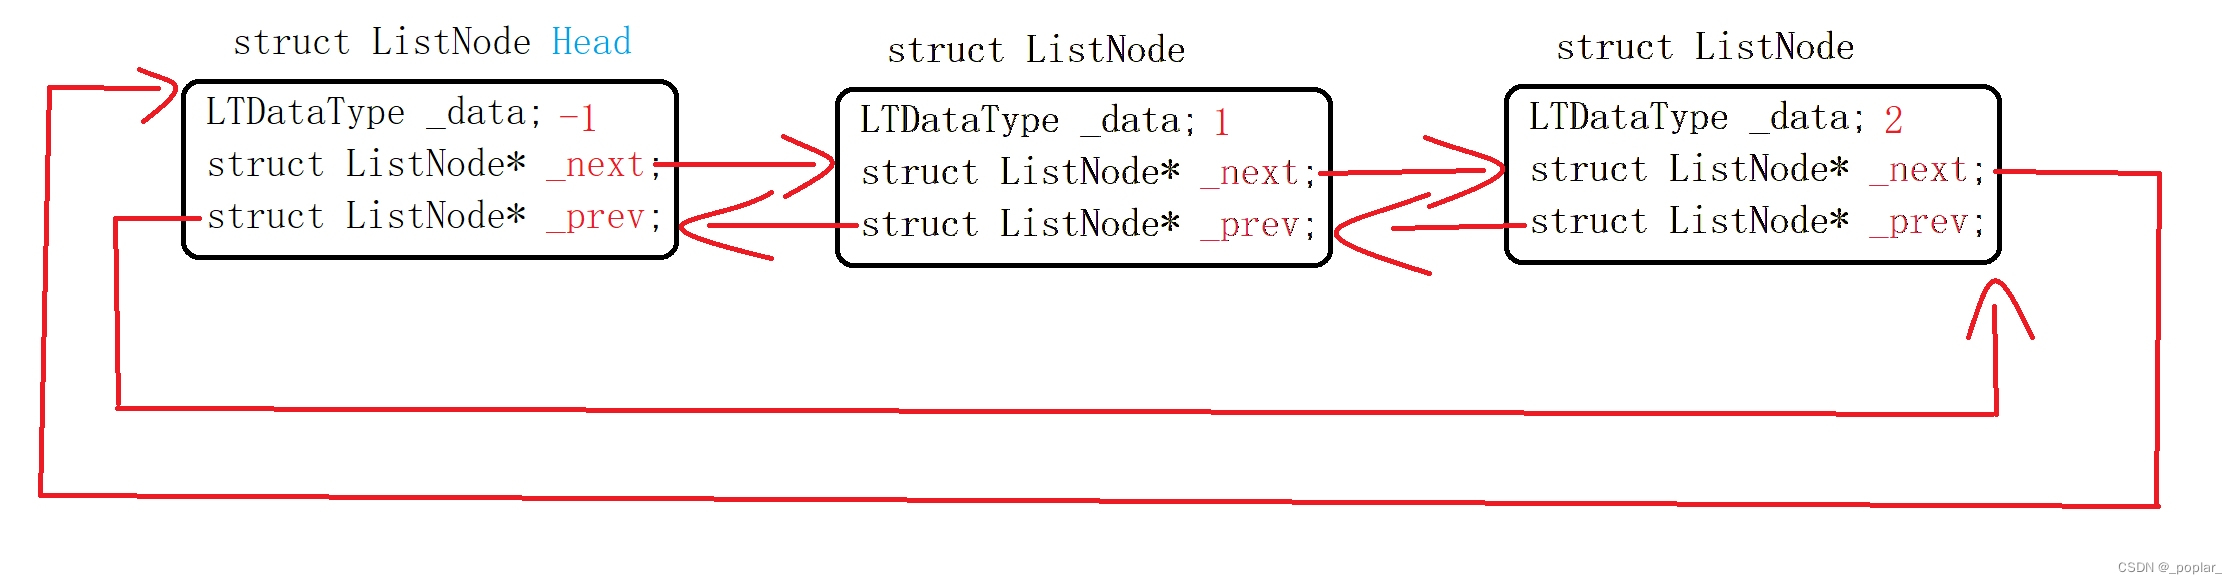
今天实现双向、带头、循环链表,它的逻辑和单链表类似,不同的是它比单链表多了带头的哨兵位还多了一个指向前一个节点的指针(prev),这使它某些函数效率大增并且简单。
一、双向链表的结构
typedef int LTDataType;
typedef struct ListNode
{
	LTDataType _data;
	struct ListNode* _next;
	struct ListNode* _prev;
}ListNode;
观察代码结构,它的普通节点结构和单链表节点结构没什么不同,只多了一个指向前一节点的结构体指针。
但是两者不同之处在于:
1.比单链表多了一个哨兵位,哨兵位顾名思义,只像哨兵一样一直“站”在链表的头部,它的结构体虽然和普通节点一样,但它并不储存实际有意义的数据,有了哨兵位的存在,插入函数的逻辑会便捷的多,之后会有体现。
2.双向:多出的prev指针意味着它将不用再遍历整个链表去寻找你正在操作的节点的前一个节点。
3.循环:和双向的效益相似,无论多长的链表,我们都可以根据哨兵位节点迅速找到尾节点。
二、双向链表增删改查的实现
1.双向链表实现各函数
#include<stdio.h>
#include<assert.h>
#include<stdlib.h>

typedef int LTDataType;
typedef struct ListNode
{
	LTDataType _data;
	struct ListNode* _next;
	struct ListNode* _prev;
}ListNode;

//创建新节点
ListNode* BuyListNode(LTDataType x);
// 创建返回链表的头结点.
ListNode* ListCreate();
// 双向链表销毁
void ListDestory(ListNode* pHead);
// 双向链表打印
void ListPrint(ListNode* pHead);
// 双向链表尾插
void ListPushBack(ListNode* pHead, LTDataType x);
// 双向链表尾删
void ListPopBack(ListNode* pHead);
// 双向链表头插
void ListPushFront(ListNode* pHead, LTDataType x);
// 双向链表头删
void ListPopFront(ListNode* pHead);
// 双向链表查找
ListNode* ListFind(ListNode* pHead, LTDataType x);
// 双向链表在pos的前面进行插入
void ListInsert(ListNode* pos, LTDataType x);
// 双向链表删除pos位置的节点
void ListErase(ListNode* pos);
2.双向链表的初始化
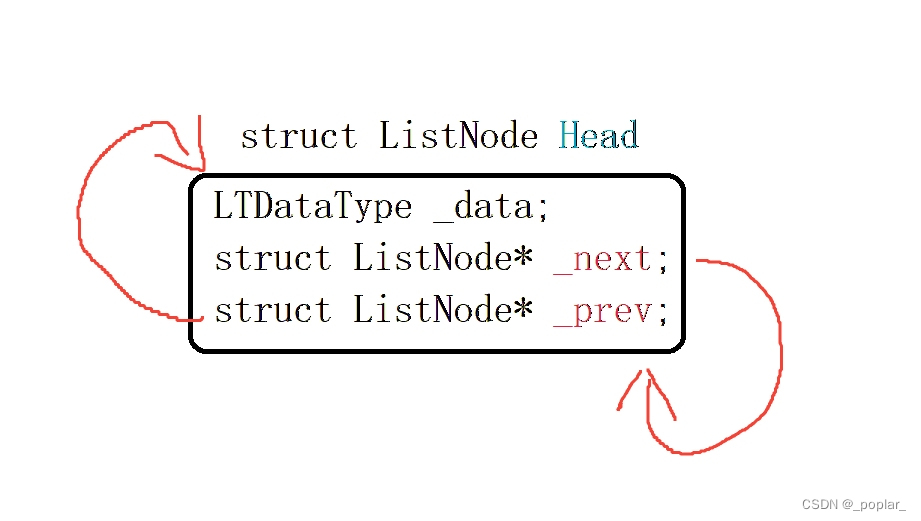
回顾单链表的初始化,我们直接用一个类型是结构体指针的变量指向NULL(它也是链表头位置),来表示一个空链表,而在带哨兵位的链表中,我们实实在在的创造一个指向性的结构体(节点),去表示一个链表的头部,那么我们怎么表示该链表是空的呢?我们使它的next指向空(NULL)吗?答案是否定,别忘了我们的链表还是双向循环的,所以我们使它的两个指针都指向它自己。也就是当链表哨兵位的next或者prev是(指向)它自己的时候,我们认为该链表是空的。
这里我们虽然假定了哨兵位的值为-1,但我们实际不去访问它。
ListNode* ListCreate()
{
	//创建哨兵位的头节点
	//ListNode* tmp = (ListNode*)malloc(sizeof(ListNode));
	//if (tmp == NULL)
	//{
	//	perror("malloc fail");
	//	return NULL;
	//}
	ListNode* tmp = BuyListNode(-1);
	tmp->_next = tmp;
	tmp->_prev = tmp;
	return tmp;
}
调用该函数时别忘了要将返回值用结构体指针变量保存起来。
空链表如图:
3.双向链表的头插头删和创建新节点(listPushFront/listPopFront//BuyListNode)
(1)头插
头插的逻辑虽和单链表神似几分,但别忘了我们这里实际需要改4个指针!!
我们这里需要创造节点(结构体),所以封装一个创造节点的函数BuySListNode
ListNode* BuyListNode(LTDataType x)
{
	assert(x != -1);
	ListNode* tmp = (ListNode*)malloc(sizeof(ListNode));
	if (tmp == NULL)
	{
		perror("malloc fail");
		return NULL;
	}
	tmp->_next = NULL;
	tmp->_prev = NULL;
	tmp->_data = x;
}
void ListPushFront(ListNode* pHead, LTDataType x)//pHead就是Head(其实是Head的传址)
{
	assert(pHead);
	ListNode* newNode=BuyListNode(x);
	pHead->_next->_prev = newNode;
	newNode->_next = pHead->_next;
	newNode->_prev = pHead;
	pHead->_next = newNode;
}
能写出这种代码固然很有成就感,也确实证明你理解了双向链表的结构精髓,但却也有点不顾读者的死活了,如果不想被共事好友吐槽代码像shi,我们最好创造出更具可读性的代码。
void ListPushFront(ListNode* pHead, LTDataType x)//pHead就是Head(其实是Head的传址)
{
	assert(pHead);
	ListNode* newNode=BuyListNode(x);
	ListNode* next=pHead->_next;//这里将头节点的下一个节点用next储存。
	newNode->_next=next;
	newNode->_prev=pHead;
	pHead->_next=newNode;
	next->_prev=newNode;
}
当我们将哨兵位节点pHead的下一个节点储存起来,这样我们需要改变的三个节点的地址就都已知了!我们无需在顾忌改了这个成员找不到那个节点了,此时只要保证你要改的四个节点都改了,且正确就好。
到这里就知道为什么结构体成员要定义多一个“_”了吧,这样可以更好的区分临时变量和在结构体中的成员变量。(当然你也可以自己定义)

这里或许有人疑问,:(链接: )单链表为空头插时不是要多一个条件判断并做特殊处理吗,这里需要吗?不需要,这就体现了哨兵位的好处之一,单链表空时头插相当于要重新指定一个真正的新头(第一个插入空链表的做头)(NULL怎么能算链表真正的头呢),而哨兵永远那么伟岸,无论身后是否有人(节点)它在都一直撑着头(Head)的大旗,以至于后来者,不会迷失方向。
(2)头删
头删可太轻松了!╮(╯▽╰)╭
void ListPopFront(ListNode* pHead)//pHead就是Head(其实是Head的传址)
{
	assert(pHead);
	ListNode* del = pHead->_next;
	if (del == pHead)
	{
		printf("链表以空,无法删除!");
		return;
	}
	/*ListNode* next = del->_next;
	pHead->_next = next;
	next->_prev = pHead;*/
	pHead->_next = pHead->_next->_next;//这两句和上面注释的代码效果一样。
	pHead->_next->_prev = pHead;//这两句和上面注释的代码效果一样。
	free(del);
}
还是那句话,别写goushi。
注意:1.别忘了注释,我们的头(哨兵)是一直挺立的(哨兵位一直存在,不会为NULL)。
2.别忘了我们的空链表条件变了,当头的下一个还是它自己时,链表为空!!
3.自己开辟的空间要自己释放O.o
4.双向链表的尾插尾删(listPushBack/listPopBack)
(1)尾插
void ListPushBack(ListNode* pHead, LTDataType x)
{
	assert(pHead);
	ListNode* tail = pHead->_prev;
	ListNode* NewHead = BuyListNode(x);
	tail->_next = NewHead;
	NewHead->_prev = tail;
	NewHead->_next = pHead;
	pHead->_prev = NewHead;
}
有了双向循环的特点,我们就不用再像单链表那样遍历整个链表去找尾(tail)。
(2)尾删
void ListPopBack(ListNode* pHead)
{
	ListNode* del = pHead->_prev;
	ListNode* tail = del->_prev;
	free(del);
	tail->_next = pHead;
	pHead->_prev = tail;
}
5.对双向链表进行打印
void ListPrint(ListNode* pHead)
{
	assert(pHead);
	ListNode* cur = pHead->_next;
	printf("<=>Head<=>");
	while (cur != pHead)
	{
		printf("%d<=>", cur->_data);
		cur = cur->_next;
	}
	printf("\n");
}
我们遍历完链表的标志不再是指针(cur)指向NULL,而是指针遍历完又循环等于哨兵位的时候。
这里我们发现就算我们不得不去遍历链表以打印它,我们也不从哨兵位开始遍历,因为它并没有实际的储存价值。
6.双向链表指定值位置查找(ListFind)
我们在链表中找到我们指定的值,并返回它的地址。
ListNode* ListFind(ListNode* pHead, LTDataType x)
{
	assert(pHead);
	ListNode* cur = pHead->_next;
	while (cur!=pHead)
	{
		if (cur->_data == x)
			return cur;
		cur = cur->_next;
	}
	return NULL;
}
7.双向链表在pos位置插入/删除(listInsert/listErase)
指定位置的插入删除和头插头删、尾插尾删的逻辑操作类似,上节我们发现在单链表中,我们不能用指定位置的插入删除函数去代替模拟头插函数,因为单链表头插是需要换头的,我们的指定位置插入并不能实现这个操作,但在双向链表中,有了哨兵位的存在,我们的头永远不改变,那么头插其实就相当于在pHead的下一个位置插入,尾删相当于删除pHead的上一个节点(我们可以用pos位置的插入/删除实现头插头删函数),这样我们写了一个指定插入函数,就相当于写了头插头删、尾插尾删4个函数,我们可以借此来快速写一个链表。
void ListInsert(ListNode* pos, LTDataType x)
{
	assert(pos);
	ListNode* newNode = BuyListNode(x);
	ListNode* prev = pos->_prev;

	prev->_next = newNode;
	newNode->_prev = prev;
	newNode->_next = pos;
	pos->_prev = newNode;
}
指定位置插入66模拟头插66:模拟头插的操作我们只需要给ListInsert传哨兵位的下一个节点(给pos传)就好。
ListInsert(A->next,66);(这里我们假设我们将哨兵位地址用结构体指针变量A保存起来)
(1)指定位置之前插入
void ListInsert(ListNode* pos, LTDataType x)
{
	assert(pos);
	ListNode* newNode = BuyListNode(x);
	ListNode* prev = pos->_prev;

	prev->_next = newNode;
	newNode->_prev = prev;
	newNode->_next = pos;
	pos->_prev = newNode;
}
(2)删除指定位置的值
void ListErase(ListNode* pos)
{
	assert(pos);
	//assert(pos->_data != -1);
	ListNode* prev = pos->_prev;
	ListNode* next = pos->_next;
	free(pos);
	//pos = NULL;
	prev->_next = next;
	next->_prev = prev;
}
注意:1.这里的pos可以不用置NULL,因为它是临时变量(函数结束会自动销毁)。
2.删除指定位置函数会配合查找位置函数ListFind使用,所以不用担心当pos->_data=-1;的时候会误删哨兵位(误删哨兵位会导致各函数均无法正常运行)。
8.双向链表的销毁
void ListDestory(ListNode* pHead)
{
	assert(pHead);
	ListNode* cur = pHead->_next;
	while (cur!=pHead)
	{
		ListNode* next = cur->_next;
		free(cur);
		cur = next;
	}
	free(cur);
	pHead = NULL;
	printf("链表销毁成功!");
}
注意:哨兵位不会为空,所以我们断言pHead。
三、完整源码
1.list.h
#define _CRT_SECURE_NO_WARNINGS 1


#include<stdio.h>
#include<assert.h>
#include<stdlib.h>

typedef int LTDataType;
typedef struct ListNode
{
	LTDataType _data;
	struct ListNode* _next;
	struct ListNode* _prev;
}ListNode;

//创建新节点
ListNode* BuyListNode(LTDataType x);
// 创建返回链表的头结点.
ListNode* ListCreate();
// 双向链表销毁
void ListDestory(ListNode* pHead);
// 双向链表打印
void ListPrint(ListNode* pHead);
// 双向链表尾插
void ListPushBack(ListNode* pHead, LTDataType x);
// 双向链表尾删
void ListPopBack(ListNode* pHead);
// 双向链表头插
void ListPushFront(ListNode* pHead, LTDataType x);
// 双向链表头删
void ListPopFront(ListNode* pHead);
// 双向链表查找
ListNode* ListFind(ListNode* pHead, LTDataType x);
// 双向链表在pos的前面进行插入
void ListInsert(ListNode* pos, LTDataType x);
// 双向链表删除pos位置的节点
void ListErase(ListNode* pos);
2.list.c
//初始化、
ListNode* ListCreate()
{
	//创建哨兵位的头节点
	//ListNode* tmp = (ListNode*)malloc(sizeof(ListNode));
	//if (tmp == NULL)
	//{
	//	perror("malloc fail");
	//	return NULL;
	//}
	ListNode* tmp = BuyListNode(-1);
	tmp->_next = tmp;
	tmp->_prev = tmp;
	return tmp;
}


//打印链表
void ListPrint(ListNode* pHead)
{
	assert(pHead);
	ListNode* cur = pHead->_next;
	printf("<=>Head<=>");
	while (cur != pHead)
	{
		printf("%d<=>", cur->_data);
		cur = cur->_next;
	}
	printf("\n");
}


//创造节点
ListNode* BuyListNode(LTDataType x)
{
	assert(x != -1);
	ListNode* tmp = (ListNode*)malloc(sizeof(ListNode));
	if (tmp == NULL)
	{
		perror("malloc fail");
		return NULL;
	}
	tmp->_next = NULL;
	tmp->_prev = NULL;
	tmp->_data = x;
}

//尾插
void ListPushBack(ListNode* pHead, LTDataType x)
{
	assert(pHead);
	ListNode* tail = pHead->_prev;
	ListNode* NewHead = BuyListNode(x);
	tail->_next = NewHead;
	NewHead->_prev = tail;
	NewHead->_next = pHead;
	pHead->_prev = NewHead;
}


//销毁
void ListDestory(ListNode* pHead)
{
	assert(pHead);
	ListNode* cur = pHead->_next;
	while (cur!=pHead)
	{
		ListNode* next = cur->_next;
		free(cur);
		cur = next;
	}
	free(cur);
	pHead = NULL;
	printf("链表销毁成功!");
}
//不可以对空指针进行销毁。


//尾删
void ListPopBack(ListNode* pHead)
{
	ListNode* del = pHead->_prev;
	ListNode* tail = del->_prev;
	free(del);
	tail->_next = pHead;
	pHead->_prev = tail;
}


//头插
void ListPushFront(ListNode* pHead, LTDataType x)
{
	assert(pHead);
	ListNode* newNode=BuyListNode(x);
	pHead->_next->_prev = newNode;
	newNode->_next = pHead->_next;
	newNode->_prev = pHead;
	pHead->_next = newNode;
}


//头删
void ListPopFront(ListNode* pHead)
{
	assert(pHead);
	ListNode* del = pHead->_next;
	if (del == pHead)
	{
		printf("链表以空,无法删除!");
		return;
	}
	/*ListNode* next = del->_next;
	free(del);
	pHead->_next = next;
	next->_prev = pHead;*/
	pHead->_next = pHead->_next->_next;
	free(del);
	pHead->_next->_prev = pHead;
}
//注意:如果这里没有对链表只剩哨兵位进行判断,会造成对类型为结构体的野指针进行访问成员的操作,会报错。


//指定位置查找
ListNode* ListFind(ListNode* pHead, LTDataType x)
{
	assert(pHead);
	ListNode* cur = pHead->_next;
	while (cur!=pHead)
	{
		if (cur->_data == x)
			return cur;
		cur = cur->_next;
	}
	return NULL;
}


//指定位置插入
void ListInsert(ListNode* pos, LTDataType x)
{
	assert(pos);
	ListNode* newNode = BuyListNode(x);
	ListNode* prev = pos->_prev;

	prev->_next = newNode;
	newNode->_prev = prev;
	newNode->_next = pos;
	pos->_prev = newNode;
}


//指定位置销毁
void ListErase(ListNode* pos)
{
	assert(pos);
	//assert(pos->_data != -1);
	ListNode* prev = pos->_prev;
	ListNode* next = pos->_next;
	free(pos);
	//pos = NULL;
	prev->_next = next;
	next->_prev = prev;
}
//注意:的是给pos置空固然很重要,但是这里传的是一级指针,我们无法改动pos的值,只能通过pos指针访问
//它所指向的成员,所以把置空的工作交给使用者。
// 如果你不想使用者滥用的话不要忘记断言(pos->_data != -1),如果把哨兵位节点删除将会使大多函数无法正常运行,导致程序奔溃。
// 但是这里最好的方式还是让使用者注意,因为对哨兵位的值进行访问其实是很愚蠢的方法。
//还有不要忘记断言pos,删除位置为NULL的节点是无稽之谈。
本文章为作者的笔记和心得记录,顺便进行知识分享,有任何错误请评论指点:)。


 6489
6489


 被折叠的 条评论
为什么被折叠?
被折叠的 条评论
为什么被折叠?
 到【灌水乐园】发言


