


文章目录
- 图书购买APP的开发
- 一、首先分析该项目都需要哪些基本的条件
- (1)关于活动、首先要一个activity,存放欢迎引导页的fragment、然后两个activity分别是登录页和注册页。其次一个activity用于展示图书列表、最后则是一个activity用来呈现购物车的内容。得:五个activity
- (2)关于适配器、因为无论是列表页亦或是购物车展示页,他们的条目信息相同,故此可以复用同一个列表条目适配器。其次欢迎页是通过viewpager2+fragment的技术实现的,所以也需要一个fragmentviewpager的适配器。得:两个适配器。
- (3)关于数据库,为什么要用到数据库呢,该文档并未提供图书名称搜索api,故此在每次请求到总的图书信息时,我将他们保存到一个数据库中(每次保存之前,先清空一下数据库),这样讲可以在搜索时给搜索框添加一个状态监听器,状态发生变化时进行模糊搜索。其次也需要一个数据库,用于购物车的增删。得:两个数据库
- (4)关于其他的小模块:当来要来fragment,用于制作欢迎页。三个fragment过于繁琐,我们创建一个通过不同的实例传参调用即可。来一个常量类,用于存放数据表的字段,方便调用减少误操作。然后则需要一个图书的bean类,方便操作。(当然,如果post实现的话,需要的bean就不止一个了)
- 二、欢迎页的xml布局
- 三、判断是否显示欢迎页
- 四、欢迎页的逻辑实现
- 五、登录页的xml布局
- 六、登录页的逻辑
- 七、注册页的布局
- 八、注册页的逻辑
- 八、常量类
- 九、bookBean类
- 十、数据库
- 十一、图书列表页xml布局
- 十二、图书列表页列表适配器
- 十三、图书列表页的逻辑实现
- 十四、购物车xml布局
- 十五、购物车页面逻辑
图书购买APP的开发
注:基于本地服务器开发
说明:
举办方提供的这个api,不知道是不是我不会操作,结果是post请求失败,故此该版本中省略了post请求的部分,当然,我会划分一个区块阐述一下如何通过android自身提供HTTPURLConnect进行post请求
一、首先分析该项目都需要哪些基本的条件
(1)关于活动、首先要一个activity,存放欢迎引导页的fragment、然后两个activity分别是登录页和注册页。其次一个activity用于展示图书列表、最后则是一个activity用来呈现购物车的内容。得:五个activity
(2)关于适配器、因为无论是列表页亦或是购物车展示页,他们的条目信息相同,故此可以复用同一个列表条目适配器。其次欢迎页是通过viewpager2+fragment的技术实现的,所以也需要一个fragmentviewpager的适配器。得:两个适配器。
(3)关于数据库,为什么要用到数据库呢,该文档并未提供图书名称搜索api,故此在每次请求到总的图书信息时,我将他们保存到一个数据库中(每次保存之前,先清空一下数据库),这样讲可以在搜索时给搜索框添加一个状态监听器,状态发生变化时进行模糊搜索。其次也需要一个数据库,用于购物车的增删。得:两个数据库
(4)关于其他的小模块:当来要来fragment,用于制作欢迎页。三个fragment过于繁琐,我们创建一个通过不同的实例传参调用即可。来一个常量类,用于存放数据表的字段,方便调用减少误操作。然后则需要一个图书的bean类,方便操作。(当然,如果post实现的话,需要的bean就不止一个了)

二、欢迎页的xml布局
欢迎页的布局如下
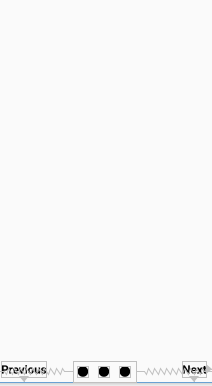
一个viewpager2全屏撑满,底部中间一个单选按钮组,配合分页的索引显示,底部两端各一个提示文字按钮。当索引为0也就是第一个页面的时候,左下角的文字隐藏,当索引为最后一个时,右下角的文字变为finish,点击跳转至登录页面。
代码如下:
<?xml version="1.0" encoding="utf-8"?>
<RelativeLayout xmlns:android="http://schemas.android.com/apk/res/android"
    xmlns:app="http://schemas.android.com/apk/res-auto"
    xmlns:tools="http://schemas.android.com/tools"
    android:layout_width="match_parent"
    android:layout_height="match_parent"
    tools:context=".MainActivity">

    <!--    欢迎页的pager-->
    <androidx.viewpager2.widget.ViewPager2
        android:id="@+id/welcome_pager"
        android:layout_width="match_parent"
        android:layout_height="match_parent" />

    <TextView
        android:id="@+id/welcome_tv_previous"
        style="@style/welcome_tv"
        android:layout_alignParentBottom="true"
        android:text="@string/previous" />

    <TextView
        android:id="@+id/welcome_tv_next"
        style="@style/welcome_tv"
        android:layout_alignParentEnd="true"
        android:layout_alignParentRight="true"
        android:layout_alignParentBottom="true"
        android:text="@string/next" />

    <RadioGroup
        android:id="@+id/welcome_group"
        android:layout_width="wrap_content"
        android:layout_height="wrap_content"
        android:layout_alignParentBottom="true"
        android:layout_centerHorizontal="true"
        android:orientation="horizontal">

        <RadioButton
            android:layout_margin="10dp"
            android:id="@+id/rb1"
            android:layout_width="20dp"
            android:layout_height="20dp"
            android:background="@drawable/rb"
            android:button="@null" />

        <RadioButton
            android:layout_margin="10dp"
            android:id="@+id/rb2"
            android:layout_width="20dp"
            android:layout_height="20dp"
            android:background="@drawable/rb"
            android:button="@null" />

        <RadioButton
            android:layout_margin="10dp"
            android:id="@+id/rb3"
            android:layout_width="20dp"
            android:layout_height="20dp"
            android:background="@drawable/rb"
            android:button="@null" />
    </RadioGroup>
</RelativeLayout>
三、判断是否显示欢迎页
判断是否为第一次显示,欢迎页只有第一次进入时才显示
来一个轻量级的存储,当第一次进入时系统自动保存一个值,后面进入时取到保存的值,如果有值则证明非是第一次进入,直接跳转至登录页面并实现

四、欢迎页的逻辑实现
分页碎片的创建
创建一个fragment,碎片的创建就不解释了,不会的自行百度。
通过一个集合,创建不同的碎片,在碎片的构造参数中我添加了背景图的参数,一次改变不同的背景
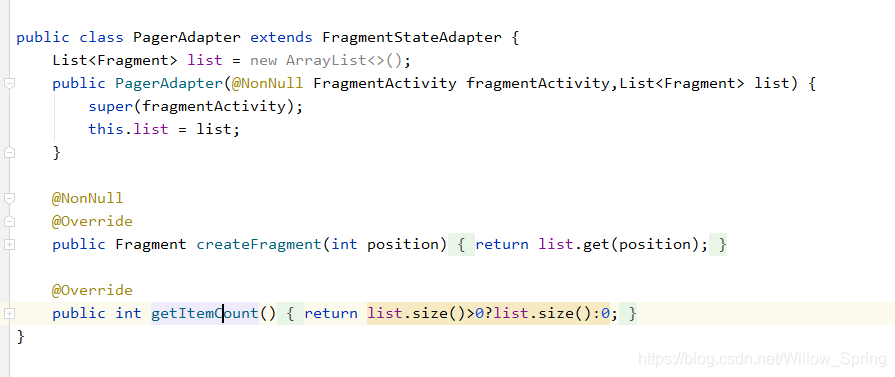
分页适配器
该适配器设置就非常简单了,注意继承的是pager2就行了,也不用刷新数据,因为我们的欢迎数据是静态的,不存在数据变更问题。写完适配器记得给pager控件设置上去
将viewpager2与单选按钮组绑定
在pager滑动到不同分页,单选按钮选中相对应的按钮(按钮的选中与未选中背景自己画一个就行,不多解释)。
同时在不同的单选按钮点击时,切换至对应的分页。
pager2的监听器与page1不同,它用的监听方法是registerOnPageChangeCallback。
单选按钮组的监听方法则是setOnCheckedChangeListener
同时在pager的分页监听器中判断,当在首页是,上一页的文字隐藏,点击下一页切换到下一页
此处的逻辑
得到当前页的索引,让他加一,再次设置给他(下一页的文本控件也要给指定的文本,否则当跳到最后一页再次返回,文本还会保持finish)
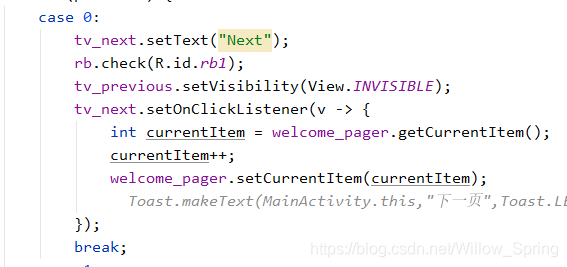
当在尾页时,点击finish文本,跳转到登录界面并关闭当前页面、
代码如下
适配器的代码
package com.yangpeilin.bookshop.Adapter;

import androidx.annotation.NonNull;
import androidx.fragment.app.Fragment;
import androidx.fragment.app.FragmentActivity;
import androidx.viewpager2.adapter.FragmentStateAdapter;

import java.util.ArrayList;
import java.util.List;

public class PagerAdapter extends FragmentStateAdapter {
    List<Fragment> list = new ArrayList<>();
    public PagerAdapter(@NonNull FragmentActivity fragmentActivity,List<Fragment> list) {
        super(fragmentActivity);
        this.list = list;
    }

    @NonNull
    @Override
    public Fragment createFragment(int position) {
        return list.get(position);
    }

    @Override
    public int getItemCount() {
        return list.size()>0?list.size():0;
    }
}
activity的逻辑代码
package com.yangpeilin.bookshop;
import androidx.appcompat.app.AppCompatActivity;
import androidx.fragment.app.Fragment;
import androidx.viewpager2.widget.ViewPager2;
import android.content.Intent;
import android.content.SharedPreferences;
import android.os.Bundle;
import android.view.View;
import android.widget.RadioGroup;
import android.widget.TextView;
import android.widget.Toast;
import com.yangpeilin.bookshop.Activity.LoginActivity;
import com.yangpeilin.bookshop.Adapter.PagerAdapter;
import com.yangpeilin.bookshop.Fragment.MyFragment;
import java.util.ArrayList;
import java.util.List;
public class MainActivity extends AppCompatActivity {
private ViewPager2 welcome_pager;
private TextView tv_previous;
private TextView tv_next;
private RadioGroup rb;
@Override
protected void onCreate(Bundle savedInstanceState) {
super.onCreate(savedInstanceState);
setContentView(R.layout.activity_main);
SharedPreferences sp = getSharedPreferences("sp",MODE_PRIVATE);
int count = sp.getInt("count",0);
if (count==1){
startActivity(new Intent(MainActivity.this,LoginActivity.class));
this.finish();
}
SharedPreferences.Editor edit = sp.edit();
edit.putInt("count",1);
edit.commit();
initview();
pagerInit();
click();
}
private void click() {
welcome_pager.registerOnPageChangeCallback(new ViewPager2.OnPageChangeCallback() {
@Override
public void onPageSelected(int position) {
super.onPageSelected(position);
switch (position) {
case 0:
tv_next.setText("Next");
rb.check(R.id.rb1);
tv_previous.setVisibility(View.INVISIBLE);
tv_next.setOnClickListener(v -> {
int currentItem = welcome_pager.getCurrentItem();
currentItem++;
welcome_pager.setCurrentItem(currentItem);
// Toast.makeText(MainActivity.this,"下一页",Toast.LENGTH_SHORT).show();
});
break;
case 1:
rb.check(R.id.rb2);
tv_next.setText("Next");
tv_previous.setVisibility(View.VISIBLE);
tv_next.setOnClickListener(v -> {
int currentItem = welcome_pager.getCurrentItem();
currentItem++;
welcome_pager.setCurrentItem(currentItem);
// Toast.makeText(MainActivity.this,"下一页",Toast.LENGTH_SHORT).show();
});
tv_previous.setOnClickListener(new View.OnClickListener() {
@Override
public void onClick(View v) {
int currentItem = welcome_pager.getCurrentItem();
currentItem--;
welcome_pager.setCurrentItem(currentItem);
// Toast.makeText(MainActivity.this,"上一页",Toast.LENGTH_SHORT).show();
}
});
break;
case 2:
tv_previous.setVisibility(View.VISIBLE);
tv_next.setText("Finish");
rb.check(R.id.rb3);
tv_next.setOnClickListener(v -> {
// Toast.makeText(MainActivity.this,"跳转到注册页面",Toast.LENGTH_SHORT).show();
startActivity(new Intent(MainActivity.this, LoginActivity.class));
});
tv_previous.setOnClickListener(new View.OnClickListener() {
@Override
public void onClick(View v) {
int currentItem = welcome_pager.getCurrentItem();
currentItem--;
welcome_pager.setCurrentItem(currentItem);
Toast.makeText(MainActivity.this,"上一页",Toast.LENGTH_SHORT).show();
}
});
break;
}
}
});
rb.setOnCheckedChangeListener(new RadioGroup.OnCheckedChangeListener() {
@Override
public void onCheckedChanged(RadioGroup group, int checkedId) {
switch (checkedId) {
case R.id.rb1:
welcome_pager.setCurrentItem(0);
break;
case R.id.rb2:
welcome_pager.setCurrentItem(1);
break;
case R.id.rb3:
welcome_pager.setCurrentItem(2);
break;
}
}
});
}
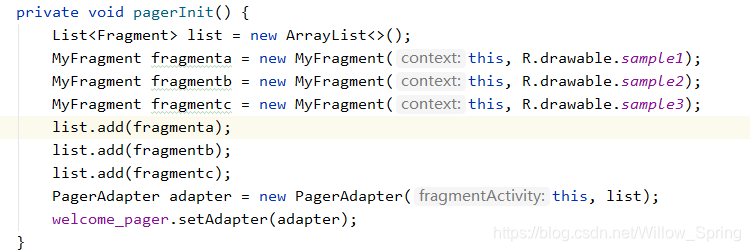
private void pagerInit() {
List<Fragment> list = new ArrayList<>();
MyFragment fragmenta = new MyFragment(this, R.drawable.sample1);
MyFragment fragmentb = new MyFragment(this, R.drawable.sample2);
MyFragment fragmentc = new MyFragment(this, R.drawable.sample3);
list.add(fragmenta);
list.add(fragmentb);
list.add(fragmentc);
PagerAdapter adapter = new PagerAdapter(this, list);
welcome_pager.setAdapter(adapter);
}
private void initview() {
welcome_pager = findViewById(R.id.welcome_pager);
tv_previous = findViewById(R.id.welcome_tv_previous);
tv_next = findViewById(R.id.welcome_tv_next);
rb = findViewById(R.id.welcome_group);
}
}
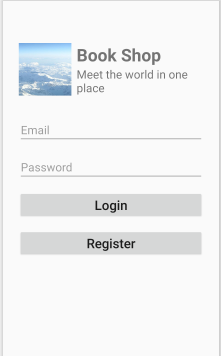
五、登录页的xml布局
布局没什么好说的,直接贴图挂代码
<?xml version="1.0" encoding="utf-8"?>
<RelativeLayout xmlns:android="http://schemas.android.com/apk/res/android"
    xmlns:app="http://schemas.android.com/apk/res-auto"
    xmlns:tools="http://schemas.android.com/tools"
    android:layout_width="match_parent"
    android:layout_height="match_parent"
    tools:context=".Activity.LoginActivity">
    <!--    logo区-->
    <LinearLayout
        android:id="@+id/linear_top"
        android:layout_width="match_parent"
        android:layout_height="wrap_content"
        android:layout_marginTop="50dp"
        android:orientation="vertical">


        <LinearLayout
            android:layout_width="match_parent"
            android:layout_height="match_parent"
            android:layout_margin="30dp">

            <ImageView
                android:layout_width="100dp"
                android:layout_height="100dp"
                android:scaleType="centerCrop"
                android:src="@drawable/bg2" />

            <LinearLayout
                android:layout_width="match_parent"
                android:layout_height="match_parent"
                android:layout_marginLeft="10dp"
                android:orientation="vertical">

                <TextView
                    android:layout_width="wrap_content"
                    android:layout_height="wrap_content"
                    android:text="@string/book_shop"
                    android:textSize="33sp"
                    android:textStyle="bold" />

                <TextView
                    android:layout_width="wrap_content"
                    android:layout_height="wrap_content"
                    android:text="Meet the world in one place"
                    android:textSize="22sp" />
            </LinearLayout>
        </LinearLayout>
    </LinearLayout>

    <!--    等录区-->
    <ScrollView
        android:scrollbars="none"
        android:layout_marginTop="10dp"
        android:layout_marginLeft="30dp"
        android:layout_marginRight="30dp"
        android:layout_width="match_parent"
        android:layout_height="match_parent"
        android:layout_below="@id/linear_top">

        <LinearLayout
            android:layout_width="match_parent"
            android:layout_height="wrap_content"
            android:orientation="vertical">

            <EditText
                android:id="@+id/login_et_email"
                android:layout_width="match_parent"
                android:layout_height="wrap_content"
                android:hint="@string/email"
                android:textSize="22sp" />

            <EditText
                android:id="@+id/login_et_password"
                android:layout_width="match_parent"
                android:layout_height="wrap_content"
                android:layout_marginTop="20dp"
                android:hint="@string/password"
                android:textSize="22sp" />


            <Button
                android:id="@+id/login_btn_login"
                android:layout_width="match_parent"
                android:layout_height="wrap_content"
                android:layout_marginTop="20dp"
                android:text="@string/login"
                android:textAllCaps="false"
                android:textSize="25sp" />

            <Button
                android:id="@+id/login_btn_register"
                android:layout_width="match_parent"
                android:layout_height="wrap_content"
                android:layout_marginTop="20dp"
                android:text="Register"
                android:textAllCaps="false"
                android:textSize="25sp" />
        </LinearLayout>
    </ScrollView>
</RelativeLayout>
PS:滚动视图是因为当初想将登录页面和注册页面放在一个activity中进行,但是发现api没有详细说具体方法,也就是说注册之后可以直接进入,故而分为两个活动也行。这里的删掉也行
六、登录页的逻辑
该页面则是在用户点击登录按钮时发起post请求,判断用户是否存在,但是因为本地服务器的原因未能实现,不能说出实际效果了。不过post请求我同样在里面写了,木的问题。当用户点击注册按钮时,跳转到注册界面
package com.yangpeilin.bookshop.Activity;

import androidx.annotation.NonNull;
import androidx.appcompat.app.AppCompatActivity;

import android.content.Intent;
import android.os.Bundle;
import android.os.Handler;
import android.os.Message;
import android.util.Log;
import android.view.View;
import android.view.animation.Animation;
import android.widget.Button;
import android.widget.EditText;

import com.yangpeilin.bookshop.MainActivity;
import com.yangpeilin.bookshop.R;

import java.io.BufferedReader;
import java.io.BufferedWriter;
import java.io.InputStream;
import java.io.InputStreamReader;
import java.io.OutputStream;
import java.io.OutputStreamWriter;
import java.net.HttpURLConnection;
import java.net.URL;

public class LoginActivity extends AppCompatActivity implements View.OnClickListener {

    private EditText et_email;
    private EditText et_password;
    private Button btn_login;
    private Button btn_register;
    String URL = "http://10.0.2.2:5000";
    String url = "/api/login";


    @Override
    protected void onCreate(Bundle savedInstanceState) {
        super.onCreate(savedInstanceState);
        setContentView(R.layout.activity_login);
        initView();
        click();
    }

    private void click() {
        btn_register.setOnClickListener(this);
        btn_login.setOnClickListener(this);
    }


    private void initView() {
        et_email = findViewById(R.id.login_et_email);
        et_password = findViewById(R.id.login_et_password);

        btn_login = findViewById(R.id.login_btn_login);
        btn_register = findViewById(R.id.login_btn_register);
    }

    @Override
    public void onClick(View v) {
        switch (v.getId()){
            case R.id.login_btn_register:
                startActivity(new Intent(LoginActivity.this, RegisiterActivity.class));
                this.finish();
                break;
            case R.id.login_btn_login:
                String email = et_email.getText().toString().trim();
                String password = et_password.getText().toString().trim();
                getData(URL+url,email,password);
                break;
        }
    }
Handler handler = new Handler(new Handler.Callback() {
    @Override
    public boolean handleMessage(@NonNull Message msg) {
        String a = (String) msg.obj;
        Log.d("TAG", "handleMessage: \n"+a);
        return true;
    }
});

    private void getData(String s,String email,String password) {
        new Thread(new Runnable() {
            @Override
            public void run() {
                try {
                    URL url = new URL(s);
                    HttpURLConnection connection = (HttpURLConnection) url.openConnection();
                    connection.setConnectTimeout(5000);
                    connection.setReadTimeout(5000);
                    connection.setRequestMethod("POST");
                    connection.setDoOutput(true);
                    connection.setDoInput(true);
                    connection.setDefaultUseCaches(false);
                    connection.setRequestProperty("Content-Type","application/json");
                    connection.setRequestProperty("Content-Type","charset=UTF-8");
                    OutputStream outputStream = connection.getOutputStream();
                    BufferedWriter bufferedWriter = new BufferedWriter(new OutputStreamWriter(outputStream));
                    bufferedWriter.write("user_no=" + et_email.getText().toString().trim() + "&user_pwd=" + et_password.getText().toString().trim());
                    bufferedWriter.close();
                    if (connection.getResponseCode()== HttpURLConnection.HTTP_OK) {
                        Log.d("TAG", "run: \n请求成功");
                        InputStream inputStream = connection.getInputStream();
                        BufferedReader bufferedReader = new BufferedReader(new InputStreamReader(inputStream));
                        String json;
                        StringBuilder sb = new StringBuilder();
                        while ((json = bufferedReader.readLine()) != null) {
                            sb.append(json);
                        }
                        bufferedReader.close();
                        Message msg = Message.obtain();
                        msg.what = 0;
                        msg.obj = sb.toString();
                        handler.sendMessage(msg);
                    }
                    connection.disconnect();
                } catch (Exception e) {
                    e.printStackTrace();
                }
            }
        }).start();
    }
}
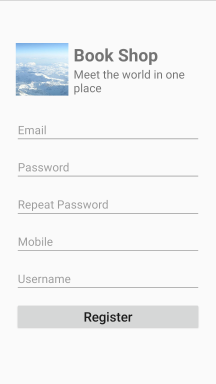
七、注册页的布局
会布局就行
在这突然想到该版本中我忘记判断两次密码是否相同了,当然,这很简单,一个全等就行,不是全等返回提示就行
<?xml version="1.0" encoding="utf-8"?>
<RelativeLayout xmlns:android="http://schemas.android.com/apk/res/android"
    xmlns:app="http://schemas.android.com/apk/res-auto"
    xmlns:tools="http://schemas.android.com/tools"
    android:layout_width="match_parent"
    android:layout_height="match_parent"
    tools:context=".Activity.RegisiterActivity">
    <!--    logo区-->
    <LinearLayout
        android:id="@+id/linear_top"
        android:layout_width="match_parent"
        android:layout_height="wrap_content"
        android:layout_marginTop="50dp"
        android:orientation="vertical">


        <LinearLayout
            android:layout_width="match_parent"
            android:layout_height="match_parent"
            android:layout_margin="30dp">

            <ImageView
                android:layout_width="100dp"
                android:layout_height="100dp"
                android:scaleType="centerCrop"
                android:src="@drawable/bg2" />

            <LinearLayout
                android:layout_width="match_parent"
                android:layout_height="match_parent"
                android:layout_marginLeft="10dp"
                android:orientation="vertical">

                <TextView
                    android:layout_width="wrap_content"
                    android:layout_height="wrap_content"
                    android:text="@string/book_shop"
                    android:textSize="33sp"
                    android:textStyle="bold" />

                <TextView
                    android:layout_width="wrap_content"
                    android:layout_height="wrap_content"
                    android:text="Meet the world in one place"
                    android:textSize="22sp" />
            </LinearLayout>
        </LinearLayout>
    </LinearLayout>

    <!--    等录区-->
    <ScrollView
        android:scrollbars="none"
        android:layout_marginTop="10dp"
        android:layout_marginLeft="30dp"
        android:layout_marginRight="30dp"
        android:layout_width="match_parent"
        android:layout_height="match_parent"
        android:layout_below="@id/linear_top">

        <LinearLayout
            android:layout_width="match_parent"
            android:layout_height="wrap_content"
            android:orientation="vertical">

            <EditText
                android:id="@+id/register_et_email"
                android:layout_width="match_parent"
                android:layout_height="wrap_content"
                android:hint="@string/email"
                android:textSize="22sp" />

            <EditText
                android:id="@+id/register_et_password"
                android:layout_width="match_parent"
                android:layout_height="wrap_content"
                android:layout_marginTop="20dp"
                android:hint="@string/password"
                android:textSize="22sp" />

            <EditText
                android:id="@+id/register_et_repeatpassword"
                android:layout_width="match_parent"
                android:layout_height="wrap_content"
                android:layout_marginTop="20dp"
                android:hint="@string/repeat_password"
                android:textSize="22sp" />

            <EditText
                android:id="@+id/register_et_Mobile"
                android:layout_width="match_parent"
                android:layout_height="wrap_content"
                android:layout_marginTop="20dp"
                android:hint="Mobile"
                android:textSize="22sp" />

            <EditText
                android:id="@+id/register_et_uesrname"
                android:layout_width="match_parent"
                android:layout_height="wrap_content"
                android:layout_marginTop="20dp"
                android:hint="@string/username"
                android:textSize="22sp" />


            <Button
                android:id="@+id/register_btn_register"
                android:layout_width="match_parent"
                android:layout_height="wrap_content"
                android:layout_marginTop="20dp"
                android:text="Register"
                android:textAllCaps="false"
                android:textSize="25sp" />
        </LinearLayout>
    </ScrollView>
</RelativeLayout>
八、注册页的逻辑
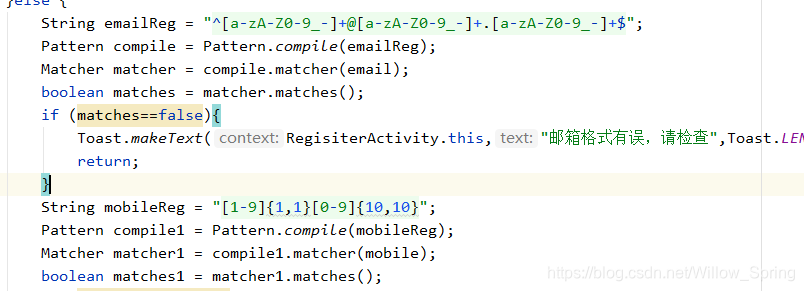
注意点:正则验证
该页面我没有写post请求,想要看的可以参考登录页面
该页面通过正则判断的方式判断邮箱格式与手机号的格式,这里的判断并不严谨,因为是根据api的要求写的正则表达,该类中需要注意的就是正则判断的方法。(我刚学的,所以需要注意嘿嘿)
package com.yangpeilin.bookshop.Activity;

import androidx.appcompat.app.AppCompatActivity;

import android.content.Intent;
import android.os.Bundle;
import android.text.TextUtils;
import android.view.View;
import android.widget.Button;
import android.widget.EditText;
import android.widget.Toast;

import com.yangpeilin.bookshop.R;

import java.util.regex.Matcher;
import java.util.regex.Pattern;

public class RegisiterActivity extends AppCompatActivity {
    private EditText et_repassword;
    private EditText et_et_mobile;
    private EditText et_uesrname;
    private Button btn_register;
    private EditText et_email;
    private EditText et_password;


    @Override
    protected void onCreate(Bundle savedInstanceState) {
        super.onCreate(savedInstanceState);
        setContentView(R.layout.activity_regisiter);
        init();
        click();
    }

    private void click() {
        btn_register.setOnClickListener(new View.OnClickListener() {
            @Override
            public void onClick(View v) {
                String email = et_email.getText().toString().trim();
                String password = et_password.getText().toString().trim();
                String repeatpassword = et_repassword.getText().toString().trim();
                String mobile = et_et_mobile.getText().toString().trim();
                String username = et_uesrname.getText().toString().trim();
                if (TextUtils.isEmpty(email) || TextUtils.isEmpty(password) || TextUtils.isEmpty(repeatpassword) || TextUtils.isEmpty(mobile) || TextUtils.isEmpty(username)) {
                    Toast.makeText(RegisiterActivity.this,"由内容为空,请检查",Toast.LENGTH_SHORT).show();
                    return;
                }else {
                    String emailReg = "^[a-zA-Z0-9_-]+@[a-zA-Z0-9_-]+.[a-zA-Z0-9_-]+$";
                    Pattern compile = Pattern.compile(emailReg);
                    Matcher matcher = compile.matcher(email);
                    boolean matches = matcher.matches();
                    if (matches==false){
                        Toast.makeText(RegisiterActivity.this,"邮箱格式有误,请检查",Toast.LENGTH_SHORT).show();
                        return;
                    }
                    String mobileReg = "[1-9]{1,1}[0-9]{10,10}";
                    Pattern compile1 = Pattern.compile(mobileReg);
                    Matcher matcher1 = compile1.matcher(mobile);
                    boolean matches1 = matcher1.matches();
                    if (matches1 == false) {
                        Toast.makeText(RegisiterActivity.this,"手机格式有误,请检查",Toast.LENGTH_SHORT).show();
                        return;
                    }
                    startActivity(new Intent(RegisiterActivity.this, BookListActivity.class));
                    finish();
                }
            }
        });
    }

    private void init() {
        et_email = findViewById(R.id.register_et_email);
        et_password = findViewById(R.id.register_et_password);
        et_repassword = findViewById(R.id.register_et_repeatpassword);
        et_et_mobile = findViewById(R.id.register_et_Mobile);
        et_uesrname = findViewById(R.id.register_et_uesrname);
        btn_register = findViewById(R.id.register_btn_register);
    }
}
八、常量类
因为注册后主页面就要显示数据了,我的想法是将获得的数据存储到数据库中,以便于模糊查询。所以需要提前设置数据库,而设计数据库,则先搞定辅助工具
package com.yangpeilin.bookshop.Constant;

public class Constant {
    public static  final String BOOKID = "bookid";
    public static  final String BOOKNAME = "bookname";
    public static  final String PRICE = "price";
    public static  final String COUNT = "count";
}
九、bookBean类
最简单的类,构造,get,set
package com.yangpeilin.bookshop.Bean;

public class BookBean {
    private String bookId;
    private String bookName;
    private String price;
    private String count;

    public BookBean() {
    }

    public BookBean(String bookId, String bookName, String price, String count) {
        this.bookId = bookId;
        this.bookName = bookName;
        this.price = price;
        this.count = count;
    }

    public String getBookId() {
        return bookId;
    }

    public void setBookId(String bookId) {
        this.bookId = bookId;
    }

    public String getBookName() {
        return bookName;
    }

    public void setBookName(String bookName) {
        this.bookName = bookName;
    }

    public String getPrice() {
        return price;
    }

    public void setPrice(String price) {
        this.price = price;
    }

    public String getCount() {
        return count;
    }

    public void setCount(String count) {
        this.count = count;
    }
}
十、数据库
第一个数据库,用于存储所有的图书列表
设计中有一点小失误,应当将书本的金额,数量设置为int类型,我这里设置了string,导致了后边购物车概述时无法实现、强转为int类型还会抛出异常,try之后数据不正确,所以这边需要注意字段类型
同时,将需要的方法一同实现,因为是服务器提供的数据列表,所以不需要修改的方法。我们需要一个插入,查询所有的,模糊查询的,以及一个删除所有的
为什么要删除所有的数据呢?因为每次用户进入该页面,加载网络数据就会清空数据表重新添加数据。
这边需要注意的是,以往我做数据库写方法是用完即关,也就是关闭帮助类,但是这里不能这样,因为后边添加数据我们是解析了json数据后添加到集合中,通过遍历添加数据,所以直接关闭的话会出错。因此定义一个关闭的方法,由我们决定在何时关闭数据库
注意模糊查询的like有单引号。数据库中%代表任意数量的字符
package com.yangpeilin.bookshop.SQLHelper;

import android.content.ContentValues;
import android.content.Context;
import android.database.Cursor;
import android.database.sqlite.SQLiteDatabase;
import android.database.sqlite.SQLiteOpenHelper;

import androidx.annotation.Nullable;

import com.yangpeilin.bookshop.Bean.BookBean;
import com.yangpeilin.bookshop.Constant.Constant;

import java.util.ArrayList;
import java.util.List;

public class BooksListSQL  extends SQLiteOpenHelper {
    //    "bookId\":\"1\",\"bookName\":\"英语书
//            \",\"price\":\"11.0\",\"count\":\"12

    private String table_name = "booklist";
    String create_table = "create table booklist(bookid text,bookname text,price text,count text)";
    private final SQLiteDatabase database;

    public BooksListSQL(@Nullable Context context) {
        super(context, "bookLisk.db", null, 1);
        database = getWritableDatabase();
    }

    @Override
    public void onCreate(SQLiteDatabase db) {
        db.execSQL(create_table);
    }

    @Override
    public void onUpgrade(SQLiteDatabase db, int oldVersion, int newVersion) {

    }

    public void insert(String id,String bookname,String price,String count){
        ContentValues values = new ContentValues();
        values.put(Constant.BOOKID,id);
        values.put(Constant.BOOKNAME,bookname);
        values.put(Constant.PRICE,price);
        values.put(Constant.COUNT,count);
        database.insert(table_name,null,values);
    }

    public void deleteAll(){
        database.delete(table_name,null,null);
    }

    public List<BookBean> queryAll(){
        List<BookBean> list = new ArrayList<>();
        Cursor cursor = database.rawQuery("select * from booklist", null);
        while (cursor.moveToNext()) {
            String bookid = cursor.getString(cursor.getColumnIndex(Constant.BOOKID));
            String bookname = cursor.getString(cursor.getColumnIndex(Constant.BOOKNAME));
            String price = cursor.getString(cursor.getColumnIndex(Constant.PRICE));
            String count = cursor.getString(cursor.getColumnIndex(Constant.COUNT));
            BookBean bookBean  = new BookBean(bookid,bookname,price,count);
            list.add(bookBean);
        }
        cursor.close();
        return list;
    }

    public List<BookBean> queryLike(String sqlLike){
        List<BookBean> list = new ArrayList<>();
//        模糊查询
        Cursor cursor = database.rawQuery("select * from " + table_name + " where " + Constant.BOOKNAME + " like '%" + sqlLike + "%'", null);
        while (cursor.moveToNext()) {
            String bookid = cursor.getString(cursor.getColumnIndex(Constant.BOOKID));
            String bookname = cursor.getString(cursor.getColumnIndex(Constant.BOOKNAME));
            String price = cursor.getString(cursor.getColumnIndex(Constant.PRICE));
            String count = cursor.getString(cursor.getColumnIndex(Constant.COUNT));
            BookBean bookBean  = new BookBean(bookid,bookname,price,count);
            list.add(bookBean);
        }
        return list;
    }

    public void dbclose(){
        database.close();
    }
}
购物车数据库
购物车的数据库相比于列表展示数据库只多了一个删除的方法,因为在购物车的内容可以进行删减操作,但是后面我没有在api看到删除的指定模块,虽然没用到,但是应该有
package com.yangpeilin.bookshop.SQLHelper;

import android.content.ContentValues;
import android.content.Context;
import android.database.Cursor;
import android.database.sqlite.SQLiteDatabase;
import android.database.sqlite.SQLiteOpenHelper;

import androidx.annotation.Nullable;

import com.yangpeilin.bookshop.Bean.BookBean;
import com.yangpeilin.bookshop.Constant.Constant;

import java.util.ArrayList;
import java.util.List;

public class BookCarSQL extends SQLiteOpenHelper {
    String table_name = "bookcar";
    String createTable  =  "create table bookcar(bookid text,bookname text,price text,count text)";
    private final SQLiteDatabase database;

    public BookCarSQL(@Nullable Context context) {
        super(context, "bookcar.db", null, 1);
        database = getWritableDatabase();
    }

    @Override
    public void onCreate(SQLiteDatabase db) {
        db.execSQL(createTable);
    }

    @Override
    public void onUpgrade(SQLiteDatabase db, int oldVersion, int newVersion) {

    }

    public void insert(String id,String bookname,String price,String count){
        ContentValues values = new ContentValues();
        values.put(Constant.BOOKID,id);
        values.put(Constant.BOOKNAME,bookname);
        values.put(Constant.PRICE,price);
        values.put(Constant.COUNT,count);
        database.insert(table_name,null,values);
    }
    public void delete(String id){
        database.delete(table_name,"bookid=?",new String[]{id});
    }

    public List<BookBean> queryAll(){
        List<BookBean> list = new ArrayList<>();
        Cursor cursor = database.rawQuery("select * from bookcar", null);
        while (cursor.moveToNext()) {
            String bookid = cursor.getString(cursor.getColumnIndex(Constant.BOOKID));
            String bookname = cursor.getString(cursor.getColumnIndex(Constant.BOOKNAME));
            String price = cursor.getString(cursor.getColumnIndex(Constant.PRICE));
            String count = cursor.getString(cursor.getColumnIndex(Constant.COUNT));
            BookBean bookBean  = new BookBean(bookid,bookname,price,count);
            list.add(bookBean);
        }
        cursor.close();
        return list;
    }
    public void deleteAll(){
        database.delete(table_name,null,null);
    }
    public void dbClose(){
        database.close();
    }
}
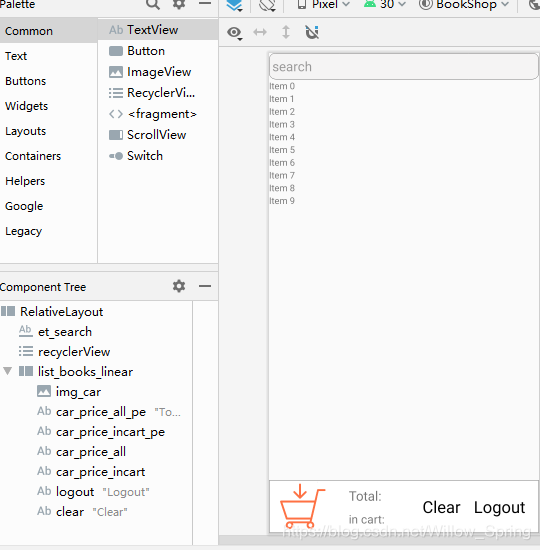
十一、图书列表页xml布局
search list car
<?xml version="1.0" encoding="utf-8"?>
<RelativeLayout
    xmlns:android="http://schemas.android.com/apk/res/android"
    xmlns:app="http://schemas.android.com/apk/res-auto"
    xmlns:tools="http://schemas.android.com/tools"
    android:layout_width="match_parent"
    android:layout_height="match_parent"
    tools:context=".Activity.BookListActivity">
    <EditText
        android:hint="@string/search"
        android:textSize="20sp"
        android:id="@+id/et_search"
        android:padding="5dp"
        android:background="@drawable/border"
        android:layout_width="match_parent"
        android:layout_height="40dp"/>
<androidx.recyclerview.widget.RecyclerView
    android:layout_below="@id/et_search"
    android:layout_above="@id/list_books_linear"
    android:id="@+id/recyclerView"
    android:layout_width="match_parent"
    android:layout_height="match_parent"/>
    <RelativeLayout
        android:layout_margin="1px"
        android:background="@drawable/itembj"
        android:layout_alignParentBottom="true"
        android:id="@+id/list_books_linear"
        android:layout_width="match_parent"
        android:layout_height="80dp"
        android:orientation="horizontal" >
        <ImageView
            android:id="@+id/img_car"
            android:layout_margin="1px"
            android:src="@drawable/cart"
            android:layout_width="100dp"
            android:layout_height="match_parent"/>
        <TextView
            android:id="@+id/car_price_all_pe"
            android:layout_marginLeft="20dp"
            android:text="Total:"
            android:textSize="20sp"
            android:layout_toRightOf="@id/img_car"
            android:layout_width="wrap_content"
            android:layout_marginTop="10dp"
            android:layout_height="wrap_content"/>
        <TextView
            android:id="@+id/car_price_incart_pe"
            android:layout_marginLeft="20dp"
            android:text="in cart:"
            android:textSize="18sp"
            android:layout_toRightOf="@id/img_car"
            android:layout_width="wrap_content"
            android:layout_below="@id/car_price_all_pe"
            android:layout_marginTop="10dp"
            android:layout_height="wrap_content"/>

        <TextView
            android:id="@+id/car_price_all"
            android:layout_marginLeft="5dp"
            android:textColor="#000"
            android:textSize="20sp"
            android:layout_toRightOf="@id/car_price_all_pe"
            android:layout_width="wrap_content"
            android:layout_marginTop="10dp"
            android:layout_height="wrap_content"/>
        <TextView
            android:id="@+id/car_price_incart"
            android:layout_marginLeft="5dp"
            android:textColor="#000"
            android:textSize="18sp"
            android:layout_toRightOf="@id/car_price_incart_pe"
            android:layout_width="wrap_content"
            android:layout_below="@id/car_price_all_pe"
            android:layout_marginTop="10dp"
            android:layout_height="wrap_content"/>

        <TextView
            android:id="@+id/logout"
            android:textColor="#000"
            android:textSize="25sp"
            android:text="Logout"
            android:layout_alignParentRight="true"
            android:layout_centerVertical="true"
            android:layout_marginRight="20dp"
            android:layout_width="wrap_content"
            android:layout_height="wrap_content"/>

        <TextView
            android:id="@+id/clear"
            android:textColor="#000"
            android:textSize="25sp"
            android:text="Clear"
            android:layout_toLeftOf="@id/logout"
            android:layout_centerVertical="true"
            android:layout_marginRight="20dp"
            android:layout_width="wrap_content"
            android:layout_height="wrap_content"/>
    </RelativeLayout>
</RelativeLayout>
十二、图书列表页列表适配器
简单的继承recyclerviewAdapter就行,item自己画一个,注意的是,以往我的数据传递都是直接在构造方法中进行,但是这里的适配器在进行模糊搜索时需要多次调用,所以单独来一个方法。条目的点击事件在适配器中就进行了,点击add文本时,实例化购物车的数据库,添加相对应索引位的条目信息即可。
package com.yangpeilin.bookshop.Adapter;

import android.annotation.SuppressLint;
import android.content.Context;
import android.util.Log;
import android.view.LayoutInflater;
import android.view.View;
import android.view.ViewGroup;
import android.widget.TextView;
import android.widget.Toast;

import androidx.annotation.NonNull;
import androidx.recyclerview.widget.RecyclerView;

import com.yangpeilin.bookshop.Bean.BookBean;
import com.yangpeilin.bookshop.R;
import com.yangpeilin.bookshop.SQLHelper.BookCarSQL;

import java.util.ArrayList;
import java.util.List;

public class ListAdapter extends RecyclerView.Adapter<ListAdapter.MyHolder> {
    private static final String TAG = "ListAdapter";
    Context context;
    List<BookBean> list = new ArrayList<>();

    public ListAdapter(Context context) {
        this.context = context;
    }

    @NonNull
    @Override
    public MyHolder onCreateViewHolder(@NonNull ViewGroup parent, int viewType) {
        return new MyHolder(LayoutInflater.from(context).inflate(R.layout.item_booklist,parent,false));
    }

    @SuppressLint("SetTextI18n")
    @Override
    public void onBindViewHolder(@NonNull MyHolder holder, int position) {
        BookBean bookBean = list.get(position);
        holder.tv_name.setText(bookBean.getBookName());
        holder.tv_count.setText("count:"+bookBean.getCount());
        holder.tv_price.setText("$"+bookBean.getPrice());
        holder.tv_add.setOnClickListener(new View.OnClickListener() {
            @Override
            public void onClick(View v) {
//                Toast.makeText(context,bookBean.getBookName()+"\n"+bookBean.getPrice(),Toast.LENGTH_SHORT).show();
                Log.d(TAG, "onClick: 添加书籍");
                BookCarSQL carSQL = new BookCarSQL(context);
                carSQL.insert(bookBean.getBookId(), bookBean.getBookName(), bookBean.getPrice(), bookBean.getCount());
                carSQL.dbClose();
                Toast.makeText(context,"已将 "+bookBean.getBookName()+" 加入购物车",Toast.LENGTH_SHORT).show();
            }
        });
    }

    @Override
    public int getItemCount() {
        return list.size()>0?list.size():0;
    }

    public void setData(List<BookBean> list) {
        this.list = list;
        notifyDataSetChanged();
    }

    class MyHolder extends RecyclerView.ViewHolder{

        private final TextView tv_name;
        private final TextView tv_price;
        private final TextView tv_count;
        private final TextView tv_add;

        public MyHolder(@NonNull View itemView) {
            super(itemView);
            tv_name = itemView.findViewById(R.id.item_tv_name);
            tv_price = itemView.findViewById(R.id.item_tv_price);
            tv_count = itemView.findViewById(R.id.item_tv_count);
            tv_add = itemView.findViewById(R.id.item_tv_add);
        }
    }
}
十三、图书列表页的逻辑实现
网络请求、解析json对象、添加集合数据、数据库存储、数据库查询、聊表视图的显示配置
首先根据给定的api进行网络的调用、在这里可以先去清单文件进行网络访问权限的设置。网络的请求要开启一个子线程进行,成功请求网络后,通过android提供的Handler将数据发送回主线程。在主线程拿到数据后、进行json格式的解析。解析数据是,在遍历解析json数据时实例化数据库,清空,然后依次添加网络数据。
数据库数据存储后,进行数据的查询,将数据提交给适配器,进而显示在主页上。
给搜索框添加状态监听事件addTextChangedListener,在搜索框内容发生变化时,模糊查询,重新刷新适配器的数据
底部栏点击clear时。实例购物车数据库,清空数据库。
点击logout是,关闭页面。
点击购物车图标时,跳转至购物车界面。
package com.yangpeilin.bookshop.Activity;

import androidx.annotation.NonNull;
import androidx.appcompat.app.AppCompatActivity;
import androidx.recyclerview.widget.LinearLayoutManager;
import androidx.recyclerview.widget.RecyclerView;

import android.annotation.SuppressLint;
import android.content.Intent;
import android.os.Bundle;
import android.os.Handler;
import android.os.Message;
import android.text.Editable;
import android.text.TextWatcher;
import android.util.Log;
import android.view.View;
import android.widget.EditText;
import android.widget.ImageView;
import android.widget.TextView;
import android.widget.Toast;

import com.yangpeilin.bookshop.Adapter.ListAdapter;
import com.yangpeilin.bookshop.Bean.BookBean;
import com.yangpeilin.bookshop.R;
import com.yangpeilin.bookshop.SQLHelper.BookCarSQL;
import com.yangpeilin.bookshop.SQLHelper.BooksListSQL;

import org.json.JSONArray;
import org.json.JSONException;
import org.json.JSONObject;

import java.io.BufferedReader;
import java.io.InputStream;
import java.io.InputStreamReader;
import java.net.HttpURLConnection;
import java.net.MalformedURLException;
import java.net.URL;
import java.util.List;

public class BookListActivity extends AppCompatActivity implements View.OnClickListener {

    private static final int GET = 0;
    private static final String TAG = "BookListActivity";
    private EditText et_search;
    private RecyclerView rc;
    private TextView clear;
    private TextView logout;
    private TextView car_price_incart;
    private TextView car_price_all;
    private ImageView img_car;

    @Override
    protected void onCreate(Bundle savedInstanceState) {
        super.onCreate(savedInstanceState);
        setContentView(R.layout.activity_book_list);
        initView();
        rc = findViewById(R.id.recyclerView);
        et_search = findViewById(R.id.et_search);
//        获得数据并保存在数据库
        getData("http://10.0.2.2:5000/api/books");
//        拿到列表视图,查询数据库,设置适配器
        showList();
//        购物车内容初始化
        carData();

//        搜索
        et_search.addTextChangedListener(new TextWatcher() {
            @Override
            public void beforeTextChanged(CharSequence s, int start, int count, int after) {

            }

            @Override
            public void onTextChanged(CharSequence s, int start, int before, int count) {
                String trim = et_search.getText().toString().trim();
                BooksListSQL sql = new BooksListSQL(BookListActivity.this);
                List<BookBean> list = sql.queryLike(trim);
                sql.close();
                ListAdapter adapter = new ListAdapter(BookListActivity.this);
                adapter.setData(list);
                rc.setAdapter(adapter);
            }

            @Override
            public void afterTextChanged(Editable s) {

            }
        });
    }

    @SuppressLint("SetTextI18n")
    private void carData() {
        BookCarSQL sql = new BookCarSQL(this);
        List<BookBean> list = sql.queryAll();

        for (int i=0;i<list.size();i++){
            BookBean bookBean = list.get(i);
//            count +=(i+1);
            Log.d(TAG, "carData: \n"+i);
//                priceAll += bookBean.getPrice();
        }
//        car_price_all.setText(priceAll+"");
//        car_price_incart.setText(count+"");
//        Log.d(TAG, "carData: 购物车数量"+count+"金额"+priceAll);
//        Log.d(TAG, "carData: 购物车数量"+count+"金额");
    }

    private void initView() {
        clear = findViewById(R.id.clear);
        logout = findViewById(R.id.logout);
        car_price_incart = findViewById(R.id.car_price_incart);
        car_price_all = findViewById(R.id.car_price_all);
        img_car = findViewById(R.id.img_car);
//        --------------------------------------------------
        clear.setOnClickListener(this);
        logout.setOnClickListener(this);
        img_car.setOnClickListener(this);
    }
    @Override
    public void onClick(View v) {
        BookCarSQL sql = new BookCarSQL(BookListActivity.this);
        switch (v.getId()){
            case R.id.clear:
//                清空购物车
                sql.deleteAll();
                Toast.makeText(BookListActivity.this,"已清空购物车",Toast.LENGTH_SHORT).show();
                break;
            case R.id.logout:
//                退出
                finish();
                break;
            case R.id.img_car:
//                跳转到购物界面
                startActivity(new Intent(BookListActivity.this,BookCarActivity.class));
                break;
        }
        sql.dbClose();
    }

    private void showList() {
        BooksListSQL sql = new BooksListSQL(this);
        List<BookBean> list = sql.queryAll();
        rc.setLayoutManager(new LinearLayoutManager(this));
        ListAdapter adapter = new ListAdapter(this);
        adapter.setData(list);
        rc.setAdapter(adapter);
    }


    Handler handler = new Handler(new Handler.Callback() {
    @Override
    public boolean handleMessage(@NonNull Message msg) {
        switch (msg.what){
            case GET:
                String result = (String) msg.obj;
                Log.d(TAG, "handleMessage: \n接收到数据"+result);
                try {
                    JSONObject jsonObject = new JSONObject(result);
                    String result1 = jsonObject.getString("Result");
                    JSONArray jsonArray = new JSONArray(result1);
                    BooksListSQL sql = new BooksListSQL(BookListActivity.this);
                    sql.deleteAll();
                    Log.d(TAG, "handleMessage: 清空数据库");
                    for (int i=0;i<jsonArray.length();i++){
                        JSONObject jsonObject1 = jsonArray.getJSONObject(i);
                        String bookId = jsonObject1.getString("bookId");
                        String bookName = jsonObject1.getString("bookName");
                        String price = jsonObject1.getString("price");
                        String count = jsonObject1.getString("count");
                        Log.d(TAG, "handleMessage: \n给数据库添加第"+(i+1)+"调数据");
                        sql.insert(bookId,bookName,price,count);
                        carData();
                    }
                    sql.close();
                } catch (JSONException e) {
                    e.printStackTrace();
                }
                break;
        }
        return true;
    }
});


    private void getData(String path) {
        new Thread(new Runnable() {
            @Override
            public void run() {
                try {
                    URL url = new URL(path);
                    HttpURLConnection connection = (HttpURLConnection) url.openConnection();
                    connection.setConnectTimeout(5000);
                    connection.setReadTimeout(5000);
                    connection.setRequestMethod("GET");
                    if (connection.getResponseCode()== HttpURLConnection.HTTP_OK) {
                        Log.d(TAG, "run: \n请求成功");
                        InputStream inputStream = connection.getInputStream();
                        BufferedReader bufferedReader = new BufferedReader(new InputStreamReader(inputStream));
                        String json;
                        StringBuilder sb = new StringBuilder();
                        while ((json = bufferedReader.readLine()) != null) {
                            sb.append(json);
                        }
                        bufferedReader.close();
                        Message msg = Message.obtain();
                        msg.what = GET;
                        msg.obj = sb.toString();
                        handler.sendMessage(msg);
                    }
                    connection.disconnect();
                } catch (Exception e) {
                    e.printStackTrace();
                }
            }
        }).start();
    }


}
十四、购物车xml布局
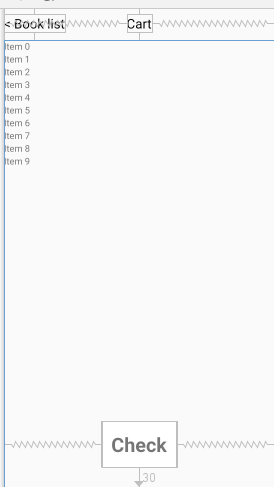
主要的是顶部的返回按钮,可以点击返回至列表页
body部分一个列表控件,用于展示购物车的数据
底部check,点击清空购物车
<?xml version="1.0" encoding="utf-8"?>
<RelativeLayout
    android:orientation="vertical"
    xmlns:android="http://schemas.android.com/apk/res/android"
    xmlns:app="http://schemas.android.com/apk/res-auto"
    xmlns:tools="http://schemas.android.com/tools"
    android:layout_width="match_parent"
    android:layout_height="match_parent"
    tools:context=".Activity.BookCarActivity">
    <RelativeLayout
        android:orientation="horizontal"
        android:id="@+id/car_linear"
        android:layout_width="match_parent"
        android:layout_height="50dp">
        <TextView
            android:id="@+id/tv_back"
            android:textSize="20sp"
            android:textColor="#000"
            android:text="@string/book_list"
            android:layout_centerVertical="true"
            android:layout_width="wrap_content"
            android:layout_height="wrap_content"/>
        <TextView
            android:text="Cart"
            android:textSize="20sp"
            android:textColor="#000"
            android:layout_centerInParent="true"
            android:layout_width="wrap_content"
            android:layout_height="wrap_content"/>
    </RelativeLayout>
<androidx.recyclerview.widget.RecyclerView
    android:id="@+id/car_rc"
    android:layout_below="@id/car_linear"
    android:layout_width="match_parent"
    android:layout_height="match_parent"/>
    <TextView
        android:id="@+id/car_check"
        android:layout_alignParentBottom="true"
        android:layout_centerHorizontal="true"
        android:text="Check"
        android:textStyle="bold"
        android:layout_marginBottom="30dp"
        android:textSize="30sp"
        android:background="@drawable/itembj"
        android:padding="15dp"
        android:layout_width="wrap_content"
        android:layout_height="wrap_content"/>
</RelativeLayout>
十五、购物车页面逻辑
该页面的逻辑最为简单,点击返回列表页,可以进行页面跳转,然后关闭此页面。在这里我直接关闭当前页,因为进入此页面只能通过列表展示页进入。
在create方法中进行购物车数据库的查询,然后复用adapter,进行条目的展示
点击check时进行购买api的调用,在购买完后进行数据库清空的操作,也就是购物车清空方法的调用。
在该页面还可以进行添加至购物车的行为,如若想要禁用的话,只需在适配器中进行上下文的判断,然后进行方法的禁用即可,亦或是在该页面直接隐藏add选项
package com.yangpeilin.bookshop.Activity;

import androidx.appcompat.app.AppCompatActivity;
import androidx.recyclerview.widget.LinearLayoutManager;
import androidx.recyclerview.widget.RecyclerView;

import android.os.Bundle;
import android.view.View;
import android.widget.TextView;
import android.widget.Toast;

import com.yangpeilin.bookshop.Adapter.ListAdapter;
import com.yangpeilin.bookshop.Bean.BookBean;
import com.yangpeilin.bookshop.R;
import com.yangpeilin.bookshop.SQLHelper.BookCarSQL;

import java.util.List;

public class BookCarActivity extends AppCompatActivity {

    private RecyclerView car_rc;
    private TextView tv_check;
    private TextView tv_back;

    @Override
    protected void onCreate(Bundle savedInstanceState) {
        super.onCreate(savedInstanceState);
        setContentView(R.layout.activity_book_car2);
        car_rc = findViewById(R.id.car_rc);
        tv_check = findViewById(R.id.car_check);
        tv_back = findViewById(R.id.tv_back);
        car_rc.setLayoutManager(new LinearLayoutManager(this));
        BookCarSQL sql = new BookCarSQL(this);
        List<BookBean> list = sql.queryAll();
        ListAdapter adapter = new ListAdapter(this);
        adapter.setData(list);
        car_rc.setAdapter(adapter);

        tv_check.setOnClickListener(new View.OnClickListener() {
            @Override
            public void onClick(View v) {
                Toast.makeText(BookCarActivity.this, "购买成功", Toast.LENGTH_SHORT).show();
                sql.deleteAll();
                adapter.notifyDataSetChanged();
            }
        });

        tv_back.setOnClickListener(new View.OnClickListener() {
            @Override
            public void onClick(View v) {
                finish();
            }
        });

    }

}


 1080
1080

 被折叠的 条评论
为什么被折叠?
被折叠的 条评论
为什么被折叠?
 到【灌水乐园】发言


