


SpringMVC
元素的属性定义对根元素下子元素的定义进行规范,的基础属性包括:
- xmlns (XML namespace)
- xmlns:xsi (使用xsi作为前缀的命名空间,为了下面的定义)
- xsi:schemaLocation(为了定义命名空间和对应的XSD(xml结构定义)文档的位置关系)
- Schema处理器将从指定位置读取Schema文档,根据描述的文档结构验证XML文件是否符合规范
(1)添加带前缀的命名空间到beans属性:
xmlns:context="http://www.springframework.org.schema.context"
(2)在xsi:schemaLocation中增加命名空间和XML结构定义URL地址
http://www.springframework.org/schema/context
http://www.springwork.org/schema/context/spring-context.xsd
配置文件
application.xml
<?xml version="1.0" encoding="UTF-8"?>
<beans xmlns="http://www.springframework.org/schema/beans"
       xmlns:xsi="http://www.w3.org/2001/XMLSchema-instance" xmlns:util="http://www.springframework.org/schema/util"
       xmlns:context="http://www.springframework.org/schema/context"
       xmlns:p="http://www.springframework.org/schema/p"
       xmlns:c="http://www.springframework.org/schema/c"
       xsi:schemaLocation="http://www.springframework.org/schema/beans http://www.springframework.org/schema/beans/spring-beans.xsd http://www.springframework.org/schema/util https://www.springframework.org/schema/util/spring-util.xsd http://www.springframework.org/schema/context https://www.springframework.org/schema/context/spring-context.xsd">
    <import resource="springMVC.xml" />
    <bean id="helloDao" class="com.dao.HelloDao" p:user-ref="user">
        <property name="s" value="2" />
    </bean>
    <bean id="helloService" class="com.service.HelloService" c:name="Spring IoC Container">
        <property name="helloDao" ref="helloDao" />
    </bean>
    <bean id="userParent" abstract="true">
        <property name="username" value="user" />
        <property name="password" value="666666" />
        <property name="phoneNumber" value="18736878369" />
    </bean>
    <bean id="user" class="com.entity.User" lazy-init="true" parent="userParent" p:userID="23"/>
    <context:annotation-config/>
    <bean class="com.entity.HelloBeanFactoryPostProcessor" />
</beans>
springMVC.xml
<?xml version="1.0" encoding="UTF-8"?>
<beans xmlns="http://www.springframework.org/schema/beans"
       xmlns:xsi="http://www.w3.org/2001/XMLSchema-instance"
       xmlns:context="http://www.springframework.org/schema/context"
       xmlns:mvc="http://www.springframework.org/schema/mvc"
       xsi:schemaLocation="http://www.springframework.org/schema/beans http://www.springframework.org/schema/beans/spring-beans.xsd http://www.springframework.org/schema/mvc https://www.springframework.org/schema/mvc/spring-mvc.xsd http://www.springframework.org/schema/context http://www.springframework.org/schema/context/spring-context-3.0.xsd">


    <!-- 自动扫描包 -->
    <context:component-scan base-package="com.controller"/>

    <!-- 配置Thymeleaf视图解析器 -->
    <bean id="viewResolver" class="org.thymeleaf.spring5.view.ThymeleafViewResolver">
        <property name="order" value="1"/>
        <property name="characterEncoding" value="UTF-8"/>
        <property name="templateEngine">
            <bean class="org.thymeleaf.spring5.SpringTemplateEngine">
                <property name="templateResolver">
                    <bean class="org.thymeleaf.spring5.templateresolver.SpringResourceTemplateResolver">

                        <!-- 视图前缀 -->
                        <property name="prefix" value="html/"/>

                        <!-- 视图后缀 -->
                        <property name="suffix" value=".html"/>
                        <property name="templateMode" value="HTML5"/>
                        <property name="characterEncoding" value="UTF-8" />
                    </bean>
                </property>
            </bean>
        </property>
    </bean>

    <!--
       处理静态资源,例如html、js、css、jpg
      若只设置该标签,则只能访问静态资源,其他请求则无法访问
      此时必须设置<mvc:annotation-driven/>解决问题
     -->
    <mvc:default-servlet-handler/>

    <!-- 开启mvc注解驱动 -->
    <mvc:annotation-driven>
        <mvc:message-converters>
            <!-- 处理响应中文内容乱码 -->
            <bean class="org.springframework.http.converter.StringHttpMessageConverter">
                <property name="defaultCharset" value="UTF-8" />
                <property name="supportedMediaTypes">
                    <list>
                        <value>text/html</value>
                        <value>application/json</value>
                    </list>
                </property>
            </bean>
        </mvc:message-converters>
    </mvc:annotation-driven>

</beans>
user-mapper.xml
<?xml version="1.0" encoding="UTF-8" ?>
<!DOCTYPE mapper
        PUBLIC "-//mybatis.org//DTD Mapper 3.0//EN"
        "http://mybatis.org/dtd/mybatis-3-mapper.dtd">

<mapper namespace="test">
    <select id="findAll" resultType="User">
        SELECT *
        FROM tb_user;
    </select>

    <insert id="insert" parameterType="User">
        INSERT INTO tb_user
        (username,password,phone_number,sex,`identify`)
        VALUES (#{username},#{password},#{phoneNumber},#{sex},#{identify});
    </insert>

    <delete id="delete" parameterType="int">
        DELETE FROM tb_user
        WHERE user_id = #{userID};
    </delete>
</mapper>
mybatis-config.xml
<?xml version="1.0" encoding="UTF-8" ?>
<!DOCTYPE configuration
PUBLIC "-//mybatis.org//DTD Config 3.0//EN"
"http://mybatis.org/dtd/mybatis-3-config.dtd">
<!--configuration核心配置文件-->
<configuration>
<!--设置别名简化 resultType 书写,该标签必须在 environments 前-->
<typeAliases>
<!--1、单个别名的定义: alias:别名,type:别名映射的类型-->
<typeAlias type="com.entity.User" alias="User"/>
<!--2、批量别名定义:指定包路径,自动扫描包下边的类,定义别名,别名默认为类名(首字母小写或大写)
<package name="com.mybatis.entity"/> -->
</typeAliases>
<!--environments配置环境组-->
<!--default默认环境-->
<!-- 配置开发环境,可以配置多个,在具体用时再做切换 -->
<environments default="test">
<!--environment单个环境-->
<environment id="test">
<!--transactionManager配置事务管理器-->
<!-- 事务管理类型:JDBC、MANAGED -->
<transactionManager type="JDBC"/>
<!--配置连接池-->
<!-- 数据源类型:POOLED、UNPOOLED、JNDI -->
<dataSource type="POOLED">
<!-- <property name="driver" value="${db.driver}"/>-->
<!-- <property name="url" value="${db.url}"/>-->
<!-- <property name="username" value="${db.user}"/>-->
<!-- <property name="password" value="${db.password}"/>-->
<property name="driver" value="com.mysql.cj.jdbc.Driver"/>
<property name="url" value="jdbc:mysql://127.0.0.1:3306/userdata?useUnicode=true&characterEncoding=utf8&useSSL=false&serverTimezone=Asia/Shanghai&rewriteBatchedStatements=true&allowPublicKeyRetrieval=true&allowMultiQueries=true"/>
<property name="username" value="root"/>
<property name="password" value="root"/>
</dataSource>
</environment>
</environments>
<!--每一个Mapper.xml需要在Mybatis核心配置文件中注册-->
<mappers>
<!-- 路径用 斜线(/) 分割,而不是用 点(.) -->
<mapper resource="com/mybatis/user-mapper.xml"/>
</mappers>
</configuration>
web.xml
<!DOCTYPE web-app PUBLIC
        "-//Sun Microsystems, Inc.//DTD Web Application 2.3//EN"
        "http://java.sun.com/dtd/web-app_2_3.dtd" >

<web-app xmlns="http://xmlns.jcp.org/xml/ns/javaee"
         xmlns:xsi="http://www.w3.org/2001/XMLSchema-instance"
         xsi:schemaLocation="http://xmlns.jcp.org/xml/ns/javaee http://xmlns.jcp.org/xml/ns/javaee/web-app_4_0.xsd"
         version="4.0">
    <!-- 配置SpringMVC的前端控制器,对浏览器发送的请求统一进行处理 -->


    <servlet>
        <servlet-name>springMVC</servlet-name>
        <servlet-class>org.springframework.web.servlet.DispatcherServlet</servlet-class>

        <!-- 通过初始化参数指定SpringMVC配置文件的位置和名称 -->
        <init-param>
            <!-- contextConfigLocation为固定值 -->
            <param-name>contextConfigLocation</param-name>
            <!-- 使用classpath:表示从类路径查找配置文件,例如maven工程中的src/main/resources -->
            <param-value>/WEB-INF/springMVC.xml</param-value>
        </init-param>
        <!--
             作为框架的核心组件,在启动过程中有大量的初始化操作要做
            而这些操作放在第一次请求时才执行会严重影响访问速度
            因此需要通过此标签将启动控制DispatcherServlet的初始化时间提前到服务器启动时
        -->
        <load-on-startup>1</load-on-startup>
    </servlet>

    <servlet-mapping>
        <servlet-name>springMVC</servlet-name>
        <url-pattern>/</url-pattern>
    </servlet-mapping>
</web-app>
classpath等同于/WEB-INF/classes
DespatcherServlet-----中央控制器
基本上所有web框架都是以前端控制器的方式进行设计,Spring对应的就是DespatcherServlet,又叫请求分发器。配置在web.xml中,用于拦截匹配的路径请求。
HandlerMapping-----处理映射器
Spring内置了三种类型的处理器映射器:
1、SimpleUrlHandlerMapping
2、BeanNameUrlHandleMapping
3、RequestMappingHandlerMapping
三种可以并存且不影响
1、SimpleUrlHandleMapping
简单的URL处理器映射器
配置URL和Controller处理器的对应,通过配置SimpleUrlHandlerMapping类的来实现,使用属性mappings进行请求的URL
controller
public class MvcHelloController implements Controller {
    @Override
    public ModelAndView handleRequest(HttpServletRequest request, HttpServletResponse response) {
        ModelAndView modelAndView = new ModelAndView();
        modelAndView.setViewName("hello.html");
        User user = new User("223456","123456","18736878369",1);
        modelAndView.addObject(user);
        return modelAndView;
    }
springMVC.xml
<bean id="helloController" class="com.controller.MvcHelloController"/>

    <bean class="org.springframework.web.servlet.handler.SimpleUrlHandlerMapping" >
        <property name="mappings">
            <props>
                <prop key="/mvcHello" >helloController</prop>
            </props>
        </property>
    </bean>
2、BeanNameUrlHandlerMapping
组件名url处理映射器
<bean id="mvcHelloController" name="/mvcHello" class="com.controller.MvcHelloController" />
是默认的映射器,Spring默认会创建一个BeanNameUrlHandlerMapping的实例,所以不需要进行BeanNameUrlHandlerMapping的Bean配置就可以映射,不过如果显式配置了也不会出错
3、RequestMappingHandlerMapping
请求映射处理器映射
前两种都是类层级的映射,实际开发更常用的是方法层级的注解映射,也就是在@controller注解类的方法上使用@RequestMappinng、@AnnotationMethodHandlerMapping等注解进行请求的映射。
自动初始化和注册注解映射处理器和处理器适配器:
<mvc:annotation-driven/>
也可以分别定义映射处理器和处理器适配器的配置达成相同的效果
<bean class="org.springframework.web.servlet.mvc.method.annotation.RequestMappingHandlerMapping"/>

<bean class="org.springframework.web.servlet.mvc.method.annotation.RequestMappingHandlerAdapter"/>
此外spring还提供抽象的映射处理器和处理器适配器AbstractHandlerMethodMapping和AbstractHandlerMethodAdapte
HandlerAdapter-------处理器适配器
设计模式-----适配器模式:目的–解决接口不兼容问题
在springMVC中,一个HTTP请求会映射到某个类中的方法处理,不直接调用处理器而通过HandlerAdapter进行调用,可以为处理器统一提供参数解析、返回值处理等适配工作。从请求被接受到HandlerAdapter进行处理器调用的具体细节如下:
- DispatcherServlet,接受请求调用doDispatch()方法进行处理。
- doDispatch()方法中,通过HandlerMapping得到HandlerExecutionChain,HandlerExecutionChain包含处理请求的处理器(或处理器链),处理器可以是一个方法或一个Controller对象
- 根据不同的Handler类型得到不同的HandlerAdapter
- HandlerAdapter的handle()方法使用反射机制调用handler对象,除此之外,HandlerAdapter还负责一些类型转换等工作。
对应不同类型处理器,Spring内置了对应的处理器适配器,主要包括4类:
- 继承Controller接口的处理器适配器SimpleControllerHandlerAdapter、
- 继承HttpRequestHandler接口的处理器适配器HttpRequestHandlerAdapter、
- 继承Servlet接口的处理器适配器SimpleServletHandlerAdapter
- 在@Controller注解类的注解方法处理器适配器RequestMappingHandlerAdapter
层级关系:
- HandlerAdapter
- AbstractHandlerMethodAdapter
- RequestMappingHandlerAdapter
- HttpRequestHandlerAdapter
- SimpleControllerHandlerAdapter
- SimpleServletHandlerAdapter
- AbstractHandlerMethodAdapter
1、SimpleControllerHandlerAdapter
简单控制器处理适配器
默认处理器适配器,用于适配实现org.springframework.web.servlet.mvc.Controller接口的处理器,最终调用处理器类的handlerRequest(request, response)方法。该适配器不会处理请求参数的转换。对应类和组件配置方法如下:
<bean class="org.springframework.web.servlet.mvc.SimpleControllerHandlerAdapter" />
2、HttpRequestHandlerAdapter
HTTP处理器适配器
适配处理器的类继承自HttpRequestHandler接口,主要处理普通的HTTP请求的处理器,比如访问静态资源时,HttpRequestHandlerAdapter会调用DefaultServletHttpRequestHandler的handleRequest(request,response)方法,将请求交给web容器的DefaultServlet处理。也可以自定义HttpRequestHandler接口实现类,代码:
public class MyHttpRequestHandler implements HttpRequestHandler {

    @Override
    public void handleRequest(HttpServletRequest request, HttpServletResponse response) throws ServletException, IOException {
        request.setAttribute("name","httpRequestHandler");
        request.getRequestDispatcher("/html/hello.html").forward(request,response);
    }
}
虽然HttpRequestHandler和Controller接口都有handlerRequest()处理方法,但Controller接口中的方法的返回值是一个ModelAndView对象,而HttpRequestHandler中 的方法无返回值。
Controller接口实现可以返回控制,可以取代HttpRequestHandler
3、SimpleServletHandlerAdapter
Servlet处理器适配器
SimpleServletHandlerAdapter处理器适配器支持的是继承自Servlet接口的类,也就是适配Servlet,Servlet使用service(request,response)进行请求处理,在SimpleServletHandlerAdapter中适配器处理方法handle()方法体:
@Override
@Nullable
//适配器处理方法
    public ModelAndView handle(HttpServletRequest request, HttpServletResponse response, Object handler) throws Exception {
        //调用Servlet的service()方法处理
        ((Servlet)handler).service(request, response);
        return null;
    }
4、RequestMappingHandlerAdapter
请求映射处理器
最常用的处理器适配器,支持的是HandlerMethod类型的处理器,也就是@RequestMapping等请求映射注解的方法。
invokeHandlerMethod()是该适配器的关键方法,该方法通过ServletInvocableHandlerMethod实例调用invokeAndHandler方法处理请求(invokeForRequest)和响应(handleReturnValue)。该适配器的具体作用是:
- 获取当前Spring容器的Bean类中标注了@ModelAttribute注解但是没标注@RequestMapping注解的方法,在真正调用具体的处理器方法之前将会这些方法依次调用。
- 获取当前Spring容器的Bean类中标注了@InitBinder注解的方法,调用这些方法对一些用户自定义的参数进行转换并且绑定。
- 根据当前Handler的方法参数标注的注解类型,获取其对应的参数处理器(ArgumentResolve),并将请求对象中的参数转换为当前方法中对应的注解类型。
- 通过反射调用具体的处理器方法
- 通过ReturnValueHandler对返回值进行适配,比如,ModelAndView类型的返回值就由ModelAndViewMethodReturnValueHandler处理,最终将所有的处理结果封装为ModelAndView类型的对象返回。
| 处理器映射器 | 处理器适配器 | 处理器 |
|---|---|---|
| BeanNameUrlHandlerMapping SimpleUrlHandlerMapping | SimpleControllerHandlerAdapter | 实现Controller的接口类 |
| BeanNameUrlHandlerMapping SimpleUrlHandlerAdapter | HttpRequestHandlerAdapter | 实现HttpRequestHandler的类 |
| BeanNameUrlHandlerMapping SimpleUrlHandlerAdapter | SimpleServletHandlerAdapter | Servlet |
| RequestMappingHandlerMapping | RequestMappingHandlerAdapter | HandlerMethod使用的@Controller注解类中,@RequestMapping等注解 方法 |
视图与视图解析器
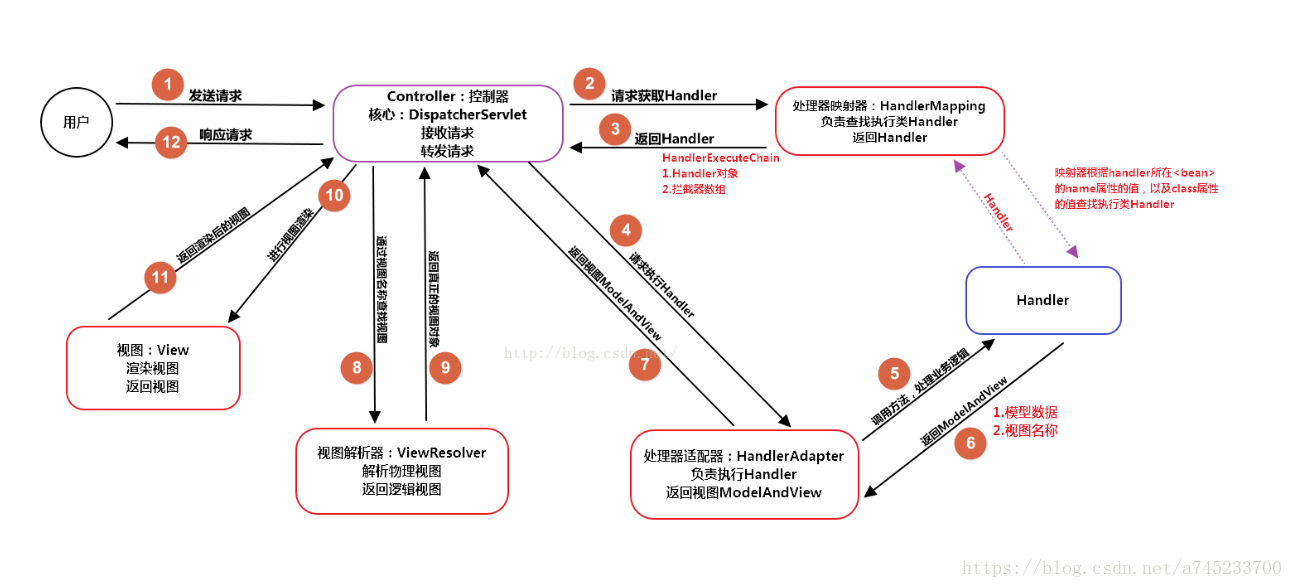
Controller中的请求处理方法执行完成会返回一个ModelAndView类型的对象(这个对象包含一个逻辑视图名和模型数据),接着执行DispatcherServlet的processDispatchResult方法,结合视图和模型进行请求的响应,具体步骤:
- 使用容器中注册的视图解析器,根据视图逻辑的名称,实例化一个View子类对象。并返回给DispatchServlet。
- DispatcherServlet调用视图的render()方法,结合模型数据对视图进行渲染后,把视图的内容通过响应流,响应到客户端。
< mvc:annotation-driven/ >
全面开启MVC相关的注解功能,该配置会注册用于处理请求映射相关的组件,支持其你去注解映射注解(@RequestMapping、@GetMapping和@PostMapping等)和参数转换注解(@RequestParam、@PathVariable和@ModelAttribute等)组件类型包括:
- RequestMappingHandlerMapping:请求映射处理器映射器
- RequestMappingHandlerAdapter:请求映射处理器适配器
- ExceptionHandlerExceptionResolver:处理异常信息的异常解析器
除此之外,<mvc:annotation-driven />配置还会加载一些数据转换支持的注解实现类。:
- ConversionService的实例对表单参数进行类型转换
- 支持使用了@NumberFormat(对数据类型格式化)
- @Vaild对JavaBean进行JSR-303验证
- 支持JSON数据类型转换注解@RequestBody和@ResponseBody
< context:component-scan />
自动扫描和注册对应包下的组件和依赖注入的注解。相比@Component的通用组件注解,Spring MVC项目中可以使用对应不同层级更为精准的组件注解,具体使用如下:
- @controller:控制器组件
- @Service:服务组件
- @Repository:DAO组件
- @Component:组件的泛型,使用不好归类的组件类,如一些用于和配置文件对应的类
依赖注入的注解和核心容器基本相同:
- @Resource:依赖注入,Java标准,默认按名称装配
- @Autowired:依赖注入,Spring自定义,默认按类型装配
@RequestMapping属性
-
vaule
@RequestMapping(value="/hello") == @RequestMapping("/hello")
-
method
指定请求类型 使用枚举类维护:
@RequestMapping(value = “/hello”, mothed = RequestMethod.GET)
有子注解可以替代:@GetMaping@PostMapping@PatchMapping@DeleteMapping
-
consumes和produces
指定请求和返回的媒体格式类型:
@RequestMapping(value="/hello", method=RequestMathod.GET, consumes=“application/json”, produces=“application/json:charset=utf-8”)
-
headers请求头限制
-
path请求路径限制
-
param请求参数限制
请求参数匹配注解
@RequestMapping("/helloWithParam")
public ModelAndView helloWithParam(
    @RequestParam(value="userName",required=true) String userName) {
    ModelAndView  mav = new ModelAndView();
    mav.setViewName("hello");
    return mav;
}
@RequestParam也可以不使用,容器会根据参数名称自动进行匹配。
路径变量注解@PathVariable
@RequestMapping(value = "/hello/{userName}" )
public ModelAndView helloPathVariable(@Pathvariable String userName) {
    ....
}
矩阵变量注解
@RequestMapping(
        value = "/{username}"
    )
    public ModelAndView register(
            @PathVariable String username,
            @MatrixVariable(name = "id",pathVar = "username") String userId) {
        System.out.println("PathVariable username:" + username);
        System.out.println("MartrixVariable userId" + userId);
        return new ModelAndView("hello");
    }


 2102
2102


 被折叠的 条评论
为什么被折叠?
被折叠的 条评论
为什么被折叠?
 到【灌水乐园】发言


