


Spring框架会给我们的日常开发中带来很大的便捷,在Spring框架中有一个非常实用的注解@Atuowired,下面详细介绍一下它。
如何使用:
@Autowire注解(自动注入)主要用于给类的属性注入JavaBean对象,修饰在属性的上方,代表从Spring容器里面找到这个对象并注入给这里的属性。这个注解默认是按照类型并通过Set()注入的方式来装配的,但是他与XML的注入方式不同在于,它不需要类提供Set方法。
使用实例:
public class user {
    public String uname;
    public int uage;
    public double umoney;

    @Autowired
    public phone phone;

}
为什么仅仅在属性上标上这个注解就可以完成属性的自动注入?它的底层是如何去Spring容器中找到这个对象并赋值给这个属性呢?
原理: AutowiredAnnotationBeanPostProcessor会先去寻找注入点,然后去解析注入点需要的依赖,最后通过反射进行注入。原理简单,但是实现起来比较复杂。
@Autowired源码分析
AutowiredAnnotationBeanPostProcessor类
该类是@Autowired的具体实现类,先预览一下类方法
发现实际有机会介入bean的创建操作只有可能是后置处理器,用于后置处理的有3个方法,其中一个过时不用,分别是postProcessMergedBeanDefinition、postProcessProperties后置处理,我们再看一下这2个方法的具体代码
public class AutowiredAnnotationBeanPostProcessor extends InstantiationAwareBeanPostProcessorAdapter
implements MergedBeanDefinitionPostProcessor, PriorityOrdered, BeanFactoryAware {
...
@Override
public void postProcessMergedBeanDefinition(RootBeanDefinition beanDefinition, Class<?> beanType, String beanName) {
// 1. 寻找bean中所有被@Autowired注释的属性,并将属性封装成InjectedElement类型
InjectionMetadata metadata = findAutowiringMetadata(beanName, beanType, null)
metadata.checkConfigMembers(beanDefinition);
}
...
@Override
public PropertyValues postProcessProperties(PropertyValues pvs, Object bean, String beanName) {
// 1. 寻找通过@Autowired注解的属性或者方法
InjectionMetadata metadata = findAutowiringMetadata(beanName, bean.getClass(), pvs);
try {
// 2. 注入
metadata.inject(bean, beanName, pvs);
}
catch (BeanCreationException ex) {
throw ex;
}
catch (Throwable ex) {
throw new BeanCreationException(beanName, "Injection of autowired dependencies failed", ex);
}
return pvs;
}
...
}
首先先找出所有注解了@Autowired的属性或者方法,然后进行注入,当然postProcessMergedBeanDefinition后置处理器的调用肯定是在postProcessProperties之前的,这里我们回顾一下spring bean的创建过程。
2个处理器我已用黄色标出

1. 查找所有@Autowired
// 寻找bean中所有被@Autowired注释的属性,并将属性封装成InjectedElement类型
InjectionMetadata metadata = findAutowiringMetadata(beanName, beanType, null);
private InjectionMetadata findAutowiringMetadata(String beanName, Class<?> clazz, @Nullable PropertyValues pvs) {
// Fall back to class name as cache key, for backwards compatibility with custom callers.
// 获取缓存的key值,一般以beanName做key
String cacheKey = (StringUtils.hasLength(beanName) ? beanName : clazz.getName());
// Quick check on the concurrent map first, with minimal locking.
// 从缓存中获取metadata
InjectionMetadata metadata = this.injectionMetadataCache.get(cacheKey);
// 检测metadata是否需要更新
if (InjectionMetadata.needsRefresh(metadata, clazz)) {
synchronized (this.injectionMetadataCache) {
metadata = this.injectionMetadataCache.get(cacheKey);
if (InjectionMetadata.needsRefresh(metadata, clazz)) {
if (metadata != null) {
metadata.clear(pvs);
}
// 通过clazz类,查找所有@Autowired的属性或者方法,并封装成InjectionMetadata类型
metadata = buildAutowiringMetadata(clazz);
// 将metadata加入缓存
this.injectionMetadataCache.put(cacheKey, metadata);
}
}
}
return metadata;
}
可以看到spring依然在用缓存的方式提高性能,继续跟踪核心代码buildAutowiringMetadata(clazz)
private InjectionMetadata buildAutowiringMetadata(final Class<?> clazz) {
// 查看clazz是否有Autowired注解
if (!AnnotationUtils.isCandidateClass(clazz, this.autowiredAnnotationTypes)) {
return InjectionMetadata.EMPTY;
}
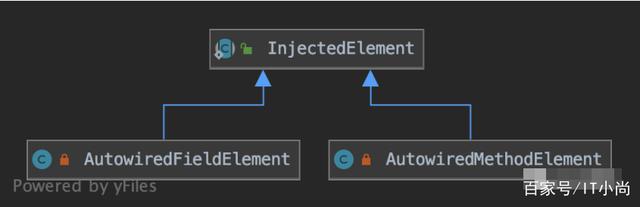
// 这里需要注意AutowiredFieldElement,AutowiredMethodElement均继承了InjectionMetadata.InjectedElement
// 因此这个列表是可以保存注解的属性和被注解的方法的
List<InjectionMetadata.InjectedElement> elements = new ArrayList<>();
Class<?> targetClass = clazz;
// 1. 通过do while循环,递归的往直接继承的父类寻找@Autowired
do {
final List<InjectionMetadata.InjectedElement> currElements = new ArrayList<>();
// 2. 通过反射,获取所有属性,doWithLocalFields则是循环的对每个属性应用以下匿名方法
ReflectionUtils.doWithLocalFields(targetClass, field -> {
// 判断当前field属性是否含有@Autowired的注解
MergedAnnotation<?> ann = findAutowiredAnnotation(field);
if (ann != null) {
// 返回该属性在类中的修饰符,如果等于static常量,则抛出异常,@Autowired不允许注解在静态属性上
if (Modifier.isStatic(field.getModifiers())) {
if (logger.isInfoEnabled()) {
logger.info("Autowired annotation is not supported on static fields: " + field);
}
return;
}
// @Autowired有required属性,获取required的值,默认为true
boolean required = determineRequiredStatus(ann);
// 3. 将field封装成InjectedElement,并添加到集合中,这里用的是AutowiredFieldElement
currElements.add(new AutowiredFieldElement(field, required));
}
});
// 4. @Autowired可以注解在方法上
ReflectionUtils.doWithLocalMethods(targetClass, method -> {
Method bridgedMethod = BridgeMethodResolver.findBridgedMethod(method);
if (!BridgeMethodResolver.isVisibilityBridgeMethodPair(method, bridgedMethod)) {
return;
}
MergedAnnotation<?> ann = findAutowiredAnnotation(bridgedMethod);
if (ann != null && method.equals(ClassUtils.getMostSpecificMethod(method, clazz))) {
if (Modifier.isStatic(method.getModifiers())) {
if (logger.isInfoEnabled()) {
logger.info("Autowired annotation is not supported on static methods: " + method);
}
return;
}
if (method.getParameterCount() == 0) {
if (logger.isInfoEnabled()) {
logger.info("Autowired annotation should only be used on methods with parameters: " +
method);
}
}
boolean required = determineRequiredStatus(ann);
PropertyDescriptor pd = BeanUtils.findPropertyForMethod(bridgedMethod, clazz);
// 5. 将方法封装成InjectedElement,并添加到集合中,这里用的是AutowiredMethodElement
currElements.add(new AutowiredMethodElement(method, required, pd));
}
});
elements.addAll(0, currElements);
// 返回直接继承的父类
targetClass = targetClass.getSuperclass();
}
// 如果父类不为空则需要把父类的@Autowired属性或方法也找出
while (targetClass != null && targetClass != Object.class);
// 6. new InjectionMetadata(clazz, elements),将找到的所有的待注入属性或方法生成metadata返回
return InjectionMetadata.forElements(elements, clazz);
}
-
外层 do … while … 的循环被用于递归的查找父类的@Autowired属性或方法
-
通过反射的方式获取到所有属性并循环验证每一个属性是否被@Autowired注解
-
将查找到包含@Autowired注解的filed封装成AutowiredFieldElement,加入到列表中
-
循环查找在方法上的注解
-
将找到的方法封装成AutowiredMethodElement,并加入列表
这里需要特别强调一点,InjectedElement被AutowiredFieldElement、AutowiredMethodElement所继承,他们都有各自的inject函数,实现各自的注入。因此改ArrayList elements是拥有2种类型的属性
-
将找到的所有元素列表和clazz作为参数生成metadata数据返回
2. 注入
// 注入
metadata.inject(bean, beanName, pvs);
public void inject(Object target, @Nullable String beanName, @Nullable PropertyValues pvs) throws Throwable {
// 获取所有需要被注入的元素
Collection<InjectedElement> checkedElements = this.checkedElements;
Collection<InjectedElement> elementsToIterate =
(checkedElements != null ? checkedElements : this.injectedElements);
// 迭代的元素不为空
if (!elementsToIterate.isEmpty()) {
for (InjectedElement element : elementsToIterate) {
if (logger.isTraceEnabled()) {
logger.trace("Processing injected element of bean '" + beanName + "': " + element);
}
// 循环注入,这里有可能是AutowiredFieldElement也可能AutowiredMethodElement,因此调用的inject是2个不同的方法
element.inject(target, beanName, pvs);
}
}
}
利用for循环,遍历刚刚我们查到到的elements列表,进行注入。
在上面有特别提醒,这里的element有可能是AutowiredFieldElement类型、或AutowiredMethodElement类型。各自代表@Autowired注解在属性上、以及注解在方法上的2种不同元素。因此他们调用的element.inject(target, beanName, pvs);也是不一样的


 346
346


 被折叠的 条评论
为什么被折叠?
被折叠的 条评论
为什么被折叠?
 到【灌水乐园】发言


