spring boot3 七、 spring alibaba cloud fastjson2 FastJsonHttpMessageConverter 配置接口的序列化 接口结果的类型转换等相关问题

在这里插入图片描述

在这里插入图片描述

fastjson2 doc

https://github.com/alibaba/fastjson2/wiki/Features_cn
https://appdoc.app/artifact/com.alibaba.fastjson2/fastjson2/2.0.2/com/alibaba/fastjson2/JSONWriter.Feature.html

spring boot3 需要引入的依赖

<dependency>
	<groupId>com.alibaba.fastjson2</groupId>
 	<artifactId>fastjson2-extension-spring6</artifactId>
	<version>2.0.25</version>
</dependency>

fastjson2 FastJsonHttpMessageConverter 配置接口的序列化 接口结果的类型转换

package com.jianmu.config;

import com.alibaba.fastjson2.JSONReader;
import com.alibaba.fastjson2.JSONWriter;
import com.alibaba.fastjson2.support.config.FastJsonConfig;
import com.alibaba.fastjson2.support.spring.http.converter.FastJsonHttpMessageConverter;
import org.springframework.context.annotation.Configuration;
import org.springframework.http.converter.HttpMessageConverter;
import org.springframework.web.servlet.config.annotation.WebMvcConfigurer;

import java.nio.charset.StandardCharsets;
import java.util.List;

/**
 * @author kong
 */
@Configuration
public class FastJson2Conf implements WebMvcConfigurer {
    @Override
    public void configureMessageConverters(List<HttpMessageConverter<?>> converters) {
        FastJsonHttpMessageConverter fastJsonHttpMessageConverter = new FastJsonHttpMessageConverter();
        FastJsonConfig fastJsonConfig = new FastJsonConfig();
        fastJsonConfig.setCharset(StandardCharsets.UTF_8);
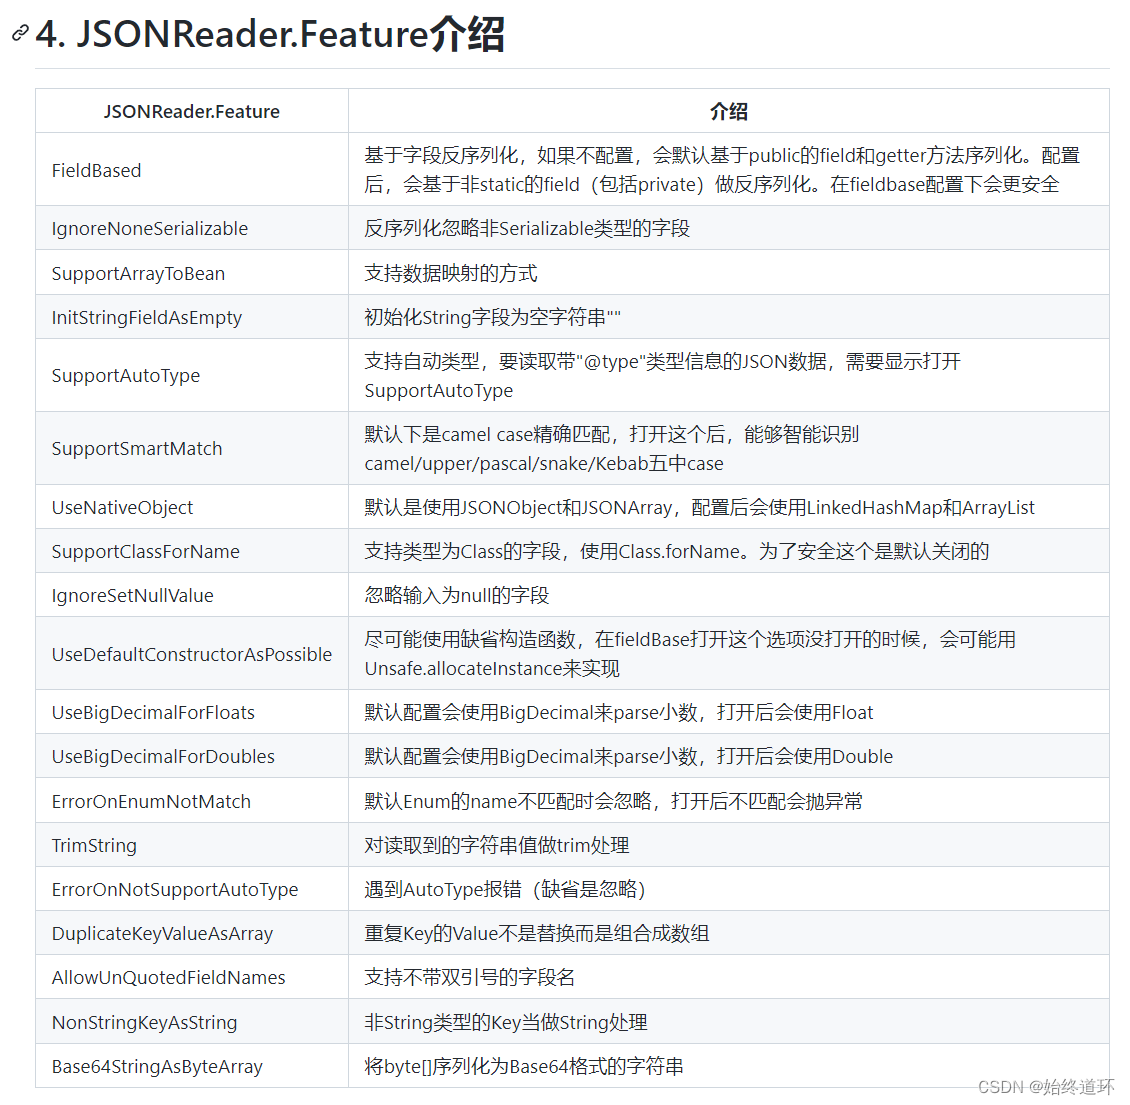
        fastJsonConfig.setReaderFeatures(
                //字段如 vBtn  会被转为 VBtn  处理这样的问题
                JSONReader.Feature.SupportSmartMatch,
                JSONReader.Feature.FieldBased,
                //初始化String字段为空字符串""
//                JSONReader.Feature.InitStringFieldAsEmpty,
                //对读取到的字符串值做trim处理
                JSONReader.Feature.TrimString);
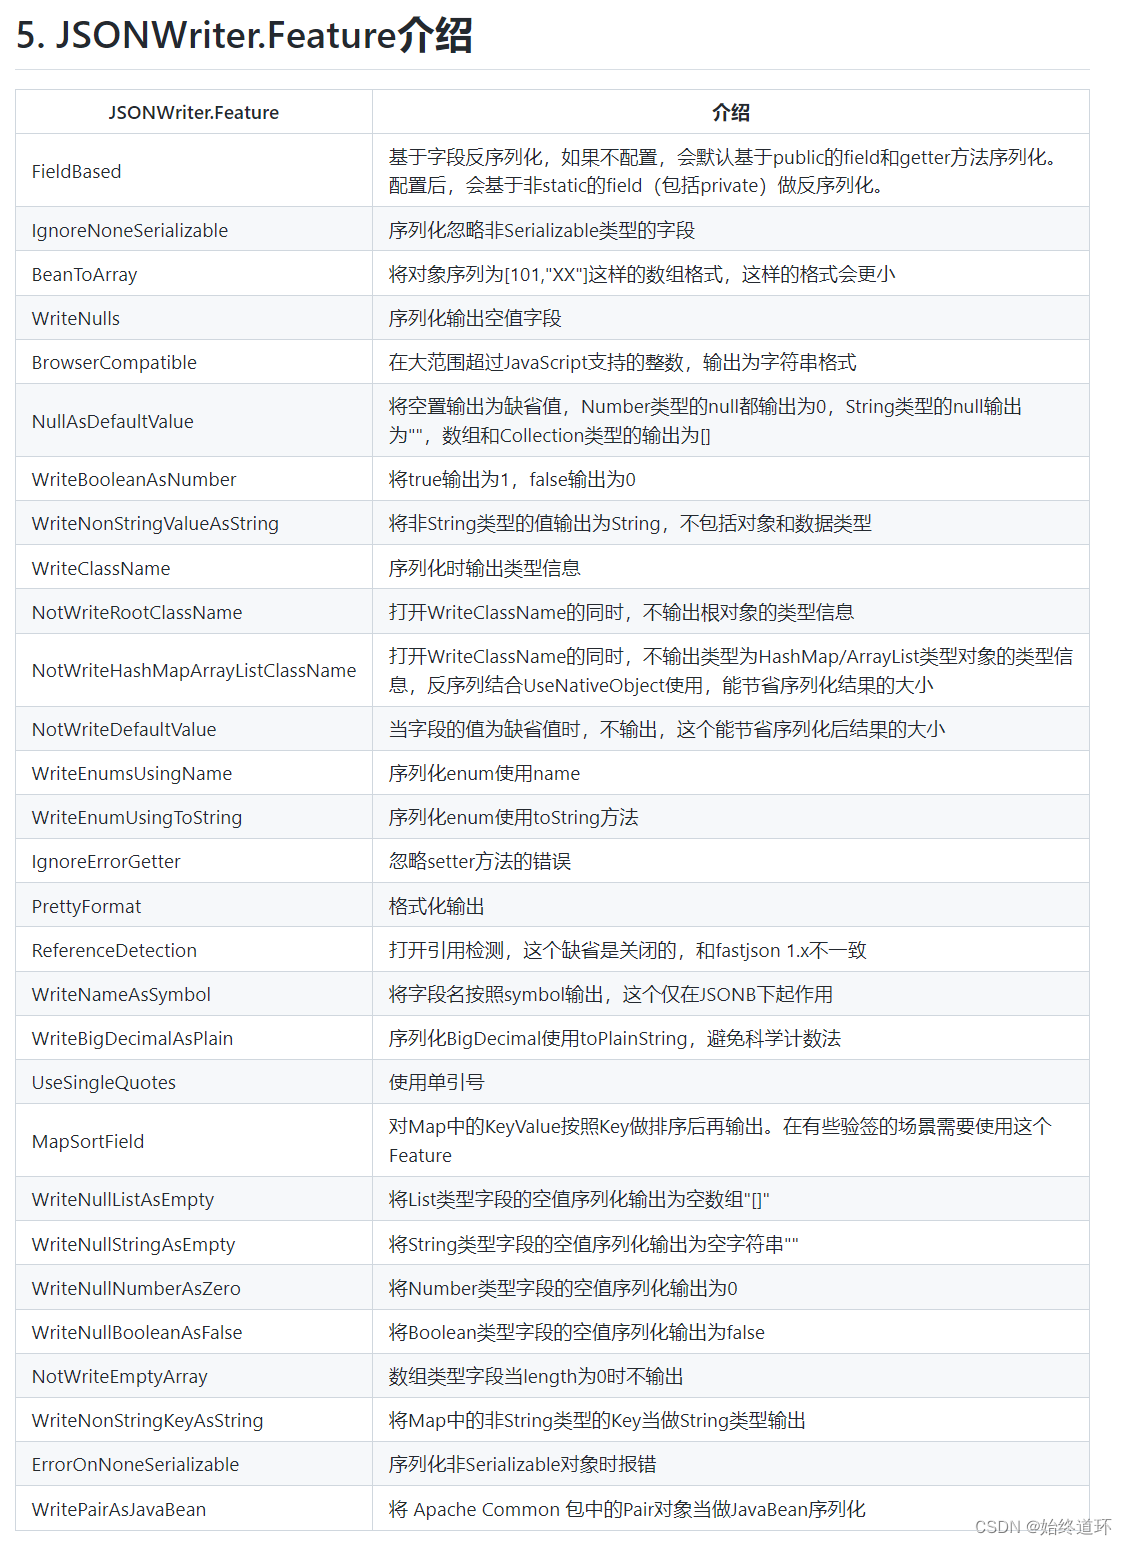
        fastJsonConfig.setWriterFeatures(
                //字段如 vBtn  会被转为 VBtn  处理这样的问题
                JSONWriter.Feature.FieldBased,
                //long 转 string 丢失精度问题
                JSONWriter.Feature.WriteLongAsString,
                // 保留map空的字段
                JSONWriter.Feature.WriteMapNullValue,
                //将List类型的null转成[]
                JSONWriter.Feature.WriteNullListAsEmpty,
                //将String类型的null转成""
                JSONWriter.Feature.WriteNullStringAsEmpty,
                //将Boolean类型的null转成false
                JSONWriter.Feature.WriteNullBooleanAsFalse,
                //日期格式转换
                JSONWriter.Feature.PrettyFormat,
                //将空置输出为缺省值,Number类型的null都输出为0,String类型的null输出为"",数组和Collection类型的输出为[]
                JSONWriter.Feature.NullAsDefaultValue);
        fastJsonHttpMessageConverter.setFastJsonConfig(fastJsonConfig);
        converters.add(0, fastJsonHttpMessageConverter);

    }
}


  • 2
    点赞
  • 3
    收藏
    觉得还不错? 一键收藏
  • 打赏
    打赏
  • 0
    评论
要在Spring Cloud Feign中配置FastJson序列化,您需要完成以下步骤: 1. 添加FastJson依赖 在项目的pom.xml文件中,添加FastJson依赖: ```xml <dependency> <groupId>com.alibaba</groupId> <artifactId>fastjson</artifactId> <version>1.2.47</version> </dependency> ``` 2. 创建FastJson转换器 创建一个FastJson转换器类,继承自SpringHttpMessageConverter接口,并实现其方法。代码如下: ```java import com.alibaba.fastjson.JSON; import com.alibaba.fastjson.parser.Feature; import com.alibaba.fastjson.serializer.SerializerFeature; import org.springframework.http.HttpHeaders; import org.springframework.http.HttpInputMessage; import org.springframework.http.HttpOutputMessage; import org.springframework.http.MediaType; import org.springframework.http.converter.HttpMessageConverter; import java.io.IOException; import java.io.InputStream; import java.io.OutputStream; import java.lang.reflect.Type; import java.nio.charset.Charset; import java.util.ArrayList; import java.util.List; public class FastJsonHttpMessageConverter implements HttpMessageConverter<Object> { public static final Charset DEFAULT_CHARSET = Charset.forName("UTF-8"); private SerializerFeature[] serializerFeatures = new SerializerFeature[0]; private Feature[] parserFeatures = new Feature[0]; @Override public boolean canRead(Type type, Class<?> contextClass, MediaType mediaType) { return true; } @Override public boolean canWrite(Type type, Class<?> aClass, MediaType mediaType) { return true; } @Override public List<MediaType> getSupportedMediaTypes() { List<MediaType> mediaTypes = new ArrayList<>(); mediaTypes.add(MediaType.APPLICATION_JSON_UTF8); mediaTypes.add(MediaType.APPLICATION_JSON); mediaTypes.add(MediaType.TEXT_PLAIN); return mediaTypes; } @Override public Object read(Type type, Class<?> contextClass, HttpInputMessage inputMessage) throws IOException { InputStream inputStream = inputMessage.getBody(); return JSON.parseObject(inputStream, DEFAULT_CHARSET, type, parserFeatures); } @Override public void write(Object o, Type type, MediaType mediaType, HttpOutputMessage outputMessage) throws IOException { HttpHeaders headers = outputMessage.getHeaders(); headers.setContentType(MediaType.APPLICATION_JSON_UTF8); String jsonString = JSON.toJSONString(o, serializerFeatures); OutputStream outputStream = outputMessage.getBody(); outputStream.write(jsonString.getBytes(DEFAULT_CHARSET)); outputStream.flush(); } public SerializerFeature[] getSerializerFeatures() { return serializerFeatures; } public void setSerializerFeatures(SerializerFeature[] serializerFeatures) { this.serializerFeatures = serializerFeatures; } public Feature[] getParserFeatures() { return parserFeatures; } public void setParserFeatures(Feature[] parserFeatures) { this.parserFeatures = parserFeatures; } } ``` 3. 配置FastJson转换器 在Spring配置类中,创建一个FastJson转换器的bean,并将其注册到SpringHttpMessageConverters中。代码如下: ```java import com.alibaba.fastjson.serializer.SerializerFeature; import org.springframework.context.annotation.Bean; import org.springframework.context.annotation.Configuration; import org.springframework.http.converter.HttpMessageConverter; import org.springframework.http.converter.json.MappingJackson2HttpMessageConverter; import org.springframework.web.client.RestTemplate; import java.util.ArrayList; import java.util.List; @Configuration public class FeignConfiguration { @Bean public HttpMessageConverter fastJsonHttpMessageConverter() { return new FastJsonHttpMessageConverter(); } @Bean public RestTemplate restTemplate() { RestTemplate restTemplate = new RestTemplate(); List<HttpMessageConverter<?>> messageConverters = new ArrayList<>(); MappingJackson2HttpMessageConverter converter = new MappingJackson2HttpMessageConverter(); converter.setObjectMapper(new ObjectMapper()); messageConverters.add(converter); messageConverters.add(fastJsonHttpMessageConverter()); restTemplate.setMessageConverters(messageConverters); return restTemplate; } } ``` 4. 配置Feign Client 在Feign Client的配置类中,使用@FeignClient注解的configuration属性,将FastJson转换器的bean引入到Feign Client中。代码如下: ```java import org.springframework.cloud.openfeign.EnableFeignClients; import org.springframework.context.annotation.Bean; import org.springframework.context.annotation.Configuration; @Configuration @EnableFeignClients(defaultConfiguration = {FeignConfiguration.class}) public class FeignClientConfiguration { } ``` 完成以上步骤之后,您就可以在Spring Cloud Feign中使用FastJson作为序列化工具了。

“相关推荐”对你有帮助么?

  • 非常没帮助
  • 没帮助
  • 一般
  • 有帮助
  • 非常有帮助
提交
评论
添加红包

请填写红包祝福语或标题

红包个数最小为10个

红包金额最低5元

当前余额3.43前往充值 >
需支付:10.00
成就一亿技术人!
领取后你会自动成为博主和红包主的粉丝 规则
hope_wisdom
发出的红包

打赏作者

等一场春雨

你的鼓励将是我创作的最大动力

¥1 ¥2 ¥4 ¥6 ¥10 ¥20
扫码支付:¥1
获取中
扫码支付

您的余额不足,请更换扫码支付或充值

打赏作者

实付
使用余额支付
点击重新获取
扫码支付
钱包余额 0

抵扣说明:

1.余额是钱包充值的虚拟货币,按照1:1的比例进行支付金额的抵扣。
2.余额无法直接购买下载,可以购买VIP、付费专栏及课程。

余额充值