


Tab与TabHost
这就是Tab,而盛放Tab的容器就是TabHost
如何实现??
每一个Tab还对应了一个布局,这个就有点好玩了。一个Activity,对应了多个功能布局。
①新建一个Tab项目,注意,不要生成main Activity
这里不要选
②在包里面新建一个类MyTab,继承于TabActivity
其实,TabActivity是Activity的子类
③从父类继承OnCreate()入口方法
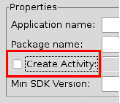
④在Manifest.xml文件中注册一下MyTab类(Activity)
⑤这时候,需要设计一下标签页对应的布局,一般采用FrameLayout作为根布局,每个标签页面对应一个子节点的Layout
⑥首先,应该声明TabHost,然后用LayoutInflater过滤出布局来,给TabHost加上含有Tab页面的FrameLayout
⑦接着,在TabHost创建一个标签,然后设置一下标题/图标/标签页布局
⑧标签切换事件处理,setOnTabChangedListener
⑨各个标签页的动态MENU
先把在XML中设计好的MENU放到一个int数组里
在setOnTabChangedListener()方法中根据标签的切换情况来设置myMenuSettingTag
然后onCreateOptionsMenu(Menu menu) 方法中通过MenuInflater过滤器动态加入MENU
menu 布局
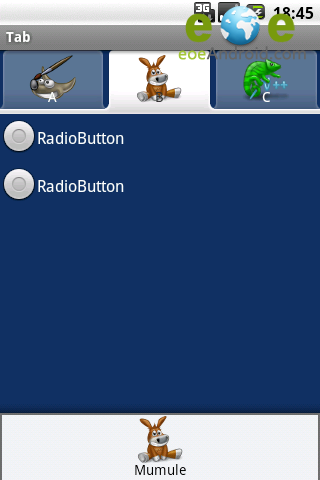
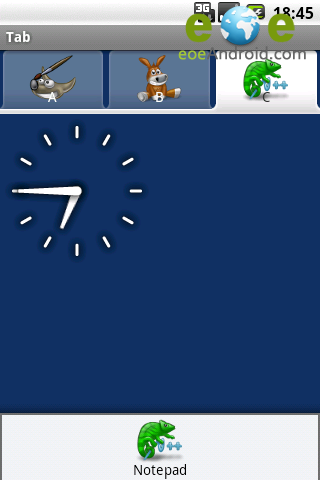
⑩运行效果

这就是Tab,而盛放Tab的容器就是TabHost
如何实现??
每一个Tab还对应了一个布局,这个就有点好玩了。一个Activity,对应了多个功能布局。
①新建一个Tab项目,注意,不要生成main Activity
这里不要选
②在包里面新建一个类MyTab,继承于TabActivity
其实,TabActivity是Activity的子类
|
1
2
3
4
5
6
7
|
package
zyf.tab.test;
import
android.app.TabActivity;
public
class
MyTab
extends
TabActivity {
}
|
③从父类继承OnCreate()入口方法
|
1
2
3
4
5
6
7
8
9
10
|
package
zyf.tab.test;
import
android.app.TabActivity;
import
android.os.Bundle;
public
class
MyTab
extends
TabActivity {
@Override
protected
void
onCreate(Bundle savedInstanceState) {
// TODO Auto-generated method stub
super
.onCreate(savedInstanceState);
}
}
|
④在Manifest.xml文件中注册一下MyTab类(Activity)
|
1
2
3
4
5
6
|
<
activity
android:name
=
".MyTab"
>
<
intent-filter
>
<
action
android:name
=
"android.intent.action.MAIN"
></
action
>
<
category
android:name
=
"android.intent.category.LAUNCHER"
></
category
>
</
intent-filter
>
</
activity
>
|
⑤这时候,需要设计一下标签页对应的布局,一般采用FrameLayout作为根布局,每个标签页面对应一个子节点的Layout
|
1
2
3
4
5
6
7
8
9
10
11
12
13
14
15
16
17
18
19
20
21
22
23
24
25
26
27
28
29
30
31
32
33
34
35
36
37
38
39
40
41
42
43
|
<?
xml
version
=
"1.0"
encoding
=
"utf-8"
?>
<!-- 这里是根节点布局 -- >
<
FrameLayout
xmlns:android
=
"http://schemas.android.com/apk/res/android"
android:layout_width
=
"fill_parent"
android:layout_height
=
"fill_parent"
>
<!-- 第一个Tab 对应的布局 -- >
<
LinearLayout
android:id
=
"@+id/widget_layout_Blue"
android:layout_width
=
"fill_parent"
android:layout_height
=
"fill_parent"
androidrientation
=
"vertical"
>
<
EditText
android:id
=
"@+id/widget34"
android:layout_width
=
"fill_parent"
android:layout_height
=
"wrap_content"
android:text
=
"EditText"
android:textSize
=
"18sp"
>
</
EditText
>
<
Button
android:id
=
"@+id/widget30"
android:layout_width
=
"wrap_content"
android:layout_height
=
"wrap_content"
android:text
=
"Button"
>
</
Button
>
</
LinearLayout
>
<!-- 第二个Tab 对应的布局 -- >
<
LinearLayout
android:id
=
"@+id/widget_layout_red"
android:layout_width
=
"fill_parent"
android:layout_height
=
"fill_parent"
androidrientation
=
"vertical"
>
<
AnalogClock
android:id
=
"@+id/widget36"
android:layout_width
=
"wrap_content"
android:layout_height
=
"wrap_content"
>
</
AnalogClock
>
</
LinearLayout
>
<!-- 第三个Tab 对应的布局 -- >
<
LinearLayout
android:id
=
"@+id/widget_layout_green"
android:layout_width
=
"fill_parent"
android:layout_height
=
"fill_parent"
androidrientation
=
"vertical"
>
<
RadioGroup
android:id
=
"@+id/widget43"
android:layout_width
=
"166px"
android:layout_height
=
"98px"
androidrientation
=
"vertical"
>
<
RadioButton
android:id
=
"@+id/widget44"
android:layout_width
=
"wrap_content"
android:layout_height
=
"wrap_content"
android:text
=
"RadioButton"
>
</
RadioButton
>
<
RadioButton
android:id
=
"@+id/widget45"
android:layout_width
=
"wrap_content"
android:layout_height
=
"wrap_content"
android:text
=
"RadioButton"
>
</
RadioButton
>
</
RadioGroup
>
</
LinearLayout
>
</
FrameLayout
>
|
⑥首先,应该声明TabHost,然后用LayoutInflater过滤出布局来,给TabHost加上含有Tab页面的FrameLayout
|
1
2
3
4
5
6
7
8
9
|
private
TabHost myTabhost;
myTabhost=
this
.getTabHost();
//从TabActivity上面获取放置Tab的TabHost
LayoutInflater.from(
this
).inflate(R.layout.main, myTabhost.getTabContentView(),
true
);
//from(this)从这个TabActivity获取LayoutInflater
//R.layout.main 存放Tab布局
//通过TabHost获得存放Tab标签页内容的FrameLayout
//是否将inflate 拴系到根布局元素上
myTabhost.setBackgroundColor(Color.argb(
150
,
22
,
70
,
150
));
//设置一下TabHost的颜色
|
⑦接着,在TabHost创建一个标签,然后设置一下标题/图标/标签页布局
|
1
2
3
4
5
|
myTabhost.addTab(myTabhost.newTabSpec(
"TT"
)
// 制造一个新的标签TT
.setIndicator(
"KK"
,getResources().getDrawable(R.drawable.ajjc))
// 设置一下显示的标题为KK,设置一下标签图标为ajjc
.setContent(R.id.widget_layout_red));
//设置一下该标签页的布局内容为R.id.widget_layout_red,这是FrameLayout中的一个子Layout
|
|
1
2
3
4
5
6
|
myTabhost.setOnTabChangedListener(
new
OnTabChangeListener(){
@Override
public
void
onTabChanged(String tabId) {
// TODO Auto-generated method stub
}
});
|
⑨各个标签页的动态MENU
先把在XML中设计好的MENU放到一个int数组里
|
1
2
|
private
static
final
int
myMenuResources[] = { R.menu.phonebook_menu,
R.menu.addphone_menu, R.menu.chatting_menu, R.menu.userapp_menu };
|
在setOnTabChangedListener()方法中根据标签的切换情况来设置myMenuSettingTag
|
1
2
3
4
5
6
7
8
9
10
11
12
13
14
15
16
17
18
19
|
@Override
public
void
onTabChanged(String tagString) {
// TODO Auto-generated method stub
if
(tagString.equals(
"One"
)) {
myMenuSettingTag =
1
;
}
if
(tagString.equals(
"Two"
)) {
myMenuSettingTag =
2
;
}
if
(tagString.equals(
"Three"
)) {
myMenuSettingTag =
3
;
}
if
(tagString.equals(
"Four"
)) {
myMenuSettingTag =
4
;
}
if
(myMenu !=
null
) {
onCreateOptionsMenu(myMenu);
}
}
|
然后onCreateOptionsMenu(Menu menu) 方法中通过MenuInflater过滤器动态加入MENU
|
1
2
3
4
5
6
7
8
9
10
11
12
13
14
15
16
17
18
19
20
21
22
23
24
25
26
27
28
|
@Override
public
boolean
onCreateOptionsMenu(Menu menu) {
// TODO Auto-generated method stub
// Hold on to this
myMenu = menu;
myMenu.clear();
//清空MENU菜单
// Inflate the currently selected menu XML resource.
MenuInflater inflater = getMenuInflater();
//从TabActivity这里获取一个MENU过滤器
switch
(myMenuSettingTag) {
case
1
:
inflater.inflate(myMenuResources[
0
], menu);
//动态加入数组中对应的XML MENU菜单
break
;
case
2
:
inflater.inflate(myMenuResources[
1
], menu);
break
;
case
3
:
inflater.inflate(myMenuResources[
2
], menu);
break
;
case
4
:
inflater.inflate(myMenuResources[
3
], menu);
break
;
default
:
break
;
}
return
super
.onCreateOptionsMenu(menu);
}
|
menu 布局
|
1
2
3
4
5
6
|
<?
xml
version
=
"1.0"
encoding
=
"utf-8"
?>
<
menu
xmlns:android
=
"http://schemas.android.com/apk/res/android"
>
<
group
android:id
=
"@+id/group_a"
><
item
android:id
=
"@+id/item_a"
android:icon
=
"@drawable/gimp"
android:title
=
"Gimp"
></
item
>
</
group
>
</
menu
>
|
⑩运行效果


 5179
5179


 被折叠的 条评论
为什么被折叠?
被折叠的 条评论
为什么被折叠?
 到【灌水乐园】发言


