


事务的回滚和不回滚的异常
-
概述
- 默认情况,遇到运行时异常回滚,遇到编译期异常不回滚。
- rollbackFor设置需要回滚的异常
- noRollbackFor设置不需要回滚的异常
-
代码实现
//@Transactional(rollbackFor = FileNotFoundException.class,noRollbackFor = ArithmeticException.class)
@Transactional(rollbackFor = Exception.class)
@Override
public void addUser(User inputUser) throws Exception {
    System.out.println("UserServiceImpl addUser");
    userDao.addUser(inputUser);
    //运行时异常,会回滚
    System.out.println(1 / 0);
    //编译期异常
    //new FileInputStream("a");

}
事务的隔离级别
-
隔离级别
- 读未提交:可以读取到事务未提交的数据
- 读已提交:可以读取到事务中的数据前后不一致
- 可重复读:查询事务中的数据(id=1)不存在,添加该数据(id=1)已存在
- 串行化:效率低
-
代码实现
@Transactional(isolation = Isolation.REPEATABLE_READ)
@Override
public void addUser(User inputUser) throws Exception {
    System.out.println("UserServiceImpl addUser");
    userDao.addUser(inputUser);
    //运行时异常,会回滚
    System.out.println(1 / 0);
    //编译期异常
    //new FileInputStream("a");
}

@Transactional(isolation = Isolation.REPEATABLE_READ)
@Override
public List<User> selectUserList() throws Exception {
    List<User> userList = userDao.selectUserList();
    userList = userDao.selectUserList();
    return userList;
}
事务传播行为(难点)
- 概述
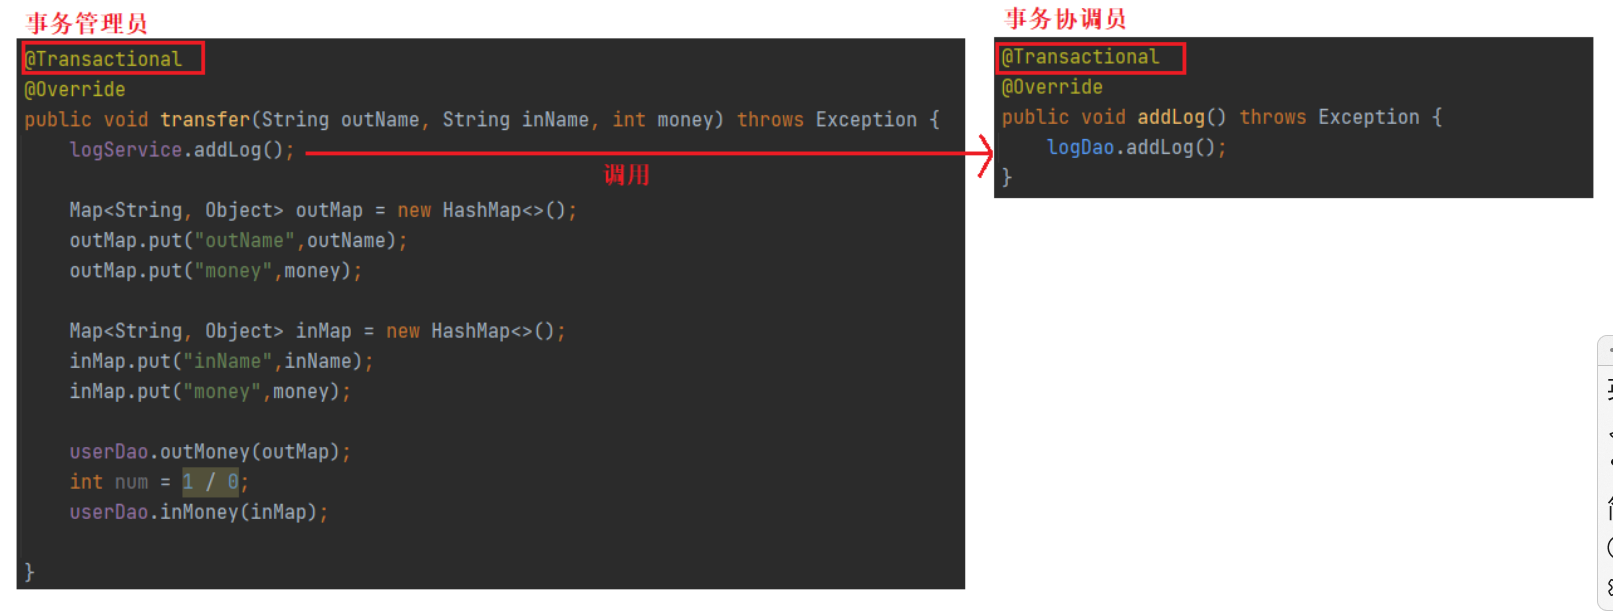
- 规定管理员中的事务和协调员中的事务的关系。
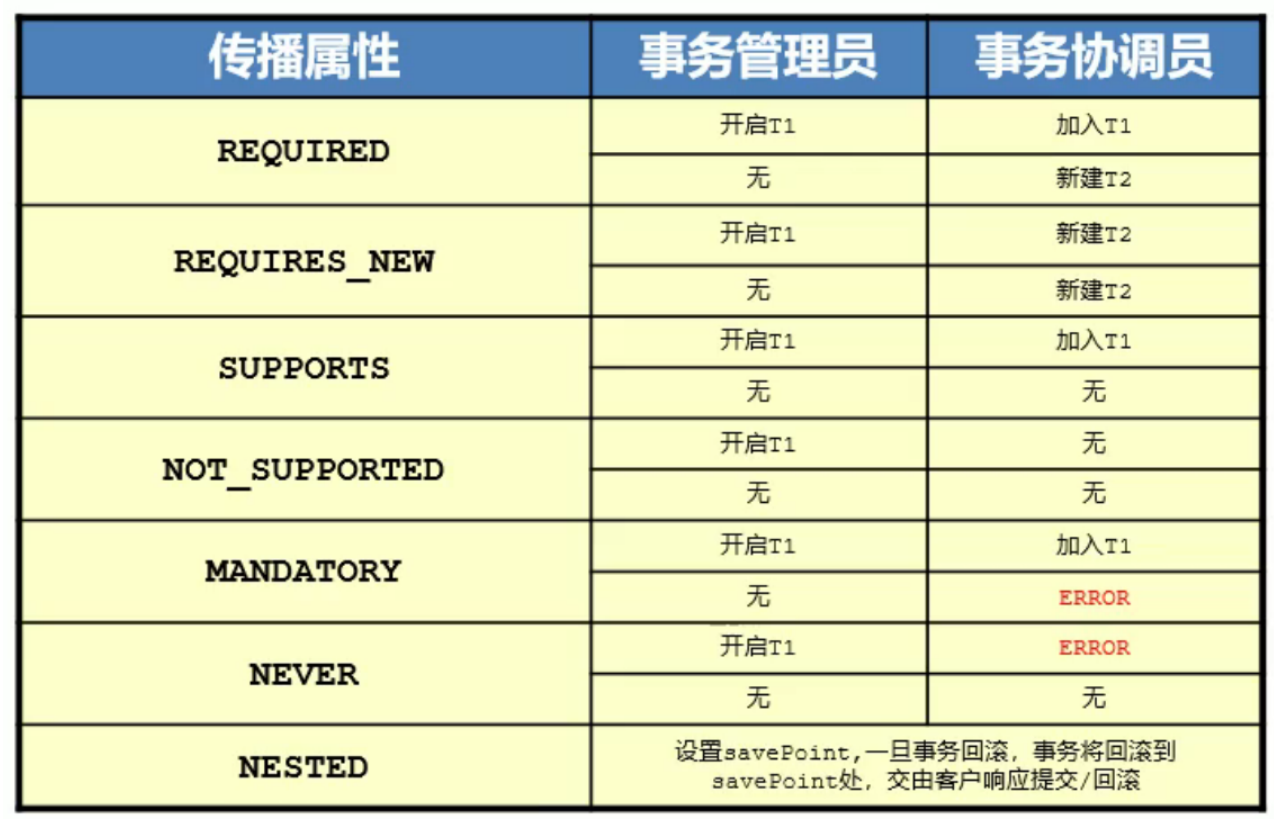
- 传播行为
事务传播行为演示(难点)
-
需求
- 进行转账业务时,进行日志记录。
-
REQUIRED
//事务管理员
@Transactional(isolation = Isolation.REPEATABLE_READ)
@Override
public List<User> selectUserList() throws Exception {
    List<User> userList = userDao.selectUserList();
    userList = userDao.selectUserList();
    return userList;
}
//事务协调员 @Transactional(propagation = Propagation.REQUIRED) @Override public void addLog(String content) throws Exception { logDao.addLog(content); System.out.println(1 / 0); } -
注意事项
- 传播行为应该在协调员进行设置.
Spring整合MyBatis概述
- 概述
- 将mybatis容器交给spring容器管理
- 传统dao开发
- dao接口 + dao实现子类 + mapper映射文件 + spring容器
- 本质是将dao实现子类交给spring容器管理
- 接口代理开发
- dao接口 + mapper映射文件 + spring容器
- 本质是将dao接口代理对象交给spring容器管理
Spring整合MyBatis之传统dao开发
-
概述
- 本质将dao实现子类交给Spring容器管理
-
开发步骤
- ①引入相关依赖
- ②定义service及其实现子类
- ③定义dao及其实现子类
- ④编写spring-core.xml
- 扫描注解
- 将SqlSessionFactory对象交给Spring容器管理(使用SqlSessionFactoryBean),FactoryBean机制
- 加载mybatis核心配置文件SqlMapConfig.xml
- 将DruidDataSource对象交给Spring容器管理
- ⑤代码测试
-
①引入相关依赖
<properties> <maven.compiler.source>8</maven.compiler.source> <maven.compiler.target>8</maven.compiler.target> <junit.version>4.13.2</junit.version> <lombok.version>1.18.22</lombok.version> <spring.version>5.3.13</spring.version> <dbutils.version>1.7</dbutils.version> <druid.version>1.2.8</druid.version> <mysql.version>5.1.48</mysql.version> <mybatis.version>3.5.7</mybatis.version> <mybatis-spring.version>2.0.6</mybatis-spring.version> </properties> <dependencies> <!--junit start--> <dependency> <groupId>junit</groupId> <artifactId>junit</artifactId> <version>${junit.version}</version> <scope>test</scope> </dependency> <!--junit end--> <!--lombok start--> <dependency> <groupId>org.projectlombok</groupId> <artifactId>lombok</artifactId> <version>${lombok.version}</version> </dependency> <!--lombok end--> <!--spring start--> <dependency> <groupId>org.springframework</groupId> <artifactId>spring-core</artifactId> <version>${spring.version}</version> </dependency> <dependency> <groupId>org.springframework</groupId> <artifactId>spring-beans</artifactId> <version>${spring.version}</version> </dependency> <dependency> <groupId>org.springframework</groupId> <artifactId>spring-context</artifactId> <version>${spring.version}</version> </dependency> <dependency> <groupId>org.springframework</groupId> <artifactId>spring-expression</artifactId> <version>${spring.version}</version> </dependency> <dependency> <groupId>org.springframework</groupId> <artifactId>spring-test</artifactId> <version>${spring.version}</version> </dependency> <dependency> <groupId>org.springframework</groupId> <artifactId>spring-jcl</artifactId> <version>${spring.version}</version> </dependency> <dependency> <groupId>org.springframework</groupId> <artifactId>spring-aop</artifactId> <version>${spring.version}</version> </dependency> <dependency> <groupId>org.springframework</groupId> <artifactId>spring-aspects</artifactId> <version>${spring.version}</version> </dependency> <dependency> <groupId>org.springframework</groupId> <artifactId>spring-jdbc</artifactId> <version>${spring.version}</version> </dependency> <dependency> <groupId>org.springframework</groupId> <artifactId>spring-tx</artifactId> <version>${spring.version}</version> </dependency> <!--spring end--> <!--mybatis-spring整合 start--> <dependency> <groupId>org.mybatis</groupId> <artifactId>mybatis-spring</artifactId> <version>${mybatis-spring.version}</version> </dependency> <!--mybatis-spring整合 end--> <!--mybatis start--> <dependency> <groupId>org.mybatis</groupId> <artifactId>mybatis</artifactId> <version>${mybatis.version}</version> </dependency> <!--mybatis end--> <!--jdbc start--> <dependency> <groupId>com.alibaba</groupId> <artifactId>druid</artifactId> <version>${druid.version}</version> </dependency> <dependency> <groupId>mysql</groupId> <artifactId>mysql-connector-java</artifactId> <version>${mysql.version}</version> </dependency> <!--jdbc end--> </dependencies> -
②定义service及其实现子类
@Service public class UserServiceImpl implements UserService { @Autowired private UserDao userDao; @Override public List<User> selectUserList() throws Exception { return userDao.selectUserList(); } } -
③定义dao及其实现子类
@Repository public class UserDaoImpl implements UserDao { @Autowired private SqlSessionFactory sqlSessionFactory; @Override public List<User> selectUserList() throws Exception { SqlSession sqlSession = sqlSessionFactory.openSession(); List<User> userList = sqlSession.selectList("selectUserList"); sqlSession.close(); return userList; } } -
④编写spring-core.xml
<?xml version="1.0" encoding="UTF-8"?> <beans xmlns="http://www.springframework.org/schema/beans" xmlns:xsi="http://www.w3.org/2001/XMLSchema-instance" xmlns:context="http://www.springframework.org/schema/context" xsi:schemaLocation="http://www.springframework.org/schema/beans http://www.springframework.org/schema/beans/spring-beans.xsd http://www.springframework.org/schema/context https://www.springframework.org/schema/context/spring-context.xsd"> <!--扫描注解--> <context:component-scan base-package="com.atguigu"></context:component-scan> <bean id="sqlSessionFactory" class="org.mybatis.spring.SqlSessionFactoryBean"> <property name="dataSource" ref="dataSource"></property> <!--加载mybatis容器--> <property name="configLocation" value="SqlMapConfig.xml"></property> </bean> <context:property-placeholder location="jdbc.properties"></context:property-placeholder> <bean id="dataSource" class="com.alibaba.druid.pool.DruidDataSource"> <property name="driverClassName" value="${driverClass}"></property> <property name="url" value="${url}"></property> <property name="username" value="${user}"></property> <property name="password" value="${password}"></property> </bean> </beans> -
⑤代码测试
public class UserController { public static void main(String[] args) throws Exception { //Spring容器初始化 ApplicationContext applicationContext = new ClassPathXmlApplicationContext("spring-core.xml"); UserService userService = applicationContext.getBean(UserService.class); List<User> userList = userService.selectUserList(); System.out.println("userList = " + userList); } }@RunWith(SpringJUnit4ClassRunner.class) @ContextConfiguration(locations = "classpath:spring-core.xml") public class UserServiceTest { @Autowired private UserService userService; @Test public void selectUserList() throws Exception { List<User> userList = userService.selectUserList(); System.out.println("userList = " + userList); } } -
存在问题
- 每次都需要通过SqlSessionFactory获取SqlSession对象并使用,结束后还得关闭,比较麻烦。
Spring整合MyBatis之传统dao开发优化
-
概述
- 使用SqlSessionDaoSupport类
-
优化一
@Repository public class UserDaoImpl extends SqlSessionDaoSupport implements UserDao { //给UserDaoImpl的父类SqlSessionDaoSupport注入SqlSessionFactory对象 @Autowired @Override public void setSqlSessionFactory(SqlSessionFactory sqlSessionFactory) { super.setSqlSessionFactory(sqlSessionFactory); } @Override public List<User> selectUserList() throws Exception { List<User> userList = getSqlSession().selectList("selectUserList"); return userList; } } -
优化二
public class BaseDao extends SqlSessionDaoSupport {

    @Autowired
    @Override
    public void setSqlSessionFactory(SqlSessionFactory sqlSessionFactory) {
        super.setSqlSessionFactory(sqlSessionFactory);
    }
}
@Repository public class UserDaoImpl extends BaseDao implements UserDao { @Override public List<User> selectUserList() throws Exception { List<User> userList = getSqlSession().selectList("selectUserList"); return userList; } }
Spring整合MyBatis之接口代理
-
概述
- 本质将接口代理对象交给Spring容器管理
-
开发步骤
- ①定义service接口及其实现子类
- ②定义dao接口
- ③编写spring-core.xml
- 扫描注解
- 将dao接口代理类对象放入Spring容器(使用MapperFactoryBean)
- 将SqlSessionFactory对象放入Spring容器(使用SqlSessionFactoryBean)
- 将DruidDataSource对象放入到Spring容器
- ④代码测试
-
①定义service接口及其实现子类
-
②定义dao接口
-
③编写spring-core.xml
<?xml version="1.0" encoding="UTF-8"?> <beans xmlns="http://www.springframework.org/schema/beans" xmlns:xsi="http://www.w3.org/2001/XMLSchema-instance" xmlns:context="http://www.springframework.org/schema/context" xsi:schemaLocation="http://www.springframework.org/schema/beans http://www.springframework.org/schema/beans/spring-beans.xsd http://www.springframework.org/schema/context https://www.springframework.org/schema/context/spring-context.xsd"> <!--扫描注解--> <context:component-scan base-package="com.atguigu"></context:component-scan> <!--将UserDao接口代理类对象放入Spring容器--> <bean class="org.mybatis.spring.mapper.MapperFactoryBean"> <property name="mapperInterface" value="com.atguigu.mapper.UserMapper"></property> <property name="sqlSessionFactory" ref="sqlSessionFactory"></property> </bean> <bean id="sqlSessionFactory" class="org.mybatis.spring.SqlSessionFactoryBean"> <property name="dataSource" ref="dataSource"></property> <property name="configLocation" value="SqlMapConfig.xml"></property> </bean> <context:property-placeholder location="jdbc.properties"></context:property-placeholder> <bean id="dataSource" class="com.alibaba.druid.pool.DruidDataSource"> <property name="driverClassName" value="${driverClass}"></property> <property name="url" value="${url}"></property> <property name="username" value="${user}"></property> <property name="password" value="${password}"></property> </bean> </beans> -
④代码测试
-
存在问题
- ①在SqlMapConfig.xml文件中,不需要再通过标签加载映射文件
- ②如果有100个mapper接口,那么就需要写100次将mapper接口代理类对象放入到Spring容器,过于麻烦。
Spring整合MyBatis之接口代理优化
-
概述
- 使用MapperScannerConfigurer
-
代码实现
<?xml version="1.0" encoding="UTF-8"?>
<beans xmlns="http://www.springframework.org/schema/beans"
       xmlns:xsi="http://www.w3.org/2001/XMLSchema-instance"
       xmlns:context="http://www.springframework.org/schema/context"
       xsi:schemaLocation="http://www.springframework.org/schema/beans http://www.springframework.org/schema/beans/spring-beans.xsd http://www.springframework.org/schema/context https://www.springframework.org/schema/context/spring-context.xsd">

    <!--扫描注解-->
    <context:component-scan base-package="com.atguigu"></context:component-scan>

    <!--将UserDao接口代理类对象放入Spring容器-->
    <bean class="org.mybatis.spring.mapper.MapperScannerConfigurer">
        <property name="basePackage" value="com.atguigu.mapper"></property>
    </bean>

    <bean id="sqlSessionFactory" class="org.mybatis.spring.SqlSessionFactoryBean">
        <property name="dataSource" ref="dataSource"></property>
        <property name="configLocation" value="SqlMapConfig.xml"></property>
    </bean>


    <context:property-placeholder location="jdbc.properties"></context:property-placeholder>
    <bean id="dataSource" class="com.alibaba.druid.pool.DruidDataSource">
        <property name="driverClassName" value="${driverClass}"></property>
        <property name="url" value="${url}"></property>
        <property name="username" value="${user}"></property>
        <property name="password" value="${password}"></property>
    </bean>

</beans>
Spring整合MyBatis引入logback
-
开发步骤
- ①引入相关依赖
- ②编写logback.xml
- ③代码测试
-
①引入相关依赖
<dependency> <groupId>ch.qos.logback</groupId> <artifactId>logback-classic</artifactId> <version>1.2.7</version> </dependency> <dependency> <groupId>org.slf4j</groupId> <artifactId>slf4j-api</artifactId> <version>1.7.32</version> </dependency> -
②编写logback.xml
<?xml version="1.0" encoding="UTF-8"?> <configuration debug="true"> <!-- 指定日志输出的位置 --> <appender name="STDOUT" class="ch.qos.logback.core.ConsoleAppender"> <encoder> <!-- 日志输出的格式 --> <!-- 按照顺序分别是:时间、日志级别、线程名称、打印日志的类、日志主体内容、换行 --> <pattern>[%d{HH:mm:ss.SSS}] [%-5level] [%thread] [%logger] [%msg]%n</pattern> </encoder> </appender> <!-- 设置全局日志级别。日志级别按顺序分别是:DEBUG、INFO、WARN、ERROR --> <!-- 指定任何一个日志级别都只打印当前级别和后面级别的日志。 --> <root level="INFO"> <!-- 指定打印日志的appender,这里通过“STDOUT”引用了前面配置的appender --> <appender-ref ref="STDOUT"/> </root> <logger name="java.sql"> <level value="debug"/> </logger> <logger name="org.apache.ibatis"> <level value="info"/> </logger> <logger name="com.atguigu.controller.UserController"> <level value="debug"/> </logger> </configuration> -
③代码测试
public class UserController {

    public static Logger logger = LoggerFactory.getLogger(UserController.class);

    public static void main(String[] args) throws Exception {
        //Spring容器初始化
        ApplicationContext applicationContext = new ClassPathXmlApplicationContext("spring-core.xml");

        UserService userService = applicationContext.getBean(UserService.class);
        List<User> userList = userService.selectUserList();
        logger.debug("userList : " + userList);
    }

}
Spring整合MyBatis引入分页插件
-
开发步骤
- ①引入相关依赖
- ②编写UserService
- ③编写SqlMapConfig.xml
- 配置PageInterceptor
- ④代码测试
-
①引入相关依赖
<dependency> <groupId>com.github.pagehelper</groupId> <artifactId>pagehelper</artifactId> <version>5.2.1</version> </dependency> -
②编写UserService
@Service public class UserServiceImpl implements UserService { @Autowired private UserMapper userMapper; @Override public PageInfo<User> selectUserListByPage(Integer currentPage, Integer pageSize) throws Exception { PageHelper.startPage(currentPage,pageSize); List<User> userList = userMapper.selectUserList(); return new PageInfo<>(userList); } } -
③编写SqlMapConfig.xml
<plugins>
    <plugin interceptor="com.github.pagehelper.PageInterceptor">
        <property name="reasonable" value="true"/>
    </plugin>
</plugins>
Spring整合MyBatis引入事务管理
-
开发步骤
- ①编写spring-core.xml
- 开启支持事务注解
- ②编写UserService
- 使用@Transactional注解
- ①编写spring-core.xml
-
①编写spring-core.xml
<!--开启事务注解支持--> <tx:annotation-driven transaction-manager="transactionManager"></tx:annotation-driven> <bean id="transactionManager" class="org.springframework.jdbc.datasource.DataSourceTransactionManager"> <property name="dataSource" ref="dataSource"></property> </bean> -
②编写UserService
@Transactional
@Service
public class UserServiceImpl implements UserService {

    @Autowired
    private UserMapper userMapper;

    @Override
    public void addUser(User inputUser) throws Exception {
        userMapper.addUser(inputUser);
        System.out.println(1 / 0);
    }

    @Override
    public List<User> selectUserList() throws Exception {
        return userMapper.selectUserList();
    }

    @Override
    public PageInfo<User> selectUserListByPage(Integer currentPage, Integer pageSize) throws Exception {
        PageHelper.startPage(currentPage, pageSize);
        List<User> userList = userMapper.selectUserList();
        return new PageInfo<>(userList);
    }
}
Spring整合web环境第一版
-
需求
- 在JavaWeb程序中使用Spring容器(在UserServlet中使用Spring容器中的UserService对象)
-
开发步骤
- ①创建web项目
- ②Spring整合MyBatis
- ③编写UserController
-
①创建web项目
-
②Spring整合MyBatis
-
③编写UserController
@WebServlet("/selectUserList") public class UserController extends HttpServlet { @Override protected void doGet(HttpServletRequest req, HttpServletResponse resp) throws ServletException, IOException { //初始化Spring容器 ApplicationContext applicationContext = new ClassPathXmlApplicationContext("spring-core.xml"); UserService userService = applicationContext.getBean(UserService.class); try { //使用Spring容器中的UserService对象 List<User> userList = userService.selectUserList(); System.out.println("userList = " + userList); } catch (Exception e) { e.printStackTrace(); } } @Override protected void doPost(HttpServletRequest req, HttpServletResponse resp) throws ServletException, IOException { doGet(req, resp); } } -
存在问题
- 发起一次请求UserController,就会创建一次Spring容器。
Spring整合web环境第二版
-
概述
- Spring容器只需要初始化一次,在后续的操作中都能够一直被使用。
-
解决方案
- 服务器启动,项目启动,就初始化Spring容器,使用ServletContextListener监听器;
-
代码实现
public class MyContextLoaderListener implements ServletContextListener { @Override public void contextInitialized(ServletContextEvent sce) { //项目启动,初始化Spring容器 ApplicationContext applicationContext = new ClassPathXmlApplicationContext("spring-core.xml"); sce.getServletContext().setAttribute("applicationContext", applicationContext); } @Override public void contextDestroyed(ServletContextEvent sce) { //项目销毁 } }<listener> <listener-class>com.atguigu.listenter.MyContextLoaderListener</listener-class> </listener>@WebServlet("/selectUserList") public class UserController extends HttpServlet { @Override protected void doGet(HttpServletRequest req, HttpServletResponse resp) throws ServletException, IOException { //初始化Spring容器 //ApplicationContext applicationContext = new ClassPathXmlApplicationContext("spring-core.xml"); ApplicationContext applicationContext = (ApplicationContext) getServletContext().getAttribute("applicationContext"); UserService userService = applicationContext.getBean(UserService.class); try { //使用Spring容器中的UserService对象 List<User> userList = userService.selectUserList(); System.out.println("userList = " + userList); } catch (Exception e) { e.printStackTrace(); } } @Override protected void doPost(HttpServletRequest req, HttpServletResponse resp) throws ServletException, IOException { doGet(req, resp); } } -
存在问题
- 存在"spring-core.xml"、"applicationContext"字符串硬编码问题。
Spring整合Web环境第三版
-
概述
- 将"spring-core.xml"设置web.xml中;
- 将"applicationContext"放入到工具类中
-
代码实现
<web-app>
    <display-name>Archetype Created Web Application</display-name>


    <context-param>
        <param-name>contextConfigLocation</param-name>
        <param-value>classpath:spring-core.xml</param-value>
    </context-param>

    <listener>
        <listener-class>com.atguigu.listenter.MyContextLoaderListener</listener-class>
    </listener>


</web-app>
public class MyContextLoaderListener implements ServletContextListener { @Override public void contextInitialized(ServletContextEvent sce) { //获取contextConfigLocation全局变量的值=spring-core.xml String contextConfigLocation = sce.getServletContext().getInitParameter("contextConfigLocation"); //项目启动,初始化Spring容器 ApplicationContext applicationContext = new ClassPathXmlApplicationContext(contextConfigLocation); sce.getServletContext().setAttribute("applicationContext", applicationContext); } @Override public void contextDestroyed(ServletContextEvent sce) { //项目销毁 } }public class MyApplicationContextUtils { public static ApplicationContext getApplicationContext(ServletContext servletContext){ return (ApplicationContext) servletContext.getAttribute("applicationContext"); } }@WebServlet("/selectUserList") public class UserController extends HttpServlet { @Override protected void doGet(HttpServletRequest req, HttpServletResponse resp) throws ServletException, IOException { //初始化Spring容器 //ApplicationContext applicationContext = new ClassPathXmlApplicationContext("spring-core.xml"); ApplicationContext applicationContext = MyApplicationContextUtils.getApplicationContext(getServletContext()); UserService userService = applicationContext.getBean(UserService.class); try { //使用Spring容器中的UserService对象 List<User> userList = userService.selectUserList(); System.out.println("userList = " + userList); } catch (Exception e) { e.printStackTrace(); } } @Override protected void doPost(HttpServletRequest req, HttpServletResponse resp) throws ServletException, IOException { doGet(req, resp); } } -
存在问题
- 特别麻烦,不要自己写,Spring已经提供给你了!!
Spring整合Web环境终极版
-
概述
- Spring框架提供了ContextLoaderListener、WebApplicationContextUtils
-
开发步骤
- ①引入相关依赖
- ②编写web.xml
- 配置ContextLoaderListener
- ③编写UserController
- 使用WebApplicationContextUtils
-
①引入相关依赖
<dependency> <groupId>org.springframework</groupId> <artifactId>spring-web</artifactId> <version>${spring.version}</version> </dependency> <dependency> <groupId>org.springframework</groupId> <artifactId>spring-webmvc</artifactId> <version>${spring.version}</version> </dependency> -
②编写web.xml
<context-param> <param-name>contextConfigLocation</param-name> <param-value>classpath:spring-core.xml</param-value> </context-param> <listener> <listener-class>org.springframework.web.context.ContextLoaderListener</listener-class> </listener> -
③编写UserController
@WebServlet("/selectUserList") public class UserController extends HttpServlet { @Override protected void doGet(HttpServletRequest req, HttpServletResponse resp) throws ServletException, IOException { ApplicationContext applicationContext = WebApplicationContextUtils.getWebApplicationContext(getServletContext()); UserService userService = applicationContext.getBean(UserService.class); try { //使用Spring容器中的UserService对象 List<User> userList = userService.selectUserList(); System.out.println("userList = " + userList); } catch (Exception e) { e.printStackTrace(); } } @Override protected void doPost(HttpServletRequest req, HttpServletResponse resp) throws ServletException, IOException { doGet(req, resp); } } -
注意事项
t.ContextLoaderListener
-
③编写UserController
@WebServlet("/selectUserList") public class UserController extends HttpServlet { @Override protected void doGet(HttpServletRequest req, HttpServletResponse resp) throws ServletException, IOException { ApplicationContext applicationContext = WebApplicationContextUtils.getWebApplicationContext(getServletContext()); UserService userService = applicationContext.getBean(UserService.class); try { //使用Spring容器中的UserService对象 List<User> userList = userService.selectUserList(); System.out.println("userList = " + userList); } catch (Exception e) { e.printStackTrace(); } } @Override protected void doPost(HttpServletRequest req, HttpServletResponse resp) throws ServletException, IOException { doGet(req, resp); } } -
注意事项
- 在web项目中,引用第三方配置文件时,需要在前面加上"classpath",比如:classpath:SqlMapConfig.xml"、“classpath:jdbc.properties”


 232
232


 被折叠的 条评论
为什么被折叠?
被折叠的 条评论
为什么被折叠?
 到【灌水乐园】发言


