


文章目录
一、MyBatis-Plus简介
1、简介
MyBatis-Plus(简称 MP)是一个 MyBatis的增强工具,在 MyBatis 的基础上只做增强不做改变,为简化开发、提高效率而生。
2、特性
- 无侵入:只做增强不做改变,引入它不会对现有工程产生影响 ,如丝般顺滑
- 损耗小:启动即会自动注入基本 CURD,性能基本无损耗,直接面向对象操作
- 强大的 CRUD 操作:内置通用 Mapper、通用 Service,仅仅通过少量配置即可实现单表大部分 CRUD 操作,更有强大的条件构造器,满足各类使用需求
- 支持 Lambda 形式调用:通过 Lambda 表达式,方便的编写各类查询条件,无需再担心字段写错
- 支持主键自动生成:支持多达 4 种主键策略(内含分布式唯一 ID 生成器 - Sequence),可自由配置,完美解决主键问题
- 支持 ActiveRecord 模式:支持 ActiveRecord 形式调用,实体类只需继承 Model 类即可进行强大的 CRUD 操作
- 支持自定义全局通用操作:支持全局通用方法注入( Write once, use anywhere )
- 内置代码生成器:采用代码或者 Maven 插件可快速生成 Mapper 、 Model 、 Service 、Controller 层代码,支持模板引擎,更有超多自定义配置
- 内置分页插件:基于 MyBatis 物理分页,开发者无需关心具体操作,配置好插件之后,写分页等同于普通 List 查询
- 分页插件支持多种数据库:支持 MySQL、MariaDB、Oracle、DB2、H2、HSQL、SQLite、 Postgre、SQLServer 等多种数据库
- 内置性能分析插件:可输出 SQL 语句以及其执行时间,建议开发测试时启用该功能,能快速揪出 慢查询
- 内置全局拦截插件:提供全表 delete 、 update 操作智能分析阻断,也可自定义拦截规则,预防 误操作
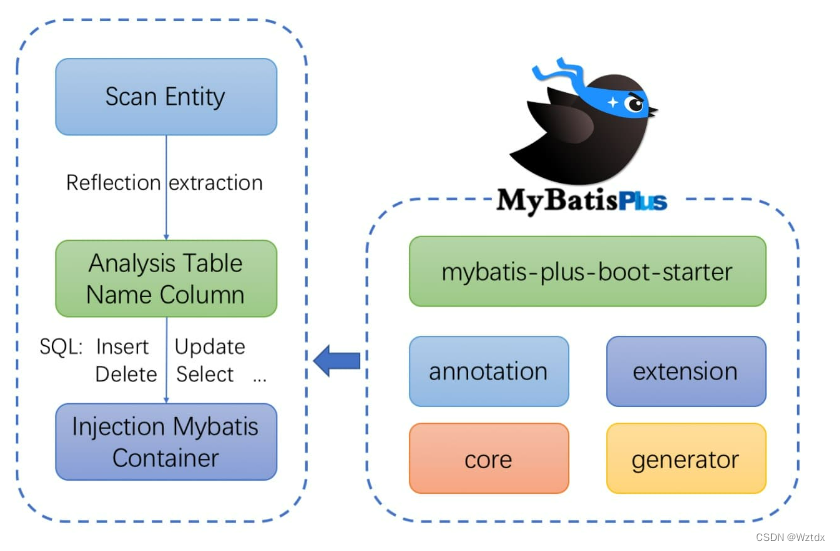
3、框架结构
二、实现
1、开发环境
IDE:idea 2021.3
JDK:JDK8+
构建工具:maven 3.5.4
MySQL版本:MySQL 5.7
Spring Boot:2.6.3
MyBatis-Plus:3.5.1
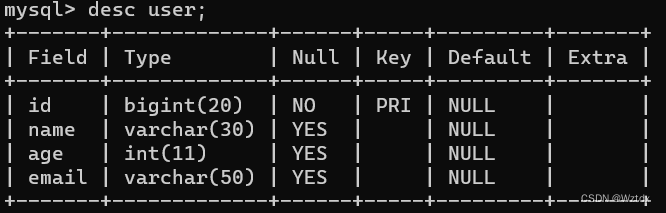
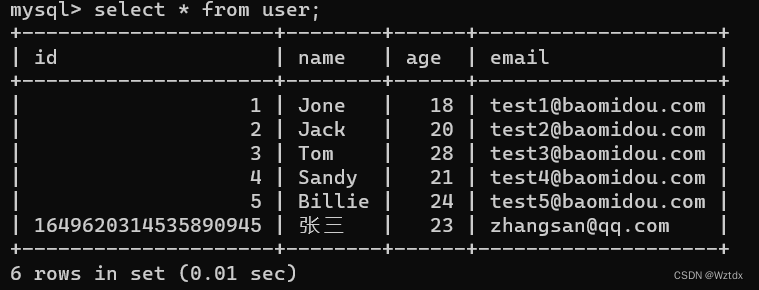
2、创建数据库及表
- 创建表
CREATE DATABASE `mybatis_plus` /*!40100 DEFAULT CHARACTER SET utf8mb4 */;
use `mybatis_plus`;
CREATE TABLE `user` (
`id` bigint(20) NOT NULL COMMENT '主键ID',
`name` varchar(30) DEFAULT NULL COMMENT '姓名',
`age` int(11) DEFAULT NULL COMMENT '年龄',
`email` varchar(50) DEFAULT NULL COMMENT '邮箱',
PRIMARY KEY (`id`)
) ENGINE=InnoDB DEFAULT CHARSET=utf8;
- 添加数据
DELETE FROM user;

INSERT INTO user (id, name, age, email) VALUES
(1, 'Jone', 18, 'test1@baomidou.com'),
(2, 'Jack', 20, 'test2@baomidou.com'),
(3, 'Tom', 28, 'test3@baomidou.com'),
(4, 'Sandy', 21, 'test4@baomidou.com'),
(5, 'Billie', 24, 'test5@baomidou.com');
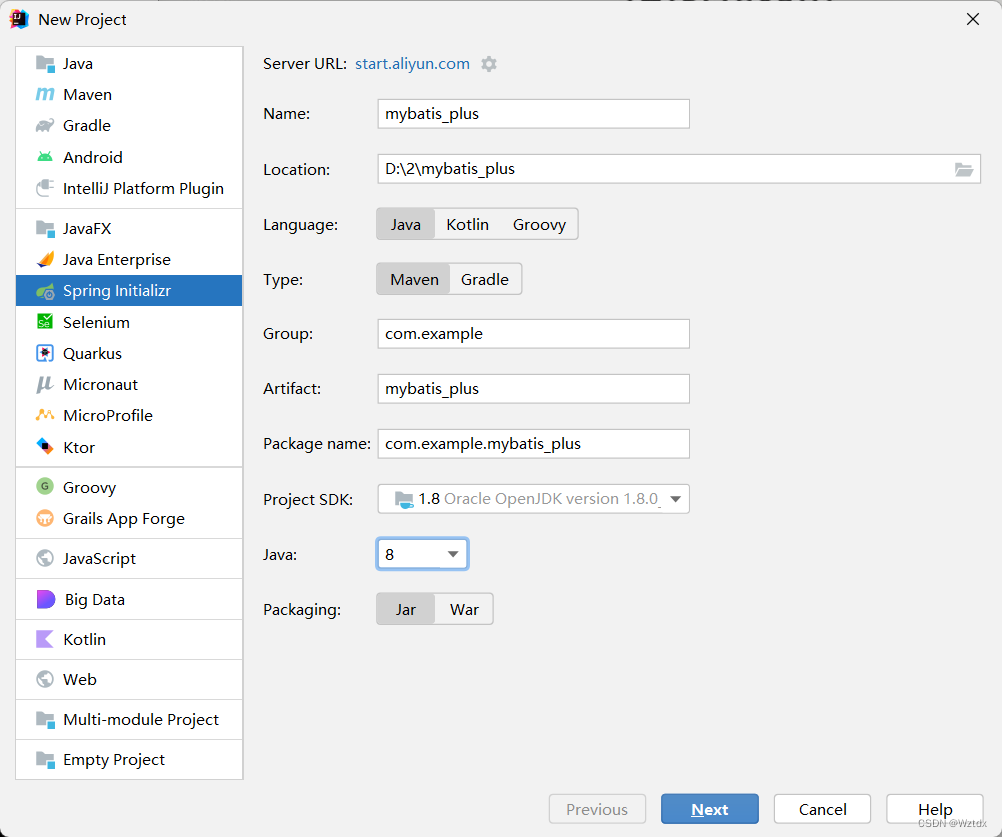
3、创建Spring Boot工程
- 初始化工程
使用 Spring Initializr 快速初始化一个 Spring Boot 工程
- 引入依赖
    <dependencies>
        <dependency>
            <groupId>org.springframework.boot</groupId>
            <artifactId>spring-boot-starter</artifactId>
        </dependency>

        <dependency>
            <groupId>org.springframework.boot</groupId>
            <artifactId>spring-boot-starter-test</artifactId>
            <scope>test</scope>
        </dependency>
<!--        mybatis_plus启动器-->
        <dependency>
           <groupId>com.baomidou</groupId>
            <artifactId>mybatis-plus-boot-starter</artifactId>
            <version>3.5.1</version>
            </dependency>
<!--        lombok用于简化实体类开发-->
        <dependency>
        <groupId>org.projectlombok</groupId>
        <artifactId>lombok</artifactId>
        <optional>true</optional>
        </dependency>
<!--        mysql驱动-->
        <dependency>
        <groupId>mysql</groupId>
        <artifactId>mysql-connector-java</artifactId>
        <scope>runtime</scope>
        </dependency>
    </dependencies>
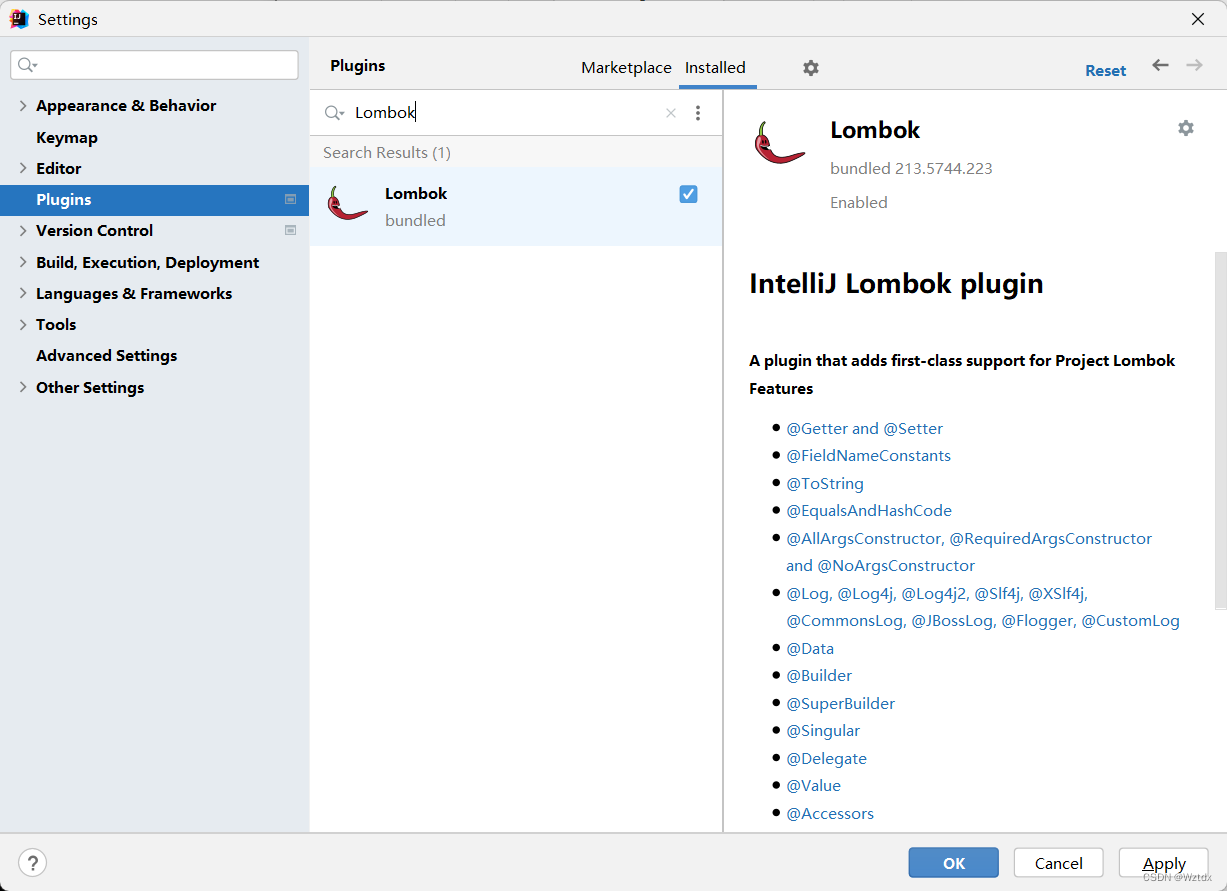
- idea中安装lombok插件
- 添加配置
application.yml
spring:
  # 配置数据源信息
  datasource:
    # 配置数据源类型
    type: com.zaxxer.hikari.HikariDataSource
    # 配置连接数据库信息
    driver-class-name: com.mysql.cj.jdbc.Driver
    url: jdbc:mysql://localhost:3306/mybatis_plus?characterEncoding=utf-8&useSSL=false
    username: root
    password: 123456
或者application.properties
#配置数据源类型
spring.datasource.type=com.zaxxer.hikari.HikariDataSource
#配置连接数据库信息
spring.datasource.driver-class-name=com.mysql.cj.jdbc.Driver
spring.datasource.url=jdbc:mysql://localhost:3306/mybatis_plus?characterEncoding=utf-8&useSSL=false
spring.datasource.username=root
spring.datasource.password=123456
注意:
1、驱动类driver-class-name
spring boot 2.0(内置jdbc5驱动),驱动类使用:
driver-class-name: com.mysql.jdbc.Driver
spring boot 2.1及以上(内置jdbc8驱动),驱动类使用:
driver-class-name: com.mysql.cj.jdbc.Driver
否则运行测试用例的时候会有 WARN 信息
2、连接地址url
MySQL5.7版本的url:
jdbc:mysql://localhost:3306/mybatis_plus?characterEncoding=utf-8&useSSL=false
MySQL8.0版本的url:
jdbc:mysql://localhost:3306/mybatis_plus?
serverTimezone=GMT%2B8&characterEncoding=utf-8&useSSL=false
否则运行测试用例报告如下错误:
java.sql.SQLException: The server time zone value ‘Öйú±ê׼ʱ¼ä’ is unrecognized or
represents more
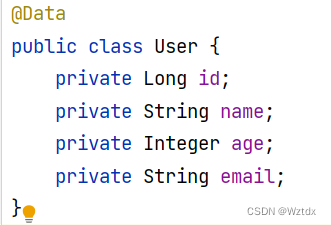
4、创建实体类
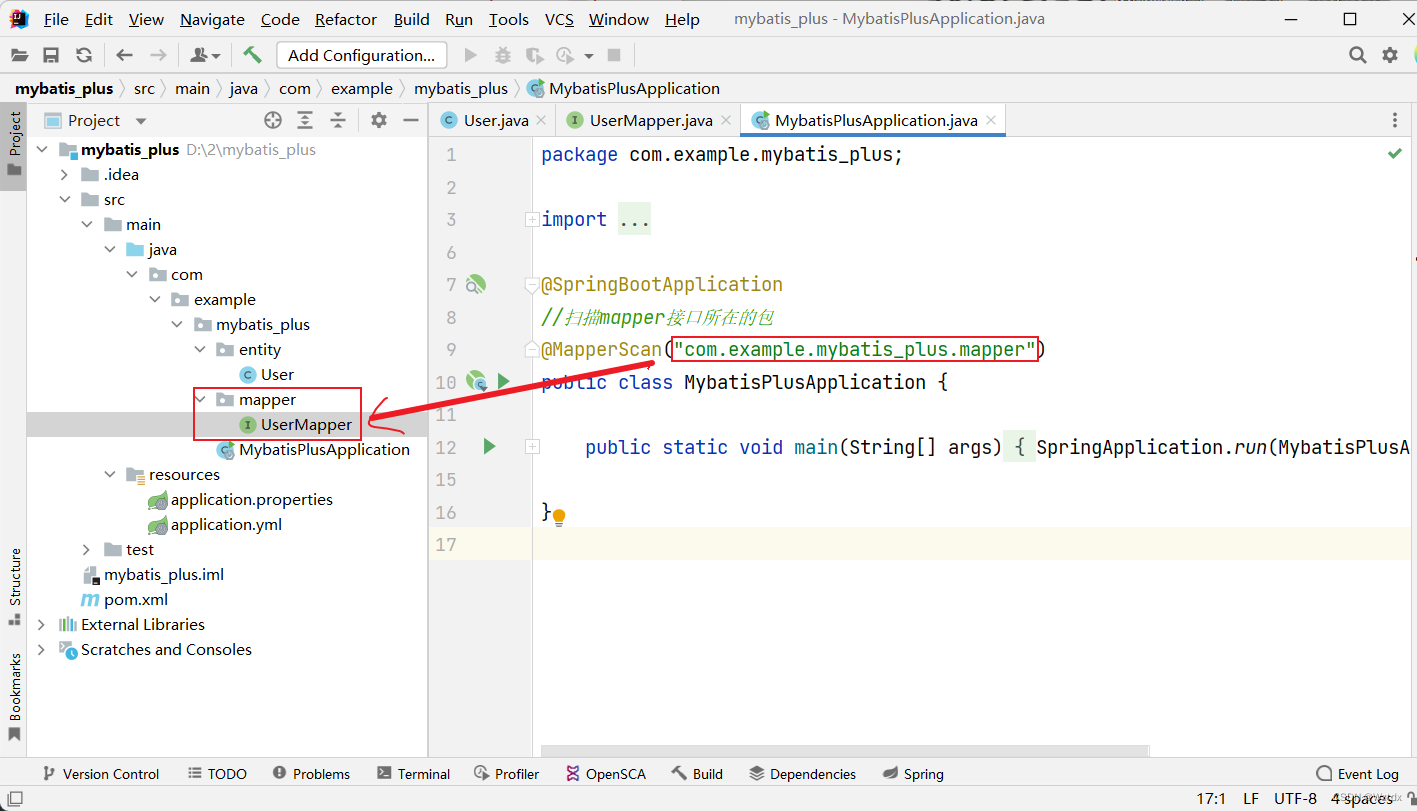
5、添加mapper
BaseMapper是MyBatis-Plus提供的模板mapper,其中包含了基本的CRUD方法,泛型为操作的实体类型
//接口继承接口
@Repository
public interface UserMapper extends BaseMapper<User> {

}

6、启动类
在Spring Boot启动类中添加 @MapperScan 注解,扫描mapper包
@SpringBootApplication
@MapperScan("com.example.mybatis_plus.mapper")
public class MybatisplusApplication {
   public static void main(String[] args) {
       SpringApplication.run(MybatisplusApplication.class, args);
 }
}
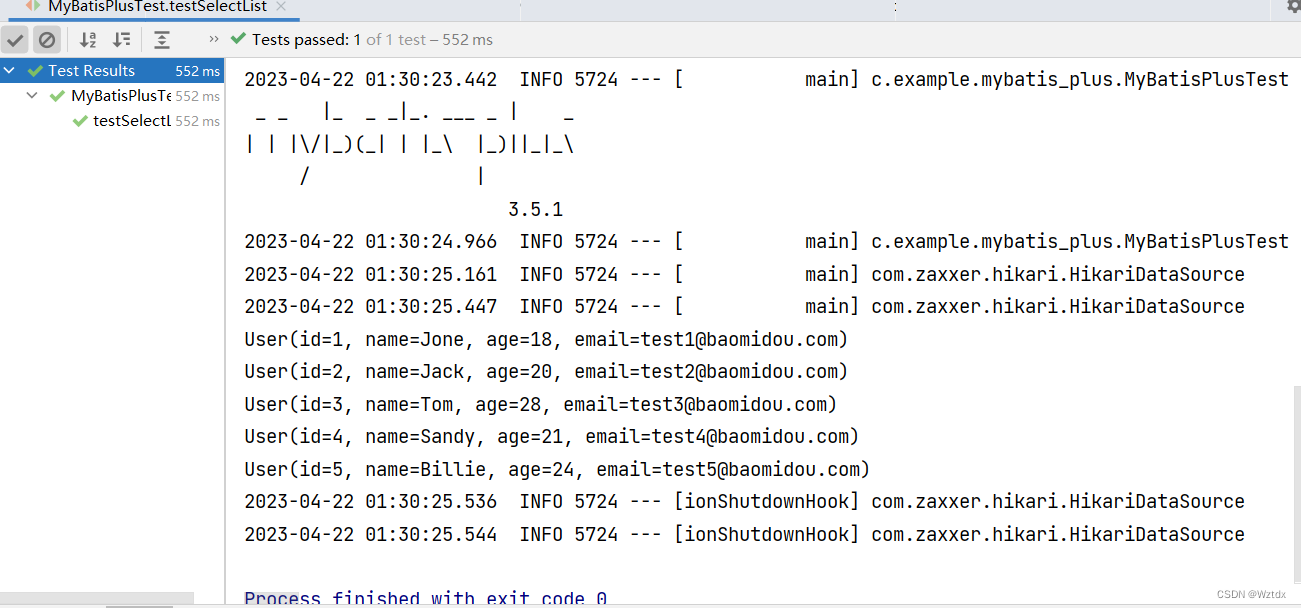
7、测试
@SpringBootTest
public class MyBatisPlusTest {
@Autowired
private UserMapper userMapper;
@Test
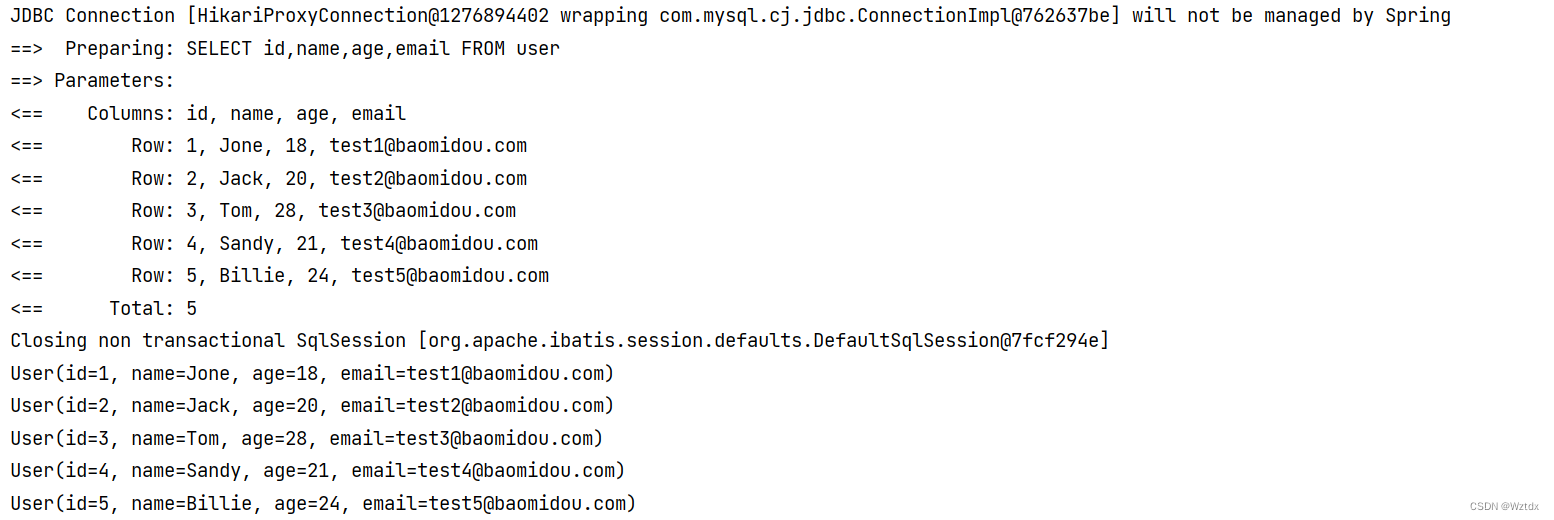
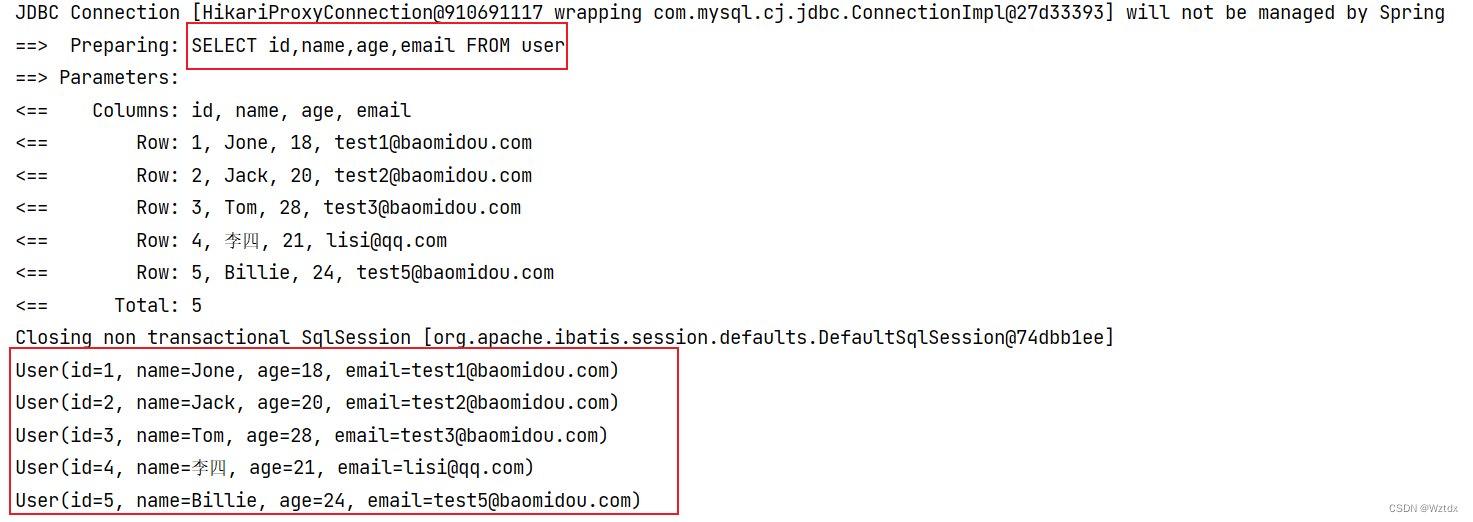
public void testSelectList(){
//通过条件构造器查询员工list集合,若没有条件,则可以设置null为参数
List<User> users = userMapper.selectList(null);
users.forEach(System.out::println);
}
}
结果:
forEach(System.out::println)用法
//创建list
List list = Arrays.asList(“123”,“456”);
//输出list里面的每个内容
list.forEach(System.out::println);
运行结果:
123
456
其中,list.forEach(System.out::println);方法相当于以下代码的功能
for(int i = 0; i < list.size(); i++) { System.out.println(list.get(i)); }
这里是java8 的新特性的应用
forEach提供的参数和System.out.println的参数类型是一致的,可以进行这种简写。
具体来说就是:
Lamda表达式为:.forEach(element -> {System.out.println(element)})
但是System.out.println的参数和传递的参数element 的类型完全匹配,所以这样的时候就可以简化为:forEach(System.out::println)
8、添加MyBatis日志
# 配置MyBatis日志
mybatis-plus:
  configuration:
    log-impl: org.apache.ibatis.logging.stdout.StdOutImpl
三、基本CRUD
1、BaseMapper
MyBatis-Plus中的基本CRUD在内置的BaseMapper中都已得到了实现,我们可以直接使用。
2、插入
@Test
public void testInsert(){
User user =new User();
user.setName("张三");
user.setAge(23);
user.setEmail("zhangsan@qq.com");
int result=userMapper.insert(user);
System.out.println("result:"+result);
//获取主键
System.out.println("id:"
+user.getId());
}

最终执行的结果,所获取的id为1649620314535890945
这是因为MyBatis-Plus在实现插入数据时,会默认基于雪花算法的策略生成id
3、删除
a>通过id删除记录
 @Test
    public void testDelete(){
        //这里id为Long类型
        int result=userMapper.deleteById(1649620314535890945L);
        System.out.println("result:"+result);
    }

b>通过map条件删除记录
根据map集合中所设置的条件进行删除。
key得是表中字段名,不是类中的属性名
@Test
    public void testDelete2(){
        Map<String,Object> map=new HashMap<>();
        map.put("name","张三");
        map.put("age","23");
        int result=userMapper.deleteByMap(map);
        System.out.println("result:"+result);
    }

c>通过id批量删除记录
@Test
    public void testDeleteBatchIds(){
        List<Long> list = Arrays.asList(1L, 2L, 3L);
        int result= userMapper.deleteBatchIds(list);
        System.out.println("result:"+result);
    }

4、修改
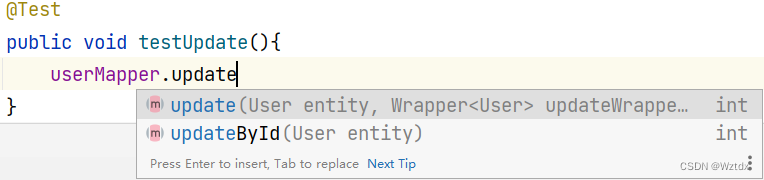
 @Test
    public void testUpdate(){
        User user=new User();
        user.setId(4L);
        user.setName("李四");
        user.setEmail("lisi@qq.com");

        int result=userMapper.updateById(user);
        System.out.println("result:"+result);

    }

5、查询
a>根据id查询用户信息
@Test
    public void testSelect(){
        User user=userMapper.selectById(4L);
        System.out.println(user);
    }

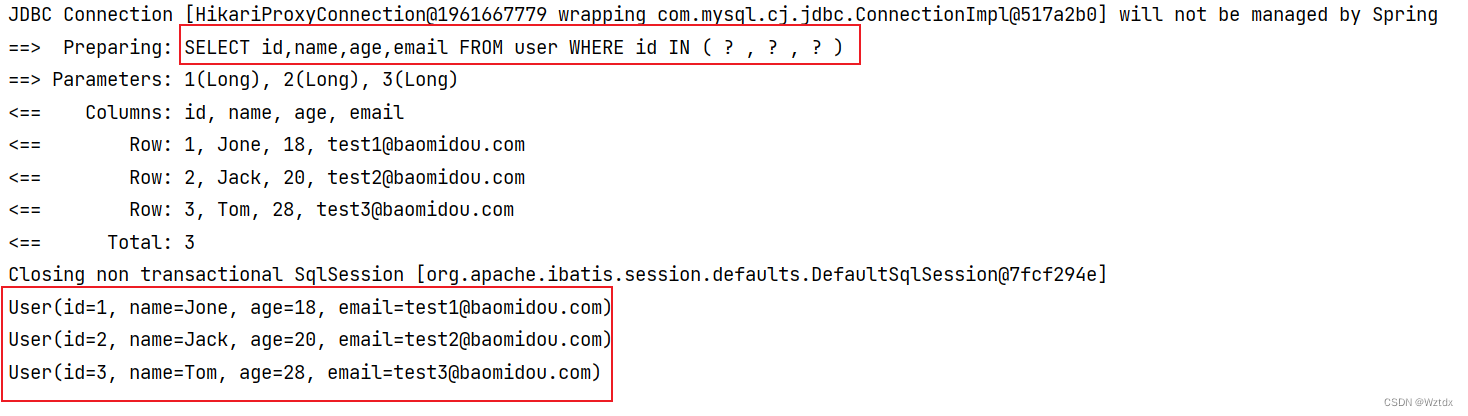
b>根据多个id查询多个用户信息
  @Test
    public void testSelectBatchIds(){
        List<Long> list = Arrays.asList(1L, 2L, 3L);
        List<User> users = userMapper.selectBatchIds(list);
        users.forEach(System.out::println);

    }
c>通过map条件查询用户信息
@Test
    public void testSelectByMap(){
        Map<String,Object> map=new HashMap<>();
        map.put("name","Jack");
        map.put("age","20");
        List<User> users = userMapper.selectByMap(map);
        users.forEach(System.out::println);
    }

d>查询所有数据
  @Test
    public void testSelectList(){
        //通过条件构造器查询员工list集合,若没有条件,则可以设置null为参数
        List<User> users = userMapper.selectList(null);
        users.forEach(System.out::println);

    }
通过观察BaseMapper中的方法,大多方法中都有Wrapper类型的形参,此为条件构造器,可针对于SQL语句设置不同的条件,若没有条件,则可以为该形参赋值null,即查询(删除/修改)所有数据
6、自定义功能
创建mapper包(默认)
如果需要创建别的名称,需要在appliaction.properties或者application,yml中进行配置
UserMapper接口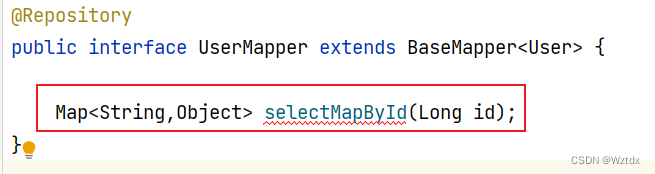
UserMapper.xml
<?xml version="1.0" encoding="UTF-8" ?>
<!DOCTYPE mapper
        PUBLIC "-//mybatis.org//DTD Mapper 3.0//EN"
        "http://mybatis.org/dtd/mybatis-3-mapper.dtd">

<mapper namespace="com.example.mybatis_plus.mapper.UserMapper">
        <select id="selectMapById" resultType="map">
            select id,name,age,email from user where id=#{id}
        </select>

</mapper>
这里的namespace是需要映射的实体类全路径
测试
  @Test
    public void test(){
        Map<String, Object> map = userMapper.selectMapById(1L);
        System.out.println(map);
    }
结果

和mybatis中的写法一样


 1240
1240


 被折叠的 条评论
为什么被折叠?
被折叠的 条评论
为什么被折叠?
 到【灌水乐园】发言


