


ActivityManagerService
在介绍ActivityManagerService之前,我们先简单了解一下Android Zygote系统启动过程。
在Android系统中,所有的应用程序进程和系统服务进程SystemServer都是由Zygote进程孕育(fork)出来的,因为Android系统是基于Linux内核的,而在Linux系统中,有一个init进程,他是内核启动的第一个用户级进程,也是最基本的程序之一,所有的进程都是init进程的子孙进程,也就是说,所有的进程都是直接或者间接地由init进程fork出来的。Zygote进程也不例外,它是在系统启动的过程中,由init进程创建的,在系统启动脚本system/core/rootdir/init.rc文件中,就可以看到启动Zygote进程的脚本命令。
在这个过程中会调用ZygoteInit.java的main函数,这个main函数里面会创建一个新进程来启动SystemServer组件,SystemServer的 main 函数会被执行。打开Android Studio,找到SystemServer这个类的main方法:
    /**
     * The main entry point from zygote.Zygote的主要入口
     */
    public static void main(String[] args) {
        new SystemServer().run();
    }
    private void run() {

            //设置一些系统属性
            if (!SystemProperties.get("persist.sys.language").isEmpty()) {
                final String languageTag = Locale.getDefault().toLanguageTag();

                SystemProperties.set("persist.sys.locale", languageTag);
                SystemProperties.set("persist.sys.language", "");
                SystemProperties.set("persist.sys.country", "");
                SystemProperties.set("persist.sys.localevar", "");
            }

            // Here we go!
            Slog.i(TAG, "Entered the Android system server!");
            int uptimeMillis = (int) SystemClock.elapsedRealtime();
            EventLog.writeEvent(EventLogTags.BOOT_PROGRESS_SYSTEM_RUN, uptimeMillis);

            // Prepare the main looper thread (this thread).
            android.os.Process.setThreadPriority(
                android.os.Process.THREAD_PRIORITY_FOREGROUND);
            android.os.Process.setCanSelfBackground(false);
            Looper.prepareMainLooper();    //准备MainLooper
            Looper.getMainLooper().setSlowLogThresholdMs(
                    SLOW_DISPATCH_THRESHOLD_MS, SLOW_DELIVERY_THRESHOLD_MS);

            // Initialize the system context.
            createSystemContext();

            // Create the system service manager.
            mSystemServiceManager = new SystemServiceManager(mSystemContext);
            mSystemServiceManager.setStartInfo(mRuntimeRestart,
                    mRuntimeStartElapsedTime, mRuntimeStartUptime);
            LocalServices.addService(SystemServiceManager.class, mSystemServiceManager);
            // Prepare the thread pool for init tasks that can be parallelized
            SystemServerInitThreadPool.get();
        } finally {
            traceEnd();  // InitBeforeStartServices
        }

        // Start services.
        try {
            traceBeginAndSlog("StartServices");
            startBootstrapServices();
            startCoreServices();
            startOtherServices();
            SystemServerInitThreadPool.shutdown();
        }

        // Loop forever.
        Looper.loop();
        throw new RuntimeException("Main thread loop unexpectedly exited");
    }
SystemServer的run方法中主要做了5件事:
1、初始化一些系统属性;
2、准备MainLooper;
3、初始化system context对象;
4、创建system server manager;
5、调用startBootstrapServices(),startCoreServices(),startOtherServices()启动各种service,包括ActivityManagerService,PowerManagerService,DisplayManagerService,PackageManagerService,WindowManagerService...等。
其中ActivityManagerService(AMS)是Android中最核心的服务,主要负责系统中四大组件的启动、切换、调度及应用程序的管理和调度等工作。
AMS通信结构如下图所示:
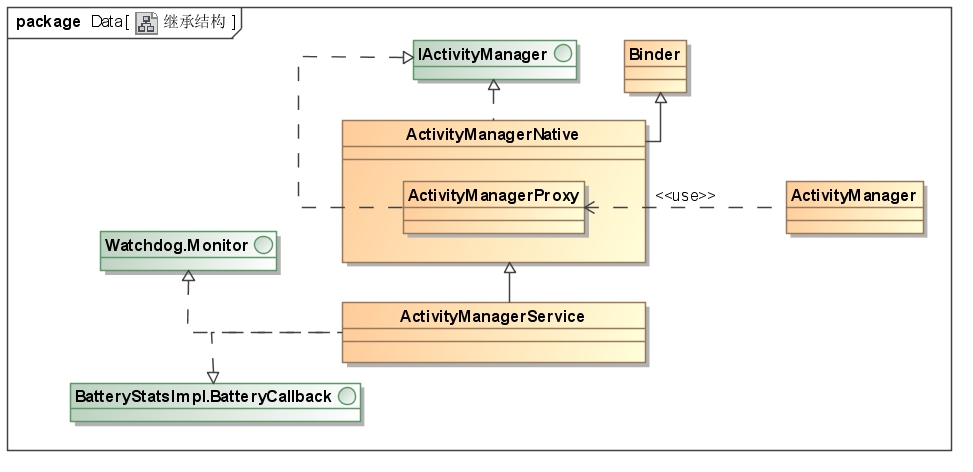
1、AMS继承自ActivityManagerNative(AMN),并实现了Watchdog.Monitor和BatteryStatsImpl.BatteryCallback接口。
2、AMN继承Java的Binder类,同时实现了IActivityManager接口,即AMN将作为Binder通信的服务端为用户提供支持。
3、在ActivityManagerNative类中定义了内部类ActivityManagerProxy,该类同样实现了IActivityManager接口,将作为客户端使用的服务端代理。
4、其它进程将使用ActivityManager来使用AMS的服务。ActivityManager通过AMN提供的getDefault接口得到ActivityManagerProxy,然后再以Binder通信的方式调用AMS的接口。
接下来简单分析一下AMS的启动过程:
1、在SystemServer开启ActivityServiceManager之后,SystemServer进程就创建出自己的Android运行环境。
在这一部分,SystemServer进程主要创建出对应的 ActivityThread 和 ContextImpl ,它们是Android运行环境的重要部分。
AMS的后续工作依赖于SystemServer在此创建出的运行环境。
2、完成AMS的初始化和启动。
在这一部分,单纯地调用AMS的构造函数和start函数,完成AMS的一些初始化工作。
3、将SystemServer进程纳入到AMS的管理体系中。
AMS作为Java世界的进程管理和调度中心,要对所有Java进程一视同仁,SystemServer可以看做一个特殊的应用进程,因此SystemServer进程也必须被AMS管理。
4、开始执行 AMS 启动完毕后才能进行的工作。
系统中的一些服务和进程,必须等待AMS完成启动后,才能展开后续工作。
在这一部分,AMS通过调用 systemReady 函数,通知系统中的其它服务和进程,可以进行对应工作了。
在这个过程中,值得我们关注的是:Home Activity被启动了。当该Activity被加载完成后,最终会触发ACTION_BOOT_COMPLETED广播。
AMS的启动流程大致就是这样,不止SystemServer需要被AMS管理,我们的应用进程也需要被AMS管理。
好了,我们知道了AMS的大致启动流程,开始看我们的应用进程的绘制流程的入口。
在介绍绘制流程前,先看几个类:
ActivityThread:首先我们要知道ActivityThread是Android Framework中一个非常重要的类,它代表一个应用进程的主线程,其职责就是调度及执行在该线程中运行的四大组件。SystemServer中也运行着一些系统APK,例如framework-res.apk、SettingsProvider.apk等,因此也可以认为SystemServer是一个特殊的应用进程。
ApplicationThread:ApplicationThread是ActivityThread的内部类,ActivityThread的成员变量中也包含ApplicationThread对象,它作为AMS与应用进程Binder通信的服务端。AMS通过ApplicationThreadNative获取应用进程对应的ApplicationThreadProxy对象。通过ApplicationThreadProxy对象,将调用信息通过Binder传递到ActivityThread中的ApplicationThread。
Let's start!
ActivityThread的main函数是应用程序的入口,main方法中做了一些初始化工作:
1、初始化looper 2、初始化ActivityThread 3、ApplicationThread和AMS建立联系 4、开启Looper循环
我们已经知道,ApplicationThread 是接收 AMS 的消息然后通知应用程序执行组件相关操作的,那么我们看一下ApplicationThread 类:
private class ApplicationThread extends IApplicationThread.Stub {

    //通知相应的进程执行启动Activity的操作
    public final void scheduleLaunchActivity(Intent intent, IBinder token, int ident,
            ActivityInfo info, Configuration curConfig, Configuration overrideConfig,
            CompatibilityInfo compatInfo, String referrer, IVoiceInteractor voiceInteractor,
            int procState, Bundle state, PersistableBundle persistentState,
            List<ResultInfo> pendingResults, List<ReferrerIntent> pendingNewIntents,
            boolean notResumed, boolean isForward, ProfilerInfo profilerInfo) {

        sendMessage(H.LAUNCH_ACTIVITY, r);
    }
    public final void scheduleResumeActivity(IBinder token, int processState,
            boolean isForward, Bundle resumeArgs) {

        sendMessage(H.RESUME_ACTIVITY, token, isForward ? 1 : 0, 0, seq);
    }
    //.....

}
当Activity启动时会先调用到 scheduleLaunchActivity() 方法,由 Handler 发送通知消息后执行 handleLaunchActivity()->performLaunchActivity()->callActivityOnCreate()->Activity.onCreate()。
private class H extends Handler {
    public void handleMessage(Message msg) {
        switch (msg.what) {
            case LAUNCH_ACTIVITY: {
                Trace.traceBegin(Trace.TRACE_TAG_ACTIVITY_MANAGER, "activityStart");
                final ActivityClientRecord r = (ActivityClientRecord) msg.obj;

                r.packageInfo = getPackageInfoNoCheck(
                        r.activityInfo.applicationInfo, r.compatInfo);
                //该方法中会执行Activity的onCreate()方法。
                handleLaunchActivity(r, null, "LAUNCH_ACTIVITY");
                Trace.traceEnd(Trace.TRACE_TAG_ACTIVITY_MANAGER);
            } break;
            //onResume();
             case RESUME_ACTIVITY:
                Trace.traceBegin(Trace.TRACE_TAG_ACTIVITY_MANAGER, "activityResume");
                SomeArgs args = (SomeArgs) msg.obj;
                handleResumeActivity((IBinder) args.arg1, true, args.argi1 != 0, true,
                        args.argi3, "RESUME_ACTIVITY");
                Trace.traceEnd(Trace.TRACE_TAG_ACTIVITY_MANAGER);
                break;
        }
    }
}

final void handleResumeActivity(IBinder token,
            boolean clearHide, boolean isForward, boolean reallyResume, int seq, String reason) {
        ActivityClientRecord r = mActivities.get(token);

    //.............

    //执行onResume()方法
    r = performResumeActivity(token, clearHide, reason);

     if (r != null) {
        final Activity a = r.activity;
         if (r.window == null && !a.mFinished && willBeVisible) {
                r.window = r.activity.getWindow();
                View decor = r.window.getDecorView();
                decor.setVisibility(View.INVISIBLE);
                ViewManager wm = a.getWindowManager();
                //获取window的layoutparams,之后赋予decorview
                WindowManager.LayoutParams l = r.window.getAttributes();
                a.mDecor = decor;

            if (a.mVisibleFromClient) {
                if (!a.mWindowAdded) {
                    a.mWindowAdded = true;
                    //将DecorView添加到Window上,参数是decorview和layoutparams
                    wm.addView(decor, l);
            }
        }
    //说法二:执行makeVisible()来添加View,但也是添加到Window里和上面一样的操作。清楚的小伙伴可以告诉我下。
    if (r.activity.mVisibleFromClient) {
            r.activity.makeVisible();
        }
    }
}
在 handleResumeActivity() 方法中,先调用了 Activity.onResume() 方法,在执行 WindowManager 的 addView() 方法将Activity的顶级View(即DecorView) 添加到Activity中,然后才开始绘制流程。这就解释了为什么初次在 onResume() 方法中获取不到 View 的宽高。
WindowManager 的实现类为 WindowManagerImpl ,它的 addView 方法又会调用 WindowManagerGlobal 的 addView 方法:
 public void addView(View view, ViewGroup.LayoutParams params,
            Display display, Window parentWindow) {
    ······
    //转化为WindowManager.LayoutParams
    final WindowManager.LayoutParams wparams = (WindowManager.LayoutParams) params;
    //创建ViewRootImpl对象
    root = new ViewRootImpl(view.getContext(), display);
    //为decorView设置LayoutParams
    view.setLayoutParams(wparams);

    mViews.add(view);
    mRoots.add(root);
    mParams.add(wparams);
    //即将开始流程绘制
    //将root和DecorView绑定起来,绘制流程也将由root来执行
    root.setView(view, wparams, panelParentView);
    ·······
}
ViewRootImpl:ViewRoot 的实现类,它是连接 WindowManager 和 DecorView 的纽带,其成员对象 mView 就是 activity 的decorView,View 的三大流程均是通过 ViewRoot 来完成的。
DecorView:它是 Activity 窗口的根视图(顶级View),是个 FrameLayout ,一般情况下它内部会包含一个竖直方向的LinearLayout ,这个 LinearLayout 分为上下两部分,即标题栏和内容栏(FrameLayout),我们的 setContentView 所设置的布局就是被加到内容栏之中,而内容的 id 是 content,所以叫 setContentView。
这里创建 ViewRootImpl 对象,并调用 setView() 方法设置 decorView。
root 的 setView 方法绘执行 requestLayout 方法,requestLayout 会异步执行 performTraversals 方法:
private void performTraversals() {

    //计算DecorView的MeasureSpec
    //这里的lp就是在addView添加decorView的时候传入的decorView的LayoutParams
    //mWidth是窗口的宽度,mHeight是窗口的高度
    int childWidthMeasureSpec = getRootMeasureSpec(mWidth, lp.width);
    int childHeightMeasureSpec = getRootMeasureSpec(mHeight, lp.height);

    performMeasure(childWidthMeasureSpec, childHeightMeasureSpec);

    performLayout(lp, mWidth, mHeight);

    performDraw();
}
在这里我们看到了View绘制的三大流程,依次是 performMeasure->performLayout->performDraw,在接下来分析这个过程是怎么回事。
measure
performMeasure 中会调用 measure 方法,measure 方法中又会调用 onMeasure 方法,onMeasure 方法中则会对所有的子元素进行 measure 过程,这时候 measure 就从父容器传递到子元素中了。
首先我们了解一下 MeasureSpec:MeasureSpec 是由父 View 的 MeaureSpec 和子View的 LayoutParams 通过简单的计算得出的一个针对 子View 的测量要求,是由 父View 的 MeaureSpec 和 子View 的 LayoutParams 共同决定的。它是一个32位的 int 类型,高二位代表 SpecMode,低30位代表 SpecSize。SpecMode代表测量模式,SpecSize代表测量的大小。它通过将SpecMode 和 SpecSize 打包成一个 int 值来避免过多的对象内存分配。
SpecMode有三种:
UNSPECIFIED:父容器不对View有限制,即可以超出父容器给的大小,要多大给多大,这种情况我们很少用到,一般用于系统内部,表示一种测量状态。
EXACTLY:父容器已经检测出View所需要的精确大小,这个时候View的最终大小就是SpecSize所指定的值。它对应于LayoutParams中的match_parent和具体的数值这两种模式。
AT_MOST:父容器指定了一个可用大小即 SpecSize,View的大小不能超过这个值,具体是多大要看不同View的具体实现。它对应于 LayoutParams 中的 wrap_content。
那么问题来了,MeasureSpec是用来干什么的呢?它由什么决定呢?(〃>皿<)
首先,MeasureSpec参与了View的measure过程,它决定了一个View的尺寸规格。对于普通View,其MeasureSpec是由其父容器的MeasureSpec和自身的LayoutParams来共同决定。对于DecorView,由于它是Activity的顶级View,所以它的MeasureSpec由窗口的尺寸和自身的LayoutParams来共同确定。
(View的LayoutParams其实就是我们在xml中设置的layout_width,layout_height转化而来的,还有其他比如padding,margin)
那计算过程是怎么样的呢?(〃>皿<)
其实计算的过程和我们平常在xml布局的时候用的思维是一样的,或者说我们布局时候的思维就是由它促成的。打个比方:
比如我们xml中的根布局是个垂直的LinearLayout,我们设置它的宽度是400,然后我们在LinearLayout中加一个子元素A,它的宽度是MATCH_PARENT,那么按照我们平常写xml布局时的思维,子元素A的宽度是多少?^_^
很多人想都不用想,反手就是一个400!没错,就是400。因为父元素的宽度固定是400,子元素的宽度又是MATCH_PARENT(填充满父容器),所以也是400嘛。这是我们平常写xml时的常用的思维,其实源码里面的计算也差不多是这个思维。
我们再从源码的角度分析这个情况,LinearLayout的MeasureSpec由它的父容器DecorView和自身共同确定,这里假设LinearLayout的MeasuresPec是模式为EXACTLY,大小为400,子元素A的LayoutParams中宽度是MATCH_PARENT,根据这两个条件计算出子元素A的LayoutParams是模式为EXACTLY,大小为400。
这里先大概理解一下,后面其他情况看的时候就容易理解一些。
1)DecorView的MeasureSpec产生过程
measure流程开始执行之前,会先计算出DecorView(即顶级View)的 MeasureSpec,前面说过 DecorView 的 MeasureSpec由窗口的尺寸和自身的 LayoutParams 来共同确定。performTraversals 方法调用了 measureHierarchy,
private void performTraversals() {
    ...
    //可以从属性名称看出screenWidthDp就是屏幕的宽度
    //screenWidthDp就是屏幕的高度
    desiredWindowWidth = dipToPx(config.screenWidthDp);
    desiredWindowHeight = dipToPx(config.screenHeightDp);

    windowSizeMayChange |= measureHierarchy(host, lp, res,
                    desiredWindowWidth, desiredWindowHeight);
}
measureHierarchy方法的参数 desiredWindowWidth 和 desiredWindowHeight 就是屏幕的宽和高,lp 就是decorView 的 LayoutPrams 。在这个方法中对 decorView 的 MeasureSpec 进行了计算 ,有如下代码:
    private boolean measureHierarchy(final View host, final WindowManager.LayoutParams lp,
            final Resources res, final int desiredWindowWidth, final int desiredWindowHeight) {
    //计算DecorView的MeasureSpec
    //这里的lp就是在addView添加decorView的时候传入的decorView的LayoutParams
    //mWidth是屏幕的宽度,mHeight是屏幕的高度
    childWidthMeasureSpec = getRootMeasureSpec(desiredWindowWidth, lp.width);
    childHeightMeasureSpec = getRootMeasureSpec(desiredWindowHeight, lp.height);
    performMeasure(childWidthMeasureSpec, childHeightMeasureSpec);
    }
    private void performMeasure(int childWidthMeasureSpec, int childHeightMeasureSpec) {
        if (mView == null) {
            return;
        }
        Trace.traceBegin(Trace.TRACE_TAG_VIEW, "measure");
        try {
            //调用decorView的measure方法,开始整个View树的测量
            mView.measure(childWidthMeasureSpec, childHeightMeasureSpec);
        } finally {
            Trace.traceEnd(Trace.TRACE_TAG_VIEW);
        }
    }
注释写的很清楚,decorView 的 MeasureSpec 由屏幕的宽高和自身的LayoutParams共同确定。再看一下 getRootMeasureSpec方法的实现,此处的 mWidth 和 mHeight 为屏幕宽度,LayoutParams 都是 match_parent:
    private static int getRootMeasureSpec(int windowSize, int rootDimension) {
        int measureSpec;
        switch (rootDimension) {

        case ViewGroup.LayoutParams.MATCH_PARENT:
            // Window can't resize. Force root view to be windowSize.
            measureSpec = MeasureSpec.makeMeasureSpec(windowSize, MeasureSpec.EXACTLY);
            break;
        case ViewGroup.LayoutParams.WRAP_CONTENT:
            // Window can resize. Set max size for root view.
            measureSpec = MeasureSpec.makeMeasureSpec(windowSize, MeasureSpec.AT_MOST);
            break;
        default:
            // Window wants to be an exact size. Force root view to be that size.
            measureSpec = MeasureSpec.makeMeasureSpec(rootDimension, MeasureSpec.EXACTLY);
            break;
        }
        return measureSpec;
    }
通过上述代码,DecorView 的 MeasureSpec 的产生过程就和明确了,这里以宽度为例:
1.如果DecorView的LayoutParams宽度是MATCH_PARENT,那就代表宽度充满窗口,窗口宽度又是一个固定的值,所以是精确模式EXACTLY,尺寸是窗口大小。
2.如果DecorView的LayoutParams宽度是WRAP_CONTENT,代表content(即包含的内容) 多大,宽度就多大,但是content 只有在调用了decorView的measure()方法的时候,才能测出content 的大小,现在内容还不确定,所以decorView宽度也无法确定,所以模式不可能是确定模式EXACTLY,那只能是最大模式AT_MOST,尺寸暂定为窗口的大小,表示decorView的大小还不确定,但是decorView不能超过这个值。
3.如果DecorView的LayoutParams宽度是一个固定值,比如100dp,既然已经确定,那就是精确模式EXACTLY,尺寸是100dp。
以上就是DecorView的MeasureSpec的产生过程,计算出DecorView的MeasureSpec后,执行DecorView的measure()方法开始整个View树的测量,measure方法中会调用onMeasure()方法,decorView 继承自 FrameLayout,decorView 的 onMeasure()方法又会调用 FrameLayout 的 onMeasure() 方法,FrameLayout 的 onMeasure() 方法中会遍历每个 子View。
测量完所有的子View后,最终调用setMeasuredDimension方法确定自己的宽高!
2)ViewGroup的measure过程

ViewGroup的measure过程会先遍历并测量每个子View,等子View测量结束了,再确定自己的宽高。
ViewGroup 的子View 的measure过程由ViewGroup 传递而来,子View 的MeasureSpec 也同样由ViewGroup计算并传递下来,ViewGroup是一个抽象类,其测量过程的 onMeasure 方法需要各个子类去具体实现,比如LinearLayout、RelativeLayout等,不同的ViewGroup子类有不同的布局特性,测量细节各不相同,ViewGroup无法做统一实现,有兴趣的可以去看看他们的具体实现,这里就不赘述了。但是我们要关注一点,ViewGroup的measureChildWithMargins()就是用来测量子View的,我们先来看一下ViewGroup的measureChildWithMargins方法:
    protected void measureChildWithMargins(View child,
            int parentWidthMeasureSpec, int widthUsed,
            int parentHeightMeasureSpec, int heightUsed) {
        //获得子View的Layoutparams
        final MarginLayoutParams lp = (MarginLayoutParams) child.getLayoutParams();
        //通过自身的MeasureSpec和子View的LayoutParams计算子View的MeasureSpe
        //计算宽度的MeasureSpec
        final int childWidthMeasureSpec = getChildMeasureSpec(parentWidthMeasureSpec,
                mPaddingLeft + mPaddingRight + lp.leftMargin + lp.rightMargin
                        + widthUsed, lp.width);
        //计算高度的MeasureSpec
        final int childHeightMeasureSpec = getChildMeasureSpec(parentHeightMeasureSpec,
                mPaddingTop + mPaddingBottom + lp.topMargin + lp.bottomMargin
                        + heightUsed, lp.height);
        //调用子View的measure方法
        child.measure(childWidthMeasureSpec, childHeightMeasureSpec);
    }
方法名很明确了,测量子元素,且测量过程和子元素的margin及父容器的padding有关。代码也简单明了,获取子元素的MarginLayoutParams,因为和View的margin有关,所以需要进行类型转化。然后通过getChildMeasureSpec方法,传入ViewGroup的MeasureSpec和子元素的LayoutParams,那第二个参数是什么?是ViewGroup的padding和子元素的margin的和,之后会减去这部分,因为我们写xml时都知道它是外边距和内边距,是不可用的。
我们看一下getChildMeasureSpec方法:
public static int getChildMeasureSpec(int spec, int padding, int childDimension) {
        int specMode = MeasureSpec.getMode(spec);
        int specSize = MeasureSpec.getSize(spec);

        //减去父容器的内边距和子元素的外边距
        int size = Math.max(0, specSize - padding);

        int resultSize = 0;
        int resultMode = 0;

        switch (specMode) {
        // Parent has imposed an exact size on us
        case MeasureSpec.EXACTLY:
            if (childDimension >= 0) {
                resultSize = childDimension;
                resultMode = MeasureSpec.EXACTLY;
            } else if (childDimension == LayoutParams.MATCH_PARENT) {
                // Child wants to be our size. So be it.
                resultSize = size;
                resultMode = MeasureSpec.EXACTLY;
            } else if (childDimension == LayoutParams.WRAP_CONTENT) {
                // Child wants to determine its own size. It can't be
                // bigger than us.
                resultSize = size;
                resultMode = MeasureSpec.AT_MOST;
            }
            break;

        // Parent has imposed a maximum size on us
        case MeasureSpec.AT_MOST:
            if (childDimension >= 0) {
                // Child wants a specific size... so be it
                resultSize = childDimension;
                resultMode = MeasureSpec.EXACTLY;
            } else if (childDimension == LayoutParams.MATCH_PARENT) {
                // Child wants to be our size, but our size is not fixed.
                // Constrain child to not be bigger than us.
                resultSize = size;
                resultMode = MeasureSpec.AT_MOST;
            } else if (childDimension == LayoutParams.WRAP_CONTENT) {
                // Child wants to determine its own size. It can't be
                // bigger than us.
                resultSize = size;
                resultMode = MeasureSpec.AT_MOST;
            }
            break;

        // Parent asked to see how big we want to be
        case MeasureSpec.UNSPECIFIED:
            if (childDimension >= 0) {
                // Child wants a specific size... let him have it
                resultSize = childDimension;
                resultMode = MeasureSpec.EXACTLY;
            } else if (childDimension == LayoutParams.MATCH_PARENT) {
                // Child wants to be our size... find out how big it should
                // be
                resultSize = View.sUseZeroUnspecifiedMeasureSpec ? 0 : size;
                resultMode = MeasureSpec.UNSPECIFIED;
            } else if (childDimension == LayoutParams.WRAP_CONTENT) {
                // Child wants to determine its own size.... find out how
                // big it should be
                resultSize = View.sUseZeroUnspecifiedMeasureSpec ? 0 : size;
                resultMode = MeasureSpec.UNSPECIFIED;
            }
            break;
        }
        //noinspection ResourceType
        return MeasureSpec.makeMeasureSpec(resultSize, resultMode);
    }
上述方法的注释很明确,根据父容器的MeasureSpec和子元素本身的LayoutParams来确定子元素的MeasureSpec,除了一些很少接触的,大部分可以用我们平时写xml布局时的思维来理解,这里我们拿其中一个来讲:
如果父View的MeasureSpec是EXACTLY,说明父View的大小是确切的,(确切的意思很好理解,如果一个View的MeasureSpec 的mode是EXACTLY,那么它的size是多大,最后展示到屏幕就一定是那么大)。
如果子View 的layout_xxxx是WRAP_CONTENT,也就是子View的大小是根据自己的content 来决定的,但是子View的毕竟是子View,大小不能超过父View的大小,但是子View的是WRAP_CONTENT,我们还不知道具体子View的大小是多少,要等到child.measure(childWidthMeasureSpec, childHeightMeasureSpec) 调用的时候才去真正测量子View 自己content的大小(比如TextView wrap_content 的时候你要测量TextView content 的大小,也就是字符占用的大小,这个测量就是在child.measure(childWidthMeasureSpec, childHeightMeasureSpec)的时候,才能测出字符占用的大小)。通过上述描述,子View MeasureSpec mode的应该是AT_MOST,而size 暂定父View的 size,表示的意思就是子View的大小没有确切的值,子View的大小最大为父View的大小,不能超过父View的大小(这就是AT_MOST 的意思),然后这个MeasureSpec 做为子View measure方法 的参数,做为子View的大小的约束或者说是要求,有了这个MeasureSpec子View再实现自己的测量。
注意在方法前面,specSize减去了参数padding,因为参数padding包含父容器的padding和子元素的margin,是不可用的。
        int specMode = MeasureSpec.getMode(spec);
        int specSize = MeasureSpec.getSize(spec);

        //减去父容器的内边距和子元素的外边距
        int size = Math.max(0, specSize - padding);
getChildMeasureSpec明确了子View的MeasureSpec的创建规则,
ViewGroup在所有子View的measure流程都执行结束后,会调用setMeasureDimension()方法给自己设置宽高!
3)View的measure过程
由于measure()方法时final类型的,这意味着子类不能重写此方法,从ViewGroup 的 measure过程我们可以知道,ViewGroup会调用View 的 measure 方法,并传入计算好的MeasureSpec,我们看一下View 的 measure 方法:
public final void measure(int widthMeasureSpec, int heightMeasureSpec) {
        ...
        int cacheIndex = forceLayout ? -1 : mMeasureCache.indexOfKey(key);
        if (cacheIndex < 0 || sIgnoreMeasureCache) {
            // measure ourselves, this should set the measured dimension flag back
            onMeasure(widthMeasureSpec, heightMeasureSpec);
            mPrivateFlags3 &= ~PFLAG3_MEASURE_NEEDED_BEFORE_LAYOUT;
        }
}
可以看到,最终会用ViewGroup传来MeasureSpec调用onMeasured 方法,因此我们只要看onMeasure方法即可:
    protected void onMeasure(int widthMeasureSpec, int heightMeasureSpec) {
        setMeasuredDimension(getDefaultSize(getSuggestedMinimumWidth(), widthMeasureSpec),
                getDefaultSize(getSuggestedMinimumHeight(), heightMeasureSpec));
    }
先看getDefaultSize 这个方法:
    public static int getDefaultSize(int size, int measureSpec) {
        int result = size;
        int specMode = MeasureSpec.getMode(measureSpec);
        int specSize = MeasureSpec.getSize(measureSpec);

        switch (specMode) {
        case MeasureSpec.UNSPECIFIED:
            result = size;
            break;
        case MeasureSpec.AT_MOST:
        case MeasureSpec.EXACTLY:
            result = specSize;
            break;
        }
        return result;
    }
MeasureSpec 中的 mode 是 AT_MOST 和 EXACTLY 两种情况下,返回的大小就是 measureSpec中的 specSize,而这个specSize就是View测量后的大小,这里提到测量后的大小,是measure阶段得到的大小,View最终的大小是在layout阶段确定的,这里要加以区分,但是几乎所有情况下View的测量大小和最终大小是相等的。
UNSPECIFIED这种情况一般用与系统内部的测量过程,这种情况下,View的大小为 getDefaultSize 的第一个参数 size,即宽/高分别为 getSuggestedMinimumWidth 和 getSuggestedMinimumHeight 的返回值,
    protected int getSuggestedMinimumHeight() {
        return (mBackground == null) ? mMinHeight : max(mMinHeight, mBackground.getMinimumHeight());

    }
    protected int getSuggestedMinimumWidth() {
        return (mBackground == null) ? mMinWidth : max(mMinWidth, mBackground.getMinimumWidth());
    }
这里只分析getSuggestedMinimumWidth方法,另外一个原理是一样的。从代码上看,如果View没有设置背景,那么View的宽度为mMinWidth,mMinWidth 对应于 android:minWidth 这个属性指定的值,默认为0;如果View指定了背景,则 View 的宽度为max(mMinWidth,mBackground.getMinimumWidth)。那mBackground.getMinimumWidth是什么?
我们看到Drawable的getMinimumWidth方法:
    public int getMinimumWidth() {
        final int intrinsicWidth = getIntrinsicWidth();
        return intrinsicWidth > 0 ? intrinsicWidth : 0;
    }
getIntrinsicWidth()方法,从方法名看起来是返回图片的固有宽度,但是其实返回值和设备的dpi有关,返回的是图片被系统拉伸后的大小。比如如果你把图片放在drawable-mdpi中,然后在240dpi即hdpi(density = 240/160)的机子上测试,系统会自动以1.5的倍数拉伸图片,因为你的图片在mdpi中显示正常,但是在像素密度更高的hdpi中会显得比较小,所以系统会对图片进行拉伸,当你调用getIntrinsicWidth()方法的时候返回的就是图片被拉伸后的大小,比如图片是高度是1920,那么getIntrinsicWidth()返回1920 * 1.5 = 2880,如果将图片放在hdpi中就不会被拉伸。还有一点,ShapeDrawable的 getIntrinsicWidth() 放回0。
所以getSuggestedMinimumWidth:如果View没有设置背景,返回android:minWidth 这个属性的值,默认是0;如果View设置了背景,则返回 android:minWidth 和 背景图片getIntrinsicWidth()值 这两者的最大值。
当 View 的 MeasureSpec 的 mode 是 UNSPECIFIED 情况下,宽高就是 getSuggestedMinimumWidth 和getSuggestedMinimumHeight 的值。
从 getDefaultSize 方法来看,View 的宽高由 specSize 决定,这里有一点注意:当我们直接继承 View 的自定义控件时,需要重写 onMeasure 方法并设置 wrap_content 时的自身大小,否则在布局中使用 wrap_content 就相当于使用 match_parent 。因为如果在布局中使用 wrap_content ,在计算MeasureSpec 的时候,specMode 是 AT_MOST 模式,specSize 就是父容器的大小,而在 getDefaultSize 中,对应 AT_MOST 模式,View 的宽高就是 specSize 。TextView、ImageView等的源码中就针对wrap_content做了处理。
layout

Layout 的作用是 ViewGroup 用来确定子元素的位置,当 ViewGroup 的位置被确定后,它在 onLayout 中会遍历所有的子元素并调用其 layout 方法,在 layout 方法中 onLayout 方法又会被调用。layout 方法确定 View 本身的位置,而 onLayout 方法则会确定所有子元素的位置,先看 View 的 layout 方法:
    public void layout(int l, int t, int r, int b) {
        if ((mPrivateFlags3 & PFLAG3_MEASURE_NEEDED_BEFORE_LAYOUT) != 0) {
            onMeasure(mOldWidthMeasureSpec, mOldHeightMeasureSpec);
            mPrivateFlags3 &= ~PFLAG3_MEASURE_NEEDED_BEFORE_LAYOUT;
        }

        int oldL = mLeft;
        int oldT = mTop;
        int oldB = mBottom;
        int oldR = mRight;

        boolean changed = isLayoutModeOptical(mParent) ?
                setOpticalFrame(l, t, r, b) : setFrame(l, t, r, b);

        if (changed || (mPrivateFlags & PFLAG_LAYOUT_REQUIRED) == PFLAG_LAYOUT_REQUIRED) {
            onLayout(changed, l, t, r, b);

            mPrivateFlags &= ~PFLAG_LAYOUT_REQUIRED;

            ListenerInfo li = mListenerInfo;
            if (li != null && li.mOnLayoutChangeListeners != null) {
                ArrayList<OnLayoutChangeListener> listenersCopy =
                        (ArrayList<OnLayoutChangeListener>)li.mOnLayoutChangeListeners.clone();
                int numListeners = listenersCopy.size();
                for (int i = 0; i < numListeners; ++i) {
                    listenersCopy.get(i).onLayoutChange(this, l, t, r, b, oldL, oldT, oldR, oldB);
                }
            }
        }
        mPrivateFlags &= ~PFLAG_FORCE_LAYOUT;
        mPrivateFlags3 |= PFLAG3_IS_LAID_OUT;
    }
四个参数均是由 父容器计算并传递下来的,首先调用 setFrame 方法来设定 View 的四个顶点的位置,
    protected boolean setFrame(int left, int top, int right, int bottom) {
            mLeft = left;
            mTop = top;
            mRight = right;
            mBottom = bottom;
            mRenderNode.setLeftTopRightBottom(mLeft, mTop, mRight, mBottom);

            if (sizeChanged) {
                sizeChange(newWidth, newHeight, oldWidth, oldHeight);
            }

            return changed;
    }
初始化 mLeft、mRight、mTop和mBottom这四个值,View 的四个顶点一旦确定,那么 View 在父容器中的位置也就确定了;我们平常调用的getWidth()、getHeight()等方法就是通过这四个参数计算而来的:
    public final int getWidth() {
        return mRight - mLeft;
    }

    public final int getHeight() {
        return mBottom - mTop;
    }
上面两个方法和getMeasuredWidth() 和 getMeasuredHeight() 有点区别!
测量宽高:getMeasuredWidth() 和 getMeasuredHeight() 方法是在 View 测量完成即 measure 过程完成后才能获取到;
最终宽高: getWidth() 和 getHeight() 则是在 layout 过程完成后才能得到。
两者的赋值时机不同。
setFrame() 后,接着会调用 onLayout 方法,这个方法的用途是父容器确定子元素的位置,和 onMeasure 方法类似,onLayout 的具体实现和具体的布局有关,所以 View 和 ViewGroup 均没有真正实现 onLayout 方法。这里我们看一下 LinearLayout 的 onLayout 方法:
    protected void onLayout(boolean changed, int l, int t, int r, int b) {
        if (mOrientation == VERTICAL) {
            layoutVertical(l, t, r, b);
        } else {
            layoutHorizontal(l, t, r, b);
        }
    }
这里只看一下 layoutVertical 方法:
    void layoutVertical(int left, int top, int right, int bottom) {
        final int paddingLeft = mPaddingLeft;

        int childTop;
        int childLeft;

        // Where right end of child should go
        final int width = right - left;
        int childRight = width - mPaddingRight;

        // Space available for child
        int childSpace = width - paddingLeft - mPaddingRight;

        final int count = getVirtualChildCount();

        final int majorGravity = mGravity & Gravity.VERTICAL_GRAVITY_MASK;
        final int minorGravity = mGravity & Gravity.RELATIVE_HORIZONTAL_GRAVITY_MASK;

        for (int i = 0; i < count; i++) {
            final View child = getVirtualChildAt(i);
            if (child == null) {
                childTop += measureNullChild(i);
            } else if (child.getVisibility() != GONE) {
                //获取子元素的测量宽高
                final int childWidth = child.getMeasuredWidth();
                final int childHeight = child.getMeasuredHeight();
                //获取子元素的LayoutParams
                final LinearLayout.LayoutParams lp =
                        (LinearLayout.LayoutParams) child.getLayoutParams();
                ...

                childTop += lp.topMargin;
                setChildFrame(child, childLeft, childTop + getLocationOffset(child),
                        childWidth, childHeight);
                childTop += childHeight + lp.bottomMargin + getNextLocationOffset(child);

                i += getChildrenSkipCount(child, i);
            }
        }
    }
layoutVertical中会遍历所有子元素并调用 setChildFrame 方法来为子元素指定位置,其中 childTop 会逐渐增大,后面的子元素的位置逐渐往下,符合竖直方向的 LinearLayout 的特性。其中 getMeasuredWidth 和 getMeasuredHeight 就是获取View在 measure 阶段 测量出来的宽高 ,setChildFrame方法则调用child 的 layout 方法,传入计算好的坐标。
    private void setChildFrame(View child, int left, int top, int width, int height) {
        child.layout(left, top, left + width, top + height);
    }
draw
Draw过程的作用是将View绘制到屏幕上,步骤如下:
1)绘制背景 background.draw(canvas).
2)保存画图的图层,准备用于绘制View 在滑动时的边框渐变效果
3)绘制自己 (onDraw)
4)绘制children(dispatchDraw)
5)绘制 View 在滑动时的边框渐变效果
6)绘制装饰(onDrawScrollBars)
我们先看一下 draw 方法:
public void draw(Canvas canvas) {
        final int privateFlags = mPrivateFlags;
        final boolean dirtyOpaque = (privateFlags & PFLAG_DIRTY_MASK) == PFLAG_DIRTY_OPAQUE &&
                (mAttachInfo == null || !mAttachInfo.mIgnoreDirtyState);
        mPrivateFlags = (privateFlags & ~PFLAG_DIRTY_MASK) | PFLAG_DRAWN;

        /*
         * Draw traversal performs several drawing steps which must be executed
         * in the appropriate order:
         *
         *      1. Draw the background
         *      2. If necessary, save the canvas' layers to prepare for fading
         *      3. Draw view's content
         *      4. Draw children
         *      5. If necessary, draw the fading edges and restore layers
         *      6. Draw decorations (scrollbars for instance)
         */

        // Step 1, draw the background, if needed
        int saveCount;

        if (!dirtyOpaque) {
            drawBackground(canvas);
        }

        // skip step 2 & 5 if possible (common case)
        final int viewFlags = mViewFlags;
        boolean horizontalEdges = (viewFlags & FADING_EDGE_HORIZONTAL) != 0;
        boolean verticalEdges = (viewFlags & FADING_EDGE_VERTICAL) != 0;
        if (!verticalEdges && !horizontalEdges) {
            // Step 3, draw the content
            if (!dirtyOpaque) onDraw(canvas);

            // Step 4, draw the children
            dispatchDraw(canvas);

            drawAutofilledHighlight(canvas);

            // Overlay is part of the content and draws beneath Foreground
            if (mOverlay != null && !mOverlay.isEmpty()) {
                mOverlay.getOverlayView().dispatchDraw(canvas);
            }

            // Step 6, draw decorations (foreground, scrollbars)
            onDrawForeground(canvas);

            // Step 7, draw the default focus highlight
            drawDefaultFocusHighlight(canvas);

            if (debugDraw()) {
                debugDrawFocus(canvas);
            }

            // we're done...
            return;
        }
    }
ViewGroup 的 dispatchDraw 中会遍历所有子元素并调用 drawChild() 方法,drawChild() 方法调用子元素的 draw() 方法。View 中的 dispatchDraw() 是空实现,其他 ViewGroup 的子类不覆写该方法。
View 的 onDraw() 方法是空的,该方法用于绘制 View 本身的内容,需要子类自己实现。比如TextView绘制自身文字、LinearLayout 绘制分割线等,有些容器不需要覆写该方法。我们自定义View时一般覆写 onDraw 方法,在这里绘制我们想画的东西。
View的绘制流程到这里就结束了,喜欢点个赞~~
参考文章:
https://www.jianshu.com/p/5a71014e7b1b
《Android开发艺术探索》


 3754
3754


 被折叠的 条评论
为什么被折叠?
被折叠的 条评论
为什么被折叠?
 到【灌水乐园】发言


