如果想看该实战系列的其他内容,请移步至 Vue.js 实战系列之实现视频类WebApp的项目开发。
项目仓库地址,欢迎 Star
实现效果

模块分析
我们从抖音app上截图一张,来分析此部分的实现方式。

我们可以看出,该模块内容的顶部标签栏有三部分组成:直播、菜单项、搜索。
此部分可以使用嵌套路由来进行路由开发,路由规则为:home -> index -> follows || recommend。
模块开发
-
修改路由
路由更新内容:
- 设置进入页面时直接重定向到推荐页面;
- 在首页添加嵌套子路由;
- 给子路由 follows 和 recommend 添加子路由 reVideoList;
import Vue from 'vue'; import VueRouter from 'vue-router'; import Home from '../views/Home.vue'; Vue.use(VueRouter); const routes = [ { path: '/', redirect: '/index/recommend', }, { path: '/index', redirect: '/index/recommend', }, { path: '/', name: 'Home', component: Home, children: [ { path: '/index', name: 'index', component: () => import(/* webpackChunkName: "index" */ '../views/index/index.vue'), children: [ { path: 'follows', name: 'follows', component: () => import(/* webpackChunkName: "follows" */ '../views/follow/index.vue'), children: [ { path: 'reVideoList', name: 'reVideoList', component: () => import(/* webpackChunkName: "VideoList" */ '../common/components/index/VideoList.vue'), }, ], }, { path: 'recommend', name: 'recommend', component: () => import(/* webpackChunkName: "recommend" */ '../views/recommend/index.vue'), children: [ { path: 'reVideoList', name: 'reVideoList', component: () => import(/* webpackChunkName: "VideoList" */ '../common/components/index/VideoList.vue'), }, ], }, ], }, { path: '/friends', name: 'friends', component: () => import(/* webpackChunkName: "friends" */ '../views/friends/index.vue'), }, { path: '/news', name: 'news', component: () => import(/* webpackChunkName: "news" */ '../views/news/index.vue'), }, { path: '/mine', name: 'mine', component: () => import(/* webpackChunkName: "mine" */ '../views/mine/index.vue'), }, ], }, { path: '/release', name: 'release', component: () => import(/* webpackChunkName: "release" */ '../views/release/index.vue'), }, ]; const router = new VueRouter({ mode: 'history', base: process.env.BASE_URL, routes, }); export default router; -
创建Topbar组件
-
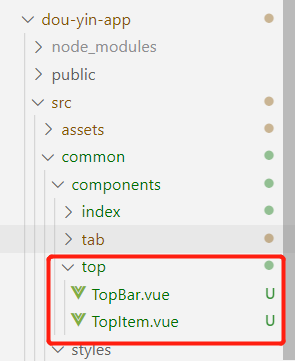
在
src -> common -> components文件夹下创建如下目录,并创建TopBar.vue 文件

-
TopItem.vue 组件
该 TopBarItem 实现方式跟 TabBarItem 的实现方式类似。
- 注意:
router-link默认会渲染成a标签 所以我们需要将router-link渲染成div标签; - 利用计算属性
isActive实现标签选中 高亮效果
<template> <div class="item" @click="itemClick"> <router-link :to="navPath" tag="div" :class="isActive ? 'active' : ''"> {{ topTitle }} </router-link> </div> </template> <script> export default { props: { topTitle: { type: String, default: '', }, navPath: { type: String, default: '/index/recommend', }, }, computed: { isActive() { return this.$route.path === this.navPath; }, }, methods: { itemClick() { console.log(this.$route.path); }, }, }; </script> <style lang="less" scoped> .active { color: #ffff; font-weight: 600; position: relative; &:after { content: ""; height: 2px; width: 30px; left: 3px; bottom: 5px; position: absolute; background: #ffffff; } } </style> - 注意:
-
Topbar.vue 组件
点击不同的标签栏,需要跳转到不同的页面,所以顶部标签栏需要传入对应的路径。
<template>
  <div class="top-bar">
    <div class="bar-fun" @click="toLive">
      <i class="iconfont icon-zhibo"></i>
    </div>
    <div class="bar-menu">
      <topItem top-title="关注" nav-path="/index/follows"> </topItem>
      <topItem top-title="推荐" nav-path="/index/recommend"> </topItem>
    </div>
    <div class="bar-fun" @click="toSearch">
      <i class="iconfont icon-sousuo"></i>
    </div>
  </div>
</template>

<script>
import topItem from './TopItem.vue';

export default {
  components: {
    topItem,
  },
  methods: {
    toLive() {
      console.log('toLive');
    },
    toSearch() {
      console.log('toSearch');
    },
  },
};
</script>

<style lang="less" scoped>
.top-bar {
  height: 60px;
  line-height: 60px;
  display: flex;
  justify-content: space-between;
  font-size: 24px;
  flex: 1;
  padding: 0 20px;
  .bar-fun {
    .iconfont {
      font-size: 28px;
      color: rgb(190, 190, 190);
    }
    .icon-sousuo {
      font-size: 30px;
    }
  }
  .bar-menu {
    display: flex;
    justify-content: space-around;
    font-size: 20px;
    width: 50%;
    color: rgb(190, 190, 190);
    font-weight: 600;
  }
}
</style>
-
-
在 index.vue 中引入 TopBar 组件
<template>
  <div class="home-content">
      <topBar></topBar>
      <router-view ></router-view>
  </div>
</template>

<script>
import topBar from '@/common/components/top/TopBar.vue';

export default {
  components: {
    topBar,
  },
};
</script>

<style lang="less" scoped>
.home-content {
  background: #000;
  height: 100vh;
}
</style>
总结
- 嵌套路由里边的子路由千万不要写成
/follows,因为写成/follows浏览器会认为是根路径跳转,而不是子路由了。
上一章节: 3. 底部状态栏实现(实现原生APP 底部导航栏)
下一章节: 5. 视频播放列表实现
项目整体介绍:Vue.js 项目实战之实现视频播放类WebApp的项目开发(仿抖音app)
项目仓库地址,欢迎 Star。
有任何问题欢迎评论区留言讨论。


 被折叠的 条评论
为什么被折叠?


