


Vue2-Vuex基础
1.Vuex基本概念
在复杂的前端应用程序中,状态管理变得至关重要。Vuex 是 Vue.js 官方提供的状态管理模式和库,它能帮助我们更好地管理应用程序的状态并实现组件间的通信。本文将介绍 Vuex 的基本概念、核心概念和实际应用。
什么是 Vuex?
Vuex 是专为 Vue.js 应用程序开发的状态管理模式。它借鉴了 Flux 和 Redux 的理念,将应用程序的状态抽象出来,集中管理在一个全局的 store 中。这样做的好处是:
- 集中化管理状态:将所有组件的共享状态抽取出来,单独管理,使得状态变化更加可控和可预测。
- 更方便的状态共享:不需要通过 props 或事件来传递状态,任何组件都可以访问状态。
- 易于调试:通过时间旅行工具(Vue Devtools)可以方便地查看状态的变化历史。
Vuex与localStorage,sessionStorage区别?
vuex 可以在多个组件之间共享数据,并且共享的数据是【响应式】的,即数据的变更能及时渲染到模板
与之对比 localStorage 与 sessionStorage 也能共享数据,但缺点是数据并非【响应式】
2.Vuex基本使用方式
import Vue from 'vue'
import Vuex from 'vuex'

Vue.use(Vuex)

export default new Vuex.Store({
  state: {
  },
  getters: {
  },
  mutations: {
  },
  actions: {
  },
  modules: {
  }
})
new Vuex.Store({})创建了一个新的 Vuex Store 实例,并导出这个实例作为默认的导出。- 在
state,getters,mutations,actions, 和modules这些选项中,你可以定义应用程序的状态管理逻辑:- state: 定义应用的状态数据。可以在这里声明需要全局共享的数据。
- getters: 类似于计算属性,用来从 store 中的 state 中派生出一些状态。
- mutations: 定义同步修改 state 的方法。每个 mutation 都有一个字符串的事件类型 (type) 和 一个回调函数 (handler)。
- actions: 类似于 mutations,但是 actions 提交的是 mutation,而不是直接变更状态。可以用来异步操作。
- modules: 允许将 store 分割成模块。每个模块拥有自己的 state、mutations、actions、getters 等。
3.Vuex入门案例
动态显示修改后的用户名称
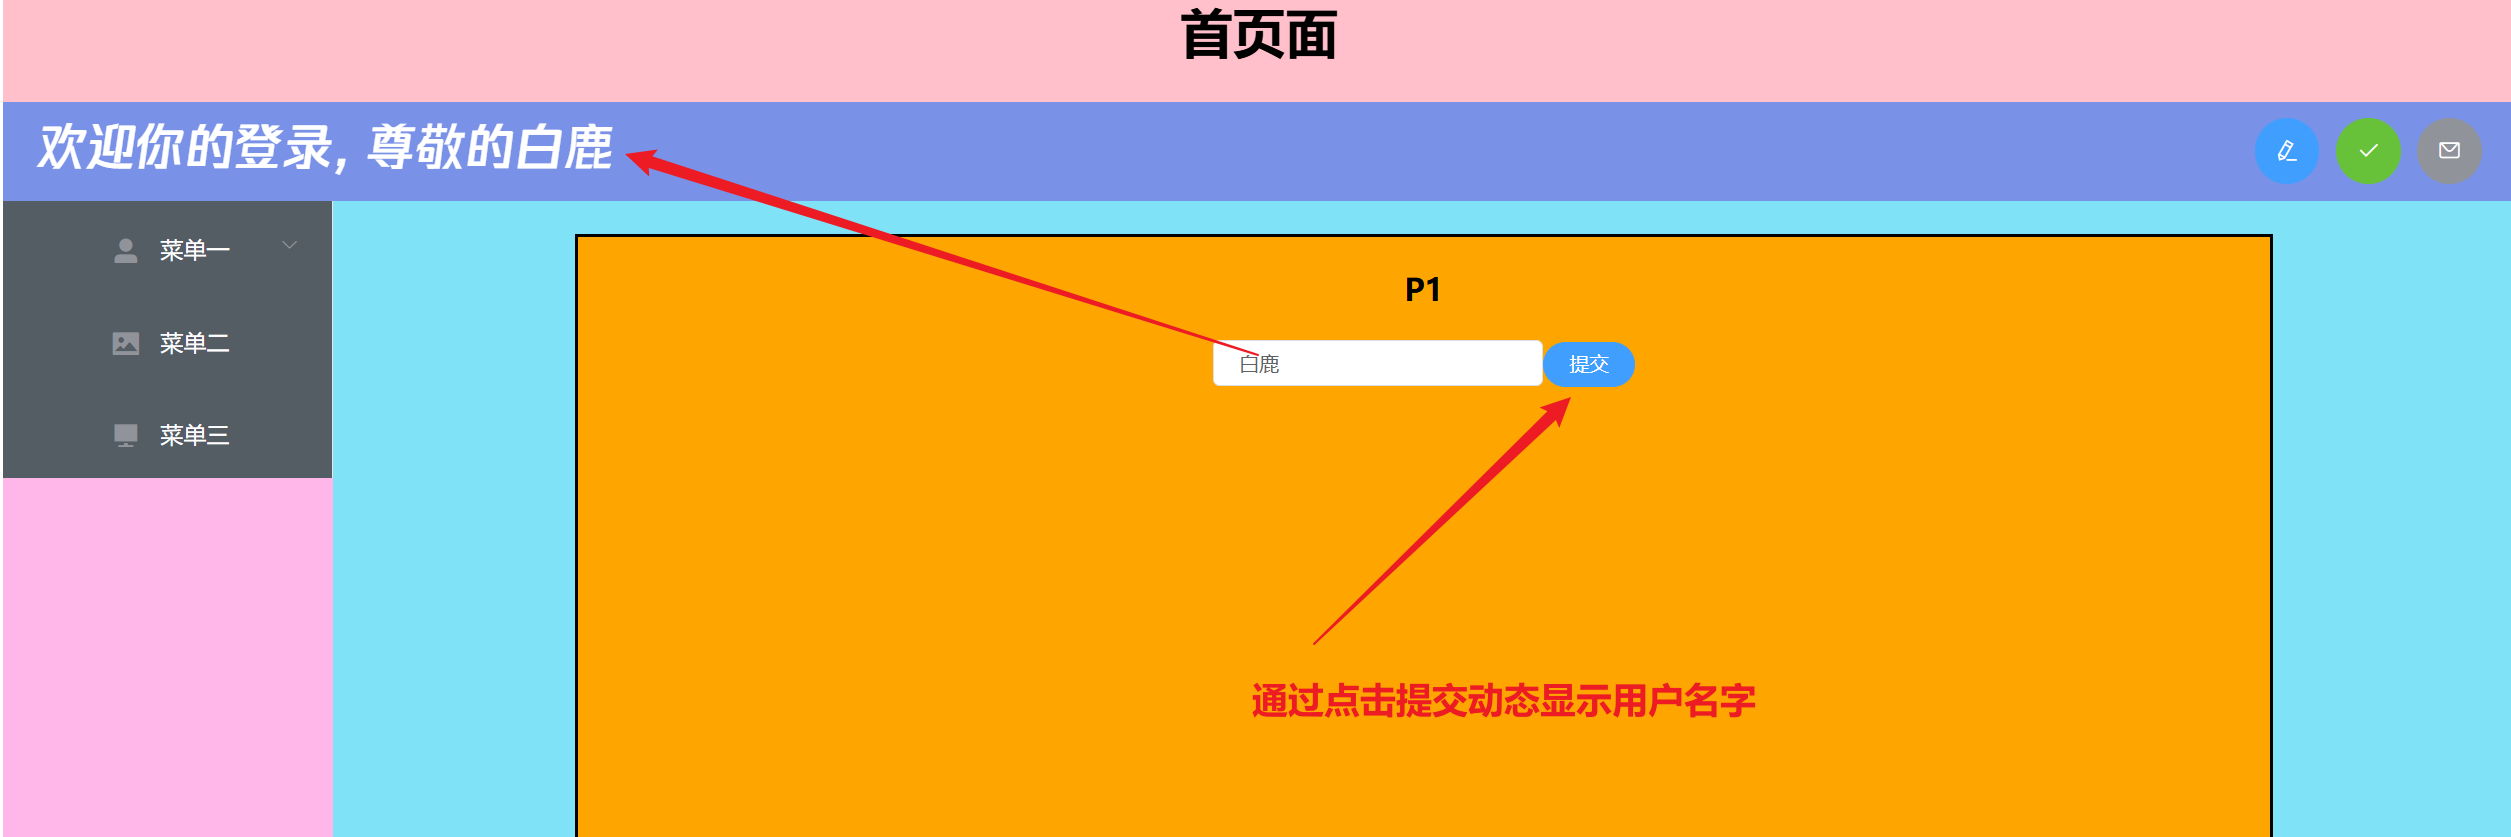
- 首页面基础代码
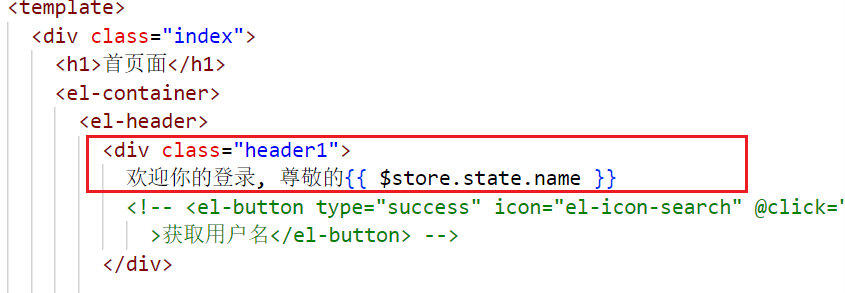
<template>
  <div class="index">
    <h1>首页面</h1>
    <el-container>
      <el-header>
        <div class="header1">
          欢迎你的登录, 尊敬的
        </div>

        <div class="header3">
          <el-button
            type="primary"
            icon="el-icon-edit"
            circle
            @click="jump('/c/p1')"
          ></el-button>
          <el-button
            type="success"
            icon="el-icon-check"
            circle
            @click="jump('/c/p2')"
          ></el-button>
          <el-button
            type="info"
            icon="el-icon-message"
            circle
            @click="jump('/c/p3')"
          ></el-button>
        </div>
      </el-header>
      <el-container>
        <el-aside width="200px">
          <el-menu
            router
            background-color="#545c64"
            text-color="#fff"
            active-text-color="#ffd04b"
          >
            <el-submenu index="">
              <span slot="title">
                <i class="el-icon-user-solid"></i>
                菜单一
              </span>
              <el-menu-item index="/c/p1">子项1</el-menu-item>
              <el-menu-item index="/c/p2">子项2</el-menu-item>
              <el-menu-item index="/c/p3">子项3</el-menu-item>
            </el-submenu>
            <el-menu-item>
              <span slot="title">
                <i class="el-icon-picture"></i>
                菜单二
              </span>
            </el-menu-item>
            <el-menu-item>
              <span slot="title">
                <i class="el-icon-s-platform"></i>
                菜单三
              </span>
            </el-menu-item>
          </el-menu>
        </el-aside>
        <el-main>
          <router-view></router-view>
        </el-main>
      </el-container>
    </el-container>
  </div>
</template>

  <script>
const options = {
  methods: {
    jump(url) {
      const currentPath = this.$route.path;
      if (currentPath !== url) {
        this.$router.push(url);
      }
    },
  },
};

export default options;
</script>

<style scoped>
.index {
  background: pink;
  text-align: center;
  width: auto;
  height: 100vh;
}

.el-header {
  background: rgb(121, 145, 231);
}

.el-aside {
  background: rgb(255, 183, 233);
  height: 100vh;
}

.el-main {
  background: rgb(128, 226, 246);
  height: 100vh;
}

.router-link {
  display: inline-block;
  padding: 10px 15px;
  margin-right: 10px;
  margin-top: 5px;
  width: 150px;
  text-decoration: none;
  color: #333; /* 链接文本颜色 */
  background-color: #f0f0f0; /* 背景色 */
  border: 1px solid #ccc; /* 边框 */
  border-radius: 5px; /* 圆角 */
  transition: background-color 0.3s, color 0.3s; /* 过渡效果 */

  /* 其他样式属性可以根据需要添加 */
}

/* 鼠标悬停时的样式 */
.router-link:hover {
  background-color: #e0e0e0;
  color: #555;
}

/* 激活状态的样式 */
.router-link.active {
  background-color: #007bff; /* 激活时的背景色 */
  color: #fff; /* 激活时的文本颜色 */
  border-color: #007bff; /* 激活时的边框颜色 */
}

.header1 {
  font-size: 30px;
  font-family: "腾讯体";
  color: white;
  float: left;
  margin-top: 10px;
}

.header3 {
  margin-top: 10px;
  float: right;
}
</style>
- P1页面基础代码
<template>
  <div class="error">
    <h1>P1</h1>

    <el-input placeholder="请输入用户名" size="mini" v-model="name"></el-input>
    <el-button type="primary" round size="mini" @click="updateName">提交</el-button>
  </div>
</template>

  <script>
const options = {
  data() {
    return {
      name: "",
    };
  },
  methods: {
    updateName() {

    },
  },

};
export default options;
</script>

<style scoped>
.error {
  background: orange;
  text-align: center;
  border: 2px solid black;
  width: 80%;
  height: 700px;
  margin: 0px auto; /* 左右外边距设置为auto,实现水平居中 */
}

.el-input {
  width: 200px;
}
</style>
- 编写store内容($store.commit(“方法名”, [方法参数列表]))
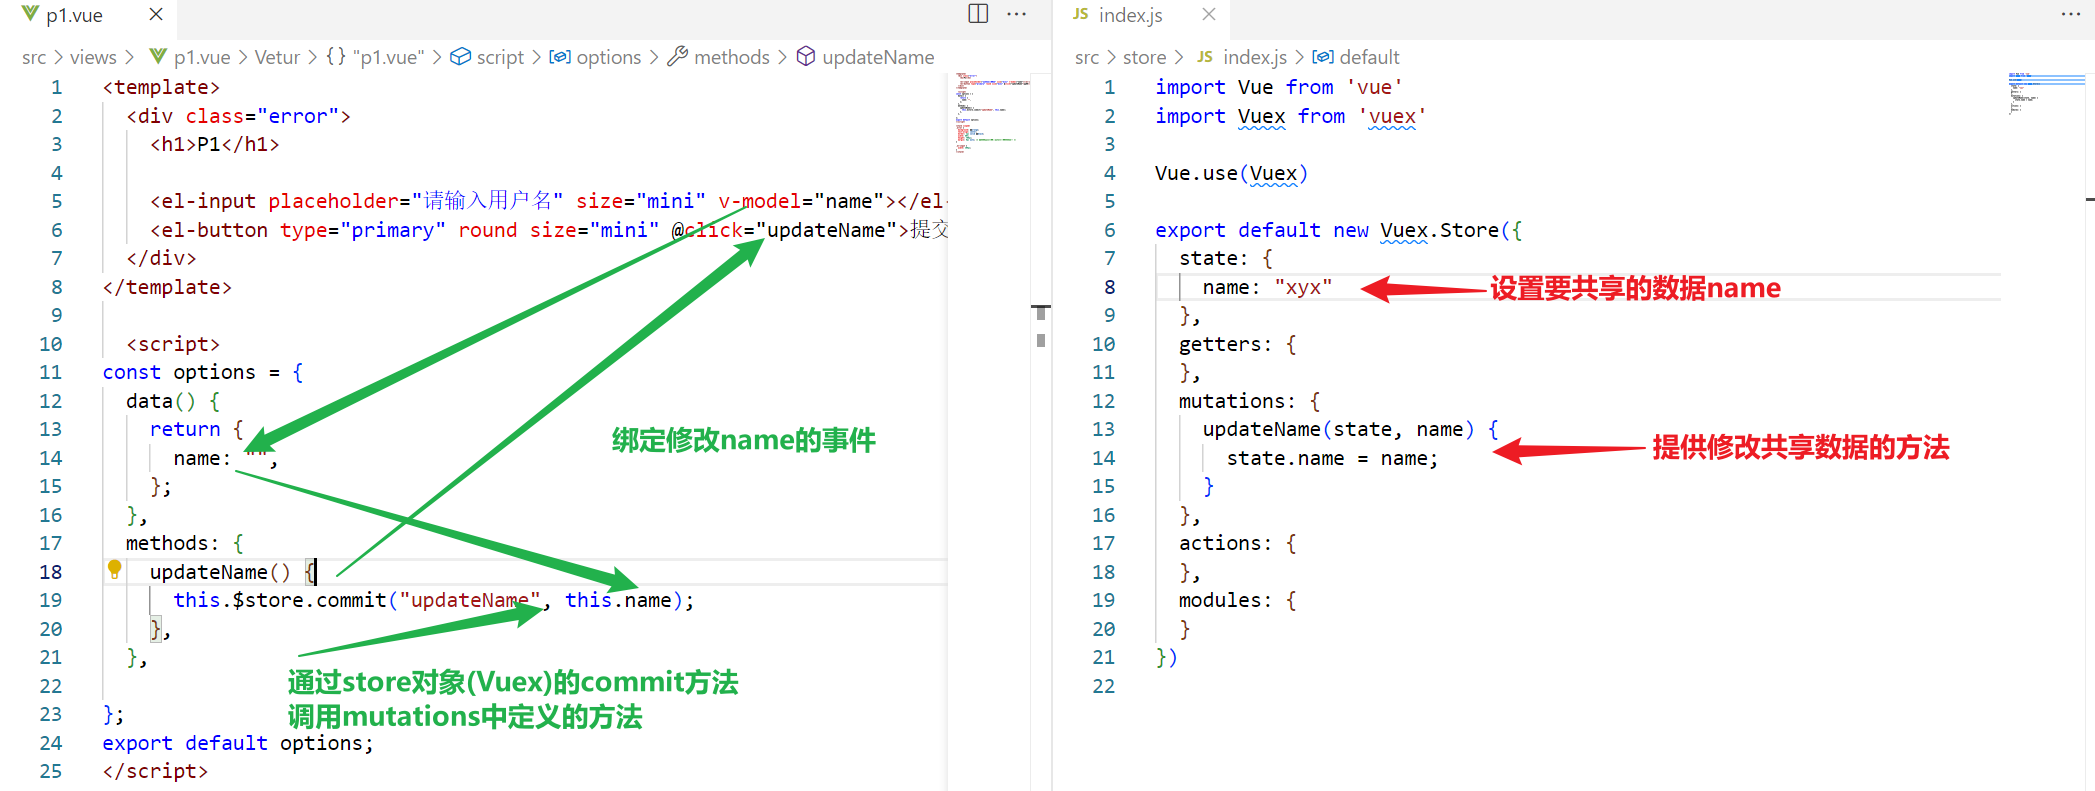
- 显示store的内容($store.state.共享的属性名)
4.mapState-优化共享属性的获取
mapState 是 Vuex 提供的一个辅助函数,用于在组件中获取 Vuex store 中的 state。它的作用是帮助简化从 Vuex store 中获取状态数据的过程,特别是在组件中需要使用多个状态时,可以减少代码的重复性和提高可读性。
//因为被共享的属性常常使用,需要每次从$store中获取,因此可以用计算属性优化这一操作
const options = {
  computed : {
    name() {
      return this.$store.state.name;
    }
  }
}
//因为每次获取属性均是此代码,因此可以使用Vuex提供的方法获取
const options = {
  computed : mapState(["name"])
}
//或者使用展开函数
const options = {
  computed : {
    ...mapState(["name"])
  },
}
5.mapMutations-优化修改函数的获取
mapMutations 是 Vuex 提供的一个辅助函数,用于在组件中映射 Vuex store 中的 mutations。它的作用是帮助简化在组件中提交 mutation 的过程,特别是在需要在组件中提交多个 mutation 时,可以减少代码的重复性和提高可读性。
//旧的获取修改函数的方法
const options = {
  data() {
    return {
      name: "",
    };
  },
  methods: {
    updateName() {
      this.$store.commit("updateName", this.name);
    },
  },
}

//通过mapMutations解决:通过展开函数将updateName作为methods对象的方法
import { mapMutations } from "vuex";
const options = {
  data() {
    return {
      name: "",
    };
  },
  methods: {
    ...mapMutations(["updateName"]),
  },
};
export default options;
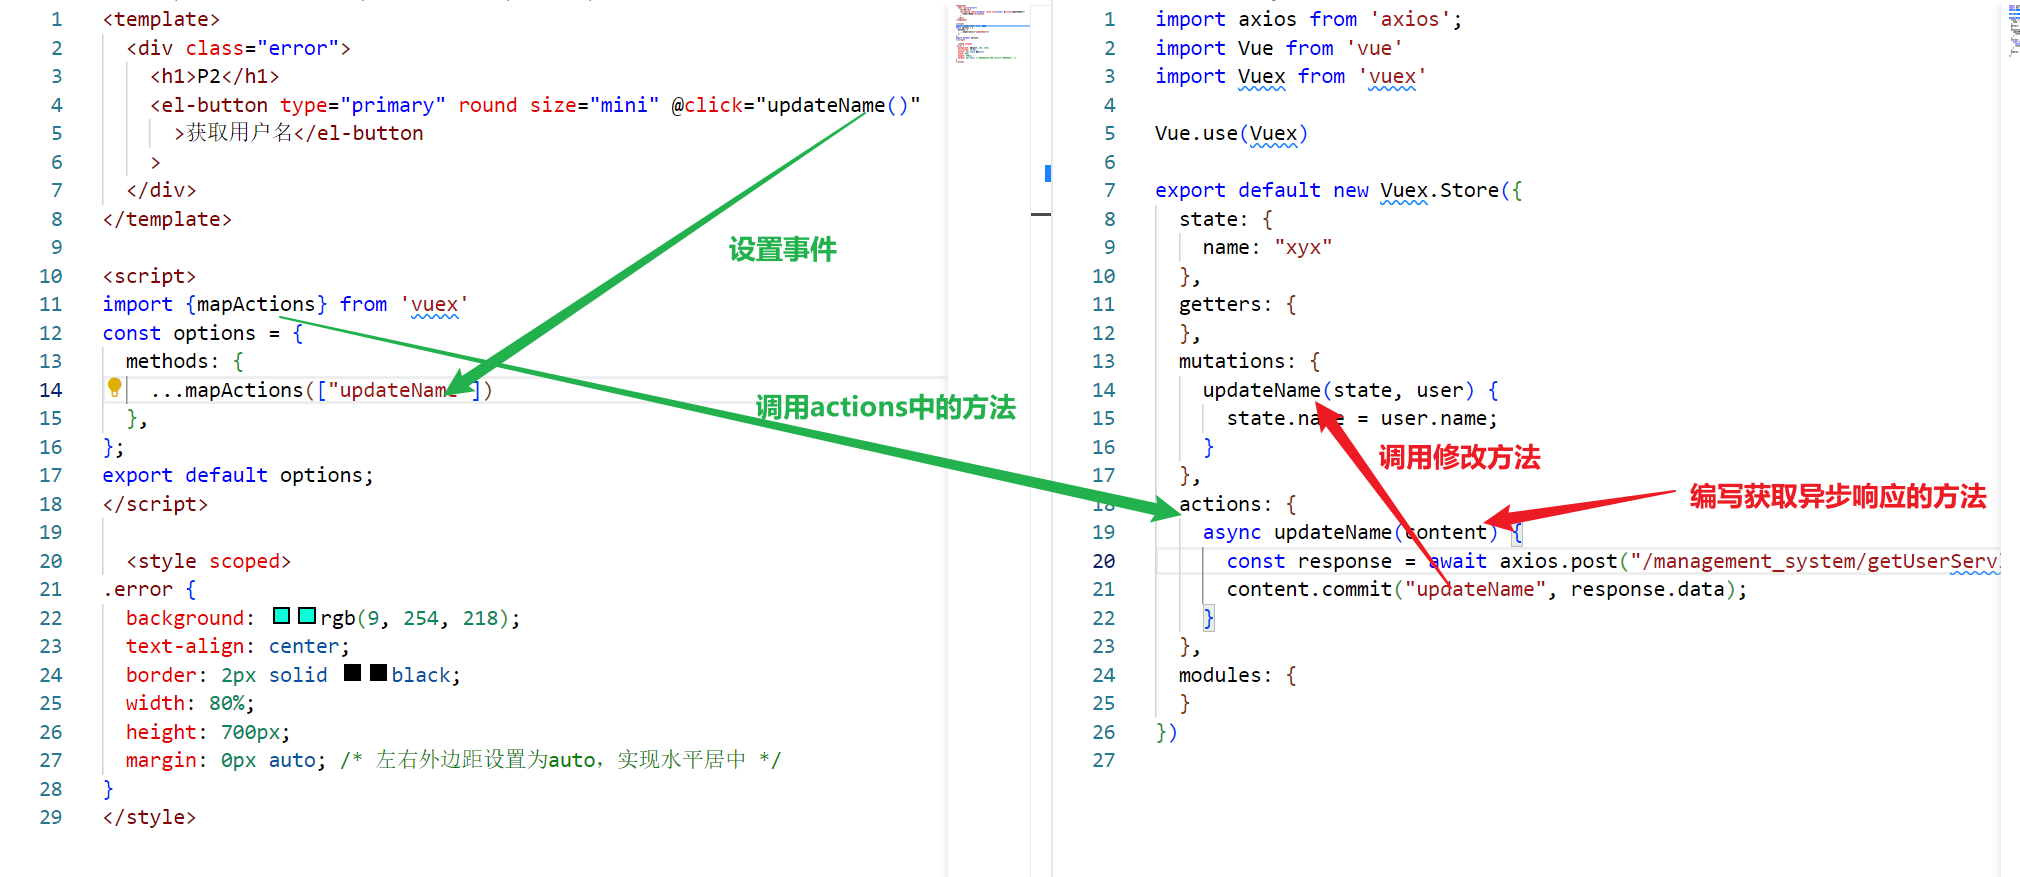
6.Actions方法-处理异步请求的方法
在Vue.js中,特别是与Vuex一起使用时,Actions是Vuex中的一种核心概念。Actions用于处理异步操作,例如调用API、获取数据,然后提交(commit)mutation来修改状态。Actions是通过store.dispatch方法来触发的,而不是直接调用mutation来修改状态。
动态获取名字并展示到页面
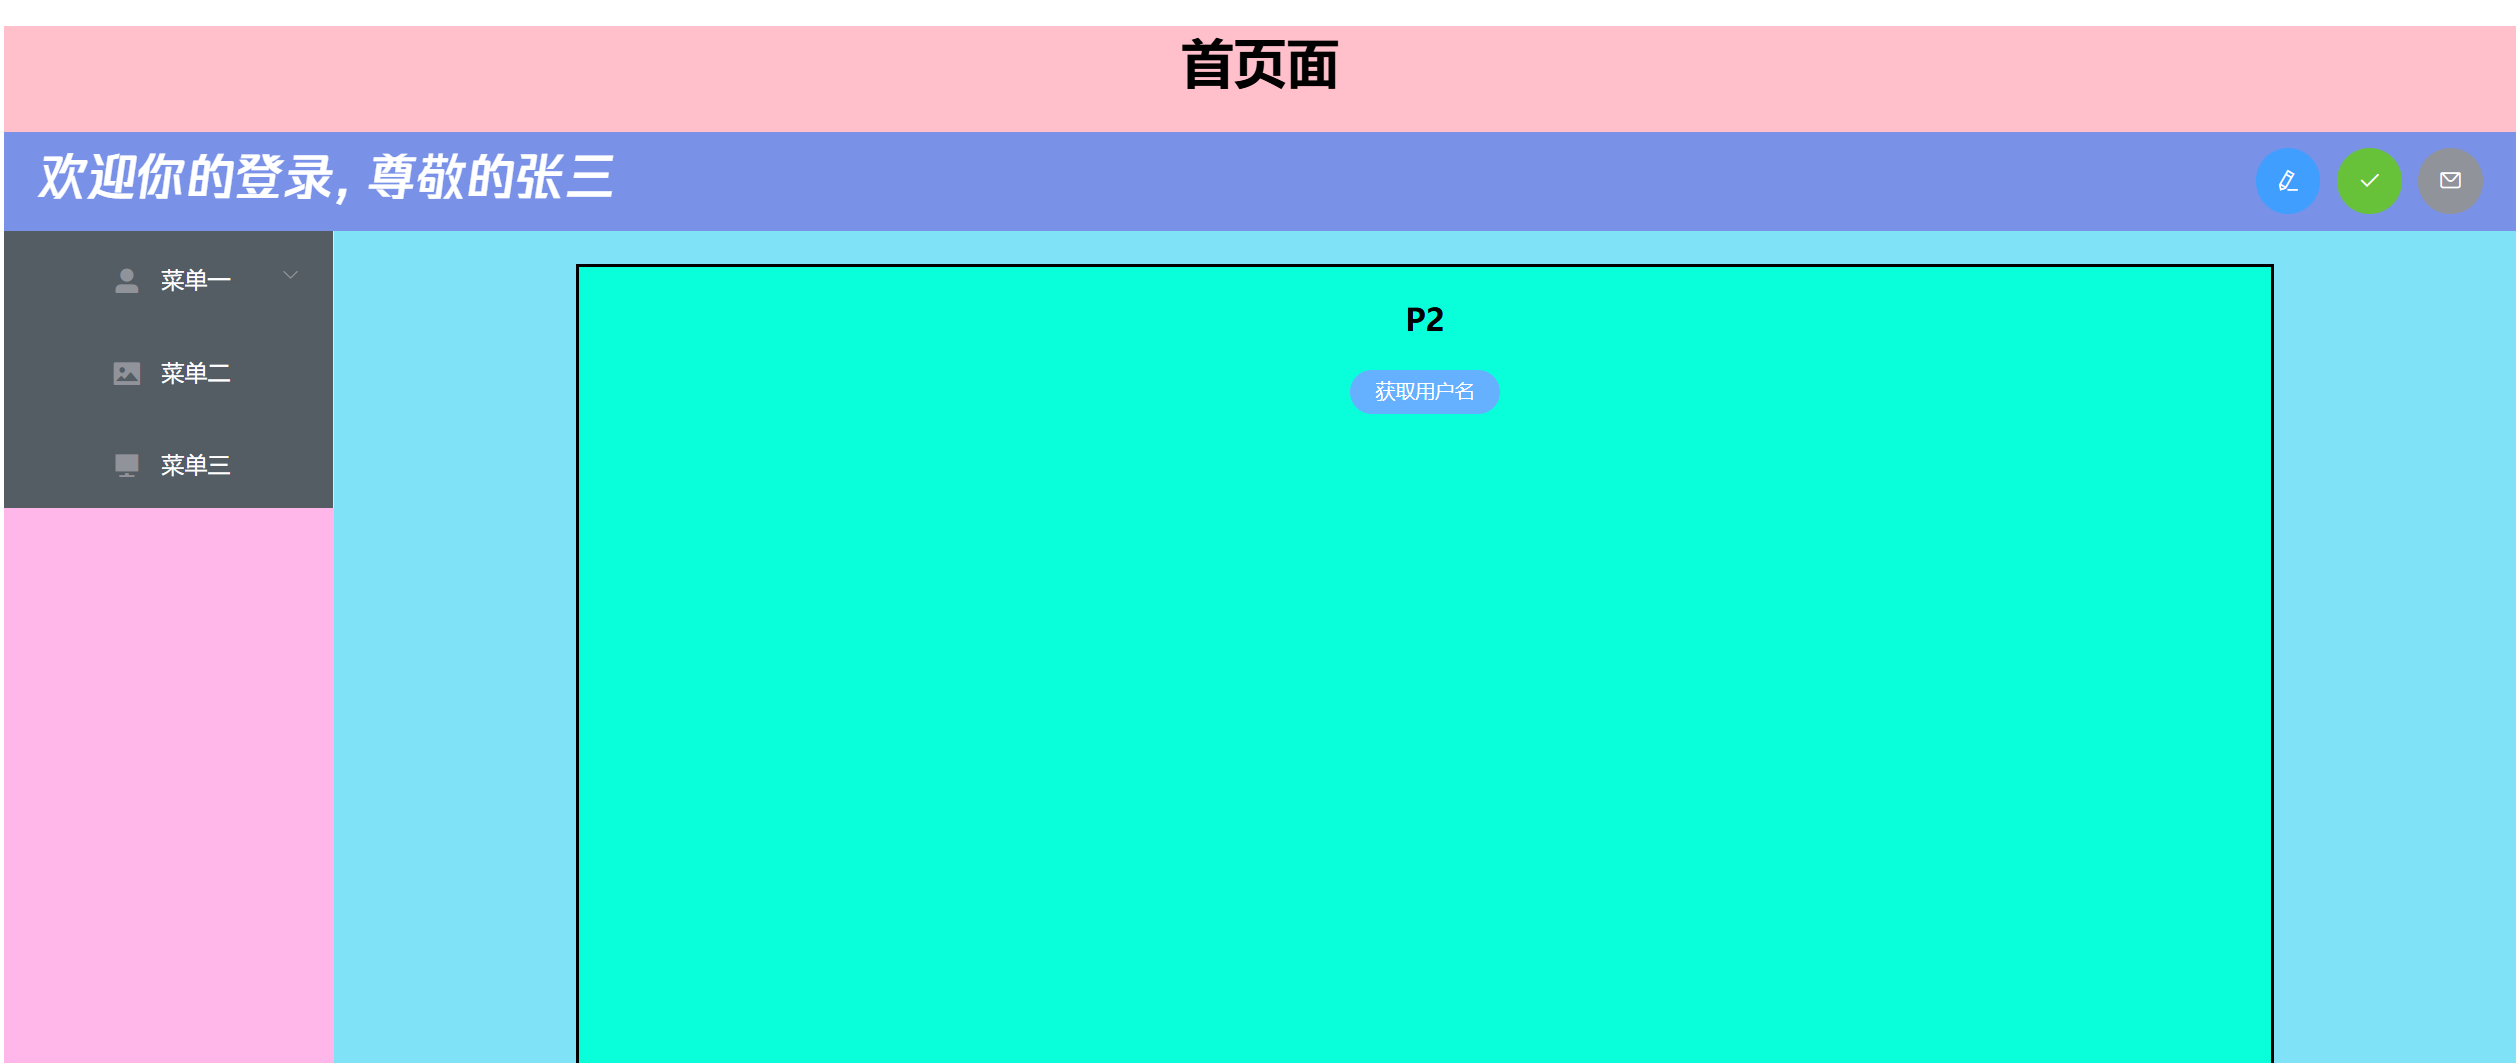
- 通过dispatch方法获取actions中的方法
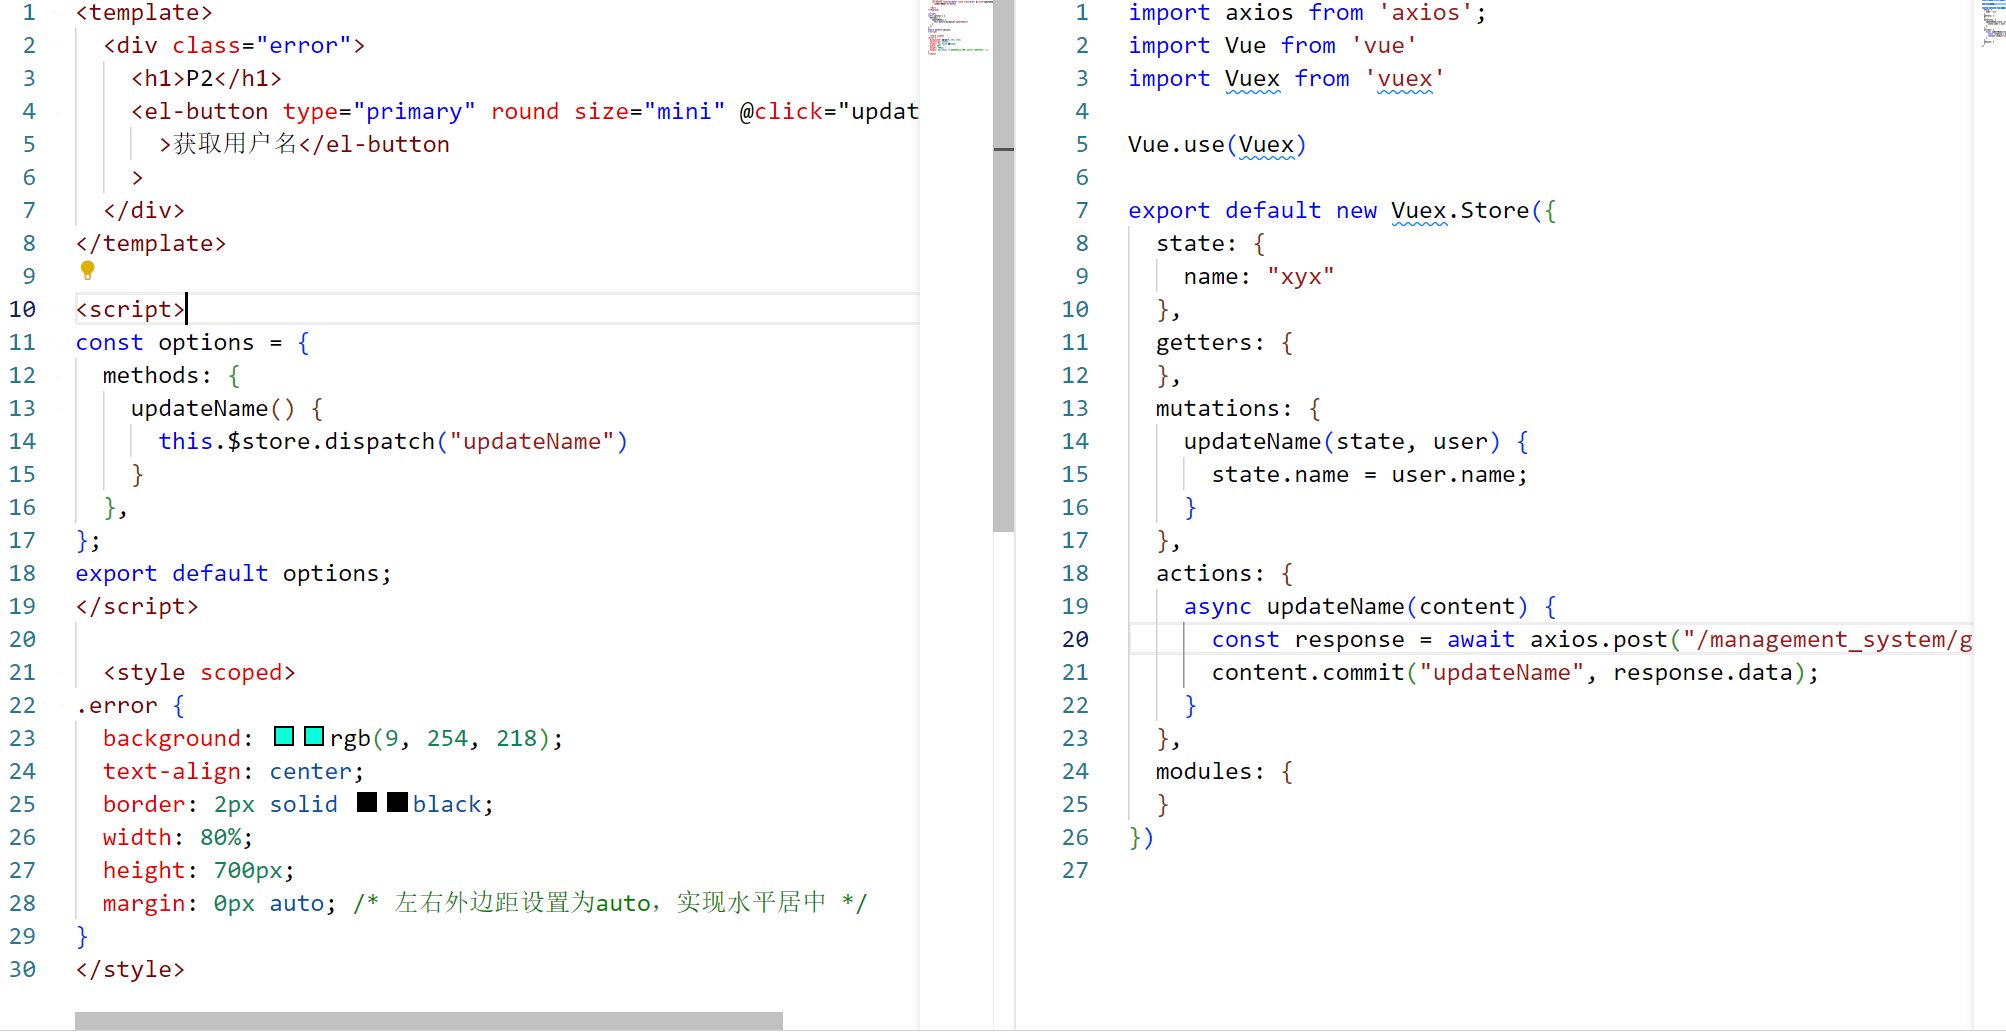
- 优化操作:通过mapActions获取actions中的方法
- 案例中服务器代码
package com.tyut.controller;

import javax.servlet.ServletException;
import javax.servlet.annotation.WebServlet;
import javax.servlet.http.HttpServlet;
import javax.servlet.http.HttpServletRequest;
import javax.servlet.http.HttpServletResponse;
import java.io.IOException;
import java.io.PrintWriter;

@WebServlet("/getUserServlet")
public class GetUserServlet extends HttpServlet {
    @Override
    protected void doGet(HttpServletRequest request, HttpServletResponse response) throws ServletException, IOException {
        response.setContentType("text/html;charset=utf-8");
        response.addHeader("Access-Control-Allow-Origin", "http://localhost:7070");
        request.setCharacterEncoding("utf-8");

        PrintWriter out = response.getWriter();

        String[] nameList = {"张三", "李四", "王五", "赵六"};
        int index = (int) (Math.random() * 10) % 4;
        String name = nameList[index];

        String jsonString = "{\"name\":\"" + name + "\"}";

        out.write(jsonString);
    }

    @Override
    protected void doPost(HttpServletRequest request, HttpServletResponse response) throws ServletException, IOException {
        this.doGet(request, response);
    }
}


 169
169

 被折叠的 条评论
为什么被折叠?
被折叠的 条评论
为什么被折叠?
 到【灌水乐园】发言


