


声明
- 最近在做公司Android系统开发,版本为7.1.1,但是作为技术点总结总不能把公司的系统源码公布出来
- 所以,为了方便我写博客,就用LineageOS作为系统源码来进行分析好了
- LineageOS 的cm-14.1对应的就是Android 7.1.1,而且我手头有一部Nexus5手机,所以这里我就下载Nexus5 对应的cm-14.1版本了
- LineageOS
- TheMuppets
- 其实使用开源AOPS的Android7.1.1也可以,没必要用LineageOS,可以去参考其他的Android系统repo的博客。
1 下载cm-14.1源码前的准备
1.1 前提是自己要能科学上网
科学上网的配置不过审,自行百度吧…
1.2 配置编译环境
- 安装jdk
android 7.1需要的是openjdk8
sudo apt-get update
sudo apt-get install openjdk-8-jdk
- 其它依赖
sudo apt-get install libx11-dev:i386 libreadline6-dev:i386 libgl1-mesa-dev g++-multilib
sudo apt-get install -y git flex bison gperf build-essential libncurses5-dev:i386
sudo apt-get install tofrodos python-markdown libxml2-utils xsltproc zlib1g-dev:i386
sudo apt-get install dpkg-dev libsdl1.2-dev libesd0-dev
sudo apt-get install git-core gnupg flex bison gperf build-essential
sudo apt-get install zip curl zlib1g-dev gcc-multilib g++-multilib
sudo apt-get install libc6-dev-i386
sudo apt-get install lib32ncurses5-dev x11proto-core-dev libx11-dev
sudo apt-get install libgl1-mesa-dev libxml2-utils xsltproc unzip m4
sudo apt-get install lib32z-dev ccache
1.3 安装repo工具
mkdir ~/bin
export PATH=~/bin:$PATH  #添加path环境变量到.bashrc文件末尾
curl https://storage.googleapis.com/git-repo-downloads/repo > ~/bin/repo
sudo chmod a+x ~/bin/repo
2 cm14-1源码下载
2.1 初始化下载
- 在系统中新建源码存放目录:
mkdir LineageOS
cd LineageOS
- 初始化cm-14.1的repo
repo init -u https://github.com/LineageOS/android.git -b cm-14.1
2.2 配置Nexus5独有下载项
因为要使用的设备为Nexus5,所以其devices、kernel、vendor要单独列出下载地址:
修改文件~/LineageOS/.repo/local_manifests内容为:
<?xml version="1.0" encoding="UTF-8"?>
<manifest>
  <project name="LineageOS/android_device_qcom_common" path="device/qcom/common" remote="github" />
  <project name="LineageOS/android_device_lge_hammerheadcaf" path="device/lge/hammerheadcaf" remote="github" />
  <project name="LineageOS/android_device_lge_hammerhead" path="device/lge/hammerhead" remote="github" />
  <project name="LineageOS/android_kernel_lge_hammerhead" path="kernel/lge/hammerhead" remote="github" />
  <project name="TheMuppets/proprietary_vendor_lge" path="vendor/lge" remote="github" revision="cm-14.1" />
</manifest>
2.3 下载同步代码
- 使用repo命令下载源代码
repo sync -j8 --no-clone-bundle
其中:
 -j:开启多线程同步操作,会加快sync命令的执行速度。默认情况下,使用4个线程并发进行sync。
 -c, –current-branch:只同步指定的远程分支。默认情况下,sync会同步所有的远程
 分支,当远程分支比较多的时候,下载的代码量就大。使用该参数,可以缩减下载时
 间,节省本地磁盘空间。
 -d, –detach:脱离当前的本地分支,切换到manifest.xml中设定的分支。在实际操作
 中这个参数很有用,当我们第一次sync完代码后,往往会切换到dev分支进行开发。
 如果不带该参数使用sync, 则会触发本地的dev分支与manifest设定的远程分支进行
 合并,这会很可能会导致sync失败。
 -f, –force-broken:当有git库sync失败了,不中断整个同步操作,继续同步其他的git
 库。
 –no-clone-bundle:在向服务器发起请求时,为了做到尽快的响应速度,会用到内容
 分发网络(CDN, Content Delivery Network)。同步操作也会通过CDN与就近的服务器
 建立连接, 使用HTTP/HTTPS的$URL/clone.bundle来初始化本地的git库,
 clone.bundle实际上是远程git库的镜像,通过HTTP直接下载,这会更好的利用网络
 带宽,加快下载速度。
值得注意的是:
因为是从外网直接下载的,所有这个是个漫长的过程,建议晚上下载。不过清华有源可以下载,但是清华的源不包含我说说的2.2节的Nexus5 的devices、kernel、vendor的源码,可以自己手动到 LineageOS、TheMuppets去下载对应代码,再手动添加到你的LineageOS的源码目录中。**
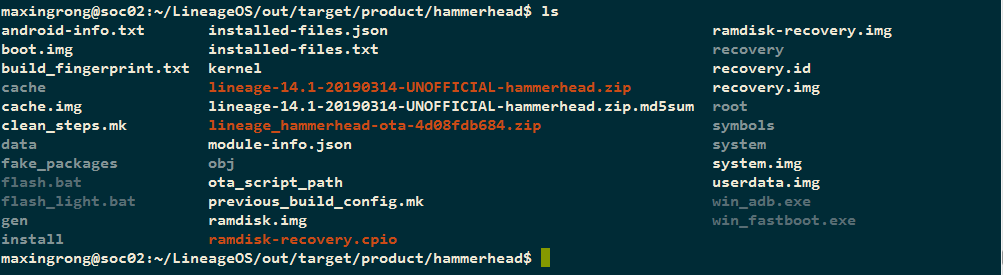
- 下面是我同步完成后的Nexus5 cm14.1的源码目录:

3 编译代码
3.1 编译代码前的配置
- 设置环境变量,与aosp编译类似,编译前同样需要引入环境
source build/envsetup.sh
- 为了加速以后的编译过程,可以开启缓存加速
export USE_CCACHE=1
prebuilts/misc/linux-x86/ccache/ccache -M 50G
export CCACHE_COMPRESS=1
- 还需要开启配置jack编译器
export JACK_SERVER_VM_ARGUMENTS=”-Dfile.encoding=UTF-8 -XX:+TieredCompilation -Xmx16g”
./prebuilts/sdk/tools/jack-admin kill-server
./prebuilts/sdk/tools/jack-admin start-server
- 开启自带root
export WITH_SU=true
- breakfast(相当于lunch命令)
准备构建前,需要先告诉编译系统你要编译什么,这里的话与aosp有点差异,它使用的是一个叫”breakfast“的命令,与lunch类似,但后面加的构建信息可以是直接从devices目录下的名字,如n5为hammerhead
breakfast hammerhead
- 开始编译lunch(相当于make -jx)
brunch hammerhead
-
编译过程中出问题的话,找百度处理,我就很顺利的
-
编译完成后的out目录
4 刷机
4.1 刷机前的准备
因为我是在公司编译服务器中编译的,可以把out目录中的recovery.img、system.img、userdata.img、boot.img、cache.img复制到我自己的Win7电脑的一个目录下,同时目录中包含win7平台的adb、fastboot工具:
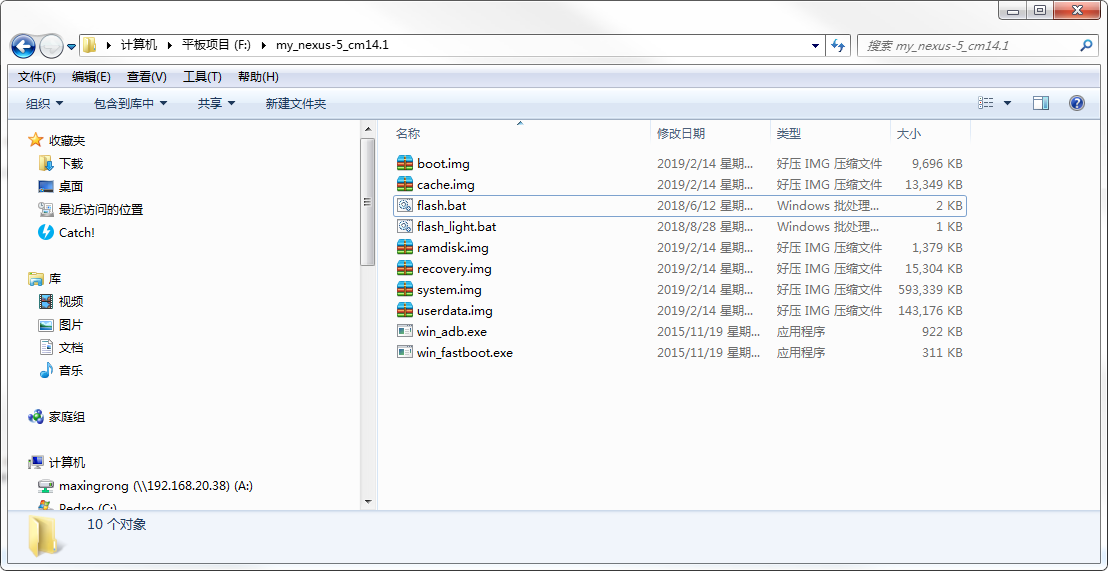
写一个刷机脚本flash.bat:
@ECHO OFF

REM read config file
setlocal ENABLEDELAYEDEXPANSION
set loop=0
for /F "tokens=*" %%A in (.config) do (
    SET /A loop=!loop! + 1
    set %%A
)

set DEVICE_FOUND=0

REM nexus has device instead of product name
IF [%PRODUCT_NAME%]==[] (
 set PRODUCT_NAME=%DEVICE%
)

REM if nexus 4 assume you are in fastboot mode, can't seem to find drivers
IF [%DEVICE%]==[mako] (
call :flash
)

REM push device from adb to fastboot mode
win_adb kill-server
win_adb devices
win_adb get-state > devicestate.txt
set /p DEVICE_STATE= < devicestate.txt

IF NOT "%DEVICE_STATE%"=="device" (
   ECHO Please check :
   ECHO 1. to make sure that only one device is connected to the computer
   ECHO 2. the device is turned on with the screen showing
   ECHO 3. the device is set to debugging via USB : ADB Only or ADB and Devtools
   ECHO 4. the device drivers are installed on the computer.
   Del devicestate.txt
   PAUSE
   EXIT /b
)

Del devicestate.txt
win_adb reboot bootloader

TIMEOUT 5

:flash
win_fastboot devices 2> fastboot_state.txt
set /p FASTBOOT_STATE= < fastboot_state.txt

IF NOT [%FASTBOOT_STATE%]==[] (
   ECHO Please check :
   ECHO 1. to make sure that only one device is connected to the computer
   ECHO 2. the device is turned on with an indication that the device is in fastboot mode
   ECHO 3. the fastboot drivers are installed on the computer.
   Del fastboot_state.txt
   PAUSE
   EXIT /b
)

Del fastboot_state.txt

ECHO "Flashing build. If nothing mentions that it flashed anything and it looks stuck, make sure you have the drivers installed."
win_fastboot flash boot ./boot.img
win_fastboot flash system ./system.img
win_fastboot flash persist ./persist.img
win_fastboot flash recovery ./recovery.img
win_fastboot flash cache ./cache.img
win_fastboot flash userdata ./userdata.img

ECHO "Done..."

win_fastboot reboot
echo "Just close the windows as you wish."
TIMEOUT 5
4.2 执行刷机脚本
给Nexus5 插好线,双击flash.bat即可开始刷机了!!
4.3 刷机完成啦,Enjoy it!!

4.4 另外,还可以使用卡刷的方式刷机
卡刷可以参考:


 621
621

 被折叠的 条评论
为什么被折叠?
被折叠的 条评论
为什么被折叠?
 到【灌水乐园】发言


