


实现登陆注册的流程
以我自己得理解说一下吧,登陆注册分为三部分:小程序、开发者服务器、微信接口服务。实现两两的交互,就是一个登陆注册的过程。那怎么交互呢?就是微信小程序想登录的话,首先就要检测公司服务器中是否有注册过的信息,而注册就是向微信接口服务中提交用户的信息,如果没有注册,就先获取用户信息进行注册,然后再返回,重新请求登录,如果查询到了已经注册过的信息,就根据返回的参数进行有关登录的一系列操作。
一、登录授权要传递token,那token是什么呢?
token服务端生成的一串字符串,是客户端频繁向服务器端请求数据时,作为客户端进行请求的一个参数,当第一次登录后,服务器生成一个token将token返回给客户端,客户端要再次发送请求,带上这个token前来请求数据就行了,其他就不用了。(前端鉴权的一种方式,有后端生成,并且token具有是时效性,意思就是说token只在一段时间内有效且只生成一个)
二、实现流程
- 在开发者工具新建js文件,这个文件对登录注册的方法进行了封装,需要获取三个参数,微信登录接口返回的 code 参数数据,iv微信登录接口返回的加密偏移数据,encryptedData:微信登录接口返回的 加密用户信息。根据这些值拿到token,保存到本地,登录的时候就从本地中获取token的值进行登录操作。
//async方法 放在谁的前面就是把普通函数变成异步操作
const { xhy_api } = require("../http/xhy_api/xhy_api.js")

//登陆方法
async function login(page) {
  //定义this 方便使用
  // const _this = this
  wx.login({
    success: function (res) {
      //因为下边登录 一样要用code值 而code值 是一次只能使用一次 所以我们要再次获取code值
      let code = res.code
      xhy_api("login_wx", { code }).then(function (res) {
        if (res.code !== 0) {
          wx.showModal({
            title: '登陆失败',
          })
          return;
        }
        //成功回调后是能够拿到openid和token的 拿到后本地保存
        wx.setStorageSync('token', res.data.token)
        wx.setStorageSync('uid', res.data.uid)
        page.onShow()
      })
    }
  })
}
//注册方法
async function register(page) {
  //定义当前页面的this 为了方便下文使用
  console.log(this)
  var _this = this
  console.log(_this)
  //先进行登录 得到coed值
  wx.login({//微信官方的方法拿code
    success: function (res) {
      //定义code值
      let code = res.code
      //因为api提供接口上需要code iv 和  encryptedData三个必要参数 所以要获取用户的信息
      wx.getUserInfo({//微信官方的方法拿iv 和 encryptedData
        success: function (res) {
          let encryptedData = res.encryptedData
          let iv = res.iv
          //三个参数齐全了 就开始调用注册接口了
          xhy_api("register_complex", { code, encryptedData, iv }).then(function(res) {
            //当前用户是否注册
            if (res.code === 10000) {
              console.log("用户已注册")
              //直接走登录
              _this.login(page)
              return;
            }
            //刚才已经完成注册直接走登录
            _this.login(page)
          })
        }
      })
    }
  })
}
//用户详情
async function getuserdetail(){
  return new Promise((resolve,reject)=>{
    const token = wx.getStorageSync('token')
    //通过api方法获取用户数据
    xhy_api("getUserInfo_details",{token}).then(res=>{
      resolve(res)
    })
  })
}
//点击退出登录  异步操作的方法
async function loadingout(){
  wx.removeStorageSync('token')
  wx.removeStorageSync('uid')
}
//抛出这个封装的模块
module.exports = {
  register: register,
  login:login,
  getuserdetail:getuserdetail,
  loadingout:loadingout
}
-
在每次需要用到登录注册时就需要把以上封装的组件进行引入

-
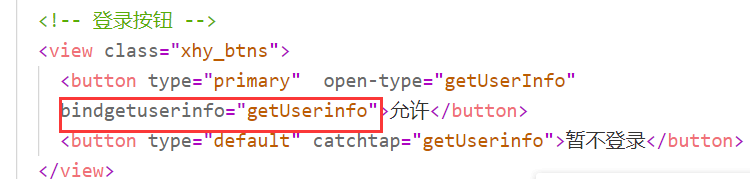
给弹出层添加一个事件,执行这个方法
/**
   * 组件的初始数据
   */
  data: {
    isShow:true
  },
  // 组件的生命周期
  pageLifetimes:{
    //判断进入页面的弹出框是否显示
    show(){
      //拿到的是本地的数据
      const token = wx.getStorageSync('token')
      console.log(token)
      if(token){
        this.setData({
          isShow:false
        })
      }else{
        console.log(1)
        this.setData({
          isShow:true
        })
      }
    }
  },

 methods: {
    //点击允许的执行 方法 给父组件一个方法 相关操作在父组件中执行
    getUserinfo(e){
      this.triggerEvent("allow",e.detail),
      this.setData({
        isShow:false
      })
    },

	//点击退出登录让弹出框显示允许登录
    getF(){
      this.setData({
        isShow:true
      })
    }
  },
- 给父组件传递的方法

 allow(e){
    //通过传参获得的是从组件传过来的页面数
    let _this = this
    let useinfo = e.detail.userInfo
    //如果传过来有内容就是点击了允许 直接去注册登录
    if(useinfo){
      AUTH.register(_this)

      //拿到本地token并保存
      AUTH.getuserdetail().then(res=>{
        console.log(res)
      })
    }else{ //否则就是点击了取消 弹出弹框
      wx.showToast({
        title: '已取消',
      })
    }
  },
- 在user.js中写入:
	//对页面进行刷新,调用onShow方法
  layout(){
    AUTH.loadingout()
    this.onShow()
    this.selectComponent('#tan').getF();
  },
  /**
   * 生命周期函数--监听页面加载
   */
  onShow: function () {
    //进入我的页面就执行 判断本地存值来让页面显示不同的头像名字
    const token  = wx.getStorageSync('token')
    if(token){
      AUTH.getuserdetail().then(res=>{
        this.setData({
          userInfo:res.data.base,
          value:"退出"
        })
      })
    }else{
      this.setData({
        userInfo:{
          avatarUrl:"../../assets/user.png",
          nick:"未登录"
        }
     })
    }
  },
以上是对今天接触的登录注册进行的一些简单的理解,可能有部分理解不当的地方,仅供参考。


 4035
4035


 被折叠的 条评论
为什么被折叠?
被折叠的 条评论
为什么被折叠?
 到【灌水乐园】发言


