


1.
保证主节点开始二进制日志,从节点配置中继日志
2.
从节点的开启一个
I/O
线程读取主节点二进制日志的内容
3.
从节点读取主节点的二进制日志之后,会将去读的内容写入从节点的中继日志
4.
从节点开启
SQL
线程,读取中继日志的内容,并执行,来保证从节点的数据和主节点的数据保持一致
缺点:
1.
从节点只能从指定的偏移量开始同步数据,也就是说偏移量之前的数据无法通过主从同步去完善,
所以就需要通过逻辑备份等方式来导入到从节点。
2.
二进制日志因为只记录数据变化状态,而不是记录真实有哪些数据存在
主从同步的过程:
1.
分别修改主从节点的配置文件,启用对应类型的日志,需要配置局域网内数据库服务的编号,以区别不同的节点
需要重启服务
2.
在主节点授权,并导出二进制日志偏移量之前的数据,以方便后续数据的写入
3.
在从节点,连接主节点的二进制日志,开启从节点的相关线程
4.
检查从节点的主从同步状态
5.
导入提前备份的主节点数据
6.
在主节点新建数据,测试数据的同步的效果
在从节点写入的数据是不会同步到主节点的!!!!!
主节点:
192.168.110.50 - mysql-1
从节点:
192.168.110.60 - mysql-2
主节点:
server-id 区别局域网内的mysql服务器
log-bin 开启二进制日志。并制定二进制日志的文件名
[root@mysql-1 ~]# cat /etc/my.cnf //如果my.cnf中没有[mysqld],那么将下面的内
容写入 /etc/my.cnf.d./mysql-server.cnf
文件末尾新增如下内容,确保几行在[mysqld]的配置块中:
log_bin=source-bin
server_id=1
validate_password.policy = low
validate_password.length = 4
validate_password.mixed_case_count = 0
validate_password.special_char_count = 0
validate_password.number_count = 0
[root@mysql-1 ~]# rm -f /var/lib/mysql/source-bin.*
[root@mysql-1 ~]# systemctl restart mysqld
[root@mysql-1 ~]# firewall-cmd --add-service=mysql
success
[root@mysql-1 ~]# firewall-cmd --add-service=mysql --permanent
success
从节点:
server-id
relay-log: 开启中继日志,并指定中继日志的文件名
[root@mysql-2 ~]# cat /etc/my.cnf //如果my.cnf中没有[mysqld],那么将下面的内容
写入 /etc/my.cnf.d./mysql-server.cnf
#文件末尾新增,确保几行在[mysqld]的配置块中
server_id = 2
relay_log = relipca-relay
relay_log_index = relipca-relay-index
[root@mysql-2 ~]# rm -f /var/lib/mysql/reli*
[root@mysql-2 ~]# ls /var/lib/mysql/rel*
ls: cannot access '/var/lib/mysql/rel*': No such file or directory
[root@mysql-2 ~]# systemctl restart mysqld
2.
主节点创建同步用户
mysql> CREATE USER 'replica-user'@'192.168.110.%' IDENTIFIED BY
'redhat';
Query OK, 0 rows affected (0.01 sec)
mysql> select user from mysql.user where user = 'replica-user';
+--------------+
| user |
+--------------+
| replica-user |
+--------------+
1 row in set (0.00 sec)
mysql> GRANT REPLICATION SLAVE ON *.* TO 'replicauser'@'192.168.110.%';
Query OK, 0 rows affected (0.00 sec)
# 增加一个读锁,避免在成功建立主从复制架构前产生任何的数据读写
mysql> FLUSH TABLES WITH READ LOCK;
mysql> show master status;
+-------------------+----------+--------------+------------------+-----
--------------+
| File | Position | Binlog_Do_DB | Binlog_Ignore_DB |
Executed_Gtid_Set |
+-------------------+----------+--------------+------------------+-----
--------------+
| source-bin.000001 | 730 | | |
|
+-------------------+----------+--------------+------------------+-----
--------------+
1 row in set (0.00 sec)
3.
主节点需要在开始主从同步之前,将部分数据预先导入从数据库,避免后续
SQL
写入失败。
1.
使用任意一种方式,实现数据迁移到从节点即可。
mysqldump
导出主节点有但是从节点没有的数据
mysql < dump.sql
从节点导入主节点备份的数据
4.
从节点同步主节点二进制日志
主节点:
mysql> UNLOCK TABLES;
从:
mysql> stop slave;
Query OK, 0 rows affected, 2 warnings (0.00 sec)
mysql> CHANGE REPLICATION SOURCE TO SOURCE_HOST='192.168.110.50',
SOURCE_USER='replica-user', SOURCE_PASSWORD='redhat',
-> SOURCE_LOG_FILE='source-bin.000001', SOURCE_LOG_POS=730,
GET_MASTER_PUBLIC_KEY=1;
Query OK, 0 rows affected, 3 warnings (0.01 sec)
mysql> start slave;
Query OK, 0 rows affected, 1 warning (0.02 sec)
mysql> show slave status\G
*************************** 1. row ***************************
Slave_IO_State: Waiting for source to send event
Master_Host: 192.168.110.50
Master_User: replica-user
Master_Port: 3306
Connect_Retry: 60
Master_Log_File: source-bin.000001
Read_Master_Log_Pos: 730
Relay_Log_File: relipca-relay.000002
Relay_Log_Pos: 327
Relay_Master_Log_File: source-bin.000001
Slave_IO_Running: Yes //这两行的值必须是YES
Slave_SQL_Running: Yes //这两行的值必须是YES
Replicate_Do_DB:
Replicate_Ignore_DB:
Replicate_Do_Table:
Replicate_Ignore_Table:
Replicate_Wild_Do_Table:
Replicate_Wild_Ignore_Table:
Last_Errno: 0
Last_Error:
Skip_Counter: 0
Exec_Master_Log_Pos: 730
Relay_Log_Space: 535
Until_Condition: None
Until_Log_File:
Until_Log_Pos: 0
Master_SSL_Allowed: No
Master_SSL_CA_File:
Master_SSL_CA_Path:
Master_SSL_Cert:
Master_SSL_Cipher:
Master_SSL_Key:
Seconds_Behind_Master: 0
Master_SSL_Verify_Server_Cert: No
Last_IO_Errno: 0
Last_IO_Error:
Last_SQL_Errno: 0
Last_SQL_Error:
Replicate_Ignore_Server_Ids:
Master_Server_Id: 1
Master_UUID: 15bdf919-04f6-11ef-b4d0-000c29bbb601
Master_Info_File: mysql.slave_master_info
SQL_Delay: 0
SQL_Remaining_Delay: NULL
Slave_SQL_Running_State: Replica has read all relay log; waiting for
more updates
Master_Retry_Count: 86400
Master_Bind:
Last_IO_Error_Timestamp:
Last_SQL_Error_Timestamp:
Master_SSL_Crl:
Master_SSL_Crlpath:
Retrieved_Gtid_Set:
Executed_Gtid_Set:
Auto_Position: 0
Replicate_Rewrite_DB:
Channel_Name:
Master_TLS_Version:
Master_public_key_path:
Get_master_public_key: 1
Network_Namespace:
1 row in set, 1 warning (0.00 sec)
4.
验证主从同步
主节点创建库
从节点检查 同步成功
主:
mysql> create database testa;
Query OK, 1 row affected (0.01 sec)
从:
mysql> show databases;
+--------------------+
| Database |
+--------------------+
| information_schema |
| mysql |
| performance_schema |
| sys |
| testa |
+--------------------+
5 rows in set (0.01 sec)
# 如果使用系统自带的mariadb数据库或者不是mysql 8.0.23以上的版本,实现下面的语句进行主节
点的连接参数配置
mysql> CHANGE MASTER TO
-> MASTER_HOST='source_host_name',
-> MASTER_USER='replication_user_name',
-> MASTER_PASSWORD='replication_password',
-> MASTER_LOG_FILE='recorded_log_file_name',
-> MASTER_LOG_POS=recorded_log_position;
Or from MySQL 8.0.23:
mysql> CHANGE REPLICATION SOURCE TO
-> SOURCE_HOST='source_host_name',
-> SOURCE_USER='replication_user_name',
-> SOURCE_PASSWORD='replication_password',
-> SOURCE_LOG_FILE='recorded_log_file_name',
-> SOURCE_LOG_POS=recorded_log_position;
5.
至此主从配置已经完成,但是部分数据还是未同步,现在在主节点上备份这个未同步的数据,并导
入从节点即可,(结合自己架构中是否需要进行数据导入操作)
1.
目前的演示环境下存在一个没有同步的
test
数据库,如果此时在主库从
test
库下的表进行写
入,从节点会因为需要在在从节点上不存在的表写入数据,而停止
SQL
线程,于是我们需要
将
test
的数据导入到从库中(演示插入了
5
,
‘eee’
) 从节点上
SQL
线程报错,同时也不存在
test
库 和
a
表。
主节点:
[root@mysql-1 ~]# mysqldump -u root -predhat --databases test > dump.sql
mysqldump: [Warning] Using a password on the command line interface can be
insecure.
[root@mysql-1 ~]# scp dump.sql root@192.168.110.60:/root
The authenticity of host '192.168.110.60 (192.168.110.60)' can't be
established.
ECDSA key fingerprint is SHA256:96uJaydFGQSVWCqYUABOjb+GQYl4fNla/WbPreRvsK0.
Are you sure you want to continue connecting (yes/no/[fingerprint])? yes
Warning: Permanently added '192.168.110.60' (ECDSA) to the list of known
hosts.
root@192.168.110.60's password:
dump.sql
100% 2050 1.2MB/s 00:00
从节点:
[root@mysql-2 ~]# mysql -u root -p'Redhat12~' < dump.sql
mysql: [Warning] Using a password on the command line interface can be
insecure.
主节点写入数据:
mysql> insert into test.a values(6, 'fff');
Query OK, 1 row affected (0.00 sec)
mysql> insert into test.a values(7, 'ggg');
Query OK, 1 row affected (0.00 sec)
从节点查看同步的数据:
mysql> select * from test.a;
+------+------+
| id | name |
+------+------+
| 1 | aaa |
| 2 | bbb |
| 3 | ccc |
| 5 | eee | //导入一次
| 5 | eee | //主从同步一次
| 6 | fff |
| 7 | ggg |
+------+------+
7 rows in set (0.01 sec)
加入新的从节点
两种方法:
1.
在新的从节点上,配置
change
语句即可
2.
从原本的从节点复制数据,修改配置文件并重启
1.
在原本的从节点上打包数据目录,方便传输
1.
原本从节点关闭数据库服务
2. tar
,命令打包
[root@mysql-2 ~]# systemctl stop mysqld
[root@mysql-2 ~]# cd /var/lib/mysql
[root@mysql-2 mysql]# tar -czf /root/salve1.tar.gz .
[root@mysql-2 ~]# scp slave1.tar.gz root@192.168.110.131:/root
root@192.168.110.131's password:
slave1.tar.gz
100% 2112KB 110.5MB/s
00:00
2.
将压缩包复制到新的从节点上
1. scp
传输压缩包
2.
启动数据库服务
[root@mysql-2 ~]# scp salve1.tar.gz root@192.168.110.131:/root
root@192.168.110.131's password:
salve1.tar.gz
100% 2108KB 116.2MB/s
00:00
[root@mysql-2 ~]# systemctl start mysqld
3.
确保从节点上新的数据的安全上下文以及权限正确
1. mysql
用户需要有完整的读写执行权限
2.
直接使用
restorecon
恢复数据目录的安全上下文为默认的标签
[root@bogon ~]# rm -rf /var/lib/mysql
[root@bogon ~]# mkdir /var/lib/mysql
[root@bogon ~]# tar -xzf salve1.tar.gz -C /var/lib/mysql/
[root@bogon ~]# chown mysql.mysql /var/lib/mysql
[root@bogon ~]# restorecon -R /var/lib/mysql
4.
在新的从节点上
1.
删除
/var/lib/mysql/auto.cnf
2.
修改配置文件
1. server_id //
值和目前主从复制架构下的任何数据库的
server_id
的值不重复
2. relay_log
相关的配置和原本的从节点保持一致
3. skip_slave_start
在启动数据库时,跳过从节点复制线程的启动
[root@bogon ~]# rm -f /var/lib/mysql/auto.cnf
[root@bogon ~]# vim /etc/my.cnf
# 添加如下内容
server_id=3
skip-slave-start=1
relay_log = relipca-relay
relay_log_index = relipca-relay-index
5.
新的从节点上,启动数据库服务
1.
检查主从配置和原本从节点配置是否一致
show slave status
(
host /user /log/pos
)
2.
执行
start slave
启动从线程。
[root@bogon ~]# systemctl start mysqld
[root@bogon ~]# mysql -uroot -p'Redhat12~'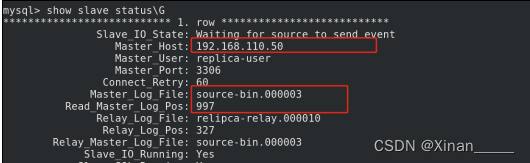
mysql> start slave;
Query OK, 0 rows affected, 1 warning (0.01 sec)
6.
测试数据同步的效果
1.
在主节点写如任何数据,都会主动同步到所有的从节点上去完成
主:
mysql> insert into test.a values(8, 'hhh');
Query OK, 1 row affected (0.00 sec)
从1:
mysql> select * from test.a;
+------+------+
| id | name |
+------+------+
| 1 | aaa |
| 2 | bbb |
| 3 | ccc |
| 5 | eee |
| 5 | eee |
| 6 | fff |
| 7 | ggg |
| 8 | hhh |
+------+------+
8 rows in set (0.00 sec)
从2:
mysql> select * from test.a;
+------+------+
| id | name |
+------+------+
| 1 | aaa |
| 2 | bbb |
| 3 | ccc |
| 5 | eee |
| 5 | eee |
| 6 | fff |
| 7 | ggg |
| 8 | hhh |
+------+------+
8 rows in set (0.04 sec)


 1146
1146


 被折叠的 条评论
为什么被折叠?
被折叠的 条评论
为什么被折叠?
 到【灌水乐园】发言


