


注意:在本次实验中使用4台主机
首先要完成Nginx负载均衡
1里面是Nginx的负载均衡,2里面是Keepalived实现Nginx负载均衡的高可用
目录
2-1 在 DS1 安装 Keepalived 并修改相关配置
2-2 在 DS2 安装 Keepalived 并修改相关配置
| 主机名 | IP地址 | 身份 | 需要的软件 |
|---|---|---|---|
| DS1 | 172.2.25.21 | 调度服务器 | Nginx,keepalived |
| DS2 | 172.2.25.22 | Nginx,keepalived | |
| RS1 | 172.2.25.23 | 后端真实服务器 | Nginx |
| RS2 | 172.2.25.24 | 后端真实服务器 | Nginx |
1.Nginx的负载均衡
1-1 安装软件
[root@LiKe-DS1 ~]# yum install -y nginx
[root@LiKe-DS1 ~]# yum install -y keepalived
图1-1 软件安装完成,没安装的使用上面命令
1-1-1 关闭防火墙及SELinux
[root@LiKe-RS1 html]# systemctl stop firewalld.service
[root@LiKe-RS1 html]# setenforce 0
图1-2 关闭防火墙
1-2 修改Nginx配置文件
[root@LiKe-DS1 ~]# vim /etc/nginx/nginx.conf


    upstream like.apply {
    server 172.2.25.33 weight=10;
    server 172.2.25.34 weight=5;
    server 172.2.25.31 backup;
    }


        location / {
        # 负载均衡
        proxy_pass http://like.apply;
        proxy_set_header X-Forwarded-For $remote_addr;
    }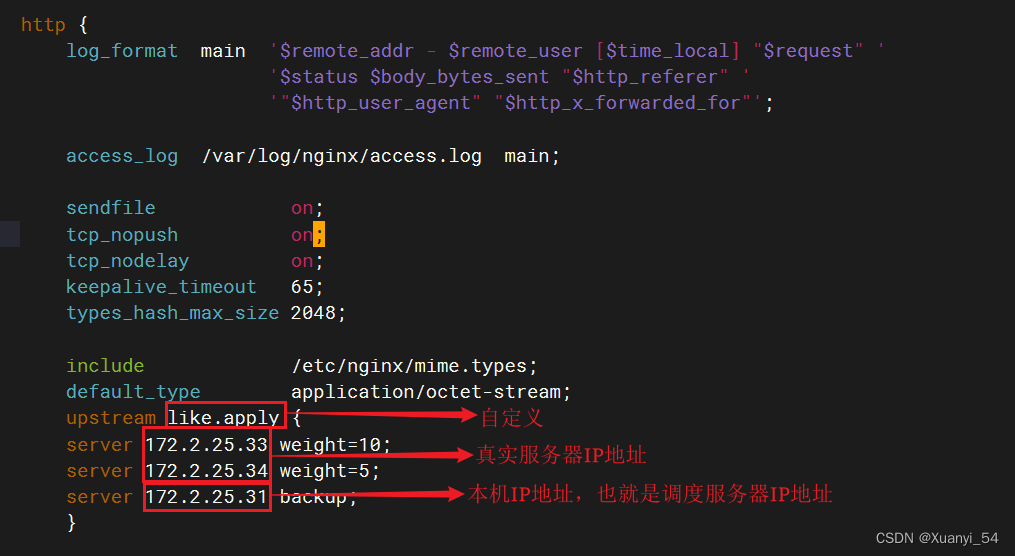
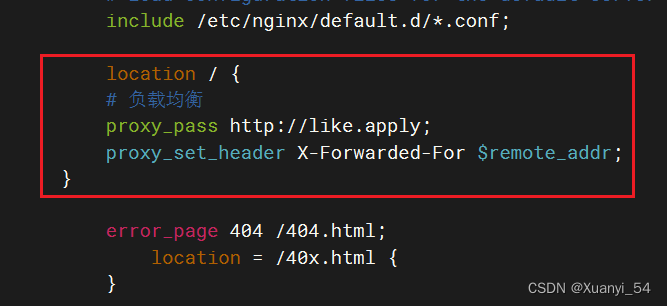
图2-1 修改/etc/nginx/nginx.conf配置文件
1-3 在后端真实服务器上面创建测试页
注意:需要在RS1和RS2上面创建测试页,在下面演示在RS1创建测试页过程,在RS2创建测试页和RS1一样
创建的测试页里面写什么都行,为了方便我写的分别是RS1和RS2
[root@LiKe-RS1 local]# cd /usr/share/nginx/html/
[root@LiKe-RS1 html]# ls
404.html  50x.html  index.html  nginx-logo.png  poweredby.png
[root@LiKe-RS1 html]# cat index.html
RS1
图3-1 创建测试页
1-4 测试可用性
我在这四台主机之外找了一个主机,该主机是与这四台服务器是同一个网段的
[root@Zabbix-Server1 ~]# curl 172.2.25.31
RS1
[root@Zabbix-Server1 ~]# curl 172.2.25.31
RS2
[root@Zabbix-Server1 ~]# curl 172.2.25.31
RS1
[root@Zabbix-Server1 ~]# curl 172.2.25.31
RS1
[root@Zabbix-Server1 ~]# curl 172.2.25.31
RS2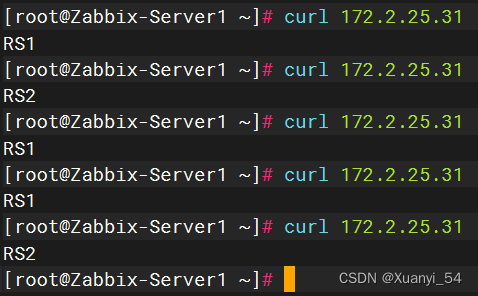
图4-1 curl调度服务器的IP,显示的是RS1和RS2,成功
2.Keepalived实现Nginx负载均衡的高可用
2-1 在 DS1 安装 Keepalived 并修改相关配置
[root@LiKe-DS1 ~]# ip a s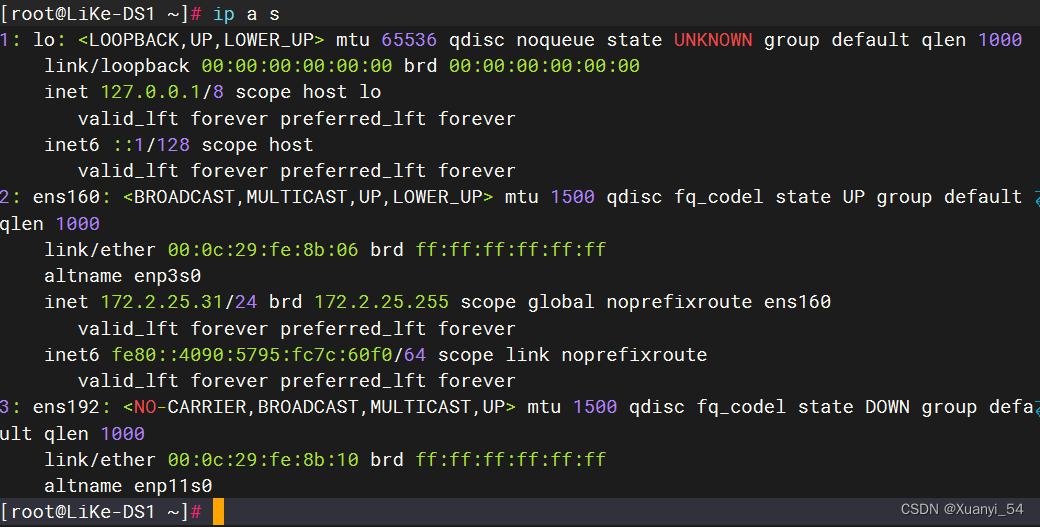
图5-1 查看网络设备名称,图中我们可看到网络设备名称为ens160
[root@LiKe-DS1 ~]# vim /etc/keepalived/keepalived.conf
[root@LiKe-DS1 ~]# cat /etc/keepalived/keepalived.conf
! Configuration File for keepalived
global_defs {
        router_id HA1
}
vrrp_instance VI_1 {
        state BACKUP
        nopreempt
        interface ens160
        virtual_router_id 70
        priority 100
        advert_int 1
        authentication {
                auth_type PASS
                auth_pass 1111
        }
        virtual_ipaddress {
                172.2.25.88/24
        }
}
图5-2 Keepalived配置文件及修改方法
[root@LiKe-DS1 ~]# systemctl restart keepalived.service
图5-3 重启服务

图5-4 配置成功
2-2 在 DS2 安装 Keepalived 并修改相关配置
[root@LiKe-DS2 ~]# ip a s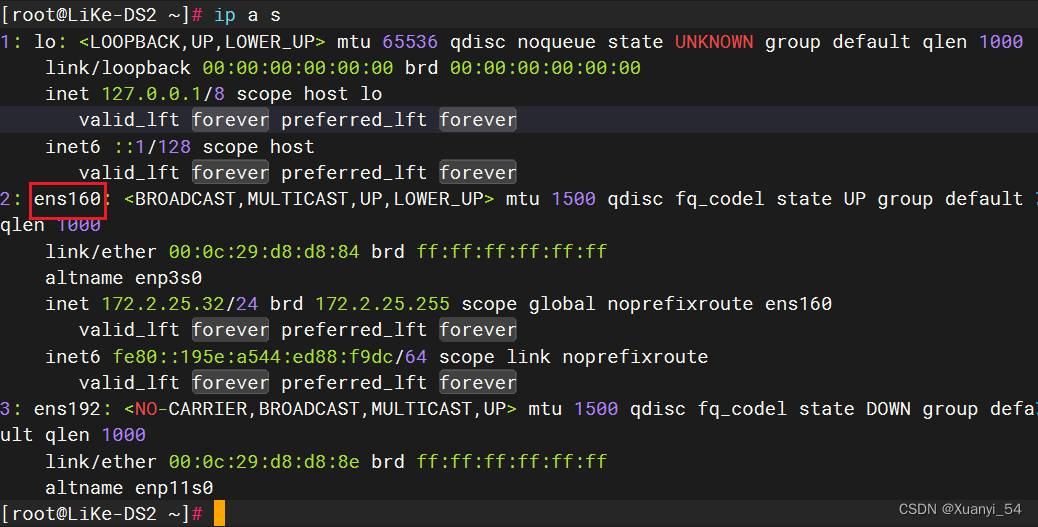 图6-1 查找网络设备名
[root@LiKe-DS2 ~]# vim /etc/keepalived/keepalived.conf
[root@LiKe-DS2 ~]# cat /etc/keepalived/keepalived.conf
global_defs {
        router_id HA2
}
vrrp_instance VI_1 {
        state BACKUP
        nopreempt
        interface ens160
        virtual_router_id 70
        priority 99
        advert_int 1
        authentication {
                auth_type PASS
                auth_pass 1111
        }
        virtual_ipaddress {
                172.2.25.88/24
        }
}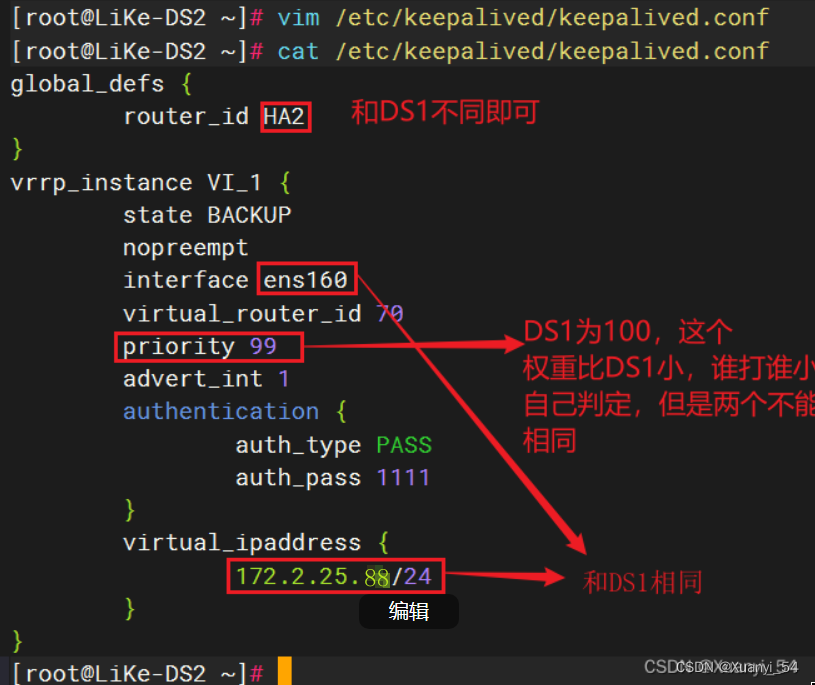
图6-2 Keepalived配置文件及修改方法
[root@LiKe-DS2 ~]# systemctl restart keepalived.service![]()
图6-3 重启Keepaliver服务
2-3 测试
[root@LiKe-RS2 html]# curl 172.2.25.88
RS1
[root@LiKe-RS2 html]# curl 172.2.25.88
RS1
[root@LiKe-RS2 html]# curl 172.2.25.88
RS2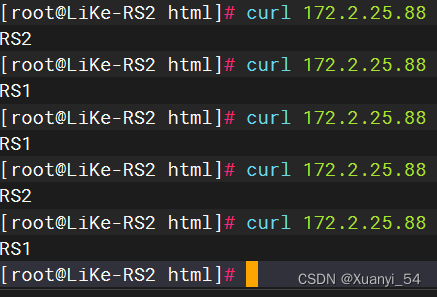
图7-3 在测试机上面进行测试,curl的是DS1虚拟出的VIP,测试成功


 被折叠的 条评论
为什么被折叠?
被折叠的 条评论
为什么被折叠?
 到【灌水乐园】发言


