


一、MyBatis-Plus
1.简介
MyBatis-Plus (opens new window)(简称 MP)是一个 MyBatis (opens new window)的增强工具,在 MyBatis 的基础上只做增强不做改变,为简化开发、提高效率而生。
文档:https://baomidou.com/pages/24112f/#特性
我们的愿景是成为 MyBatis 最好的搭档,就像 魂斗罗 中的 1P、2P,基友搭配,效率翻倍。

2.特性
- 无侵入:只做增强不做改变,引入它不会对现有工程产生影响,如丝般顺滑
- 损耗小:启动即会自动注入基本 CURD,性能基本无损耗,直接面向对象操作
- 强大的 CRUD 操作:内置通用 Mapper、通用 Service,仅仅通过少量配置即可实现单表大部分 CRUD 操作,更有强大的条件构造器,满足各类使用需求
- 支持 Lambda 形式调用:通过 Lambda 表达式,方便的编写各类查询条件,无需再担心字段写错
- 支持主键自动生成:支持多达 4 种主键策略(内含分布式唯一 ID 生成器 - Sequence),可自由配置,完美解决主键问题
- 支持 ActiveRecord 模式:支持 ActiveRecord 形式调用,实体类只需继承 Model 类即可进行强大的 CRUD 操作
- 支持自定义全局通用操作:支持全局通用方法注入( Write once, use anywhere )
- 内置代码生成器:采用代码或者 Maven 插件可快速生成 Mapper 、 Model 、 Service 、 Controller 层代码,支持模板引擎,更有超多自定义配置等您来使用
- 内置分页插件:基于 MyBatis 物理分页,开发者无需关心具体操作,配置好插件之后,写分页等同于普通 List 查询
- 分页插件支持多种数据库:支持 MySQL、MariaDB、Oracle、DB2、H2、HSQL、SQLite、Postgre、SQLServer 等多种数据库
- 内置性能分析插件:可输出 SQL 语句以及其执行时间,建议开发测试时启用该功能,能快速揪出慢查询
- 内置全局拦截插件:提供全表 delete 、 update 操作智能分析阻断,也可自定义拦截规则,预防误操作
3.支持数据库
任何能使用
MyBatis进行 CRUD, 并且支持标准 SQL 的数据库,具体支持情况如下,如果不在下列表查看分页部分教程 PR 您的支持。
- MySQL,Oracle,DB2,H2,HSQL,SQLite,PostgreSQL,SQLServer,Phoenix,Gauss ,ClickHouse,Sybase,OceanBase,Firebird,Cubrid,Goldilocks,csiidb
- 达梦数据库,虚谷数据库,人大金仓数据库,南大通用(华库)数据库,南大通用数据库,神通数据库,瀚高数据库
4.框架结构
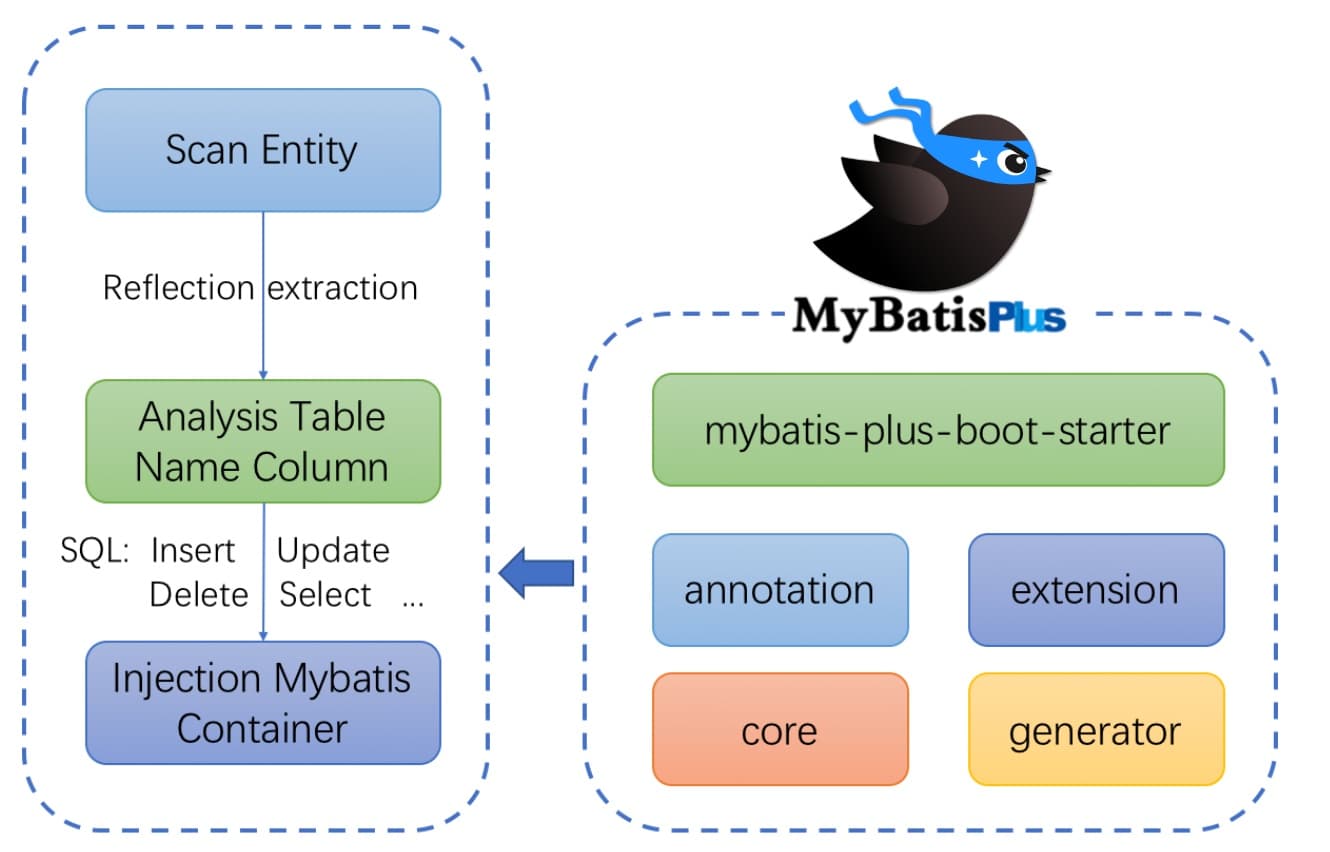
5.官方地址
二、入门案例
1.开发环境
- IDE:IDEA 2019.3.5
- JDK:JDK8+
- 构建工具:Maven 3.5.4
- MySQL:MySQL 8.0.24
- Navicat:Navicat Premium 15
- Spring Boot:2.6.7
- MyBatis-Plus:3.5.1
2.建库建表
- 打开Navicat运行以下SQL脚本进行建库建表
CREATE DATABASE `mybatis_plus` /*!40100 DEFAULT CHARACTER SET utf8mb4 */;
use `mybatis_plus`;
CREATE TABLE `user` (
    `id` bigint(20) NOT NULL COMMENT '主键ID',
    `name` varchar(30) DEFAULT NULL COMMENT '姓名',
    `age` int(11) DEFAULT NULL COMMENT '年龄',
    `email` varchar(50) DEFAULT NULL COMMENT '邮箱',
    PRIMARY KEY (`id`)
) ENGINE=InnoDB DEFAULT CHARSET=utf8;
- 插入几条测试数据
INSERT INTO user (id, name, age, email) VALUES
(1, 'Jone', 18, 'test1@baomidou.com'),
(2, 'Jack', 20, 'test2@baomidou.com'),
(3, 'Tom', 28, 'test3@baomidou.com'),
(4, 'Sandy', 21, 'test4@baomidou.com'),
(5, 'Billie', 24, 'test5@baomidou.com');
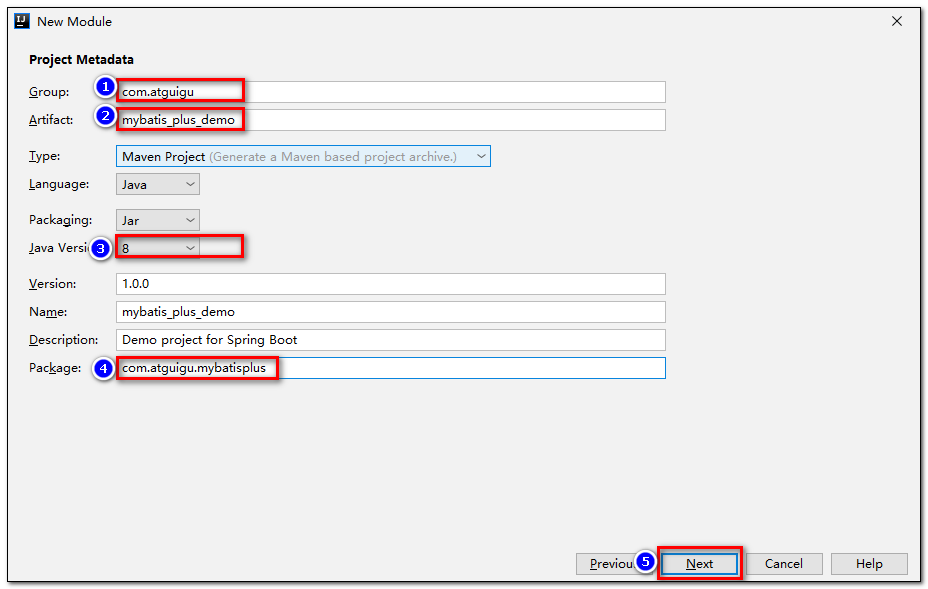
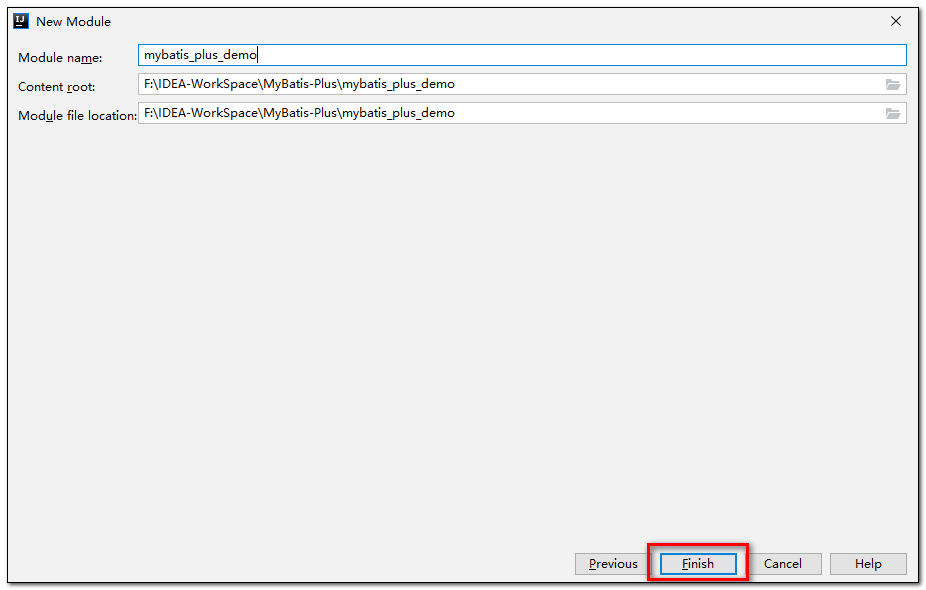
3.创建工程
- 使用
**Spring Initializer**快速初始化一个 Spring Boot 工程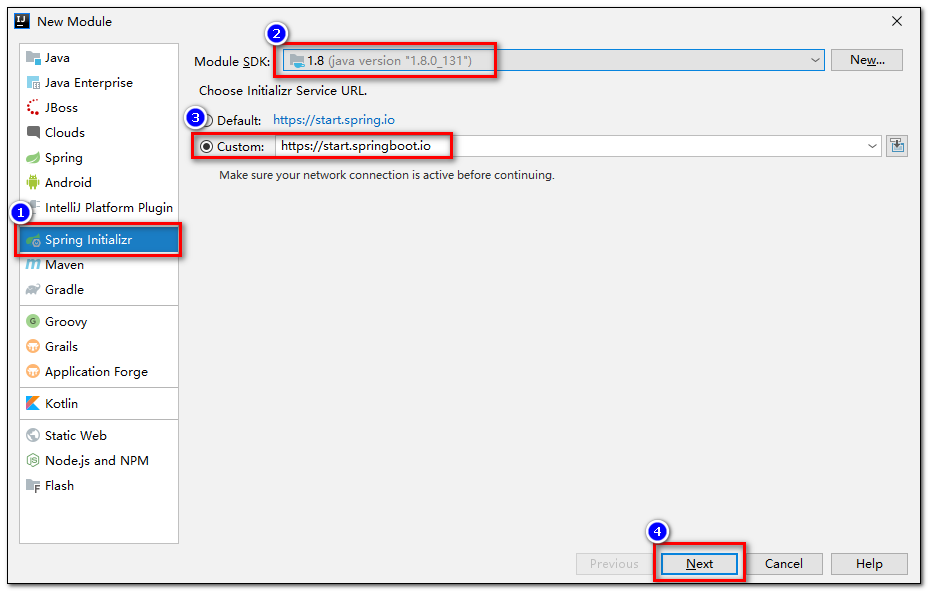

- 引入
**MyBatis-Plus**的依赖
<dependency>
    <groupId>com.baomidou</groupId>
    <artifactId>mybatis-plus-boot-starter</artifactId>
    <version>3.5.1</version>
</dependency>
- 安装
**Lombok**插件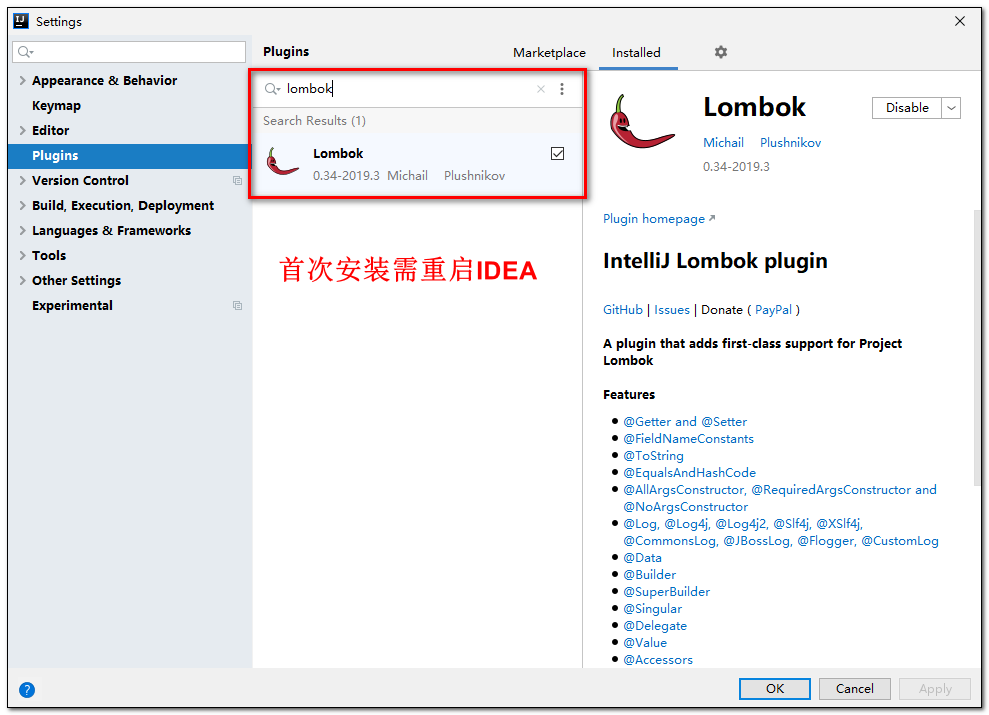
4.配置编码
- 配置
**application.yml**文件
#配置端口
server:
  port: 80

spring:
  #配置数据源
  datasource:
    #配置数据源类型
    type: com.zaxxer.hikari.HikariDataSource
    #配置连接数据库的信息
    driver-class-name: com.mysql.cj.jdbc.Driver
    url: jdbc:mysql://localhost:3306/mybatis_plus?characterEncoding=utf-8&useSSL=false
    username: {username}
    password: {password}

#MyBatis-Plus相关配置
mybatis-plus:
  configuration:
    #配置日志
    log-impl: org.apache.ibatis.logging.stdout.StdOutImpl
- 在 Spring Boot 启动类中添加
**@MapperScan**注解,扫描 Mapper 文件夹
@SpringBootApplication
@MapperScan("指定Mapper接口所在的包")
public class MybatisPlusDemoApplication {
	public static void main(String[] args) {
		SpringApplication.run(MybatisPlusDemoApplication.class, args);
	}
}
- 编写实体类
**User.java**(此处使用了 Lombok 简化代码)
@Data
public class User {
    private Long id;
    private String name;
    private Integer age;
    private String email;
}
- **编写 Mapper 包下的 **
**UserMapper**接口
public interface UserMapper extends BaseMapper<User> {}
5.测试查询
- 编写一个测试类
**MyBatisPlusTest.java**
@SpringBootTest
public class MyBatisPlusTest {
@Resource
private UserMapper userMapper;
/**
* 测试查询所有数据
*/
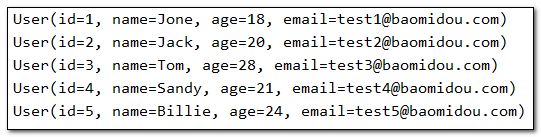
@Test
void testSelectList(){
//通过条件构造器查询一个list集合,若没有条件,则可以设置null为参数
List<User> users = userMapper.selectList(null);
users.forEach(System.out::println);
}
}
- 控制台打印查询结果
三、增删改查
1.BaseMapper
说明:
- 通用 CRUD 封装BaseMapper 接口,为
Mybatis-Plus启动时自动解析实体表关系映射转换为Mybatis内部对象注入容器- 泛型
T为任意实体对象- 参数
Serializable为任意类型主键Mybatis-Plus不推荐使用复合主键约定每一张表都有自己的唯一id主键- 对象
Wrapper为条件构造器
MyBatis-Plus中的基本CRUD在内置的BaseMapper中都已得到了实现,因此我们继承该接口以后可以直接使用。
本次演示的CRUD操作不包含参数带有条件构造器的方法,关于条件构造器将单独在一个章节进行演示。
BaseMapper中提供的CRUD方法:
- 增加:Insert
// 插入一条记录
int insert(T entity);
- 删除:Delete
// 根据 entity 条件,删除记录
int delete(@Param(Constants.WRAPPER) Wrapper<T> wrapper);
// 删除(根据ID 批量删除)
int deleteBatchIds(@Param(Constants.COLLECTION) Collection<? extends Serializable> idList);
// 根据 ID 删除
int deleteById(Serializable id);
// 根据 columnMap 条件,删除记录
int deleteByMap(@Param(Constants.COLUMN_MAP) Map<String, Object> columnMap);
- 修改:Update
// 根据 whereWrapper 条件,更新记录
int update(@Param(Constants.ENTITY) T updateEntity, @Param(Constants.WRAPPER) Wrapper<T> whereWrapper);
// 根据 ID 修改
int updateById(@Param(Constants.ENTITY) T entity);
- 查询:Selete
// 根据 ID 查询
T selectById(Serializable id);
// 根据 entity 条件,查询一条记录
T selectOne(@Param(Constants.WRAPPER) Wrapper<T> queryWrapper);

// 查询(根据ID 批量查询)
List<T> selectBatchIds(@Param(Constants.COLLECTION) Collection<? extends Serializable> idList);
// 根据 entity 条件,查询全部记录
List<T> selectList(@Param(Constants.WRAPPER) Wrapper<T> queryWrapper);
// 查询(根据 columnMap 条件)
List<T> selectByMap(@Param(Constants.COLUMN_MAP) Map<String, Object> columnMap);
// 根据 Wrapper 条件,查询全部记录
List<Map<String, Object>> selectMaps(@Param(Constants.WRAPPER) Wrapper<T> queryWrapper);
// 根据 Wrapper 条件,查询全部记录。注意: 只返回第一个字段的值
List<Object> selectObjs(@Param(Constants.WRAPPER) Wrapper<T> queryWrapper);

// 根据 entity 条件,查询全部记录(并翻页)
IPage<T> selectPage(IPage<T> page, @Param(Constants.WRAPPER) Wrapper<T> queryWrapper);
// 根据 Wrapper 条件,查询全部记录(并翻页)
IPage<Map<String, Object>> selectMapsPage(IPage<T> page, @Param(Constants.WRAPPER) Wrapper<T> queryWrapper);
// 根据 Wrapper 条件,查询总记录数
Integer selectCount(@Param(Constants.WRAPPER) Wrapper<T> queryWrapper);
2.调用Mapper层实现CRUD
2.1 插入
最终执行的结果,所获取的id为1527206783590903810
这是因为MyBatis-Plus在实现插入数据时,会默认基于雪花算法的策略生成id
/**
  * 测试插入一条数据
  * MyBatis-Plus在实现插入数据时,会默认基于雪花算法的策略生成id
  */
@Test
public void testInsert(){
    User user = new User();
    user.setName("Vz");
    user.setAge(21);
    user.setEmail("vz@oz6.cn");
    int result = userMapper.insert(user);
    System.out.println(result > 0 ? "添加成功!" : "添加失败!");
    System.out.println("受影响的行数为:" + result);
    //1527206783590903810(当前 id 为雪花算法自动生成的id)
    System.out.println("id自动获取" + user.getId());
}
2.2 删除
a、根据ID删除数据
调用方法:int deleteById(Serializable id);
/**
  * 测试根据id删除一条数据
  */
@Test
public void testDeleteById(){
    int result = userMapper.deleteById(1527206783590903810L);
    System.out.println(result > 0 ? "删除成功!" : "删除失败!");
    System.out.println("受影响的行数为:" + result);
}
b、根据ID批量删除数据
调用方法:int deleteBatchIds(**@Param(Constants.COLLECTION) **** Collection<? extends Serializable> idList); **
/**
  * 测试通过id批量删除数据
  */
@Test
public void testDeleteBatchIds(){
    List<Long> ids = Arrays.asList(6L,7L,8L);
    int result = userMapper.deleteBatchIds(ids);
    System.out.println(result > 0 ? "删除成功!" : "删除失败!");
    System.out.println("受影响的行数为:" + result);
}
c、根据Map条件删除数据
调用方法:int deleteByMap(**@Param(Constants.COLUMN_MAP) **** Map<String, Object> columnMap); **
/**
   * 测试根据Map集合中所设置的条件删除数据
   */
@Test
public void testDeleteByMap(){
    //当前演示为根据name和age删除数据
    //执行SQL为:DELETE FROM user WHERE name = ? AND age = ?
    Map<String,Object> map = new HashMap<>();
    map.put("name","Vz");
    map.put("age",21);
    int result = userMapper.deleteByMap(map);
    System.out.println(result > 0 ? "删除成功!" : "删除失败!");
    System.out.println("受影响的行数为:" + result);
}
2.3 修改
调用方法:int updateById(**@Param(Constants.ENTITY) **** T entity); **
/**
  * 测试根据id修改用户信息
  */
@Test
public void testUpdateById(){
    //执行SQL为: UPDATE user SET name=?, age=?, email=? WHERE id=?
    User user = new User();
    user.setId(6L);
    user.setName("VzUpdate");
    user.setAge(18);
    user.setEmail("Vz@sina.com");
    int result = userMapper.updateById(user);
    System.out.println(result > 0 ? "修改成功!" : "修改失败!");
    System.out.println("受影响的行数为:" + result);
}
2.4 查询
a、根据ID查询用户信息
调用方法:T selectById(Serializable id);
/**
  * 测试根据id查询用户数据
  */
@Test
public void testSelectById(){
    User user = userMapper.selectById(1L);
    System.out.println(user);
}
b、根据多个ID查询多个用户信息
调用方法:List selectBatchIds(**@Param(Constants.COLLECTION) **** Collection<? extends Serializable> idList); **
/**
  * 根据多个id查询用户数据
  */
@Test
public void testSelectBatchIds(){
    //执行SQL为:SELECT id,name,age,email FROM user WHERE id IN ( ? , ? , ? )
    List<Long> ids = Arrays.asList(1L,2L,3L);
    List<User> users = userMapper.selectBatchIds(ids);
    users.forEach(System.out::println);
}
c、根据Map条件查询用户信息
调用方法:List selectByMap(**@Param(Constants.COLUMN_MAP) **** Map<String, Object> columnMap); **
/**
  * 根据Map所设置的条件查询用户
  */
@Test
public void testSelectByMap(){
    //执行SQL为:SELECT id,name,age,email FROM user WHERE age = ?
    Map<String,Object> map = new HashMap<>();
    map.put("age",18);
    List<User> users = userMapper.selectByMap(map);
    users.forEach(System.out::println);
}
d、查询所有用户信息
调用方法:List selectList(**@Param(Constants.WRAPPER) **** Wrapper queryWrapper);**
/**
  * 测试查询所有数据
  */
@Test
void testSelectList(){
    List<User> users = userMapper.selectList(null);
    users.forEach(System.out::println);
}
3.通用Service
说明:
- 通用 Service CRUD 封装
IService接口,进一步封装 CRUD 采用get 查询单行remove 删除list 查询集合page 分页前缀命名方式区分Mapper层避免混淆,- 泛型
T为任意实体对象- 建议如果存在自定义通用 Service 方法的可能,请创建自己的
IBaseService继承Mybatis-Plus提供的基类- 对象
Wrapper为 条件构造器
MyBatis-Plus中有一个接口 **IService**和其实现类 **ServiceImpl**,封装了常见的业务层逻辑,详情查看源码IService和ServiceImpl
因此我们在使用的时候仅需在自己定义的**Service**接口中继承**IService**接口,在自己的实现类中实现自己的Service并继承**ServiceImpl**即可
IService中的CRUD方法
- 增加:Save、SaveOrUpdate
// 插入一条记录(选择字段,策略插入)
boolean save(T entity);
// 插入(批量)
boolean saveBatch(Collection<T> entityList);
// 插入(批量)
boolean saveBatch(Collection<T> entityList, int batchSize);

// TableId 注解存在更新记录,否插入一条记录
boolean saveOrUpdate(T entity);
// 根据updateWrapper尝试更新,否继续执行saveOrUpdate(T)方法
boolean saveOrUpdate(T entity, Wrapper<T> updateWrapper);
// 批量修改插入
boolean saveOrUpdateBatch(Collection<T> entityList);
// 批量修改插入
boolean saveOrUpdateBatch(Collection<T> entityList, int batchSize);
- 删除:Remove
// 根据 entity 条件,删除记录
boolean remove(Wrapper<T> queryWrapper);
// 根据 ID 删除
boolean removeById(Serializable id);
// 根据 columnMap 条件,删除记录
boolean removeByMap(Map<String, Object> columnMap);
// 删除(根据ID 批量删除)
boolean removeByIds(Collection<? extends Serializable> idList);
- 修改:Update
// 根据 UpdateWrapper 条件,更新记录 需要设置sqlset
boolean update(Wrapper<T> updateWrapper);
// 根据 whereWrapper 条件,更新记录
boolean update(T updateEntity, Wrapper<T> whereWrapper);
// 根据 ID 选择修改
boolean updateById(T entity);
// 根据ID 批量更新
boolean updateBatchById(Collection<T> entityList);
// 根据ID 批量更新
boolean updateBatchById(Collection<T> entityList, int batchSize);
- 查询:Get、List、Count
// 根据 ID 查询
T getById(Serializable id);
// 根据 Wrapper,查询一条记录。结果集,如果是多个会抛出异常,随机取一条加上限制条件 wrapper.last("LIMIT 1")
T getOne(Wrapper<T> queryWrapper);
// 根据 Wrapper,查询一条记录
T getOne(Wrapper<T> queryWrapper, boolean throwEx);
// 根据 Wrapper,查询一条记录
Map<String, Object> getMap(Wrapper<T> queryWrapper);
// 根据 Wrapper,查询一条记录
<V> V getObj(Wrapper<T> queryWrapper, Function<? super Object, V> mapper);


// 查询所有
List<T> list();
// 查询列表
List<T> list(Wrapper<T> queryWrapper);
// 查询(根据ID 批量查询)
Collection<T> listByIds(Collection<? extends Serializable> idList);
// 查询(根据 columnMap 条件)
Collection<T> listByMap(Map<String, Object> columnMap);
// 查询所有列表
List<Map<String, Object>> listMaps();
// 查询列表
List<Map<String, Object>> listMaps(Wrapper<T> queryWrapper);
// 查询全部记录
List<Object> listObjs();
// 查询全部记录
<V> List<V> listObjs(Function<? super Object, V> mapper);
// 根据 Wrapper 条件,查询全部记录
List<Object> listObjs(Wrapper<T> queryWrapper);
// 根据 Wrapper 条件,查询全部记录
<V> List<V> listObjs(Wrapper<T> queryWrapper, Function<? super Object, V> mapper);

// 查询总记录数
int count();
// 根据 Wrapper 条件,查询总记录数
int count(Wrapper<T> queryWrapper);
- 分页:Page
// 根据 ID 查询
T getById(Serializable id);
// 根据 Wrapper,查询一条记录。结果集,如果是多个会抛出异常,随机取一条加上限制条件 wrapper.last("LIMIT 1")
T getOne(Wrapper<T> queryWrapper);
// 根据 Wrapper,查询一条记录
T getOne(Wrapper<T> queryWrapper, boolean throwEx);
// 根据 Wrapper,查询一条记录
Map<String, Object> getMap(Wrapper<T> queryWrapper);
// 根据 Wrapper,查询一条记录
<V> V getObj(Wrapper<T> queryWrapper, Function<? super Object, V> mapper);
4.调用Service层操作数据
我们在自己的Service接口中通过继承MyBatis-Plus提供的IService接口,不仅可以获得其提供的CRUD方法,而且还可以使用自身定义的方法。
- 创建
**UserService**并继承**IService**
/**
  * UserService继承IService模板提供的基础功能
  */
public interface UserService extends IService<User> {}
- 创建
**UserService**的实现类并继承**ServiceImpl**
/**
  * ServiceImpl实现了IService,提供了IService中基础功能的实现
  * 若ServiceImpl无法满足业务需求,则可以使用自定的UserService定义方法,并在实现类中实现
  */
@Service
public class UserServiceImpl extends ServiceImpl<UserMapper,User> implements UserService{}
- 测试查询记录数
调用方法:int count();
@Test
public void testGetCount(){
    //查询总记录数
    //执行的SQL为:SELECT COUNT( * ) FROM user
    long count = userService.count();
    System.out.println("总记录数:" + count);
}
- 测试批量插入数据
调用方法:boolean saveBatch(Collection entityList);
@Test
public void test(){
    List<User> list = new ArrayList<>();
    for (int i = 1; i <= 10; i++) {
        User user = new User();
        user.setName("Vz"+i);
        user.setAge(20+i);
        list.add(user);
    }
    boolean b = userService.saveBatch(list);
    System.out.println(b ? "添加成功!" : "添加失败!");
}
四、常用注解
MyBatis-Plus提供的注解可以帮我们解决一些数据库与实体之间相互映射的问题。
1.@TableName
经过以上的测试,在使用MyBatis-Plus实现基本的CRUD时,我们并没有指定要操作的表,只是在Mapper接口继承BaseMapper时,设置了泛型User,而操作的表为user表,由此得出结论,MyBatis-Plus在确定操作的表时,由BaseMapper的泛型决定,即实体类型决定,且默认操作的表名和实体类型的类名一致。
1.1 引出问题
若实体类类型的类名和要操作的表的表名不一致,会出现什么问题?
- 我们将表
user更名为t_user,测试查询功能
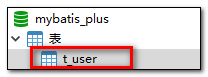
- 程序抛出异常,Table ‘mybatis_plus.user’ doesn’t exist,因为现在的表名为
t_user,而默认操作的表名和实体类型的类名一致,即user表

1.2 解决问题
a、使用注解解决问题
在实体类类型上添加
**@TableName("t_user")**,标识实体类对应的表,即可成功执行SQL语句
@Data
@TableName("t_user")
public class User {
    private Long id;
    private String name;
    private Integer age;
    private String email;
}
b、使用全局配置解决问题
在开发的过程中,我们经常遇到以上的问题,即实体类所对应的表都有固定的前缀,例如
**t_**或**tbl_**此时,可以使用MyBatis-Plus提供的全局配置,为实体类所对应的表名设置默认的前缀,那么就不需要在每个实体类上通过@TableName标识实体类对应的表
mybatis-plus:
  global-config:
    db-config:
      # 设置实体类所对应的表的统一前缀
      table-prefix: t_
2.@TableId
经过以上的测试,MyBatis-Plus在实现CRUD时,会默认将id作为主键列,并在插入数据时,默认基于雪花算法的策略生成id
2.1 引出问题
若实体类和表中表示主键的不是id,而是其他字段,例如uid,MyBatis-Plus会自动识别uid为主键列吗?
- 我们实体类中的属性
id改为uid,将表中的字段id也改为uid,测试添加功能
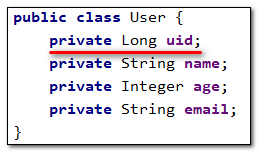

- 程序抛出异常,Field ‘uid’ doesn’t have a default value,说明MyBatis-Plus没有将
uid作为主键赋值

2.2 解决问题
在实体类中uid属性上通过
**@TableId**将其标识为主键,即可成功执行SQL语句
@Date
public class User {
    @TableId
    private Long uid;
    private String name;
    private Integer age;
    private String email;
}
2.3 @TableId的value属性
若实体类中主键对应的属性为id,而表中表示主键的字段为uid,此时若只在属性id上添加注解@TableId,则抛出异常Unknown column ‘id’ in ‘field list’,即MyBatis-Plus仍然会将id作为表的主键操作,而表中表示主键的是字段uid此时需要通过@TableId注解的value属性,指定表中的主键字段,
@TableId("uid")或@TableId(value="uid")

2.4 @TableId的type属性
type属性用来定义主键策略:默认雪花算法
常用的主键策略:
| 值 | 描述 |
|---|---|
| IdType.ASSIGN_ID(默认) | 基于雪花算法的策略生成数据id,与数据库id是否设置自增无关。 |
| 代码类为IdWorker.getId(result) | |
| IdType.AUTO | 使用数据库的自增策略,注意,该类型请确保数据库设置了id自增, |
配置全局主键策略:
#MyBatis-Plus相关配置
mybatis-plus:
  configuration:
    #配置日志
    log-impl: org.apache.ibatis.logging.stdout.StdOutImpl
  global-config:
    db-config:
      #配置mp的主键策略为自增
      id-type: auto
      # 设置实体类所对应的表的统一前缀
      table-prefix: t_
3.@TableField
经过以上的测试,我们可以发现,MyBatis-Plus在执行SQL语句时,要保证实体类中的属性名和表中的字段名一致
如果实体类中的属性名和字段名不一致的情况,会出现什么问题呢?
3.1 情况一
若实体类中的属性使用的是驼峰命名风格,而表中的字段使用的是下划线命名风格例如实体类属性userName,表中字段user_name
此时MyBatis-Plus会自动将下划线命名风格转化为驼峰命名风格相当于在MyBatis中配置
3.2 实体类中的属性和表中的字段不满足
若实体类中的属性和表中的字段不满足情况1
例如实体类属性
name,表中字段username此时需要在实体类属性上使用
@TableField("username")设置属性所对应的字段名
public class User {
    @TableId("uid")
    private Long id;
    @TableField("username")
    private String name;
    private Integer age;
    private String email;
}
3.3 数据库列名与数据库关键字冲突
直接在实体类上添加 @TableField 注解,给上别名加上反单引号即可
@TableFiled(value = "'key'")
private String key;
3.3 自动填充
实现对字段值自动填充
- 实现元对象处理器接口:com.baomidou.mybatisplus.core.handlers.MetaObjectHandler
- 注解填充字段
@TableField(.. fill = FieldFill.INSERT)生成器策略部分也可以配置!
public class User {

    // 注意!这里需要标记为填充字段
    @TableField(.. fill = FieldFill.INSERT)
    private String fillField;

    ....
}
- 自定义实现类 MyMetaObjectHandler
@Slf4j
@Component
public class MyMetaObjectHandler implements MetaObjectHandler {

    @Override
    public void insertFill(MetaObject metaObject) {
        log.info("start insert fill ....");
        this.strictInsertFill(metaObject, "createTime", LocalDateTime.class, LocalDateTime.now()); // 起始版本 3.3.0(推荐使用)
        // 或者
        this.strictInsertFill(metaObject, "createTime", () -> LocalDateTime.now(), LocalDateTime.class); // 起始版本 3.3.3(推荐)
        // 或者
        this.fillStrategy(metaObject, "createTime", LocalDateTime.now()); // 也可以使用(3.3.0 该方法有bug)
    }

    @Override
    public void updateFill(MetaObject metaObject) {
        log.info("start update fill ....");
        this.strictUpdateFill(metaObject, "updateTime", LocalDateTime.class, LocalDateTime.now()); // 起始版本 3.3.0(推荐)
        // 或者
        this.strictUpdateFill(metaObject, "updateTime", () -> LocalDateTime.now(), LocalDateTime.class); // 起始版本 3.3.3(推荐)
        // 或者
        this.fillStrategy(metaObject, "updateTime", LocalDateTime.now()); // 也可以使用(3.3.0 该方法有bug)
    }
}
注意事项:
- 填充原理是直接给
entity的属性设置值!!! - 注解则是指定该属性在对应情况下必有值,如果无值则入库会是
null MetaObjectHandler提供的默认方法的策略均为:如果属性有值则不覆盖,如果填充值为null则不填充- 字段必须声明
TableField注解,属性fill选择对应策略,该声明告知Mybatis-Plus需要预留注入SQL字段 - 填充处理器
MyMetaObjectHandler在 Spring Boot 中需要声明@Component或@Bean注入 - 要想根据注解
FieldFill.xxx和字段名以及字段类型来区分必须使用父类的strictInsertFill或者strictUpdateFill方法 - 不需要根据任何来区分可以使用父类的
fillStrategy方法 - update(T t,Wrapper updateWrapper)时t不能为空,否则自动填充失效
3.4 字段类型处理
类型处理器,用于 JavaType 与 JdbcType 之间的转换,用于 PreparedStatement 设置参数值和从 ResultSet 或 CallableStatement 中取出一个值,本文讲解 mybatis-plus 内置常用类型处理器如何通过TableField注解快速注入到 mybatis 容器中。
记得在实体类名处添加@TableName(autoResultMap = true)注解
- JSON 字段类型
@Data
@Accessors(chain = true)
@TableName(autoResultMap = true)
public class User {
    private Long id;

    ...


    /**
     * 注意!! 必须开启映射注解
     *
     * @TableName(autoResultMap = true)
     *
     * 以下两种类型处理器,二选一 也可以同时存在
     *
     * 注意!!选择对应的 JSON 处理器也必须存在对应 JSON 解析依赖包
     */
    @TableField(typeHandler = JacksonTypeHandler.class)
    // @TableField(typeHandler = FastjsonTypeHandler.class)
    private OtherInfo otherInfo;

}
该注解对应了 XML 中写法为
<result column="other_info" jdbcType="VARCHAR" property="otherInfo" typeHandler="com.baomidou.mybatisplus.extension.handlers.JacksonTypeHandler" />
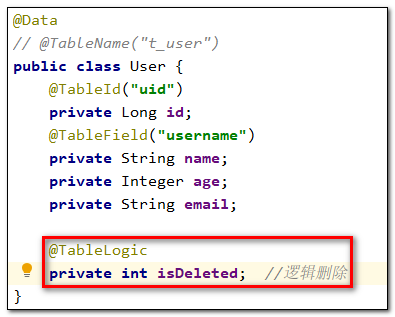
4.@TableLogic
4.1 逻辑删除
物理删除:真实删除,将对应数据从数据库中删除,之后查询不到此条被删除的数据
逻辑删除:假删除,将对应数据中代表是否被删除字段的状态修改为“被删除状态”,之后在数据库中仍旧能看到此条数据记录
使用场景:可以进行数据恢复
4.2 实现逻辑删除
- 数据库中创建逻辑删除状态列,设置默认值为0
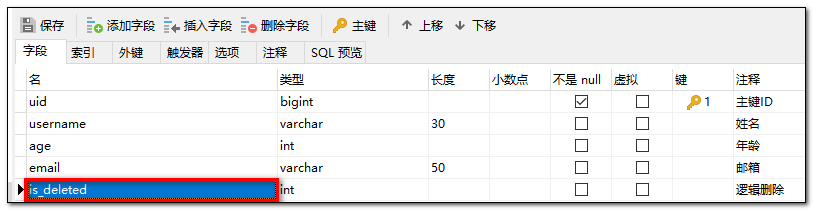
- 实体类中添加逻辑删除属性
- 测试删除功能,真正执行的是修改
public void testDeleteById(){
    int result = userMapper.deleteById(1527472864163348482L);
    System.out.println(result > 0 ? "删除成功!" : "删除失败!");
    System.out.println("受影响的行数为:" + result);
}

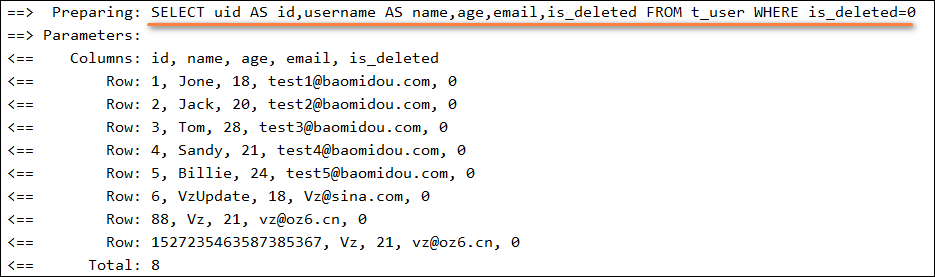
- 此时执行查询方法,查询的结果为自动添加条件
**is_deleted=0**
五、条件构造器
1.Wrapper介绍
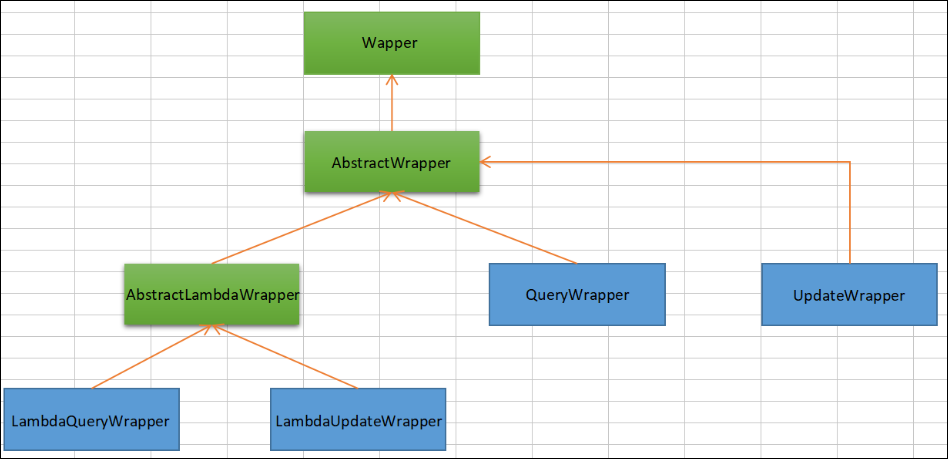
Wrapper: 条件构造抽象类,最顶端父类AbstractWrapper: 用于查询条件封装,生成 sql 的 where 条件QueryWrapper: 查询条件封装UpdateWrapper: Update 条件封装AbstractLambdaWrapper: 使用Lambda 语法LambdaQueryWrapper:用于Lambda语法使用的查询WrapperLambdaUpdateWrapper: Lambda 更新封装Wrapper
2.QueryWrapper
- 组装查询条件
**执行SQL:**SELECT uid AS id,username AS name,age,email,is_deleted FROM t_user WHERE is_deleted=0 AND (username LIKE ? AND age BETWEEN ? AND ? AND email IS NOT NULL)
public void test01(){
    //查询用户名包含a,年龄在20到30之间,邮箱信息不为null的用户信息
    QueryWrapper<User> queryWrapper = new QueryWrapper<>();
    queryWrapper.like("username","a").between("age",20,30).isNotNull("email");
    List<User> users = userMapper.selectList(queryWrapper);
    users.forEach(System.out::println);
}
- 组装排序条件
**执行SQL:**SELECT uid AS id,username AS name,age,email,is_deleted FROM t_user WHERE is_deleted=0 ORDER BY age DESC,id ASC
public void test02(){
    //查询用户信息,按照年龄的降序排序,若年龄相同,则按照id升序排序
    QueryWrapper<User> queryWrapper = new QueryWrapper<>();
    queryWrapper.orderByDesc("age").orderByAsc("id");
    List<User> users = userMapper.selectList(queryWrapper);
    users.forEach(System.out::println);
}
- 组装删除条件
**执行SQL:**UPDATE t_user SET is_deleted=1 WHERE is_deleted=0 AND (email IS NULL)
public void test03(){
    //删除邮箱地址为null的用户信息
    QueryWrapper<User> queryWrapper = new QueryWrapper<>();
    queryWrapper.isNull("email");
    int result = userMapper.delete(queryWrapper);
    System.out.println(result > 0 ? "删除成功!" : "删除失败!");
    System.out.println("受影响的行数为:" + result);
}
- 条件的优先级
**执行SQL:**UPDATE t_user SET user_name=?, email=? WHERE is_deleted=0 AND (age > ? AND user_name LIKE ? OR email IS NULL)
public void test04(){
    //将(年龄大于20并且用户名中包含有a)或邮箱为null的用户信息修改
    UpdateWrapper<User> updateWrapper = new UpdateWrapper<>();
    updateWrapper.gt("age",20).like("username","a").or().isNull("email");
    User user = new User();
    user.setName("Oz");
    user.setEmail("test@oz6.com");

    int result = userMapper.update(user, updateWrapper);
    System.out.println(result > 0 ? "修改成功!" : "修改失败!");
    System.out.println("受影响的行数为:" + result);
}
**执行SQL:**UPDATE t_user SET username=?, email=? WHERE is_deleted=0 AND (username LIKE ? AND (age > ? OR email IS NULL))
public void test05(){
    //将用户名中包含有a并且(年龄大于20或邮箱为null)的用户信息修改
    UpdateWrapper<User> updateWrapper = new UpdateWrapper<>();
    updateWrapper.like("username","a").and(i->i.gt("age",20).or().isNull("email"));
    User user = new User();
    user.setName("Vz7797");
    user.setEmail("test@ss8o.com");

    int result = userMapper.update(user, updateWrapper);
    System.out.println(result > 0 ? "修改成功!" : "修改失败!");
    System.out.println("受影响的行数为:" + result);
}
- 组装select子句
**执行SQL:**SELECT username,age,email FROM t_user WHERE is_deleted=0
public void test06(){
    //查询用户的用户名、年龄、邮箱信息
    QueryWrapper<User> queryWrapper = new QueryWrapper<>();
    queryWrapper.select("username","age","email");
    List<Map<String, Object>> maps = userMapper.selectMaps(queryWrapper);
    maps.forEach(System.out::println);
}
- 实现子查询
**执行SQL:**SELECT uid AS id,user_name AS name,age,email,is_deleted FROM t_user WHERE is_deleted=0 AND (uid IN (select uid from t_user where uid <= 100))
public void test07(){
    //查询id小于等于100的用户信息
    QueryWrapper<User> queryWrapper = new QueryWrapper<>();
    queryWrapper.inSql("uid", "select uid from t_user where uid <= 100");
    List<User> list = userMapper.selectList(queryWrapper);
    list.forEach(System.out::println);
}
- 自定义使用
当默认的模板不满足使用时,需要自定义mapper.xml语句。可以使用以下方式声明使用
public interface AccountMapper extends BaseMapper<Account> {
    AccountAllInfo getAllInfo(@Param(Constants.WRAPPER) Wrapper<Account> queryWrapper);
}
不需要where标签包裹,切记!
    <select id="getAllInfo" resultMap="AllResultMap">
        SELECT * FROM account as a ${ew.customSqlSegment}
    </select>
3.UpdateWrapper
UpdateWrapper不仅拥有QueryWrapper的组装条件功能,还提供了set方法进行修改对应条件的数据库信息
public void test08(){
    //将用户名中包含有a并且(年龄大于20或邮箱为null)的用户信息修改
    UpdateWrapper<User> updateWrapper = new UpdateWrapper<>();
    updateWrapper.like("username","a").and( i -> i.gt("age",20).or().isNull("email")).set("email","svip@qq.com");
    int result = userMapper.update(null, updateWrapper);
    System.out.println(result > 0 ? "修改成功!" : "修改失败!");
    System.out.println("受影响的行数为:" + result);
}
4.condition
在真正开发的过程中,组装条件是常见的功能,而这些条件数据来源于用户输入,是可选的,因此我们在组装这些条件时,必须先判断用户是否选择了这些条件,若选择则需要组装该条件,若没有选择则一定不能组装,以免影响SQL执行的结果
- 思路一
**执行SQL:**SELECT uid AS id,user_name AS name,age,email,is_deleted FROM t_user WHERE is_deleted=0 AND (user_name LIKE ? AND age <= ?)
 public void test09(){
     String username = "a";
     Integer ageBegin = null;
     Integer ageEnd = 30;
     QueryWrapper<User> queryWrapper = new QueryWrapper<>();
     if(StringUtils.isNotBlank(username)){
         //isNotBlank判断某个字符创是否不为空字符串、不为null、不为空白符
         queryWrapper.like("user_name", username);
     }
     if(ageBegin != null){
         queryWrapper.ge("age", ageBegin);
     }
     if(ageEnd != null){
         queryWrapper.le("age", ageEnd);
     }
     List<User> list = userMapper.selectList(queryWrapper);
     list.forEach(System.out::println);
 }
- 思路二
上面的实现方案没有问题,但是代码比较复杂,我们可以使用带condition参数的重载方法构建查询条件,简化代码的编写
public void test10(){
    String username = "a";
    Integer ageBegin = null;
    Integer ageEnd = 30;
    QueryWrapper<User> queryWrapper = new QueryWrapper<>();
    queryWrapper.like(StringUtils.isNotBlank(username), "user_name", username)
        .ge(ageBegin != null, "age", ageBegin)
        .le(ageEnd != null, "age", ageEnd);
    List<User> list = userMapper.selectList(queryWrapper);
    list.forEach(System.out::println);
}
5.LambdaQueryWrapper
功能等同于QueryWrapper,提供了Lambda表达式的语法可以避免填错列名。
public void test11(){
    String username = "a";
    Integer ageBegin = null;
    Integer ageEnd = 30;
    LambdaQueryWrapper<User> queryWrapper = new LambdaQueryWrapper<>();
    queryWrapper.like(StringUtils.isNotBlank(username), User::getName, username)
        .ge(ageBegin != null, User::getAge, ageBegin)
        .le(ageEnd != null, User::getAge, ageEnd);
    List<User> list = userMapper.selectList(queryWrapper);
    list.forEach(System.out::println);
}
6.LambdaUpdateWrapper
功能等同于UpdateWrapper,提供了Lambda表达式的语法可以避免填错列名。
public void test12(){
    //将用户名中包含有a并且(年龄大于20或邮箱为null)的用户信息修改
    LambdaUpdateWrapper<User> updateWrapper = new LambdaUpdateWrapper<>();
    updateWrapper.like(User::getName, "a")
        .and(i -> i.gt(User::getAge, 20).or().isNull(User::getEmail));
    updateWrapper.set(User::getName, "小黑").set(User::getEmail,"abc@atguigu.com");
    int result = userMapper.update(null, updateWrapper);
    System.out.println("result:"+result);
}
六、常用插件
1.分页插件
MyBatis Plus自带分页插件,只要简单的配置即可实现分页功能
- 添加配置类
**MyBatisPlusConfig**
@Configuration
@MapperScan("com.atguigu.mybatisplus.mapper")
public class MyBatisPlusConfig {
    @Bean
    public MybatisPlusInterceptor mybatisPlusInterceptor(){
        MybatisPlusInterceptor interceptor = new MybatisPlusInterceptor();
        //添加分页插件
        interceptor.addInnerInterceptor(new PaginationInnerInterceptor(DbType.MYSQL));
        return interceptor;
    }
}
- 编写测试方法
@Test
public void testPage(){
    //new Page()中的两个参数分别是当前页码,每页显示数量
    Page<User> page = userMapper.selectPage(new Page<>(1, 2), null);
    List<User> users = page.getRecords();
    users.forEach(System.out::println);
}
2.自定义分页
上面调用的是MyBatis-Plus提供的带有分页的方法,那么我们自己定义的方法如何实现分页呢?
- 在
**UserMapper**接口中定义一个方法
/**
  * 根据年龄查询用户列表,分页显示
  * @param page 分页对象,xml中可以从里面进行取值,传递参数 Page 即自动分页,必须放在第一位
  * @param age 年龄
  * @return
  */
Page<User> selectPageVo(@Param("page") Page<User> page,@Param("age") Integer age);
- 在
**UserMapper.xml**中编写SQL实现该方法
<select id="selectPageVo" resultType="User">
    select id,username as name,age,email from t_user where age > #{age}
</select>
- 编写测试方法
@Test
public void testPageVo(){
    Page<User> page = userMapper.selectPageVo(new Page<User>(1,2), 20);
    List<User> users = page.getRecords();
    users.forEach(System.out::println);
}
3.乐观锁
作用:当要更新一条记录的时候,希望这条记录没有被别人更新
乐观锁的实现方式:
- 取出记录时,获取当前 version
- 更新时,带上这个 version
- 执行更新时, set version = newVersion where version = oldVersion
- 如果 version 不对,就更新失败
3.1 场景
- 一件商品,成本价是80元,售价是100元。老板先是通知小李,说你去把商品价格增加50元。小李正在玩游戏,耽搁了一个小时。正好一个小时后,老板觉得商品价格增加到150元,价格太高,可能会影响销量。又通知小王,你把商品价格降低30元。
- 此时,小李和小王同时操作商品后台系统。小李操作的时候,系统先取出商品价格100元;小王也在操作,取出的商品价格也是100元。小李将价格加了50元,并将100+50=150元存入了数据库;小王将商品减了30元,并将100-30=70元存入了数据库。是的,如果没有锁,小李的操作就完全被小王的覆盖了。
- 现在商品价格是70元,比成本价低10元。几分钟后,这个商品很快出售了1千多件商品,老板亏1万多。
3.2 乐观锁与悲观锁
- 上面的故事,如果是乐观锁,小王保存价格前,会检查下价格是否被人修改过了。如果被修改过了,则重新取出的被修改后的价格,150元,这样他会将120元存入数据库。
- 如果是悲观锁,小李取出数据后,小王只能等小李操作完之后,才能对价格进行操作,也会保证最终的价格是120元。
3.3 模拟修改冲突
- 数据库中增加商品表
CREATE TABLE t_product (
    id BIGINT(20) NOT NULL COMMENT '主键ID',
    NAME VARCHAR(30) NULL DEFAULT NULL COMMENT '商品名称',
    price INT(11) DEFAULT 0 COMMENT '价格',
    VERSION INT(11) DEFAULT 0 COMMENT '乐观锁版本号',
    PRIMARY KEY (id)
);
- 添加一条数据
INSERT INTO t_product (id, NAME, price) VALUES (1, '外星人笔记本', 100);
- 添加一个实体类
**Product**
@Data
public class Product {
    private Long id;
    private String name;
    private Integer price;
    private Integer version;
}
- 添加一个Mapper接口
**ProductMapper**
public interface ProductMapper extends BaseMapper<Product> {}
- 测试方法
@Test
public void testProduct01(){
    //1.小李获取商品价格
    Product productLi = productMapper.selectById(1);
    System.out.println("小李获取的商品价格为:" + productLi.getPrice());

    //2.小王获取商品价格
    Product productWang = productMapper.selectById(1);
    System.out.println("小李获取的商品价格为:" + productWang.getPrice());

    //3.小李修改商品价格+50
    productLi.setPrice(productLi.getPrice()+50);
    productMapper.updateById(productLi);

    //4.小王修改商品价格-30
    productWang.setPrice(productWang.getPrice()-30);
    productMapper.updateById(productWang);

    //5.老板查询商品价格
    Product productBoss = productMapper.selectById(1);
    System.out.println("老板获取的商品价格为:" + productBoss.getPrice());
}
- 执行结果

3.4 乐观锁解决问题
- 实体类
**version**字段添加注解**@Version**
@Data
public class Product {
    private Long id;
    private String name;
    private Integer price;
    @Version
    private Integer version;
}
- 添加乐观锁插件配置
@Bean
public MybatisPlusInterceptor mybatisPlusInterceptor(){
    MybatisPlusInterceptor interceptor = new MybatisPlusInterceptor();
    //添加分页插件
    interceptor.addInnerInterceptor(new PaginationInnerInterceptor(DbType.MYSQL));
    //添加乐观锁插件
    interceptor.addInnerInterceptor(new OptimisticLockerInnerInterceptor());
    return interceptor;
}
- 再次执行测试方法
小李查询商品信息:
SELECT id,name,price,version FROM t_product WHERE id=?
小王查询商品信息:
SELECT id,name,price,version FROM t_product WHERE id=?
小李修改商品价格,自动将version+1
UPDATE t_product SET name=?, price=?, version=? WHERE id=? AND version=?
Parameters: 外星人笔记本(String), 150(Integer), 1(Integer), 1(Long), 0(Integer)
小王修改商品价格,此时version已更新,条件不成立,修改失败
UPDATE t_product SET name=?, price=?, version=? WHERE id=? AND version=?
Parameters: 外星人笔记本(String), 70(Integer), 1(Integer), 1(Long), 0(Integer)
最终,小王修改失败,查询价格:150
SELECT id,name,price,version FROM t_product WHERE id=?
- 优化执行流程
@Test
public void testProduct01(){
    //1.小李获取商品价格
    Product productLi = productMapper.selectById(1);
    System.out.println("小李获取的商品价格为:" + productLi.getPrice());

    //2.小王获取商品价格
    Product productWang = productMapper.selectById(1);
    System.out.println("小李获取的商品价格为:" + productWang.getPrice());

    //3.小李修改商品价格+50
    productLi.setPrice(productLi.getPrice()+50);
    productMapper.updateById(productLi);

    //4.小王修改商品价格-30
    productWang.setPrice(productWang.getPrice()-30);
    int result = productMapper.updateById(productWang);
    if(result == 0){
        //操作失败,重试
        Product productNew = productMapper.selectById(1);
        productNew.setPrice(productNew.getPrice()-30);
        productMapper.updateById(productNew);
    }

    //5.老板查询商品价格
    Product productBoss = productMapper.selectById(1);
    System.out.println("老板获取的商品价格为:" + productBoss.getPrice());
}

4.数据权限隔离
数据权限插件的应用场景和多租户的动态拦截拼接SQL一样。
4.1 数据权限拦截器
写一个自定义的权限注解,该注解用来标注被拦截方法,注解上可以配置数据权限的表别名和表字段,它们会在拼接sql的时候用到。
import java.lang.annotation.ElementType;
import java.lang.annotation.Retention;
import java.lang.annotation.RetentionPolicy;
import java.lang.annotation.Target;

@Target({ElementType.METHOD, ElementType.TYPE})
@Retention(RetentionPolicy.RUNTIME)
public @interface MyDataScope {
    /**
     * 表别名设置
     */
    String alias() default "";

    /**
     * 数据权限表字段名
     */
    String dataId() default "";
}
接下来就是写最核心的拦截器的处理逻辑了。创建一个接口实现类,实现Mybatis Plus的DataPermissionHandler接口。DataPermissionHandler的接口方法getSqlSegment有两个参数。
- Expression where。where参数是mapper接口在xml中定义的sql的where条件表达式,在拦截处理器中我们可以给where条件表达式添加一些 and 或 or 的条件。
- String mappedStatementId。mappedStatementId参数是mapper接口方法的全限定名,通过它我们可以得到mapper接口的Class类名以及接口方法名。
DataPermissionHandler的接口方法getSqlSegment会返回一个Expression类型的结果,即通过拦截器方法我们将原始的where条件表达式做了修改之后返回给Mybatis Plus并在代码运行时生效。
在拦截器方法中还使用到了一开始我们自定义的MyDataScope注解,没有被MyDataScope注解标注过的mapper方法我们直接返回原始的where条件表达式即可。
import cn.hutool.core.util.StrUtil;
import com.baomidou.mybatisplus.extension.plugins.handler.DataPermissionHandler;
import com.itguoguo.annotation.MyDataScope;
import com.itguoguo.system.api.model.LoginUser;
import lombok.extern.slf4j.Slf4j;
import net.sf.jsqlparser.JSQLParserException;
import net.sf.jsqlparser.expression.Expression;
import net.sf.jsqlparser.expression.operators.conditional.AndExpression;
import net.sf.jsqlparser.parser.CCJSqlParserUtil;

import java.lang.reflect.Method;
import java.util.Objects;

import static com.itguoguo.utils.LoginUserUtils.getLoginUser;

@Slf4j
public class MyDataScopeHandler implements DataPermissionHandler {
    /**
     * 获取数据权限 SQL 片段表达式
     * @param where             待执行 SQL Where 条件表达式
     * @param mappedStatementId Mybatis MappedStatement Id 根据该参数可以判断具体执行方法
     * @return 数据权限 SQL 片段表达式
     */
    @Override
    public Expression getSqlSegment(Expression where, String mappedStatementId) {
        try {
            String className = mappedStatementId.substring(0, mappedStatementId.lastIndexOf("."));
            String methodName = mappedStatementId.substring(mappedStatementId.lastIndexOf(".") + 1);
            //使用分页插件时,会调用新增的 ‘方法+_COUNT’ 故也需要处理,防止分页信息有错误
            if (methodName.endsWith("_COUNT")) {
                methodName = methodName.replace("_COUNT", "");
            }
            Method[] methods = Class.forName(className).getMethods();
            for (Method m : methods) {
                if (StrUtil.isBlank(m.getName()) || !m.getName().equals(methodName)) {
                    continue;
                }
                MyDataScope annotation = m.getAnnotation(MyDataScope.class);
                if (Objects.isNull(annotation)) {
                    return where;
                }
                String sqlSegment = getSqlSegment(annotation);
                return StrUtil.isBlank(sqlSegment) ? where : getExpression(where, sqlSegment);
            }
        } catch (ClassNotFoundException e) {
            log.error(e.getMessage(), e);
        }
        return null;
    }

    /**
     * 拼接需要在业务 SQL 中额外追加的数据权限 SQL
     * @param annotation
     * @return 数据权限 SQL
     */
    private String getSqlSegment(MyDataScope annotation) {
        LoginUser loginUser = getLoginUser();
        String userType = loginUser.getSysUser().getUserType();
        Long userId = loginUser.getSysUser().getUserId();
        String sqlSegment = "";
        if (StrUtil.isBlank(userType)) {
            return sqlSegment;
        }
        if ("0".equals(userType)) {
            return sqlSegment;
        } else {
            sqlSegment = StrUtil.format(" {}.{} IN (SELECT project_id FROM sys_user where user_id = '{}') ",
                    annotation.alias(), annotation.dataId(), userId);
        }
        return sqlSegment;
    }

    /**
     * 将数据权限 SQL 语句追加到数据权限 SQL 片段表达式里
     * @param where         待执行 SQL Where 条件表达式
     * @param sqlSegment    数据权限 SQL 片段
     * @return
     */
    private Expression getExpression(Expression where, String sqlSegment) {
        try {
            Expression sqlSegmentExpression = CCJSqlParserUtil.parseCondExpression(sqlSegment);
            return (null != where) ? new AndExpression(where, sqlSegmentExpression) : sqlSegmentExpression;
        } catch (JSQLParserException e) {
            log.error(e.getMessage(), e);
        }
        return null;
    }
}
4.2 拦截器配置
配置Mybatis Plus拦截器,数据权限handler作为参数传给拦截器构造方法。
import com.baomidou.mybatisplus.extension.plugins.MybatisPlusInterceptor;
import com.baomidou.mybatisplus.extension.plugins.inner.DataPermissionInterceptor;
import org.springframework.context.annotation.Bean;
import org.springframework.context.annotation.Configuration;

@Configuration
public class MybatisPlusConfig {
    @Bean
    public MybatisPlusInterceptor mybatisPlusInterceptor() {
        MybatisPlusInterceptor interceptor = new MybatisPlusInterceptor();
        //需要写在其他拦截器的前面
        interceptor.addInnerInterceptor(new DataPermissionInterceptor(new MyDataScopeHandler()));
        return interceptor;
    }
}
4.3 使用
使用时,在mapper接口的方法上标注MyDataScope注解,给注解标上表别名和表字段。
public interface MyMapper {
    @MyDataScope(alias = "a", dataId = "id")
    List findList();
}
七、通用枚举
表中的有些字段值是固定的,例如性别(男或女),此时我们可以使用MyBatis-Plus的通用枚举来实现
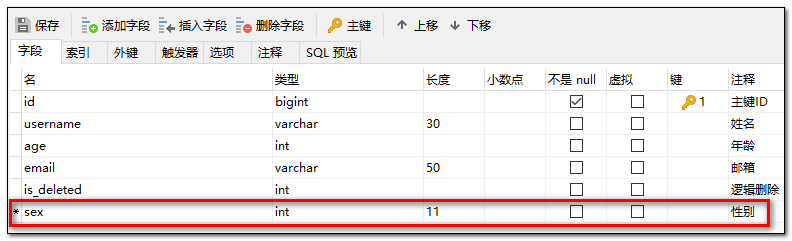
- 数据库表添加字段
**sex**
- 创建通用枚举类型
- 使用 @EnumValue 注解枚举属性
@Getter
public enum SexEnum {
    MALE(1, "男"),
    FEMALE(2, "女");

    @EnumValue //将注解所标识的属性的值存储到数据库中
    private int sex;
    private String sexName;

    SexEnum(Integer sex, String sexName) {
        this.sex = sex;
        this.sexName = sexName;
    }
}
- 枚举属性,实现 IEnum 接口如下:
@Getter
public enum SexEnum IEnum<Integer>{
    MALE(1, "男"),
    FEMALE(2, "女");

    private int sex;
    private String sexName;

    SexEnum(Integer sex, String sexName) {
        this.sex = sex;
        this.sexName = sexName;
    }

    @Override
    public Integer getValue() {
        return this.sex;
    }
}
- User实体类中添加属性sex
public class User {
    private Long id;
    @TableField("username")
    private String name;
    private Integer age;
    private String email;

    @TableLogic
    private int isDeleted;  //逻辑删除

    private SexEnum sex;
}
- 配置扫描通用枚举
#MyBatis-Plus相关配置
mybatis-plus:
  #指定mapper文件所在的地址
  mapper-locations: classpath:mapper/*.xml
  configuration:
    #配置日志
    log-impl: org.apache.ibatis.logging.stdout.StdOutImpl
  global-config:
    banner: off
    db-config:
      #配置mp的主键策略为自增
      id-type: auto
      # 设置实体类所对应的表的统一前缀
      table-prefix: t_
  #配置类型别名所对应的包
  type-aliases-package: com.atguigu.mybatisplus.pojo
  # 扫描通用枚举的包
  type-enums-package: com.atguigu.mybatisplus.enums
- 执行测试方法
@Test
public void test(){
    User user = new User();
    user.setName("admin");
    user.setAge(33);
    user.setSex(SexEnum.MALE);
    int result = userMapper.insert(user);
    System.out.println("result:"+result);
}
八、多数据源
适用于多种场景:纯粹多库、 读写分离、 一主多从、 混合模式等
场景说明:
我们创建两个库,分别为:mybatis_plus(以前的库不动)与mybatis_plus_1(新建),将mybatis_plus库的product表移动到mybatis_plus_1库,这样每个库一张表,通过一个测试用例分别获取用户数据与商品数据,如果获取到说明多库模拟成功
1.创建数据库及表
- 创建数据库
**mybatis_plus_1**和表`product
CREATE DATABASE `mybatis_plus_1` /*!40100 DEFAULT CHARACTER SET utf8mb4 */;
use `mybatis_plus_1`;
CREATE TABLE product (
    id BIGINT(20) NOT NULL COMMENT '主键ID',
    name VARCHAR(30) NULL DEFAULT NULL COMMENT '商品名称',
    price INT(11) DEFAULT 0 COMMENT '价格',
    version INT(11) DEFAULT 0 COMMENT '乐观锁版本号',
    PRIMARY KEY (id)
);
- 添加测试数据
INSERT INTO product (id, NAME, price) VALUES (1, '外星人笔记本', 100);
- 删除
**mybatis_plus**库中的**product**表
use mybatis_plus;
DROP TABLE IF EXISTS product;
2.新建工程引入依赖
自行新建一个Spring Boot工程并选择MySQL驱动及Lombok依赖
引入MyBaits-Plus的依赖及多数据源的依赖
<dependency>
    <groupId>com.baomidou</groupId>
    <artifactId>mybatis-plus-boot-starter</artifactId>
    <version>3.5.1</version>
</dependency>

<dependency>
    <groupId>com.baomidou</groupId>
    <artifactId>dynamic-datasource-spring-boot-starter</artifactId>
    <version>3.5.0</version>
</dependency>
3.编写配置文件
spring:
  # 配置数据源信息
  datasource:
    dynamic:
      # 设置默认的数据源或者数据源组,默认值即为master
      primary: master
      # 严格匹配数据源,默认false.true未匹配到指定数据源时抛异常,false使用默认数据源
      strict: false
      datasource:
        master:
          url: jdbc:mysql://localhost:3306/mybatis_plus?characterEncoding=utf-8&useSSL=false
          driver-class-name: com.mysql.cj.jdbc.Driver
          username: root
          password: 132537
        slave_1:
          url: jdbc:mysql://localhost:3306/mybatis_plus_1?characterEncoding=utf-8&useSSL=false
          driver-class-name: com.mysql.cj.jdbc.Driver
          username: root
          password: 132537
4.创建实体类
- 新建一个
User实体类(如果数据库表名有t_前缀记得配置)
@Data
public class User {
    private Long id;
    private String name;
    private Integer age;
    private String email;
}
- 新建一个实体类
Product
@Data
public class Product {
    private Long id;
    private String name;
    private Integer price;
    private Integer version;
}
5.创建Mapper及Service
- 新建接口
UserMapper
public interface UserMapper extends BaseMapper<User> {}
- 新建接口
ProductMapper
public interface ProductMapper extends BaseMapper<Product> {}
- 新建Service接口
UserService指定操作的数据源
@DS("master") //指定操作的数据源,master为user表
public interface UserService extends IService<User> {}
- 新建Service接口
ProductService指定操作的数据源
@DS("slave_1")
public interface ProductService extends IService<Product> {}
- 自行建立Service的实现类
...
6.编写测试方法
记得在启动类中添加注解
**@MapperScan()**
class TestDatasourceApplicationTests {
	@Resource
	UserService userService;

	@Resource
	ProductService productService;

	@Test
	void contextLoads() {
		User user = userService.getById(1L);
		Product product = productService.getById(1L);
		System.out.println("User = " + user);
		System.out.println("Product = " + product);
	}

}

九、MyBatisX插件
MyBatis-Plus为我们提供了强大的mapper和service模板,能够大大的提高开发效率。
但是在真正开发过程中,MyBatis-Plus并不能为我们解决所有问题,例如一些复杂的SQL,多表联查,我们就需要自己去编写代码和SQL语句,我们该如何快速的解决这个问题呢,这个时候可以使用MyBatisX插件。
MyBatisX一款基于 IDEA 的快速开发插件,为效率而生。
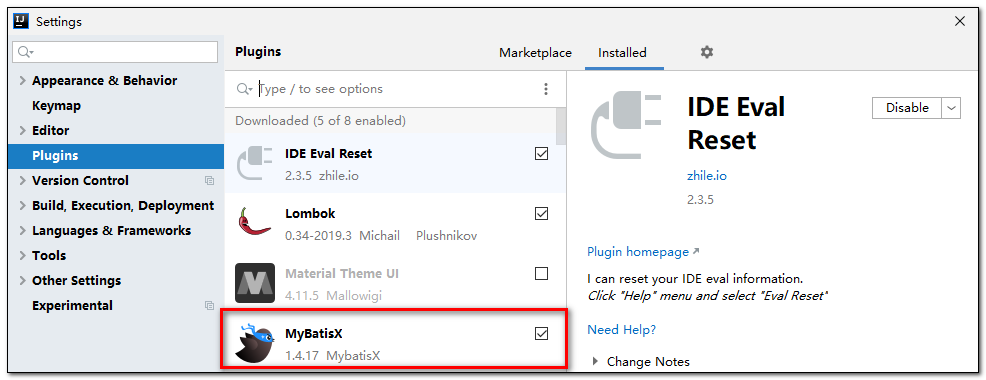
1.安装MyBatisX插件
打开IDEA,File-> Setteings->Plugins->MyBatisX,搜索栏搜索MyBatisX然后安装。
2.快速生成代码
- 新建一个Spring Boot项目引入依赖(创建工程时记得勾选lombok及mysql驱动)
<dependency>
    <groupId>com.baomidou</groupId>
    <artifactId>mybatis-plus-boot-starter</artifactId>
    <version>3.5.1</version>
</dependency>

<dependency>
    <groupId>com.baomidou</groupId>
    <artifactId>dynamic-datasource-spring-boot-starter</artifactId>
    <version>3.5.0</version>
</dependency>
- 配置数据源信息
spring:
  datasource:
    type: com.zaxxer.hikari.HikariDataSource
    driver-class-name: com.mysql.cj.jdbc.Driver
    url: jdbc:mysql://localhost:3306/mybatis_plus?characterEncoding=utf-8&useSSL=false
    username: root
    password: 132537
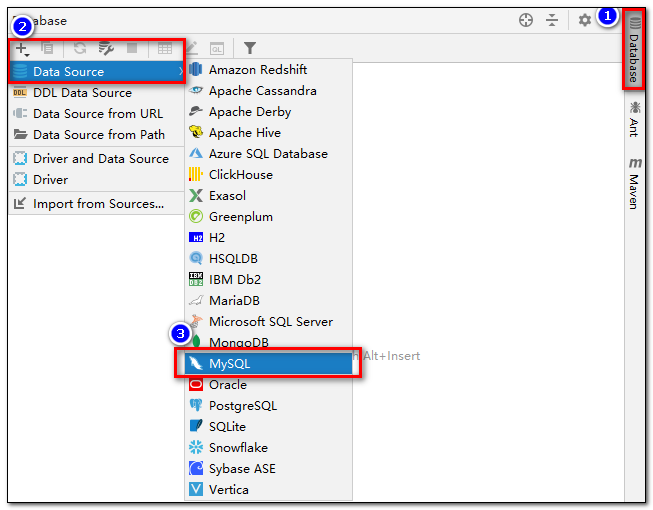
- 在IDEA中与数据库建立链接
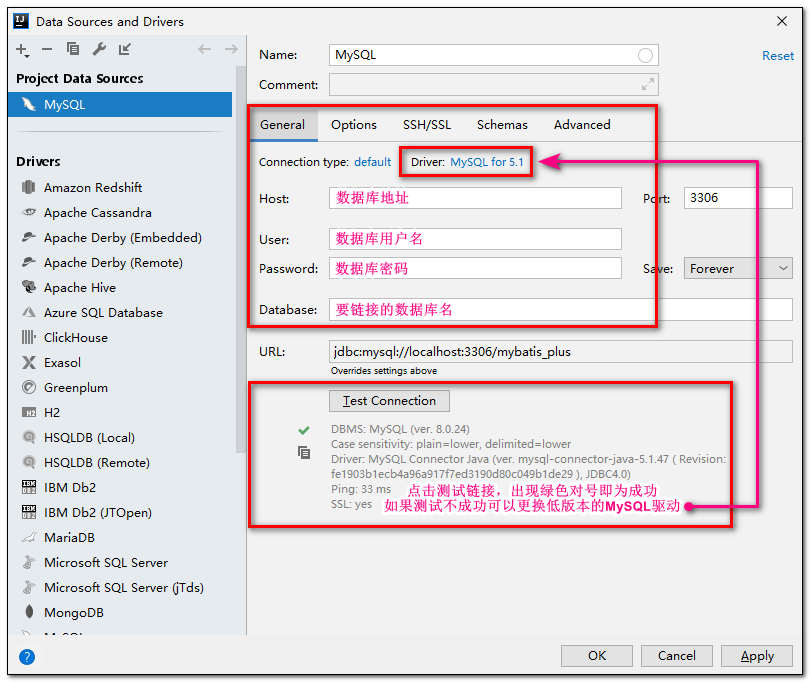
- 填写数据库信息并保存
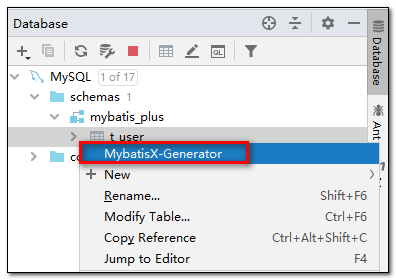
- 找到我们需要生成的表点击右键
- 填写完信息以后下一步
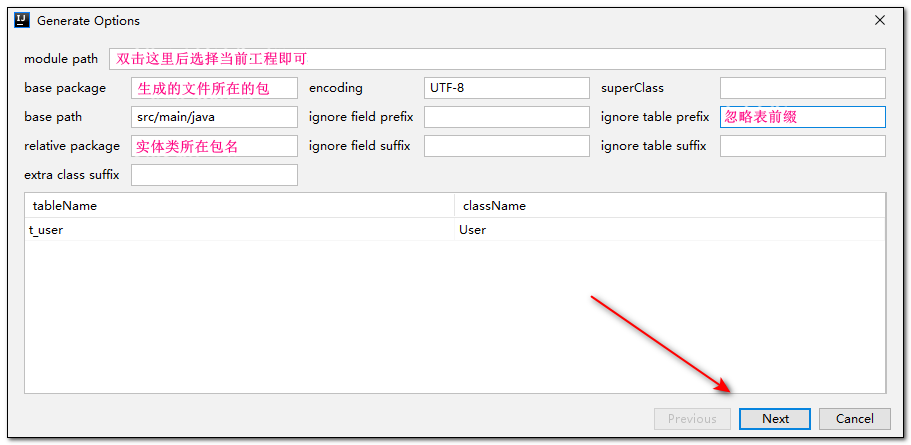
- 继续填写信息

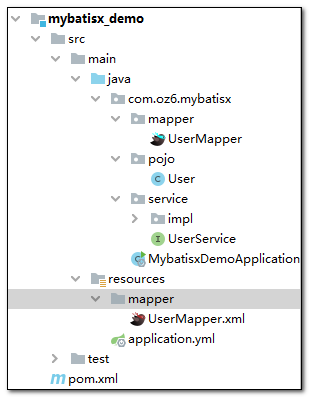
- 大功告成(真特么好用yyds)
3.快速生成CRUD
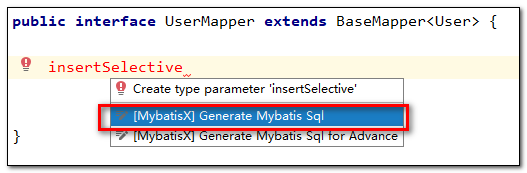
MyBaitsX可以根据我们在Mapper接口中输入的方法名快速帮我们生成对应的sql语句


 407
407

 被折叠的 条评论
为什么被折叠?
被折叠的 条评论
为什么被折叠?
 到【灌水乐园】发言


