


💖JDBC概述
1.什么是JDBC?
Java DataBase Connectivity
在java语言中编写sq1语句,对mysq1数据库中的数据进行CRUD操作。
2.JDBC相关的类库在哪里?
java.sq1. * ;
3.JDBC本质上是一堆什么呢?
java.sq1. * ;这个包下都是JDBC的接口,SUN公司制定的!
JDBC是体现"接口作用"的非常经典的例子。 JDBC降低了耦合度,提高了扩展力。
对于java程序员来说,不需要关心数据库是哪个品牌。只要面向JDBC接口编程就行!
✨JDBC编程六步
JDBC编程六步
1、注册驱动
(通知java程序我们即将要连接的是哪个品牌的数据库)
2、获取数据库连接
(java进程和mysql进程,两个进程之间的通道开启了)(java进程可能在北京,mysql进程在上海)
3、获取数据库操作对象
这个对象很重要,用这个对象执行SOL的。
4、执行SQL语句
执行CRUD操作
5、处理查询结果集
如果第四步是select语句,才有这个第五步
6、释放资源
关闭所有的资源(因为JDBC毕意是进程之间的通信,占用很多资源的,需要关闭!
💖IDEA开发的第一个JDBC程序
✨导入驱动
这里我们介绍的是最朴素的导入MySQL驱动的方法,就是直接导入jar包的方式。
首先在包下面创建一个专门放jar包的目录
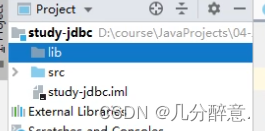
然后把驱动粘贴到这个新建的目录下面
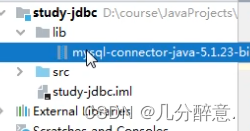
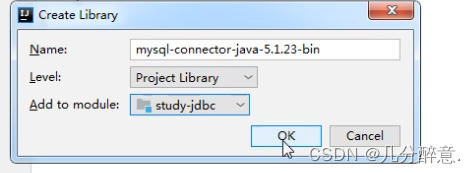
选中驱动,然后右键–选择Add as Libary

然后点击ok,加到这个库里面就行了
✨实战代码
public class IDEA开发的第一个JDBC程序 {
    public static void main(String[] args) {
        Connection conn = null;
        Statement stmt = null;
        ResultSet rs = null;
        try {
            //注册驱动
            DriverManager.registerDriver(new com.mysql.jdbc.Driver());
            //获取连接
            conn = DriverManager.getConnection("jdbc:mysql://localhost:3306/feifei","root","123456");
            //获取数据库操作对象
            stmt = conn.createStatement();
            //执行SQL
            String sql = "select e.ename , d.dname from emp e join dept d on e.deptno=d.deptno ";
            rs = stmt.executeQuery(sql);
            //处理查询结果集
            while (rs.next()){
                String ename = rs.getString("ename");
                String dname = rs.getString("dname");
                System.out.println(ename+","+dname);
            }
        } catch (SQLException throwables) {
            throwables.printStackTrace();
        }finally {
            //释放资源
            if (rs != null) {
                try {
                    rs.close();
                } catch (SQLException throwables) {
                    throwables.printStackTrace();
                }
            }
            if (stmt != null) {
                try {
                    stmt.close();
                } catch (SQLException throwables) {
                    throwables.printStackTrace();
                }
            }
            if (conn != null) {
                try {
                    conn.close();
                } catch (SQLException throwables) {
                    throwables.printStackTrace();
                }
            }
        }
    }
}
✨注册驱动的第二种方式–类加载注册
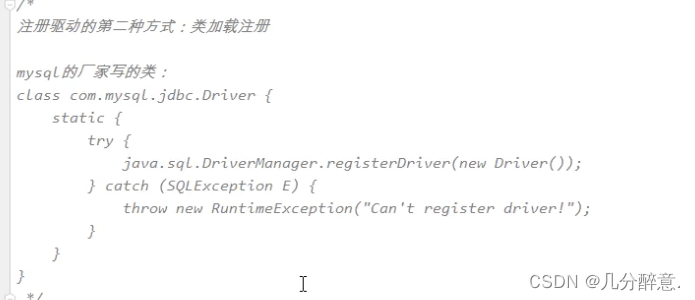
代码演示
public class 注册驱动的第二种方式 {
    public static void main(String[] args) {
        Connection conn = null;
        Statement stmt = null;
        ResultSet rs = null;
        try {
            //1注册驱动
            //oracle数据库:Class.forName("oracle.jdbc.driver.OracleDriver");
            Class.forName("com.mysql.jdbc.Driver");
            //2获取连接
            conn = DriverManager.getConnection("jdbc:mysql://127.0.0.1:3306/feifei","root","123456");

            //3.获取数据库操作对象
            stmt = conn.createStatement();
            //4.执行SQL语句
            String sql = "select a.ename as '员工' ,b.ename as '领导' from emp a left join emp b on a.mgr = b.empno";
            rs = stmt.executeQuery(sql);//返回结果集
            //5.处理查询结果集
            while (rs.next()){
                String  ename = rs.getString("员工");
                String  lname = rs.getString("领导");
                System.out.println(ename +","+ lname);
            }

        } catch (ClassNotFoundException | SQLException e) {
            e.printStackTrace();
        }finally {
            if (rs != null) {
                try {
                    rs.close();
                } catch (SQLException throwables) {
                    throwables.printStackTrace();
                }
            }
            if (stmt != null) {
                try {
                    stmt.close();
                } catch (SQLException throwables) {
                    throwables.printStackTrace();
                }
            }
            if (conn != null) {
                try {
                    conn.close();
                } catch (SQLException throwables) {
                    throwables.printStackTrace();
                }
            }
        }
    }
}
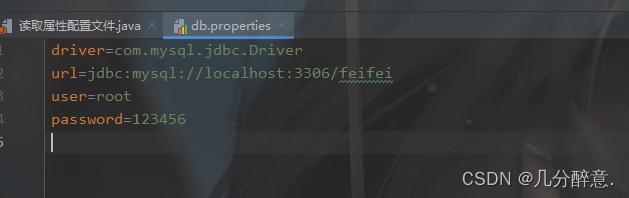
✨读取属性配置文件

首先创建一个属性配置文件,(以.properties结尾的)
在里面把下面几项单独提取出来,好处是如果需要改动,直接来配置文件就行,不用动java源程序了。
代码演示
public class 读取属性配置文件 {
    public static void main(String[] args) {
        Connection conn = null;
        Statement stmt = null;
        ResultSet rs = null;
        //资源绑定器
        ResourceBundle bundle =ResourceBundle.getBundle("db");
        //通过属性配置文件拿到信息
        String driver = bundle.getString("driver");
        String url = bundle.getString("url");
        String user = bundle.getString("user");
        String password = bundle.getString("password");
/*        System.out.println(driver);
        System.out.println(url);
        System.out.println(user);
        System.out.println(password);*/
        try {
            //1注册驱动
            //oracle数据库:Class.forName("oracle.jdbc.driver.OracleDriver");
            Class.forName(driver);
            //2获取连接
            conn = DriverManager.getConnection(url,user,password);

            //3.获取数据库操作对象
            stmt = conn.createStatement();
            //4.执行SQL语句
            String sql = "select a.ename as '员工' ,b.ename as '领导' from emp a left join emp b on a.mgr = b.empno";
            rs = stmt.executeQuery(sql);//返回结果集
            //5.处理查询结果集
            while (rs.next()){
                String  ename = rs.getString("员工");
                String  lname = rs.getString("领导");
                System.out.println(ename +","+ lname);
            }

        } catch (ClassNotFoundException | SQLException e) {
            e.printStackTrace();
        }finally {
            if (rs != null) {
                try {
                    rs.close();
                } catch (SQLException throwables) {
                    throwables.printStackTrace();
                }
            }
            if (stmt != null) {
                try {
                    stmt.close();
                } catch (SQLException throwables) {
                    throwables.printStackTrace();
                }
            }
            if (conn != null) {
                try {
                    conn.close();
                } catch (SQLException throwables) {
                    throwables.printStackTrace();
                }
            }
        }
    }
}
好啦本期到此结束,感兴趣的话可以关注博主的相关专栏,期待您的三连加关注。


 1522
1522


 被折叠的 条评论
为什么被折叠?
被折叠的 条评论
为什么被折叠?
 到【灌水乐园】发言


