


简介
本篇文章是关于对Volley的图片加载做相应的分析,分析Volley的ImageRequest、ImageLoader、NetworkImageView类对图片加载的策略,同样,本文是多多少少基于前面两篇文章 Volley – 基本用法 和Volley – 源码分析 的分析,比如说上面提及三个类的用法,从将请求添加到请求获取队列的过程等。
ImageRequest
先看其parseNetworkResponse(NetworkResponse response)方法:
 @Override
    protected Response<Bitmap> parseNetworkResponse(NetworkResponse response) {
        // Serialize all decode on a global lock to reduce concurrent heap usage.
        // # 全局锁,以减少并发堆上使用。
        // # 并且手动catch OutOfMemoryError
        synchronized (sDecodeLock) {
            try {
                return doParse(response);
            } catch (OutOfMemoryError e) {
                VolleyLog.e("Caught OOM for %d byte image, url=%s", response.data.length, getUrl());
                return Response.error(new ParseError(e));
            }
        }
}这个类中方法不多,主要是关于Bitmap图片的压缩方式
先看doParse()方法代码
/**
     * The real guts of parseNetworkResponse. Broken out for readability.
     */
    private Response<Bitmap> doParse(NetworkResponse response) {
        byte[] data = response.data;
        BitmapFactory.Options decodeOptions = new BitmapFactory.Options();
        Bitmap bitmap = null;
        // #如果mMaxWidth 和mMaxHeight 都为0,不压缩图片
        if (mMaxWidth == 0 && mMaxHeight == 0) {
            // #设置压缩图片的质量
            decodeOptions.inPreferredConfig = mDecodeConfig;
            bitmap = BitmapFactory.decodeByteArray(data, 0, data.length, decodeOptions);
        } else {
            // If we have to resize this image, first get the natural bounds.
            // #设置压缩操作为只压缩边界,从而获取真实图片的尺寸
            decodeOptions.inJustDecodeBounds = true;
            BitmapFactory.decodeByteArray(data, 0, data.length, decodeOptions);
            int actualWidth = decodeOptions.outWidth;
            int actualHeight = decodeOptions.outHeight;

            // Then compute the dimensions we would ideally like to decode to.
            // #大概是根据图片真实尺寸跟显示尺寸,获取合适的尺寸
            int desiredWidth = getResizedDimension(mMaxWidth, mMaxHeight,
                    actualWidth, actualHeight, mScaleType);
            int desiredHeight = getResizedDimension(mMaxHeight, mMaxWidth,
                    actualHeight, actualWidth, mScaleType);

            // Decode to the nearest power of two scaling factor.
            decodeOptions.inJustDecodeBounds = false;
            // TODO(ficus): Do we need this or is it okay since API 8 doesn't support it?
            // decodeOptions.inPreferQualityOverSpeed = PREFER_QUALITY_OVER_SPEED;
            // #根据图片真实尺寸和合适尺寸获取压缩比
            decodeOptions.inSampleSize =
                findBestSampleSize(actualWidth, actualHeight, desiredWidth, desiredHeight);
            Bitmap tempBitmap =
                BitmapFactory.decodeByteArray(data, 0, data.length, decodeOptions);

            // If necessary, scale down to the maximal acceptable size.
            // #如果压缩后图片还是合适图片大,再压缩
            if (tempBitmap != null && (tempBitmap.getWidth() > desiredWidth ||
                    tempBitmap.getHeight() > desiredHeight)) {
                bitmap = Bitmap.createScaledBitmap(tempBitmap,
                        desiredWidth, desiredHeight, true);
                tempBitmap.recycle();
            } else {
                bitmap = tempBitmap;
            }
        }

        if (bitmap == null) {
            return Response.error(new ParseError(response));
        } else {
            return Response.success(bitmap, HttpHeaderParser.parseCacheHeaders(response));
        }
    }
上面方法中有以下方法:
//根据图片真实尺寸跟待显示尺寸,获取图片合适的尺寸
private static int getResizedDimension(int maxPrimary, int maxSecondary, int actualPrimary,
            int actualSecondary, ScaleType scaleType)
//根据图片真实尺寸和合适尺寸获取压缩比
static int findBestSampleSize(
int actualWidth, int actualHeight, int desiredWidth, int desiredHeight) 这两个方法通过注释大致应该明白用意了,具体实现可以自己看源码,不要问我懂不懂,你懂的,哈哈,这句话怎么这么熟悉。
结合我之前做的本地图片加载跟Volley图片加载的代码,总结一下压缩图片的思路:
一、获取要显示图片的ImageView的大小尺寸
二、获取要显示图片的大小尺寸
三、对以上两者进行比较,获取压缩比例inSampleSize
四、压缩获取Bitmap
ImageLoader
ImageLoader可以说是ImageRequest的封装,并且能够处理重复的请求。
先看一下ImageLoader类结构
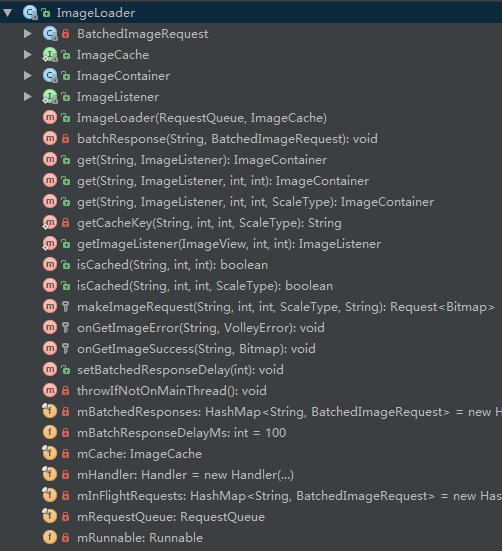
结构挺复杂的,这里先说明一下部分成员变量以及内部类和接口代表什么
- ImageListener:请求结果监听接口,该接口继承与ErrorListener,并有onResponse()处理请求成功结果,其第一个参数为ImageContainer内部类(见下面说明),第二个参数为是否在ImageLoader的get(…)方法中调用。这个标记作用也是挺大的,为什么呢?下面讲解batchResponse()方法时就知道了
/**
     * Interface for the response handlers on image requests.
     */
    public interface ImageListener extends ErrorListener {
        /**
         * Listens for non-error changes to the loading of the image request.
         */
        public void onResponse(ImageContainer response, boolean isImmediate);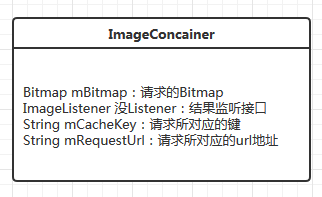
}- 内部类ImageConcainer
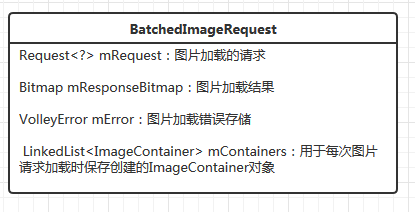
- 内部类BatchedImageRequest
- ImageLoader部分成员变量

到这里估计还不能很好的理解,不过接下来可以通过其用法慢慢体会
在第一版文章可以知道ImageLoader通过get(…)方法开始加载图片,
查看最终调用的get(…)源码:
public ImageContainer get(String requestUrl, ImageListener imageListener,
            int maxWidth, int maxHeight, ScaleType scaleType) {

        // only fulfill requests that were initiated from the main thread.
        // #检查是否在主线程运行
        throwIfNotOnMainThread();

        // #通过图片的请求信息获取缓存的键值
        final String cacheKey = getCacheKey(requestUrl, maxWidth, maxHeight, scaleType);

        // Try to look up the request in the cache of remote images.
        // #获取缓存中的Bitmap
        Bitmap cachedBitmap = mCache.getBitmap(cacheKey);
        if (cachedBitmap != null) {
            // Return the cached bitmap.
            ImageContainer container = new ImageContainer(cachedBitmap, requestUrl, null, null);
            imageListener.onResponse(container, true);
            return container;
        }

        // #没有缓存,先展示默认图片,在加载
        // The bitmap did not exist in the cache, fetch it!
        ImageContainer imageContainer =
                new ImageContainer(null, requestUrl, cacheKey, imageListener);

        // Update the caller to let them know that they should use the default bitmap.
        imageListener.onResponse(imageContainer, true);

        // Check to see if a request is already in-flight.
        // #检查是否正在加载中
        BatchedImageRequest request = mInFlightRequests.get(cacheKey);
        if (request != null) {
            // If it is, add this request to the list of listeners.
            // #添加到BatchedImageRequest 中的LinkedList<ImageContainer>做一次标记
            request.addContainer(imageContainer);
            return imageContainer;
        }

        // The request is not already in flight. Send the new request to the network and
        // track it.
        // #没缓存又不是正在加载,则创建请求去加载
        Request<Bitmap> newRequest = makeImageRequest(requestUrl, maxWidth, maxHeight, scaleType,
                cacheKey);

        mRequestQueue.add(newRequest);
        mInFlightRequests.put(cacheKey,
                new BatchedImageRequest(newRequest, imageContainer));
        return imageContainer;
    }
通过上面代码可以大致知道图片加载过程,而且现在应该知道ImageLoader是如何处理重复的请求,是通过mInFlightRequests集合标记来判断是否请求正在加载中。
到这里有一个问题,ImageRequest的构造函数中有结果跟错误的监听器,它是怎么被传递到ImageListener的
查看其创建ImageRequest的方法makeImageRequest(…)
protected Request<Bitmap> makeImageRequest(String requestUrl, int maxWidth, int maxHeight,
            ScaleType scaleType, final String cacheKey) {
        return new ImageRequest(requestUrl, new Listener<Bitmap>() {
            @Override
            public void onResponse(Bitmap response) {
                onGetImageSuccess(cacheKey, response);
            }
        }, maxWidth, maxHeight, scaleType, Config.RGB_565, new ErrorListener() {
            @Override
            public void onErrorResponse(VolleyError error) {
                onGetImageError(cacheKey, error);
            }
        });
    }
可以发现在结果接口中通过onGetImageSuccess(cacheKey, response)和onGetImageError(cacheKey, error)处理,通过源码发现,这两个方法最终调用batchResponse(…)方法
  /**
     * Starts the runnable for batched delivery of responses if it is not already started.
     * @param cacheKey The cacheKey of the response being delivered.
     * @param request The BatchedImageRequest to be delivered.
     */
    private void batchResponse(String cacheKey, BatchedImageRequest request) {
        mBatchedResponses.put(cacheKey, request);
        // If we don't already have a batch delivery runnable in flight, make a new one.
        // Note that this will be used to deliver responses to all callers in mBatchedResponses.
        // #判读成员变量mRunnable是否为空
        if (mRunnable == null) {
            mRunnable = new Runnable() {
                @Override
                public void run() {
                    for (BatchedImageRequest bir : mBatchedResponses.values()) {
                        for (ImageContainer container : bir.mContainers) {
                            // If one of the callers in the batched request canceled the request
                            // after the response was received but before it was delivered,
                            // skip them.
                            if (container.mListener == null) {
                                continue;
                            }
                            if (bir.getError() == null) {
                            // #加载成功,传递Bitmap
                                container.mBitmap = bir.mResponseBitmap;
                                container.mListener.onResponse(container, false);
                            } else {
                                // #加载失败,传递error
                                container.mListener.onErrorResponse(bir.getError());
                            }
                        }
                    }
                    // #加载结果传递完成,清空集合数据
                    mBatchedResponses.clear();
                    // #mRunnable执行完毕,令其指向null
                    mRunnable = null;
                }

            };
            // Post the runnable.
            mHandler.postDelayed(mRunnable, mBatchResponseDelayMs);
        }
}到这里,ImageLoader图片加载过程已经分析完成,现在问一个问题,为什么batchResponse(…)处理结果函数中采用Handler.post(…)方式处理结果?
- 不知道你有没有发现if (mRunnable == null)、 mRunnable = null、mHandler.postDelayed(mRunnable, mBatchResponseDelayMs);语句,这里我想了想,作用可能是等待在UI线程中图片显示完成,即上一个post中的mRunnable执行完成,才去进行下一个发送,这样可以避免过多post导致的图片加载顺序不变,以及减少UI压力,也许还有其他原因,可能还避免内存泄漏等方面,如果你觉得还有什么作用的话,希望能够一起讨论。
这里提一下getCacheKey(…)方法,为什么要提这个方法呢,之前我在做本地图片加载时,遇到一个问题,如何对同一张图片在不同ImageView跟属性进行显示,因为当时直接将url作为键值key,通过Volley也能够学习到别人处理问题的方式。
    /**
     * Creates a cache key for use with the L1 cache.
     * @param url The URL of the request.
     * @param maxWidth The max-width of the output.
     * @param maxHeight The max-height of the output.
     * @param scaleType The scaleType of the imageView.
     */
    private static String getCacheKey(String url, int maxWidth, int maxHeight, ScaleType scaleType) {
        return new StringBuilder(url.length() + 12).append("#W").append(maxWidth)
                .append("#H").append(maxHeight).append("#S").append(scaleType.ordinal()).append(url)
                .toString();
    }
NetworkImageView
最后讲解的NetworkImageview是继承ImageView的控件,可以说是对前面ImageRequest和ImageLoader的再封装,方便使用。
这里主要看下其void loadImageIfNecessary(final boolean isInLayoutPass) 方法:
/**
     * Loads the image for the view if it isn't already loaded.
     * @param isInLayoutPass True if this was invoked from a layout pass, false otherwise.
     */
    void loadImageIfNecessary(final boolean isInLayoutPass) {
        int width = getWidth();
        int height = getHeight();
        ScaleType scaleType = getScaleType();

        boolean wrapWidth = false, wrapHeight = false;
        if (getLayoutParams() != null) {
            wrapWidth = getLayoutParams().width == LayoutParams.WRAP_CONTENT;
            wrapHeight = getLayoutParams().height == LayoutParams.WRAP_CONTENT;
        }

        // if the view's bounds aren't known yet, and this is not a wrap-content/wrap-content
        // view, hold off on loading the image.
        boolean isFullyWrapContent = wrapWidth && wrapHeight;
        if (width == 0 && height == 0 && !isFullyWrapContent) {
            return;
        }

        // if the URL to be loaded in this view is empty, cancel any old requests and clear the
        // currently loaded image.
        if (TextUtils.isEmpty(mUrl)) {
            if (mImageContainer != null) {
                mImageContainer.cancelRequest();
                mImageContainer = null;
            }
            setDefaultImageOrNull();
            return;
        }

        // if there was an old request in this view, check if it needs to be canceled.

        if (mImageContainer != null && mImageContainer.getRequestUrl() != null) {
            // #如果加载的url跟当前显示的url一样
            if (mImageContainer.getRequestUrl().equals(mUrl)) {
                // if the request is from the same URL, return.
                return;
            } else {
                // if there is a pre-existing request, cancel it if it's fetching a different URL.
                // #url不一样则先取消当前加载,并设置默认显示图片
                mImageContainer.cancelRequest();
                setDefaultImageOrNull();
            }
        }

        // Calculate the max image width / height to use while ignoring WRAP_CONTENT dimens.
        int maxWidth = wrapWidth ? 0 : width;
        int maxHeight = wrapHeight ? 0 : height;

        // The pre-existing content of this view didn't match the current URL. Load the new image
        // from the network.
        ImageContainer newContainer = mImageLoader.get(mUrl,
                new ImageListener() {
                    @Override
                    public void onErrorResponse(VolleyError error) {
                        if (mErrorImageId != 0) {
                            setImageResource(mErrorImageId);
                        }
                    }

                    @Override
                    public void onResponse(final ImageContainer response, boolean isImmediate) {
                        // If this was an immediate response that was delivered inside of a layout
                        // pass do not set the image immediately as it will trigger a requestLayout
                        // inside of a layout. Instead, defer setting the image by posting back to
                        // the main thread.
                        // #如果是在ImageLoader.get(...)方法中立即获取缓存并调用加载显示,或者是正在ImageView的布局路线中,则通过post(..),重新调用onResponse(response, false);进行图片显示操作
                        // #根据上面的英文解析,大概的,具体原因是避免ImageView还没加载完成,就过早的加载图片的显示,从而避免requestLayout()方法的调用
                        if (isImmediate && isInLayoutPass) {
                            post(new Runnable() {
                                @Override
                                public void run() {
                                    onResponse(response, false);
                                }
                            });
                            return;
                        }

                        if (response.getBitmap() != null) {
                            setImageBitmap(response.getBitmap());
                        } else if (mDefaultImageId != 0) {
                            setImageResource(mDefaultImageId);
                        }
                    }
                }, maxWidth, maxHeight, scaleType);

        // update the ImageContainer to be the new bitmap container.
        mImageContainer = newContainer;
    }
到这里,你应该知道ImageListener接口中的onResponse(.. , ..)的第二个参数的具体作用了吧。
其次看下NetworkImageView的另外两个方法:
首先是onDetachedFromWindow()方法:
    @Override
    protected void onDetachedFromWindow() {
        if (mImageContainer != null) {
            // If the view was bound to an image request, cancel it and clear
            // out the image from the view.
            // #取消图片的加载,并设置图片为null,并将mImageContainer赋为null
            mImageContainer.cancelRequest();
            setImageBitmap(null);
            // also clear out the container so we can reload the image if necessary.
            mImageContainer = null;
        }
        super.onDetachedFromWindow();
    }
查看View的onDetachedFromWindow()方法
     /**
     * This is called when the view is detached from a window.  At this point it
     * no longer has a surface for drawing.
     *
     * @see #onAttachedToWindow()
     */
    protected void onDetachedFromWindow() {
    }
可以知道该方法是该view与界面不联系时调用,而NetworkImageView重写该方法可以在NetworkImageView不用时清除数据,释放内存,还避免了内存泄漏
第二个是drawableStateChanged()方法
    @Override
    protected void drawableStateChanged() {
        super.drawableStateChanged();
        invalidate();
}同样通过查看View中drawableStateChanged()方法可以知道,该方法是在View状态改变时调用,View一般有4种状态,可以查考博客Android中View(视图)绘制不同状态背景图片原理深入分析以及StateListDrawable使用详解
总结
通过本篇文章,可以看到Volley对图片加载的处理方式,以下对全文进行下收获总结
- 了解Bitmap的压缩思路
- 获得Volley的部分工具代码
- 处理多次请求的方式
- 减少UI压力的方法
本文章对Volley图片处理做了相关讲解,如有哪些地方不足或者错误,希望能够指正,谢谢。


 236
236

 被折叠的 条评论
为什么被折叠?
被折叠的 条评论
为什么被折叠?
 到【灌水乐园】发言


