


【算法】代码随想录训练营Day3打卡,链表,leetcode203.移除链表元素 707.设计链表206.反转链表
链表
代码随想录算法训练营Day13任务。
认识链表
链表是一种比较常见的数据结构,同样也是线性表。链表其实是利用了内存中零散的内存空间,其中通过指针指向某个内存空间的地址来达到线性的一个存储结构。
链表一般分为
单链表
双链表
循环链表
单链表
单链表是数据结构中最常用的链表,也是算法题中经常考察的,他的每一个节点中都拥有两个属性值
- value 表示当前节点的值
- next指针,表示链表下一节点的地址
单链表只有当前节点下一节点的值,所以单链表只能从头寻到尾,并不能反向寻找
双链表
双链表相比单链表多了一个prev的属性,该属性指向的是上一个节点的地址,所以双链表是可以从头寻到尾,也可以反之寻找
循环链表
循环链表其实可以说是单链表的一种特殊情况,他在某个节点的next属性中存储的是链表内另外一个节点的地址,这样就形成了一个闭环,如果一直根据链表寻下去,永远都不会找到null
在C语言和JS中都没有链表这种数据结构,所以需要我们自己来定义链表
C语言手写链表
struct ListNode {
	int val;
	struct ListNode *next //next是一个指针
}
js手写链表
// 定义一个构造函数,到时候就可以使用 new 构造出链表节点
function ListNode(val,next){
	  this.val = (val===undefined ? 0 : val)
      this.next = (next===undefined ? null : next)
}
移除链表元素
力扣链接:https://leetcode.cn/problems/remove-linked-list-elements/description/
先写一个例子
链表 1-3-6-5-null
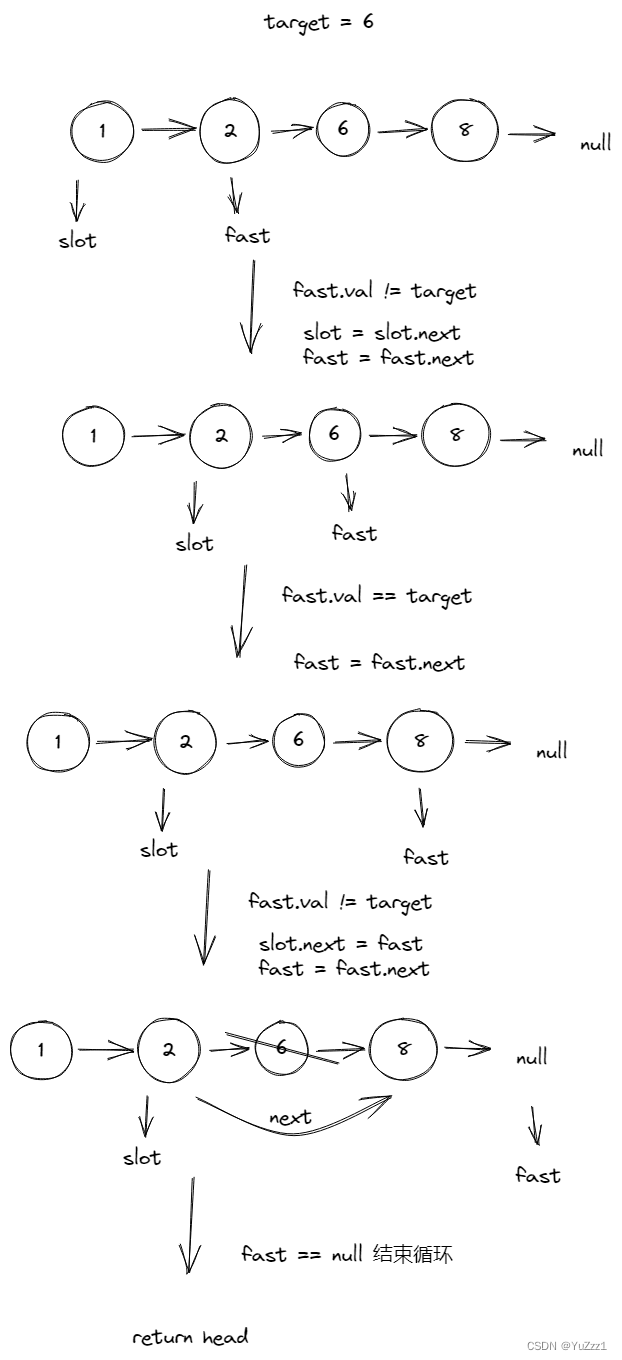
target = 6
这道题其实我思考出有两种解法
1.是使用双指针方法,这种方法也就是原地修改的方法,不需要使用虚拟节点,但是会比较麻烦,慢指针slot初始化为head,快指针fast初始化为head.next,当fast.val != null时 我们开始判断如果,fast.val != target 那么我们移动 fast和slot指针,否则,我们就移动fast指针,并且判断移动后的fast.val 是否为null 如果为null表示我们走到链表尽头了,直接slot.next = null 就ok,若不为null, 但 fast.val != target slot.next = fast 就ok,若都不满足以上条件,则时 fast.val == target 那我们就不用动,进入下一次循环的时候会重复以上的判断。
当fast指针到null时循环结束,链表内的节点我们就基本都删除完毕了,但还有头部节点我们还没有判断到,因为我们fast时从head.next开始的,这时候我们单独判断head.val = targe 如果时 则把head.next赋值为头节点
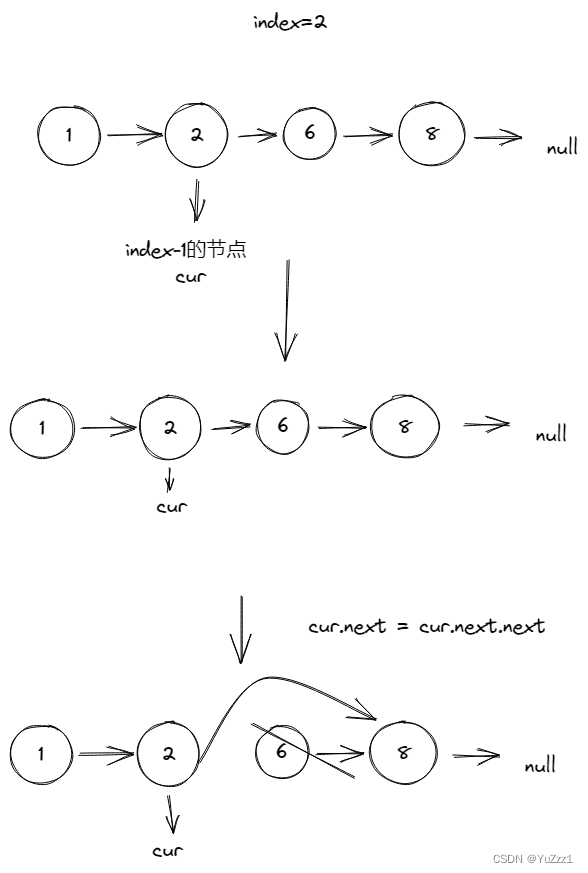
2.使用虚拟链表法
我们创造一个虚拟的头节点,并将该节点的next指向head,
我们创造一个指针cur,指向虚拟头节点,每次判断cur.next.val == target
若 = targe 则 cur = cur.next.next
若 != target 则 cur = cur.next

C语言版本
虚拟头节点
/**
 * Definition for singly-linked list.
 * struct ListNode {
 *     int val;
 *     struct ListNode *next;
 * };
 */


struct ListNode* removeElements(struct ListNode* head, int val){
    typedef struct ListNode ListNode;
    ListNode *shead; //创建虚拟头节点并开辟一片内存空间
    shead = (ListNode *)malloc(sizeof(ListNode));
    shead->next = head;// c语言 指针使用 -> 访问属性值
    ListNode *cur = shead;
    while(cur->next  != NULL){
        if(cur->next->val == val){
            ListNode *tmp = cur->next; // 这里不需要开辟新的内存空间,我们只需要保存指向的内存空间地址就行
            cur->next = cur->next->next;
            free(tmp); // 删掉的节点要主动释放内存空间
        }else{
            cur = cur->next;
        }
    }
    head = shead->next;
    free(shead);
    return head;
}```


### JS版本

方法1

```javascript
/**
 * Definition for singly-linked list.
 * function ListNode(val, next) {
 *     this.val = (val===undefined ? 0 : val)
 *     this.next = (next===undefined ? null : next)
 * }
 */
/**
 * @param {ListNode} head
 * @param {number} val
 * @return {ListNode}
 */
var removeElements = function(head, val) {
    if(head == null  ){
        return head
    }

    let slot = head;
    let fast = head.next;
    while(fast != null){
        if(fast.val != val){
            slot = slot.next;
            fast = fast.next;
        }else{
            fast = fast.next;
            if(fast == null){
                slot.next = null
            }else if(fast.val != val  ){
                slot.next = fast
            }
        }
    }
    if(head.val == val){ head = head.next } // 一定要注意判断头节点 否则会有错
    return head;
};
方法2
/**
 * Definition for singly-linked list.
 * function ListNode(val, next) {
 *     this.val = (val===undefined ? 0 : val)
 *     this.next = (next===undefined ? null : next)
 * }
 */
/**
 * @param {ListNode} head
 * @param {number} val
 * @return {ListNode}
 */
var removeElements = function(head, val) {
    let newHead = new ListNode(0,head);
    let cur = newHead
    while(cur.next){
        if(cur.next.val != val){
            cur = cur.next
        }
        else{
            cur.next = cur.next.next;
        }
    }
    return newHead.next

}
设计链表
https://leetcode.cn/problems/design-linked-list/
这道题我们先读题干,这道题比较长,部分函数只会用js来书写
我们一共要实现
get(index); 获得index节点的val的值
addAtHead(val); 头节点增加一个节点
addAtTail(val); 在尾节点增加一个节点
addAtIndex(index,val); 在index节点前增加一个节点
deleteAtIndex(index); 删除index节点
首先我们得实现一个LinkNode的方法实现链表节点
function LinkNode(val,next) {
        this.val = val;
        this.next = next;
}
接着再实现一个链表的方法,我们将再这个方法的原型上书写各种方法
var MyLinkedList = function() {
	// 在链表中 我们要有 大小,头节点,尾节点  三个属性以便我们使用
    this._size = 0;
    this._head = null;
    this._tail = null;
};
get(index)
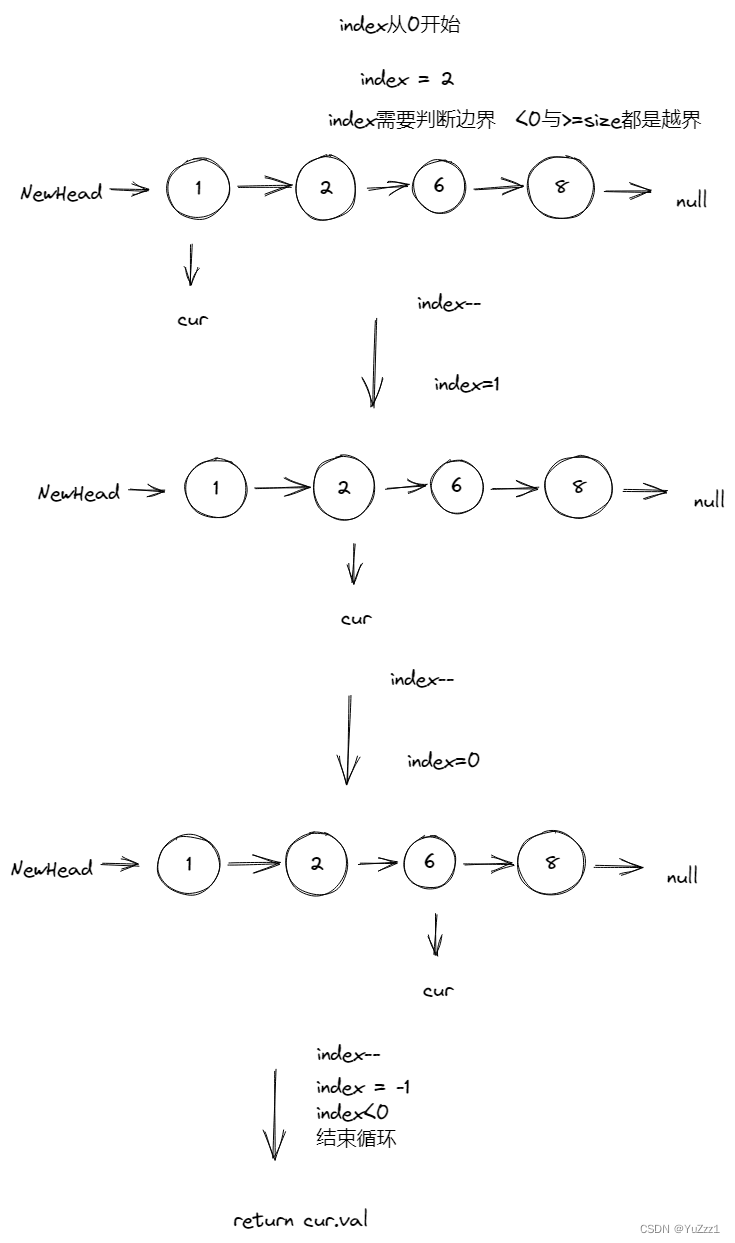
因为后面的getAtIndex与deleteAtIndex都需要用到寻找某一个节点的功能,所以我们把getNode单独封装成一个方法
代码
MyLinkedList.prototype.getNode = function(index){
   // if(index < 0 || index >= this._size) return null;
    let cur = new LinkNode(0, this._head);
    while(index-- >= 0) {
        cur = cur.next;
    }
    return cur;
}

/**
 * @param {number} index
 * @return {number}
 */
MyLinkedList.prototype.get = function(index) {
    if(index < 0 || index >= this._size) return -1;
    // 获取当前节点
    return this.getNode(index).val;
};
addAtHead(val)
这个方法比较简单,我们直接在 _head的前面new一个节点,将next指向_head
这里需要判断一下 若是只有一个节点那么这个节点即是头节点 也是尾节点

MyLinkedList.prototype.addAtHead = function(val) {

    let node = new LinkNode(val,this._head);
    this._head = node;
    this._size++;
    if(this._size == 1){
    	this._tail = node
	}

};
addAtTail(val)
这个方法是在尾部插入一个节点,那么我们直接通过tail方法可以拿到尾部节点,若是tail == null,我们直接吧tail设置为新节点就好了,若是不为null,则需要先把tail.next指向新节点,再把tail设置为新节点
MyLinkedList.prototype.addAtTail = function(val) {
    let node = new LinkNode(val,null);
    if(!this._tail){
        this._size++;
        this._tail = node;
    }else{
        this._tail.next = node;
        this._tail = node;
        this._size++;
    }
    if(this._size == 1){
        this._head = this._tail
    }


};
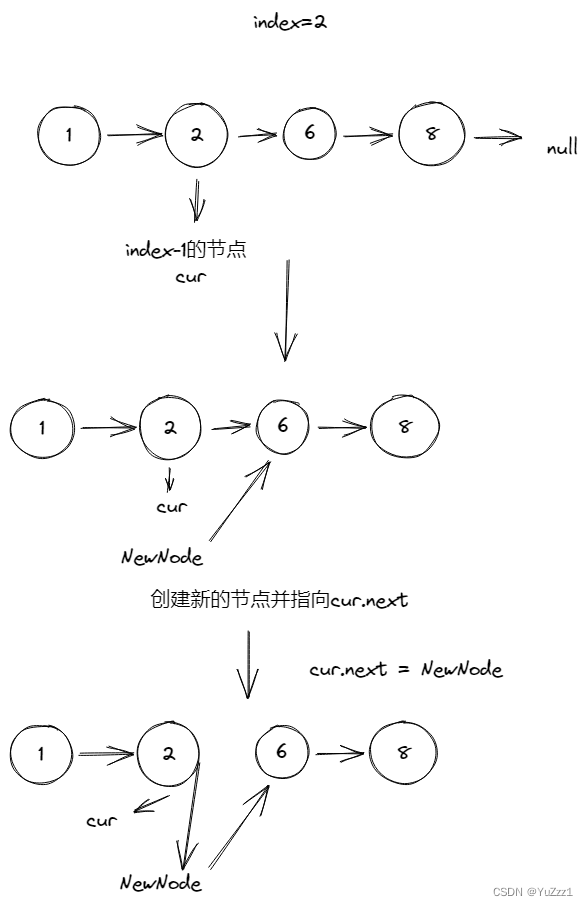
addAtIndex(index,val)
这道题根据index来判断,若index>size 则 直接ruturn 不进行操作
若index <= 则执行 addAtHead方法
若index == size 则执行 addAtTail方法
若不满足以上规则,则是在边界内的
我们通过 getNode方法取到index的前一个节点,
在通过指针改变实现新增
/**
 * @param {number} index
 * @param {number} val
 * @return {void}
 */
MyLinkedList.prototype.addAtIndex = function(index, val) {
    if(index > this._size){
        return
    }
    if(index<=0){
        this.addAtHead(val);
        return;
    }
    if(index == this._size){
        this.addAtTail(val);
        return
    }
        const node = this.getNode(index - 1);
        node.next = new LinkNode(val, node.next);
        this._size++;


};
deleteAtIndex(index)
在这里我们要判断index的边界 若index<0或index>=size 则index是无效的,则不进行操作
若 index == 0 则表示要删除头节点,我们在删除后要把 head修改为head.next
接下来我们通过getNode 找到index-1的节点,然后将next指向 他的next.next节点就完成了删除
然后我们要判断若是删除后 index= size-1 则表示是删除的是最后一个节点,则要将tail设置为index-1的节点
/**
 * @param {number} index
 * @return {void}
 */
MyLinkedList.prototype.deleteAtIndex = function(index) {
    if(index<0 || index>this._size-1){
        return
    }
    if(index == 0){
        this._head = this._head.next;
        if(index === this._size - 1){ //判断是否是最后一个节点
            this._tail = this._head
        }
        this._size--;
        return;
    }
    let node = this.getNode(index-1);
    node.next = node.next.next;
    if(index === this._size - 1) {
        this._tail = node;
    }
    this._size--;
};
LeetCode 206. 反转链表
https://leetcode.cn/problems/reverse-linked-list/
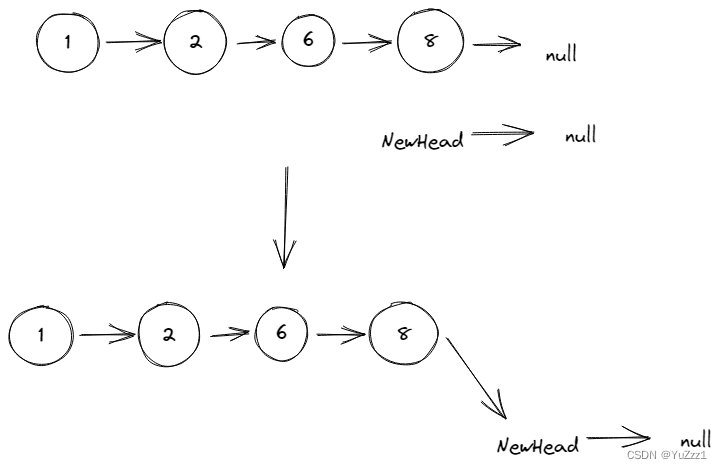
反转链表我们首先准备一个虚拟头节点newHead next指向null
准备两个指针一个cur = head pre = cur.next;
每一次我们把 newHead.next 指向 cur,
cur.next指向 newHead.next
在把cur的指针zhixiang pre,
下一次时pre又置为 cur.next
如图
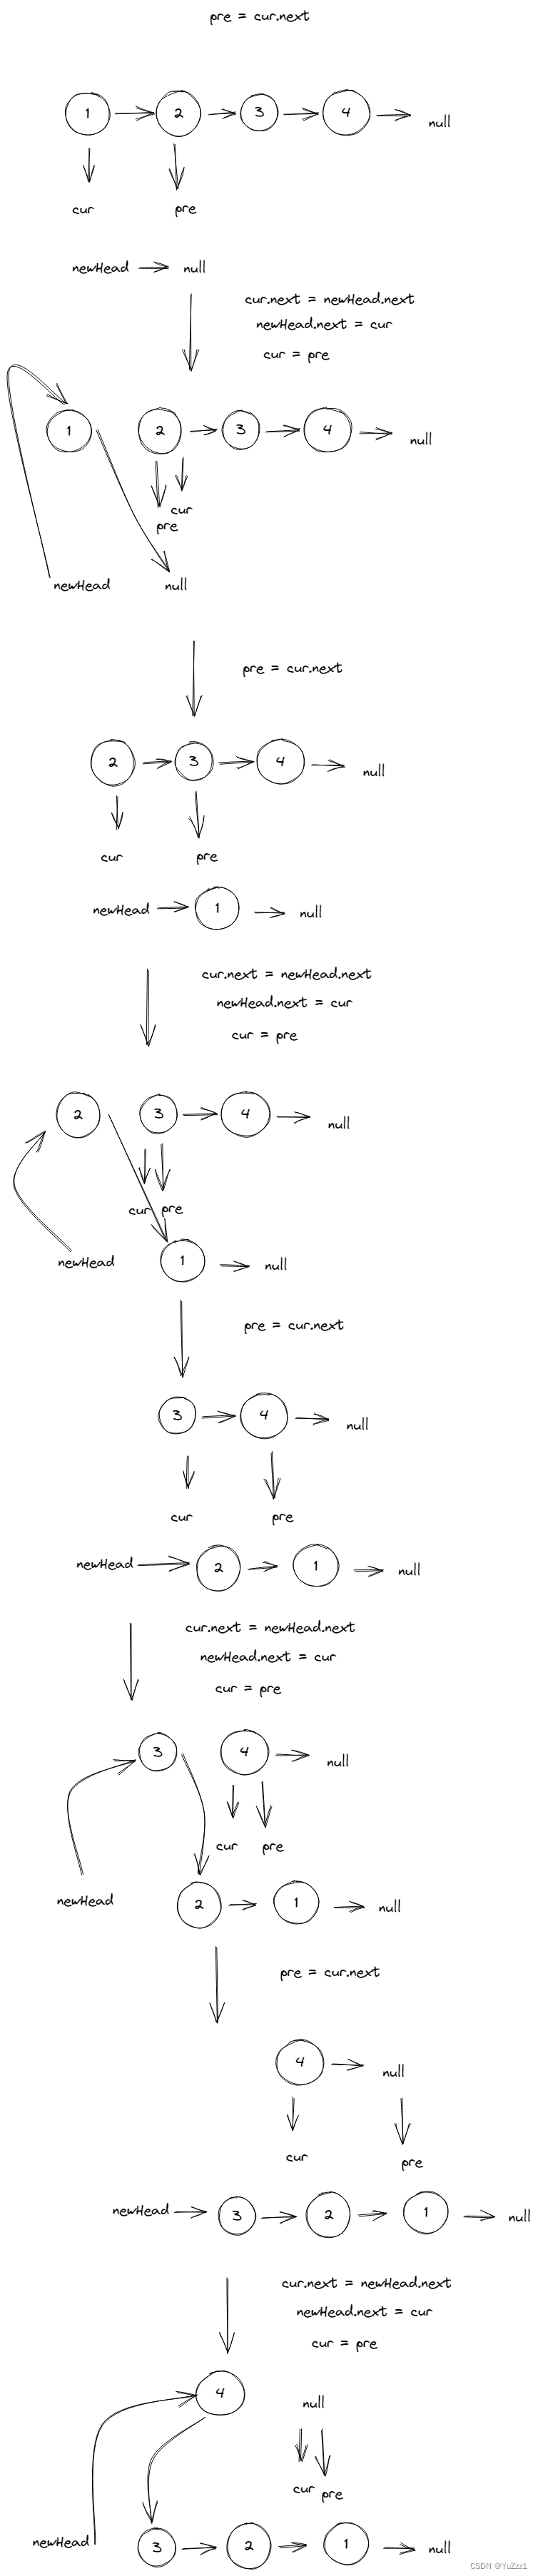
这样只要我们返回 newHead.next 就是一个反转过的链表了
C语言解法
/**
 * Definition for singly-linked list.
 * struct ListNode {
 *     int val;
 *     struct ListNode *next;
 * };
 */


struct ListNode* reverseList(struct ListNode* head){
   struct ListNode newHead = {0,NULL}; //这里要注意newHead虚拟头节点时一个变量,而不是指针变量
   struct ListNode* pre;
   struct ListNode* cur =  head;
   while(cur){
      pre = cur->next;
      cur->next = newHead.next;
      newHead.next = cur;
       cur = pre;
   }
   return newHead.next;


}
JS解法
/**
 * Definition for singly-linked list.
 * function ListNode(val, next) {
 *     this.val = (val===undefined ? 0 : val)
 *     this.next = (next===undefined ? null : next)
 * }
 */
/**
 * @param {ListNode} head
 * @return {ListNode}
 */
var reverseList = function(head) {
    let newHead = new ListNode(0,null);
    let cur = head;
    while(cur){
        let pre = cur.next;
        cur.next =  newHead.next; //一定要注意cur.next 与 newHead.next的赋值顺序
        newHead.next = cur;
        cur = pre;


    }
    return newHead.next;
};
今日心得
今日完成算法+完成文章的总共时间共4小时,以前刷链表主要在反转链表和设计链表这两道题过的很快,并没有特别深刻的去理解这两道题,今日将每一道题都细细分解,仔细画图去理顺思路,让今日对链表的题目又很大的收获,并且在c语言刷反转链表的时候其实遇到了变量和指针变量的坑,也让我对c语言指针要熟悉一些


 133
133


 被折叠的 条评论
为什么被折叠?
被折叠的 条评论
为什么被折叠?
 到【灌水乐园】发言


