


1.创建maven项目:创建工程参见之前写的博客https://blog.csdn.net/ZHANGLIZENG/article/details/80866682
2.pom.xml中引入需要的依赖文件和编码设置:
  <properties>
       <project.build.sourceEncoding>UTF-8</project.build.sourceEncoding>
       <project.reporting.outputEncoding>UTF-8</project.reporting.outputEncoding>
       <java.version>1.8</java.version>
  </properties>

  <!-- 配置父类启动器,主要解决热加载文件 -->
  <parent>
      <groupId>org.springframework.boot</groupId>
      <artifactId>spring-boot-starter-parent</artifactId>
      <version>1.5.4.RELEASE</version>
  </parent>

  <dependencies>

     <!-- 项目启动需要的jar包 -->
     <dependency>
      <groupId>org.springframework.boot</groupId>
      <artifactId>spring-boot-starter-web</artifactId>
    </dependency>

    <dependency>
      <groupId>junit</groupId>
      <artifactId>junit</artifactId>
      <scope>test</scope>
    </dependency>

    <!-- 热部署方法1spring boot devtools 依赖包. -->
     <dependency>
         <groupId>org.springframework.boot</groupId>
         <artifactId>spring-boot-devtools</artifactId>
         <optional>true</optional>
        <scope>true</scope>
     </dependency>

     <!--整合mybatis依赖-->
     <dependency>
         <groupId>org.mybatis.spring.boot</groupId>
         <artifactId>mybatis-spring-boot-starter</artifactId>
         <version>1.3.2</version>
     </dependency>

     <!--数据库连接驱动-->
     <dependency>
         <groupId>mysql</groupId>
         <artifactId>mysql-connector-java</artifactId>
         <scope>runtime</scope>
     </dependency>

     <dependency>
         <groupId>org.springframework.boot</groupId>
         <artifactId>spring-boot-starter-test</artifactId>
         <scope>test</scope>
     </dependency>

     <!-- 分页插件 -->
     <dependency>
         <groupId>com.github.pagehelper</groupId>
         <artifactId>pagehelper-spring-boot-starter</artifactId>
         <version>1.2.5</version>
     </dependency>

     <!-- alibaba的druid数据库连接池 -->
     <dependency>
         <groupId>com.alibaba</groupId>
         <artifactId>druid-spring-boot-starter</artifactId>
         <version>1.1.9</version>
     </dependency>

     <!-- 导入thymeleaf模板依赖 -->
     <dependency>
         <groupId>org.springframework.boot</groupId>
         <artifactId>spring-boot-starter-thymeleaf</artifactId>
     </dependency>

     <!-- json处理的jar包 -->
     <dependency>
         <groupId>com.alibaba</groupId>
         <artifactId>fastjson</artifactId>
         <version>1.2.14</version>
     </dependency>

  </dependencies>
3.设置项目的包结构:
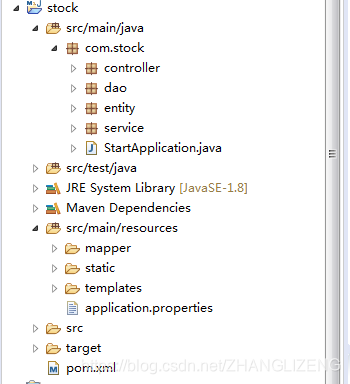
4.配置springboot默认的application.properties属性:
#配置端口号以及拦截策略
server.port=8080

#seesion 过期时间  单位 (秒)  5分钟
server.session.timeout=300

#开始配置mysql连接驱动以及数据库连接池参数
spring.datasource.name=mysql_test
spring.datasource.type=com.alibaba.druid.pool.DruidDataSource
spring.datasource.druid.filters=stat
spring.datasource.druid.driver-class-name=com.mysql.jdbc.Driver
spring.datasource.druid.url=jdbc:mysql://localhost:3306/stock?useUnicode=true&characterEncoding=UTF-8&allowMultiQueries=true
spring.datasource.druid.username=root
spring.datasource.druid.password=root

#这里可以不用配置,有默认参数,根据自己需求
spring.datasource.druid.initial-size=1
spring.datasource.druid.min-idle=1
spring.datasource.druid.max-active=20
spring.datasource.druid.max-wait=6000
spring.datasource.druid.time-between-eviction-runs-millis=60000
spring.datasource.druid.min-evictable-idle-time-millis=300000
spring.datasource.druid.validation-query=SELECT 'x'
spring.datasource.druid.test-while-idle=true
spring.datasource.druid.test-on-borrow=false
spring.datasource.druid.test-on-return=false
spring.datasource.druid.pool-prepared-statements=false
spring.datasource.druid.max-pool-prepared-statement-per-connection-size=20

#开始配置mybatis
mybatis.mapper-locations=classpath:mapper/*.xml
mybatis.type-aliases-package=com.stock.entity

#配置thymeleaf缓存开发期间先关闭,否则影响测试
spring.thymeleaf.cache=false
spring.thymeleaf.prefix=classpath:/templates/
spring.thymeleaf.suffix=.html
spring.thymeleaf.mode=HTML5
spring.thymeleaf.encoding=UTF-8

#禁用默认的favicon.ico图标
spring.mvc.favicon.enabled=false
5.配置springboot启动器及扫描的包:
package com.stock;

import org.mybatis.spring.annotation.MapperScan;
import org.springframework.boot.SpringApplication;
import org.springframework.boot.autoconfigure.SpringBootApplication;
import org.springframework.context.annotation.ComponentScan;

/**
 * @Description 程序启动类
 * @author 张立增
 * @Date 2019年1月20日 下午4:39:59
 */
@SpringBootApplication
@ComponentScan(basePackages ={"com.stock"})
@MapperScan("com.stock.dao")
public class StartApplication {

    public static void main( String[] args )
    {
         SpringApplication.run(StartApplication.class, args);
    }
}
6.编写查询用户表user数据展示的前后端代码:
(1)建表语句:
CREATE TABLE `user` (
  `id` INT(11) PRIMARY KEY NOT NULL AUTO_INCREMENT,
  `name` VARCHAR(255),
  `password` VARCHAR(255)
) ENGINE=MYISAM DEFAULT CHARSET=utf8 COMMENT='user'
(2)controller层代码:
import java.util.List;

import org.springframework.beans.factory.annotation.Autowired;
import org.springframework.web.bind.annotation.RequestMapping;
import org.springframework.web.bind.annotation.RestController;
import org.springframework.web.servlet.ModelAndView;

import com.stock.entity.User;
import com.stock.service.UserService;
/**
 * @Description index的控制类
 * @Date 2019年1月20日 下午5:04:27
 */
@RestController
public class IndexController {

    @Autowired
    UserService userService;


    @RequestMapping("/index")
    public ModelAndView index() {
        System.out.println("hello world!");
        ModelAndView mv = new ModelAndView("pages/index");
        List<User> userList = userService.findUserList();
        mv.addObject("userList", userList);
        return mv;
    }
(3)service代码:
import java.util.List;

import org.springframework.beans.factory.annotation.Autowired;
import org.springframework.stereotype.Service;

import com.stock.dao.UserDao;
import com.stock.entity.User;

@Service
public class UserService {

     @Autowired
     UserDao userDao;

     public List<User> findUserList() {
        return userDao.findUserList();
     }
}
(4)dao层代码:
import java.util.List;

import org.springframework.stereotype.Repository;

import com.stock.entity.User;

@Repository
public interface UserDao {

    List<User> findUserList();


}
(5)实体类代码:
public class User {
private Integer id;
private String name;
private String password;
public User() {
super();
}
public User(Integer id, String name, String password) {
super();
this.id = id;
this.name = name;
this.password = password;
}
public Integer getId() {
return id;
}
public void setId(Integer id) {
this.id = id;
}
public String getName() {
return name;
}
public void setName(String name) {
this.name = name;
}
public String getPassword() {
return password;
}
public void setPassword(String password) {
this.password = password;
}
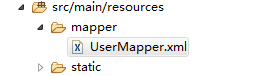
}(6)存放在resources下的mapper包下的操作数据库sql的xml文件:
<?xml version="1.0" encoding="UTF-8"?>
<!DOCTYPE mapper PUBLIC "-//mybatis.org//DTD Mapper 3.0//EN" "http://mybatis.org/dtd/mybatis-3-mapper.dtd">
<mapper namespace="com.stock.dao.UserDao">
<select id="findUserList" resultType="com.stock.entity.User">
select * from stock.user
</select>
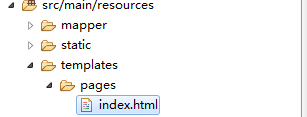
</mapper>(7)html页面对查询的用户集合进行展示:
<!DOCTYPE html>
<html>
<head>
<meta charset="UTF-8"/>
<title>测试页面</title>
</head>
<body>
  <table>
    <tr>
        <th>编号</th>
        <th>姓名</th>
        <th>密码</th>
    </tr>
    <!-- 对集合变量userList进行遍历-->
    <tr th:each="user : ${userList}">
        <td th:text="${user.id}"></td>
        <td th:text="${user.name}"></td>
        <td th:text="${user.password}"></td>
    </tr>
</table>
</body>
</html>
(8)在页面输入访问连接:127.0.0.1:8080/index,查看是否查询出结果,有结果则整套流程走通

完整项目git代码下载链接(项目down下来转成maven工程,配置数据源新建表添加数据即可使用):https://github.com/zhangliqingyun/stock


 481
481


 被折叠的 条评论
为什么被折叠?
被折叠的 条评论
为什么被折叠?
 到【灌水乐园】发言


