


自定义日期选择器
代码
在工程目录components文件夹下新建一个newDatePicker.vue的文件,将如下代码粘贴至文件中即可。
<!--
author: 单乘风
description: 自定义日期选择
createTime: 2023-12-18
-->
<template>
	<view>
		<uni-popup ref="scfPopup" type="bottom">
			<view class="popup-top-box">
				<text>{{ scfTitle }}</text>
				<text class="cancel-btn" @click="close">取消</text>
			</view>
			<view class="popup-box">
				<picker-view v-if="visible" :indicator-style="indicatorStyle" :value="currentVal" @change="dateChangeFun" class="picker-view">
					<picker-view-column>
						<view class="item" v-for="(item,index) in dateArray[0]" :key="index">{{item}}年</view>
					</picker-view-column>
					<picker-view-column>
						<view class="item" v-for="(item,index) in dateArray[1]" :key="index">{{item}}月</view>
					</picker-view-column>
					<picker-view-column>
						<view class="item" v-for="(item,index) in dateArray[2]" :key="index">{{item}}日</view>
					</picker-view-column>
				</picker-view>
			</view>
			<view class="btn-box sub-btn">
				<button type="warn" @click="submiDateFun" class="btnConfirm">确定</button>
			</view>
		</uni-popup>
	</view>
</template>

<script>
	export default {
		components: {

		},

		props:{
			scfTitle: {
				type: String,
				default:()=>{
					return "我是标题"
				}
			},
			nowDate:{
				type: String,
				default: ""
			},
			preYears: {
				type: Number,
				default: 100
			},
			nexYears: {
				type: Number,
				default: 50
			}
		},

		data() {
			return {
				visible: true,
				indicatorStyle: `height: 50px;`,
				dateArray: [],
				currentVal: [0,0,0],
			};
		},

		onLoad(options) {

		},

		mounted() {
			this.close()
			this.createDate()
		},

		methods: {
			/**
			 * @author 单乘风
			 * @description 初始日期数组
			 * */
			createDate () {
			  var years = []
			  var year = new Date().getFullYear()
			  for (let i = year - this.preYears; i <= year + this.nexYears; i++) {
			    years.push(String(i))
			  }
			  var months = []
			  for (let i = 1; i <= 12; i++) {
			    months.push((i < 10 ? '0' : '') + i)
			  }
			  var days = []
			  for (let i = 1; i <= 31; i++) {
			    days.push((i < 10 ? '0' : '') + i)
			  }
			  years.push(String(9999))
			  this.dateArray.push(years, months, days)
			},

			/**
			 * @author 单乘风
			 * @description 设置默认值(高亮值/当前值)
			 * */
			setDefaultVal(){
				let tempFullDate, tempYears, tempMonth, tempDate, tempAry = [];
				if(this.nowDate == ""){
					tempFullDate = new Date()
					tempYears = tempFullDate.getFullYear()
					tempMonth = tempFullDate.getMonth()+1
					tempDate = tempFullDate.getDate()
					tempAry = [String(tempYears), String(tempMonth), String(tempDate)]
				}else tempAry = this.nowDate.split("-")
				this.currentVal = [this.dateArray[0].indexOf(tempAry[0]), this.dateArray[1].indexOf(tempAry[1]), this.dateArray[2].indexOf(tempAry[2])]
			},

			/**
			 * @author 单乘风
			 * @description 关闭 popup
			 * */
			close(){
				this.$refs.scfPopup.close()
			},

			/**
			 * @author 单乘风
			 * @description 弹出 popup
			 * */
			open(){
				this.setDefaultVal()
				this.$refs.scfPopup.open()
			},

			/**
			 * @author 单乘风
			 * @description 选择器中值发生改变时触发该方法
			 * @params e: 当前节点对象(即响应值)
			 * */
			dateChangeFun(e){
				const val = e.detail.value
				if(this.currentVal[0] !== val[0]){
					this.currentVal = [val[0], 0, 0]
				}else if(this.currentVal[1] !== val[1]){
					this.currentVal = [val[0], val[1], 0]
					this.setData(this.dateArray[0][val[0]], this.dateArray[1][val[1]])
				}else{
					this.currentVal = val
				}
			},


			/**
			 * @author 单乘风
			 * @description 根据年、月设置对应日
			 * @params y: 年, m: 月
			 * */
			setData(y,m){
				var Marr = [1,3,5,7,8,10,12]
				var day = ''
				var year = parseInt(y) + 1960
				if(m == 2){
					if((year % 4 == 0 && year % 100 != 0) || (year % 400 == 0)){
						day = 29
					}else{
						day = 28
					}
				}else if(Marr.indexOf(Number(m)) != -1){
					day = 31
				}else{
					day = 30
				}

				var days = []
				for (let i = 1; i <= day; i++) {
				  days.push((i < 10 ? '0' : '') + i)
				}
				this.dateArray[2] = days
			},

			/**
			 * @author 单乘风
			 * @description 选择器点击 "确定" 触发该方法设置选择的参数
			 * */
			submiDateFun(){
				let tempStr = this.dateArray[0][this.currentVal[0]] + "-" + this.dateArray[1][this.currentVal[1]] + "-" + this.dateArray[2][this.currentVal[2]]
				this.$emit("submiDateFun", tempStr)
				this.close()
			},
		}
	};
</script>

<style lang="scss">
	.cancel-btn {
		position: absolute;
		top: 28rpx;
		right: 20rpx;
		font-size: 28rpx;
		color: $text999Color;
	}
	.popup-box {
		height: 300rpx;
		text-align: center;
		background-color: #FFFFFF;
	}
	.picker-view {
		height: 100%;
	}
	.item {
		line-height: 50px;
	}
	.sub-btn{
		padding: 10px;
		background-color: #FFFFFF;
	}
	.btnConfirm{
		background-color: $themeColor;
		border: none;
		color: #FFFFFF;
	}
	.uni-popup {
		z-index: 999;
	}
	.popup-top-box {
		border-top-left-radius: 20rpx;
		border-top-right-radius: 20rpx;
		color: $text333Color;
		font-size: 36rpx;
		background-color: #FFF;
		text-align: center;
		padding: 20rpx 0;
		border-bottom: 1rpx solid #eee;
		box-sizing: border-box;
		position: relative;
	}
</style>
调用说明
dom 部分
<new-date-picker ref="popupDate" scfTitle="证件到期日期选择" :nowDate="tempDate" @submiDateFun="submitCertEndDate"></new-date-picker>
script 部分
import newDatePicker from '@/components/newDatePicker.vue'

components: { newDatePicker },

data:{
	return{
		tempDate: "", // 详情接口,将对应日期复制给它
	}
}

/**
* @author 单乘风
* @description 证件到期日期,选择器点击 "确定" 触发该方法设置选择的参数
* */
submitCertEndDate(val){
	// 将 val 赋值对应变量即可
},
页面结构懒得写了DDDD,将如上调用代码放在对应位置即可。
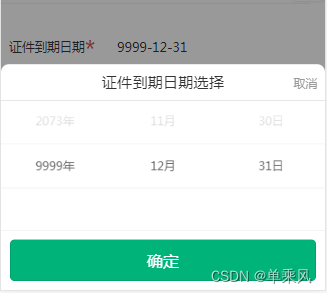
效果图
总结
可能有人不禁要问,uniapp 有对应的 picker mode="date" 不就行了?! 为什么要费劲去搞这么一个东东?
请听我狡辩
我的甲方爸爸有这么一个要求,要在日期后面加一个 9999 年,我最初的想法这个需求简单,把源码改了不就行了?呵呵!改完源码之后发现不生效,在网上找了很多大佬的文章,都试了一遍,搞不定。
我觉得有一篇文章比较靠谱,但是试了也不行,大家可以去试试,文章链接如下:
vue项目中修改element-ui源码,如何运用到项目中 (修改 node_modules 里的文件,并应用)
我也仅试了文章里如下的这个方法(PS:因为我懒觉得前面的方式太复杂不想去试)
使用patch-package来修改
使用patch-package来修改node_modules里面的文件更方便
- 安装
patch-package:npm i patch-package --save-dev- 修改
package.json,新增命令postinstall"scripts": { "postinstall": "patch-package" }
- 修改
node_modules里面的代码- 执行命令:
npx patch-package qiankun(qiankun为组件名/框架名)。第一次使用patch-package会在项目根目录生成patches文件夹,里面有修改过的文件diff记录。
当这个包版本更新后,执行命令:
git apply --ignore-whitespace patches/qiankun+2.0.11.patch即可。其中qiankun+2.0.11.patch是它生成的文件名。
搞了一下之后发现不生效,随后我就放弃了,可能是技术水平有限,决定自己搞一个,就有了如上代码。
如果大家有更好的处理方式,望不吝赐教。


 被折叠的 条评论
为什么被折叠?
被折叠的 条评论
为什么被折叠?
 到【灌水乐园】发言


