


1.前言
在Android的体系中View扮演者很重要的角色,虽然说View不属于Android的四大控件,但是它的作用和四大组件一样重要。简单的说,View是Android在视觉上的呈现,系统给我们提供了一套GUI库,里面有很多控件我们可以直接使用,比如:TextView、EditText、Button等,也可以进行自定义后使用。
2.View的绘制流程
首先我们通过一张图看看Activity的控件架构图
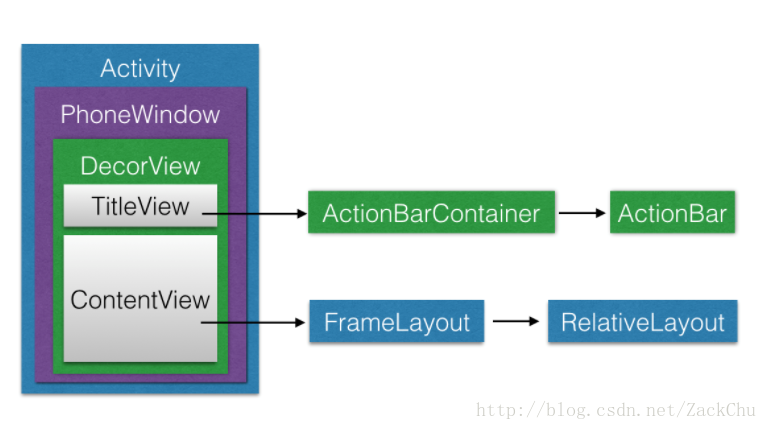
从上面的图可以看出,DecorView作为顶级View,一般情况下它的内部都会包含一个竖直方向的LinearLayout,在这个LinearLayout中又分为上下两部分,上面的TitleView时标题栏,下面的ContentView是内容栏,内容栏的id是content,我们在Activity中通常使用setContentView()方法所设置的布局文件,其实就是将布局文件加入到内容栏中显示出来,这样很好的解释了为什么使用requestWindowFeature(Window.FEATURE_NO_TITLE)方法去除标题栏为什么需要在setContentView()方法之前才会有效果。
在Activity的onCreate()方法中还可以通过ViewGroup content = (ViewGroup)findViewById(android.R.id.content)得到ContentView,通过content.getchildAt(0)得到其中的一个View,View层的事件都是先经过DecorView,然后才能传递给View。
ViewRoot对应于ViewRootImpl类,它是连接WindowManager和DecorView的纽带,View的三大流程均是通过ViewRoot来完成的。View的绘制流程是从ViewRoot的performTraversals方法开始的,它经过measure、layout和draw三个过程才能最终将一个View绘制出来。其中measure是用来测量View的宽和高,layout是用来确定View在父容器中的放置位置,而draw则负责将View绘制在屏幕上。
Measure过程:这一过程决定了View的宽和高,在测量结束后,可以通过getMeasuredWidth和getMeasuredHeight的方法来获取到View测量后的宽和高(注:这时的宽和高基本上等同于View最终的宽和高)。
Layout过程:这一过程在Measure过程完成以后,layout过程决定了View的四个顶点的坐标和实际View的宽和高,在layout结束之后,可以通过getTop、getBottom、getLeft和getRight来得到View的四个顶点的位置,并且可以通过getWidth和getHeight来获取到View最终的宽和高(注:measure中得到的宽和高和layout中得到的宽和高几乎是一样的,但是也有可能不一样)。
draw过程:这一过程在Layout过程完成之后,draw过程决定了View的显示,只有这一过程完成以后View的内容才能显示在屏幕上。
3.Measure中View的宽高和和Layout中View的宽高的区别
在上面我们说到过,Measure过程中通过getMeasuredWidth/getMeasuredHeight的方法来获取到View的宽和高与Layout过程中通过getWidth和getHeight来获取到View最终的宽和高是有可能不一样的。
想要知道这里的原因我们就必须更深入的去了解View的测量过程,在这里还必须要了解到MeasureSpec这个类,从名字上看MeasureSpec可以被翻译成为“测量规格”或者“测量说明书”。其实MeasureSpec代表的是一个32位的int类型的值,高2位代表的是SpecMode(测量模式),低30位代表SpecSize(在某种测量模式下的规格大小),MeasureSpec通过将SpecMode和SpecSize打包成一个int值来避免过多的内存对象分配。
SpecMode有三种类型,每种类型都代表一种特殊的含义:
- UNSPECIFIED—父容器对View没有任何限制,要多大给多大
- EXACTLY—父容器已经检测出View所需要的精确大小,这时View的最终大小就是SpecSize所指定的值
- AT_MOST—父容器指定了一个可用大小,View的大小不能大于这个值
- LayoutParams.MATCH_PARENT—精确模式,大小就是窗口的大小
- LayoutParams.WRAP_CONTENT—最大模式,大小不定但是不能超过窗口的大小
- 固定大小—精确模式,大小位LayoutParams中指定的大小
//getWidth和getHeight的源码
public final int getWidth()
{
    return mRight-mLeft;
}

public final int getHeight()
{
    return mBottom-mTop;
}public void layout(int l, int t, int r, int b)
{
super.layout(l, t, r + 100, b + 100);
}4.measure过程
在进行measure过程时需要分两种情况来看待,如果只是一个原始的View,那么通过measure方法就可以完成测量过程,如果是一个ViewGroup在进行自身的测量过程中还会去遍历调用所有元素的measure方法,其各个子元素再递归去执行这个流程。
1)ViewGroup的measure过程
ViewGroup在完成自身的测量外还会通过遍历去调用所有子元素的measure方法,各个子元素再递归去执行这个过程。ViewGroup提供了measureChildren的方法,通过这个方法会对所有的子元素进行遍历。
protected void measureChildren(int widthMeasureSpec, int heightMeasureSpec) {
        final int size = mChildrenCount;
        final View[] children = mChildren;
        for (int i = 0; i < size; ++i) {
            final View child = children[i];
            if ((child.mViewFlags & VISIBILITY_MASK) != GONE) {
                measureChild(child, widthMeasureSpec, heightMeasureSpec);
            }
        }
    }
protected void measureChild(View child, int parentWidthMeasureSpec,
            int parentHeightMeasureSpec) {
   final LayoutParams lp = child.getLayoutParams();
   final int childWidthMeasureSpec = getChildMeasureSpec(parentWidthMeasureSpec,
                mPaddingLeft + mPaddingRight, lp.width);
   final int childHeightMeasureSpec = getChildMeasureSpec(parentHeightMeasureSpec,
                mPaddingTop + mPaddingBottom, lp.height);
   child.measure(childWidthMeasureSpec, childHeightMeasureSpec);
}1、首先,通过child.getLayoutParams()方法取出当前子元素的LayoutParams
2、其次,通过getChildMeasureSpec()方法分别获取childWidthMeasureSpec和childHeightMeasureSpec
3、最后,通过child.measure()方法将childWidthMeasureSpec和childHeightMeasureSpec传递给当前子元素的measure进行测量
2)View的measure过程
当ViewGroup将childWidthMeasureSpec和childHeightMeasureSpec传递给当前子元素的measure进行测量后,系统就开始对当前View进行测量,View的测量过程是由其measure方法来完成的,在measure方法中又会去调用View的onMeasure方法。
protected void onMeasure(int widthMeasureSpec, int heightMeasureSpec) {
    setMeasuredDimension(getDefaultSize(getSuggestedMinimumWidth(), widthMeasureSpec),
    getDefaultSize(getSuggestedMinimumHeight(), heightMeasureSpec));
}
public static int getDefaultSize(int size, int measureSpec) {
    int result = size;
    int specMode = MeasureSpec.getMode(measureSpec);
    int specSize = MeasureSpec.getSize(measureSpec);

    switch (specMode) {
    case MeasureSpec.UNSPECIFIED:
        result = size;
        break;
    case MeasureSpec.AT_MOST:
    case MeasureSpec.EXACTLY:
        result = specSize;
        break;
    }
    return result;
}从getDefaultSize的方法源码可以看出,View的宽/高是由specSize决定的,所以我们在通过继承View进行自定义控件时需要重写onMeasure方法并且设置wrap_content时控件的大小,否则在布局中使用wrap_content就相当于match_parent,通过以下的代码就可以很好的解决这个问题。
protected void onMeasure(int widthMeasureSpec, int heightMeasureSpec)
{
    super.onMeasure(widthMeasureSpec, heightMeasureSpec);
    int widthSpecMode = MeasureSpec.getMode(widthMeasureSpec);
    int widthSpecSize = MeasureSpec.getSize(widthMeasureSpec);
    int heightSpecMode = MeasureSpec.getMode(heightMeasureSpec);
    int heightSpecSize = MeasureSpec.getSize(heightMeasureSpec);
    if(widthSpecMode == MeasureSpec.AT_MOST && heightMeasureSpec == MeasureSpec.AT_MOST)
    {
        //mWidth/mHeight为用户默认指定的宽/高
        setMeasuredDimension(mWidth, mHeight);
    }
    else if(widthSpecMode == MeasureSpec.AT_MOST)
    {
        setMeasuredDimension(mWidth, heightSpecSize);
    }
    else if(heightMeasureSpec == MeasureSpec.AT_MOST)
    {
        setMeasuredDimension(widthSpecMode, mHeight);
    }
}在上述代码中我们只需要在wrap_content的情况下给View一个指定的内部宽/高(mWidth/mHeight),对于非wrap_content的情况下,我们沿用系统的测量值即可,至于默认内部宽/高的数值如何指定,没有固定的依据,只要按照当前情况灵活指定即可。
4.layout过程
ViewGroup是通过Layout来确定子元素的位置,当ViewGroup的位置被确定后,在ViewGroup的onLayout方法中会遍历所有的子元素并调用其layout方法,在子元素的layout方法中又会去调用它的onLayout方法。
    public void draw(Canvas canvas) {
        final int privateFlags = mPrivateFlags;
        final boolean dirtyOpaque = (privateFlags & PFLAG_DIRTY_MASK) == PFLAG_DIRTY_OPAQUE &&
                (mAttachInfo == null || !mAttachInfo.mIgnoreDirtyState);
        mPrivateFlags = (privateFlags & ~PFLAG_DIRTY_MASK) | PFLAG_DRAWN;

        /*
         * Draw traversal performs several drawing steps which must be executed
         * in the appropriate order:
	 * Draw方法必须以适当的顺序遍历执行几个绘图步骤:
         *
         *      1. Draw the background
	 *	1. 绘制背景
         *      2. If necessary, save the canvas' layers to prepare for fading
	 *	2. 如果需要,保存Canvas层并且准备褪色
         *      3. Draw view's content
	 *	3. 绘制View自身
         *      4. Draw children
	 *	4. 绘制children
         *      5. If necessary, draw the fading edges and restore layers
	 *	5. 如果需要,绘制出边缘和恢复层
         *      6. Draw decorations (scrollbars for instance)
	 *	6. 绘制装饰(例如:滚动条)
         */

        // Step 1, draw the background, if needed
	// 第一步,绘制背景
        int saveCount;

        if (!dirtyOpaque) {
            drawBackground(canvas);
        }

        // skip step 2 & 5 if possible (common case)
        final int viewFlags = mViewFlags;
        boolean horizontalEdges = (viewFlags & FADING_EDGE_HORIZONTAL) != 0;
        boolean verticalEdges = (viewFlags & FADING_EDGE_VERTICAL) != 0;
        if (!verticalEdges && !horizontalEdges) {
            // Step 3, draw the content
            if (!dirtyOpaque) onDraw(canvas);

            // Step 4, draw the children
            dispatchDraw(canvas);

            // Overlay is part of the content and draws beneath Foreground
            if (mOverlay != null && !mOverlay.isEmpty()) {
                mOverlay.getOverlayView().dispatchDraw(canvas);
            }

            // Step 6, draw decorations (foreground, scrollbars)
            onDrawForeground(canvas);

            // we're done...
            return;
        }

        /*
         * Here we do the full fledged routine...
         * (this is an uncommon case where speed matters less,
         * this is why we repeat some of the tests that have been
         * done above)
         */

        boolean drawTop = false;
        boolean drawBottom = false;
        boolean drawLeft = false;
        boolean drawRight = false;

        float topFadeStrength = 0.0f;
        float bottomFadeStrength = 0.0f;
        float leftFadeStrength = 0.0f;
        float rightFadeStrength = 0.0f;

        // Step 2, save the canvas' layers
	// 第二步,保存Canvas层
        int paddingLeft = mPaddingLeft;

        final boolean offsetRequired = isPaddingOffsetRequired();
        if (offsetRequired) {
            paddingLeft += getLeftPaddingOffset();
        }

        int left = mScrollX + paddingLeft;
        int right = left + mRight - mLeft - mPaddingRight - paddingLeft;
        int top = mScrollY + getFadeTop(offsetRequired);
        int bottom = top + getFadeHeight(offsetRequired);

        if (offsetRequired) {
            right += getRightPaddingOffset();
            bottom += getBottomPaddingOffset();
        }

        final ScrollabilityCache scrollabilityCache = mScrollCache;
        final float fadeHeight = scrollabilityCache.fadingEdgeLength;
        int length = (int) fadeHeight;

        // clip the fade length if top and bottom fades overlap
        // overlapping fades produce odd-looking artifacts
        if (verticalEdges && (top + length > bottom - length)) {
            length = (bottom - top) / 2;
        }

        // also clip horizontal fades if necessary
        if (horizontalEdges && (left + length > right - length)) {
            length = (right - left) / 2;
        }

        if (verticalEdges) {
            topFadeStrength = Math.max(0.0f, Math.min(1.0f, getTopFadingEdgeStrength()));
            drawTop = topFadeStrength * fadeHeight > 1.0f;
            bottomFadeStrength = Math.max(0.0f, Math.min(1.0f, getBottomFadingEdgeStrength()));
            drawBottom = bottomFadeStrength * fadeHeight > 1.0f;
        }

        if (horizontalEdges) {
            leftFadeStrength = Math.max(0.0f, Math.min(1.0f, getLeftFadingEdgeStrength()));
            drawLeft = leftFadeStrength * fadeHeight > 1.0f;
            rightFadeStrength = Math.max(0.0f, Math.min(1.0f, getRightFadingEdgeStrength()));
            drawRight = rightFadeStrength * fadeHeight > 1.0f;
        }

        saveCount = canvas.getSaveCount();

        int solidColor = getSolidColor();
        if (solidColor == 0) {
            final int flags = Canvas.HAS_ALPHA_LAYER_SAVE_FLAG;

            if (drawTop) {
                canvas.saveLayer(left, top, right, top + length, null, flags);
            }

            if (drawBottom) {
                canvas.saveLayer(left, bottom - length, right, bottom, null, flags);
            }

            if (drawLeft) {
                canvas.saveLayer(left, top, left + length, bottom, null, flags);
            }

            if (drawRight) {
                canvas.saveLayer(right - length, top, right, bottom, null, flags);
            }
        } else {
            scrollabilityCache.setFadeColor(solidColor);
        }

        // Step 3, draw the content
	// 第三步,绘制View自身
        if (!dirtyOpaque) onDraw(canvas);

        // Step 4, draw the children
	// 第四步,绘制children
        dispatchDraw(canvas);

        // Step 5, draw the fade effect and restore layers
	// 第五步,绘制出边缘和恢复层
        final Paint p = scrollabilityCache.paint;
        final Matrix matrix = scrollabilityCache.matrix;
        final Shader fade = scrollabilityCache.shader;

        if (drawTop) {
            matrix.setScale(1, fadeHeight * topFadeStrength);
            matrix.postTranslate(left, top);
            fade.setLocalMatrix(matrix);
            p.setShader(fade);
            canvas.drawRect(left, top, right, top + length, p);
        }

        if (drawBottom) {
            matrix.setScale(1, fadeHeight * bottomFadeStrength);
            matrix.postRotate(180);
            matrix.postTranslate(left, bottom);
            fade.setLocalMatrix(matrix);
            p.setShader(fade);
            canvas.drawRect(left, bottom - length, right, bottom, p);
        }

        if (drawLeft) {
            matrix.setScale(1, fadeHeight * leftFadeStrength);
            matrix.postRotate(-90);
            matrix.postTranslate(left, top);
            fade.setLocalMatrix(matrix);
            p.setShader(fade);
            canvas.drawRect(left, top, left + length, bottom, p);
        }

        if (drawRight) {
            matrix.setScale(1, fadeHeight * rightFadeStrength);
            matrix.postRotate(90);
            matrix.postTranslate(right, top);
            fade.setLocalMatrix(matrix);
            p.setShader(fade);
            canvas.drawRect(right - length, top, right, bottom, p);
        }

        canvas.restoreToCount(saveCount);

        // Overlay is part of the content and draws beneath Foreground
        if (mOverlay != null && !mOverlay.isEmpty()) {
            mOverlay.getOverlayView().dispatchDraw(canvas);
        }

        // Step 6, draw decorations (foreground, scrollbars)
	// 第六步,绘制装饰(例如:滚动条)
        onDrawForeground(canvas);
    }


 1303
1303


 被折叠的 条评论
为什么被折叠?
被折叠的 条评论
为什么被折叠?
 到【灌水乐园】发言


