


| 前言 |
最近结束了一个阶段的学习,有点空空荡荡的感觉。为了减少心中的“寂寞空虚冷”,加上没有什么实际的项目来练手,便想到做一些小Demo来自我验收一下学习成果,Demo的功能就仿制于各大主流App。至于如何仿制、与原版的区别、UI设计的重要性,且看下文详情分解! :)
| 迷惘总有时 |
最初是看到酷狗音乐的一些界面效果很有意思,就是这个:

点击右边的按钮会动态插入一个视图,正如这样:
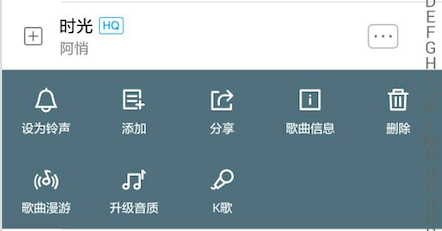
就想着自己也来捣鼓捣鼓,看能不能实现出这样的功能!
实践1
当点击按钮时,动态插入一个视图。循着这个思路,浏览了一遍UITableView的方法,下面的方法可能是我想要的:
- (void)beginUpdates;   // allow multiple insert/delete of rows and sections to be animated simultaneously.

- (void)endUpdates;     // only call insert/delete/reload calls or change the editing state inside an update block.  otherwise things like row count, etc. may be invalid.

- (void)insertSections:(NSIndexSet *)sections withRowAnimation:(UITableViewRowAnimation)animation;
- (void)insertRowsAtIndexPaths:(NSArray<NSIndexPath *> *)indexPaths withRowAnimation:(UITableViewRowAnimation)animation;

- (void)deleteSections:(NSIndexSet *)sections withRowAnimation:(UITableViewRowAnimation)animation;
- (void)deleteRowsAtIndexPaths:(NSArray<NSIndexPath *> *)indexPaths withRowAnimation:

- (void)moveSection:(NSInteger)section toSection:(NSInteger)newSection NS_AVAILABLE_IOS(5_0);
- (void)moveRowAtIndexPath:(NSIndexPath *)indexPath toIndexPath:(NSIndexPath *)newIndexPath NS_AVAILABLE_IOS(5_0);
上述方法在表视图的编辑模式下经常被使用到,但是它们仅能在已有的视图中增加、删除、移动。例如QQ的分组管理视图中,移动分组和删除分组是在原有的视图基础上进行操作。在添加分组时,通过模态视图输入组名,然后刷新表视图的数据源,达到新增分组的目的。显然,此处场景不能应用此方法。
实践2
在实践1上一番折腾无果后,就向学长请假了这个问题,他给出了他的解决方法——最开始将每个分组的cell数量设为0,当点击每个分组的headerView时,刷新数据并将cell正常设置为数据源所提供的数量。看了他给出的Demo,发现也正是基于这个巧妙的设计,在最开始进入QQ好友管理列表视图时所有的分组就都是“关闭”的。同时在酷狗音乐中,你的“已下载(XXX)”是无法像“正在下载(XXX)”“折叠”成一个组的。鉴于道理的相通性,笔者在恍然大悟之后就转身投入到仿制QQ的怀抱中了。
| 水是由水分子组成的 |
为了构建这个界面:
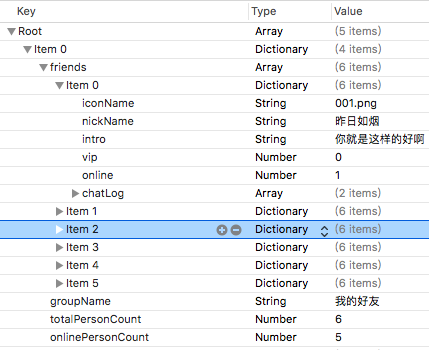
我们需要一些假数据,包括分组信息、好友信息等。为此笔者设计了groups.plist这个文件,它长成这样:
当然,还得有一些图片资源充当好友头像之类的。
接下来,我们就需要从假数据的文件中读取数据并且创建数据实体。根据数据之间的相互依赖关系,笔者构建了DataSource、Friend、FriendsGroups,下面是它们的一些关键代码:
//DataSource.h
+ (NSArray *)dataStore;

//DataSource.m
+ (NSArray *)dataStore {
    NSArray *groupsData = [NSArray arrayWithContentsOfFile:[[NSBundle mainBundle] pathForResource:@"groups" ofType:@"plist"]];

    return groupsData;
}

//FriendsGroups.h
@property (nonatomic, strong, readonly) NSArray *friends;

@property (nonatomic, copy, readonly) NSString *groupName;

@property (nonatomic, assign, readonly) NSNumber *totalPersonCount;
@property (nonatomic, assign, readonly) NSNumber *onlinePersonCount;

@property (nonatomic, assign, getter=isOpened) BOOL open;

- (instancetype)initWithGroupsMsg:(NSDictionary *)msg;

//FriendsGroups.m
@synthesize friends = _friends; // because of readonly

#pragma mark - Initializer

- (instancetype)initWithGroupsMsg:(NSDictionary *)msg {
    self = [super init];
    if (self) {
        [self setValuesForKeysWithDictionary:msg]; // KVC

        NSMutableArray *friends = [NSMutableArray array];
        for (NSDictionary *friendMsg in self.friends) {
            Friend *friend = [[Friend alloc] initWithFriendMsg:friendMsg];
            [friends addObject:friend];
        }

        _friends = friends;
    }

    return self;
}

//Friend.h
@property (nonatomic, copy, readonly) NSString *iconName;
@property (nonatomic, copy, readonly) NSString *nickName;
@property (nonatomic, copy, readonly) NSString *intro;

@property (nonatomic, strong, readonly) NSArray *chatLog;

@property (nonatomic, assign, readonly, getter=isVip) BOOL vip;
@property (nonatomic, assign, readonly, getter=isOnline) BOOL online;

- (instancetype)initWithFriendMsg:(NSDictionary *)msg;

//Friend.m
- (instancetype)initWithFriendMsg:(NSDictionary *)msg {
    self = [super init];
    if (self) {
        [self setValuesForKeysWithDictionary:msg]; // KVC
    }

    return self;
}
数据配合与界面的交互,最终的功能就能慢慢的成型了!
| MVVM实践 |
正如被误解的MVC和被神化的MVVM一文所说的那样,MVC的问题在于臃肿的控制器,而将那些在控制器中处理的逻辑抽出来,形成一个新的模块:ViewModel,就可以完成MVC到MVVM的过渡。在这个场景中,笔者就构建了一个ListViewModel来处理一些原本在控制器里完成的逻辑(ps:可能有些“不干不净”,经验欠缺,献丑了!),它里面有这样一些代码:
//ListViewModel.h
@property (nonatomic, strong, readonly) NSArray<FriendsGroups *> *groups;
@property (nonatomic, strong, readonly) NSArray<NSNumber *> *groupsStatus;
@property (nonatomic, strong, readonly) NSArray<NSNumber *> *aGroupFriendCounts;

@property (nonatomic, assign, readonly) NSInteger groupsCount;

//ListViewModel.m
@synthesize groups = _groups;
@synthesize groupsCount = _groupsCount;
@synthesize groupsStatus = _groupsStatus;
@synthesize aGroupFriendCounts = _aGroupFriendCounts;

#pragma mark - getters

- (NSArray<FriendsGroups *> *)groups {
    if (!_groups) { // lazy load
        NSArray *groupsInfo = [DataStore dataStore];
        NSMutableArray *msgGroups = [NSMutableArray array];
        for (NSDictionary *groupsMsg in groupsInfo) {
            FriendsGroups *group = [[FriendsGroups alloc] initWithGroupsMsg:groupsMsg];
            [msgGroups addObject:group];
        }

        _groups = msgGroups;
    }

    return _groups;
}

- (NSInteger)groupsCount {
    if (!_groupsCount) {
        _groupsCount = self.groups.count;
    }

    return _groupsCount;
}

- (NSArray<NSNumber *> *)groupsStatus {
//    if (!_groupsStatus) { // when the status of group is changed, groupsStatus should update
        NSMutableArray *statusInfo = [NSMutableArray array];
        for (FriendsGroups *group in self.groups) {
            [statusInfo addObject:@(group.isOpened)];
        }

        _groupsStatus = statusInfo;
//    }

    return _groupsStatus;
}

- (NSArray<NSNumber *> *)aGroupFriendCounts {
    if (!_aGroupFriendCounts) {
        NSMutableArray *friendCounts = [NSMutableArray array];
        for (FriendsGroups *group in self.groups) {
            [friendCounts addObject:@(group.friends.count)];
        }

        _aGroupFriendCounts = friendCounts;
    }

    return _aGroupFriendCounts;
}| 你用我的,我用你的 |
有了上面一系列的准备工作,视图控制器就可以瘦身了。“妈妈再也不用担心我被叫做重度视图控制器了”,某VC如是说。
//CustomTableViewController.m
#pragma mark - Table View DataSource
- (NSInteger)numberOfSectionsInTableView:(UITableView *)tableView {
    return self.viewModel.groupsCount;
}

- (NSInteger)tableView:(UITableView *)tableView numberOfRowsInSection:(NSInteger)section {
    return [self.viewModel.groupsStatus[section] boolValue] ? [self.viewModel.aGroupFriendCounts[section] integerValue]: 0;
}

- (UITableViewCell *)tableView:(UITableView *)tableView cellForRowAtIndexPath:(NSIndexPath *)indexPath {
    FriendCell *cell = [tableView dequeueReusableCellWithIdentifier:[FriendCell reuseID] forIndexPath:indexPath];
    cell.cellModel = self.viewModel.groups[indexPath.section].friends[indexPath.row];
    cell.accessoryType = UITableViewCellAccessoryDisclosureIndicator;
    cell.layer.shouldRasterize = YES;
    cell.layer.rasterizationScale = [UIScreen mainScreen].scale;

    return cell;
}

#pragma mark - Table View Delegate

- (UIView *)tableView:(UITableView *)tableView viewForHeaderInSection:(NSInteger)section {
    CustomHeaderView *headerView = [tableView dequeueReusableHeaderFooterViewWithIdentifier:[CustomHeaderView reuseID]];
    headerView.delegate = self;
    headerView.group = self.viewModel.groups[section];
    headerView.sectionIndex = section;

    // cache layer to improve preformance
    headerView.layer.shouldRasterize = YES;
    headerView.layer.rasterizationScale = [UIScreen mainScreen].scale;

    return headerView;
}为了能在点击headerView,折叠或展开分组,我们需要监听一下它的点击,然后局部刷新视图即可。嗯,代理模式是个不错的选择,说干就干:
//CustomHeaderView.h
@protocol foldViewDelegate <NSObject>

@required

- (void)tableViewDidFoldView:(NSInteger)section;

@end

@interface CustomHeaderView : UITableViewHeaderFooterView

@property (nonatomic, strong) FriendsGroups *group;

@property (nonatomic, assign) NSInteger sectionIndex;

@property (nonatomic, weak) id<foldViewDelegate> delegate;

+ (NSString *)reuseID;

//CustomHeaderView.m
static NSString *const headerViewID = @"headerCELL";

@interface CustomHeaderView()

@property (nonatomic, strong) UIImageView *listIcon;
@property (nonatomic, strong) UIView *lineView;

@property (nonatomic, strong) UILabel *groupNameLabel;
@property (nonatomic, strong) UILabel *personCountLabel;

@property (nonatomic, strong) UIButton *viewTouched;

@end

@implementation CustomHeaderView

#pragma mark - Initializer

- (instancetype)initWithReuseIdentifier:(NSString *)reuseIdentifier {
    self = [super initWithReuseIdentifier:reuseIdentifier];
    if (self) {
        [self.contentView addSubview:self.listIcon];
        [self.contentView addSubview:self.groupNameLabel];
        [self.contentView addSubview:self.personCountLabel];
        [self.contentView addSubview:self.lineView];
        [self.contentView addSubview:self.viewTouched];
    }

    return self;
}

#pragma mark - Layout Subviews

- (void)layoutSubviews {
    [super layoutSubviews];

    [self.listIcon mas_makeConstraints:^(MASConstraintMaker *make) {
        make.centerY.equalTo(self);
        make.leading.mas_equalTo(10);
        make.size.mas_equalTo(CGSizeMake(7, 11));
    }];

    [self.groupNameLabel mas_makeConstraints:^(MASConstraintMaker *make) {
        make.leadingMargin.equalTo(self.listIcon).mas_equalTo(22);
        make.centerY.equalTo(self.listIcon);
        make.top.equalTo(self);
        make.bottom.equalTo(self);
        make.width.mas_equalTo(187);
    }];

    [self.personCountLabel mas_makeConstraints:^(MASConstraintMaker *make) {
        make.trailingMargin.equalTo(self).mas_equalTo(0);
        make.top.equalTo(self);
        make.bottom.equalTo(self);
        //make.width.mas_equalTo(50);
    }];

    [self.lineView mas_makeConstraints:^(MASConstraintMaker *make) {
        make.leading.equalTo(self);
        make.trailing.equalTo(self);
        make.bottom.equalTo(self);
        make.height.mas_equalTo(1);
    }];

    [self.viewTouched mas_makeConstraints:^(MASConstraintMaker *make) {
        make.edges.equalTo(self);
    }];
}

#pragma mark - Interface Method

+ (NSString *)reuseID {
    return headerViewID;
}

#pragma mark - Private  Method

- (void)handleTouched:(UIButton *)sender {
    self.group.open = !self.group.isOpened;

    if ([_delegate respondsToSelector:@selector(tableViewDidFoldView:)]) {
        [_delegate tableViewDidFoldView:self.sectionIndex];
    }
}

#pragma mark - getters and setters

- (UIImageView *)listIcon {
    if (!_listIcon) {
        _listIcon = [[UIImageView alloc] initWithImage:[UIImage imageNamed:@"listIcon"]];
        _listIcon.contentMode = UIViewContentModeScaleAspectFit;
    }

    return _listIcon;
}

- (UILabel *)groupNameLabel {
    if (!_groupNameLabel) {
        _groupNameLabel = [[UILabel alloc] init];
        _groupNameLabel.text = @"我是组名怎么滴";
    }

    return _groupNameLabel;
}

- (UILabel *)personCountLabel {
    if (!_personCountLabel) {
        _personCountLabel = [[UILabel alloc] init];
        _personCountLabel.text = @"12/12";
        _personCountLabel.textColor = [UIColor grayColor];
        _personCountLabel.textAlignment = NSTextAlignmentCenter;
    }

    return _personCountLabel;
}

- (UIView *)lineView {
    if (!_lineView) {
        _lineView = [[UIView alloc] init];
        _lineView.backgroundColor = [UIColor grayColor];
    }

    return _lineView;
}

- (UIButton *)viewTouched {
    if (!_viewTouched) {
        _viewTouched = [UIButton buttonWithType:UIButtonTypeSystem];
        _viewTouched.backgroundColor = [UIColor clearColor];

        [_viewTouched addTarget:self action:@selector(handleTouched:) forControlEvents:UIControlEventTouchUpInside];
    }

    return _viewTouched;
}

- (void)setGroup:(FriendsGroups *)group {
    if (_group != group) {
        _group = group;

        self.groupNameLabel.text = _group.groupName;
        self.personCountLabel.text = [NSString stringWithFormat:@"%@/%@", _group.onlinePersonCount, _group.totalPersonCount];
    }

    CGFloat angle = self.group.open ? M_PI_2 : 0;
    self.listIcon.transform = CGAffineTransformMakeRotation(angle);
}

@end
然后让视图控制器遵循折叠视图协议,并实现相应方法:
//CustomTableViewController.m
@interface CustomTableViewController () <foldViewDelegate>
......
#pragma mark - Fold View Delegate
- (void)tableViewDidFoldView:(NSInteger)section {
[self.tableView reloadSections:[NSIndexSet indexSetWithIndex:section] withRowAnimation:UITableViewRowAnimationAutomatic];
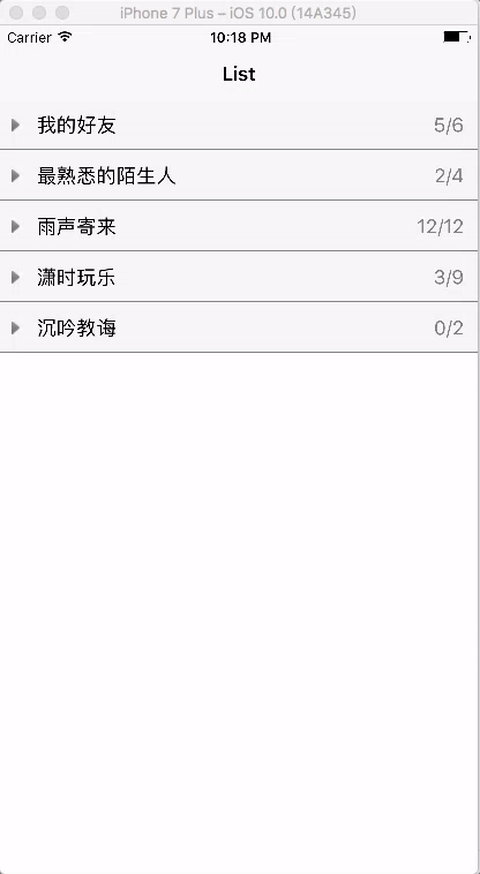
}至此,好友列表功能就大体实现了,效果是这样的:
| 常联系,不冷漠 |
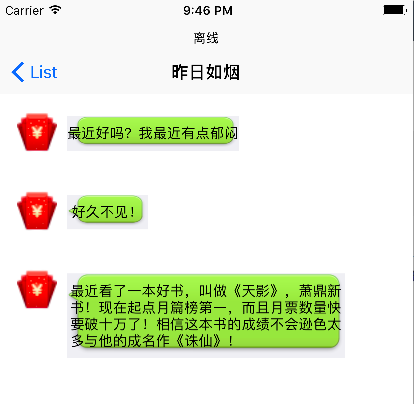
笔者在假数据文件中,有一个数据项叫做chatLog,用于记录该好友给你发的消息。当你点击某好友的cell时,视图随之过渡到消息界面,希望你看到那或长或短的简易文字,总能体会到人情的温暖。(ps:煽情结束,^_^)
毫无疑问,消息界面的cell的高度是随着消息的长度而改变的,所以就需要动态的调整它的高度。好消息是自iOS8后,系统就支持动态调节高度了。对笔者来说是坏消息的是在这个Demo工程中就一直实现不了,曾一度怀疑是不是Xcode8的Bug,然而今天新建了个测试工程就又行了。哎,手动计算加上选取背景图片的不当致使文字嵌套在气泡中的效果没有达到预想中的效果,不过当做演示还算够用!为了给视图控制器减负,笔者再次把玩了下MVVM,下面贴出根据文字及其大小计算它所需要占用的尺寸的代码:
//MessageViewModel.m
......

NSAttributedString *attriMsg = [[NSAttributedString alloc] initWithString:message attributes:@{NSFontAttributeName: [UIFont systemFontOfSize:14.0f]}];
            CGRect msgSize = [attriMsg boundingRectWithSize:CGSizeMake([UIScreen mainScreen].bounds.size.width - 136.0f, 2000.0f) options:NSStringDrawingUsesLineFragmentOrigin context:nil];

......当要通过表视图的代理方法返回cell的高度时,就从存储高度的字典中取出即可,这样就免去了控制器计算的负担。完成后的效果是这样的:
灰色的区域就是按钮的真实区域。可明显看出因为气泡背景左边的一个尖角对按钮的标题的嵌入不怎么搭配,而且背景也不能完全适应整个按钮的大小,即使控制标题的偏移,这个问题也不能很好的解决。而真实的QQ中使用的气泡是这样的:
那些主题气泡背景也是这种方方正正的形状,尖角被放置在最顶部估计也是QQ的UI设计团队基于这方面的考量。所以说UI设计是应用的灵魂所在,这也就难怪一些UI设计师一张小小的图片就敢收费几百上千了!
| 总结 |
不知不觉,文章的篇幅已经这么长了,主要原因估计就是充斥着太多的代码,文字的串接其实比较少。这么做的原因有两点:一是方便看这篇文章的朋友理解Demo的实现,二是笔者文辞有点匮乏,写博客的技巧尚待提高。
虽然时断时续,不过总算写完了这个类别下的第一篇文章。笔者后面会继续尝试仿制其他的一些功能,一来记录下学习的点滴,二来分享在这过程中用到的一些东西。完整的Demo可以在这里找到,谢谢!


 1万+
1万+

 被折叠的 条评论
为什么被折叠?
被折叠的 条评论
为什么被折叠?
 到【灌水乐园】发言


