


这么菜还不努力
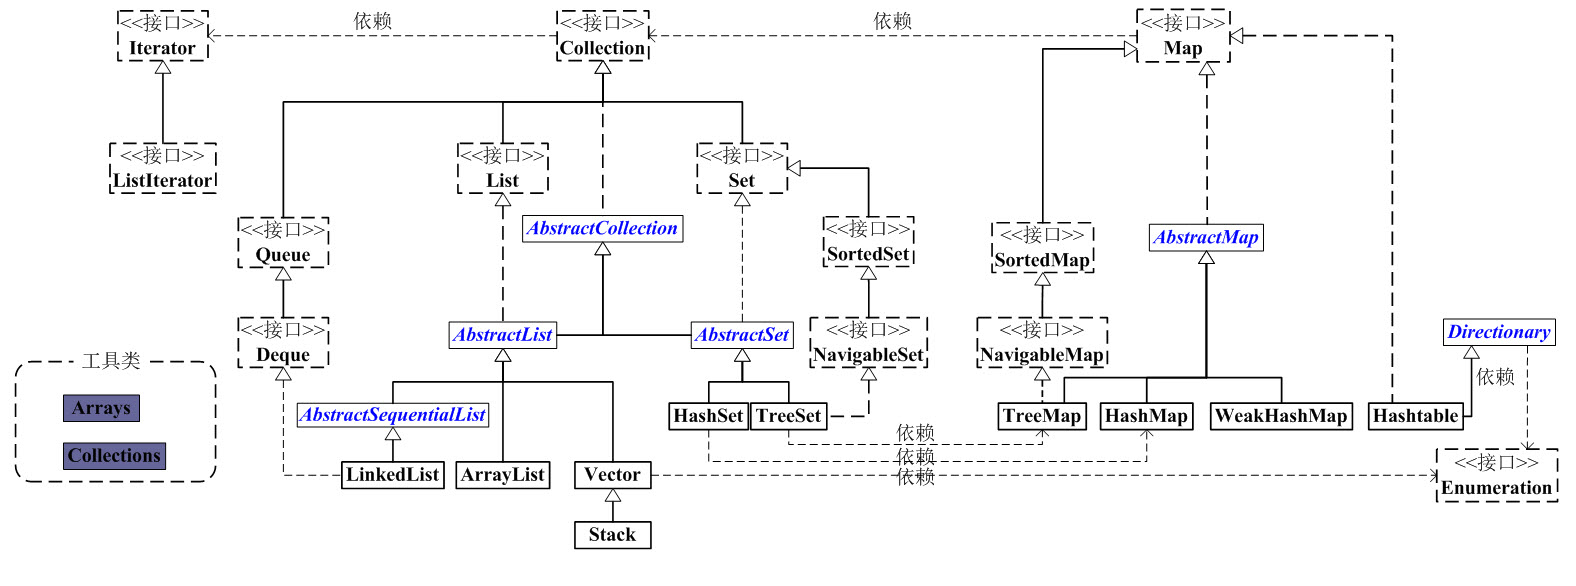
此篇文章集合结构图转自http://www.cnblogs.com/skywang12345/p/3323085.html
Collection
Collection是一个接口,它是一个高度抽象的集合,主要有List和Set两个抽象集合继承它,集合中最基本的操作增删改查,获取集合大小等都在此定义;
它的类名定义为public interface Collection<E> extends Iterable<E>,可以看出Collection接口继承了Iterable这个接口,由于Collection中有一个iterator()函数,我们可以通过Iterator迭代器来遍历集合(List还有一个功能更多的迭代器,ListIterator)
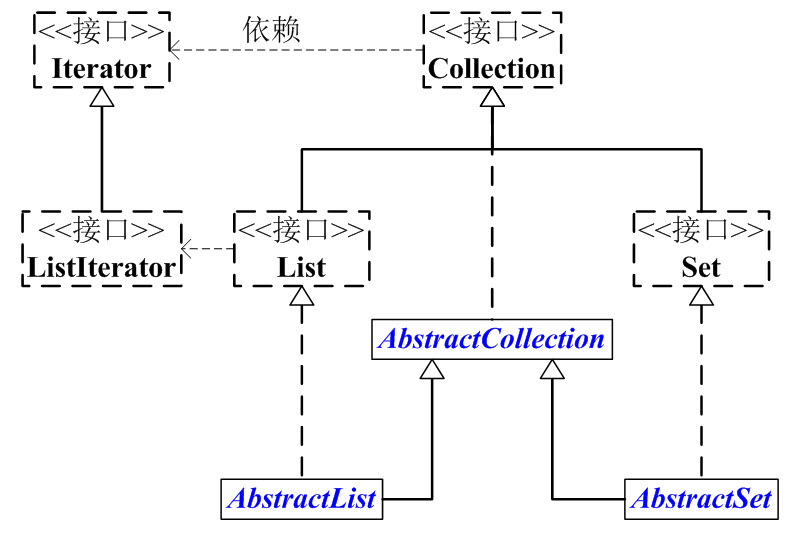
AbstractCollection
public abstract class AbstractCollection<E> implements Collection<E>
是一个实现了Collection中除了iterator()和size()方法之外大部分方法的抽象类(jdk1.8),它的存在意义在于方便其他类实现Collection,如ArrayList只需继承AbstractCollection即可实现Collection中大部分功能。
List

public interface List<E> extends Collection<E>
List是一个继承于Collection的接口,它是有序存储(按插入元素的顺序存储)的,且存储的元素可以重复。List中每一个元素都有一个索引,第一个元素的索引是0,之后元素索引按存入顺序依次加一。
AbstractList
public abstract class AbstractList<E> extends AbstractCollection<E> implements List<E>
AbstractList是一个实现了List接口的抽象类,它实现了List中的大部分方法,以此方便其他类继承List,AbstractList也继承了AbstractCollection,它实现了iterator方法及ListIterator。
ArrayList
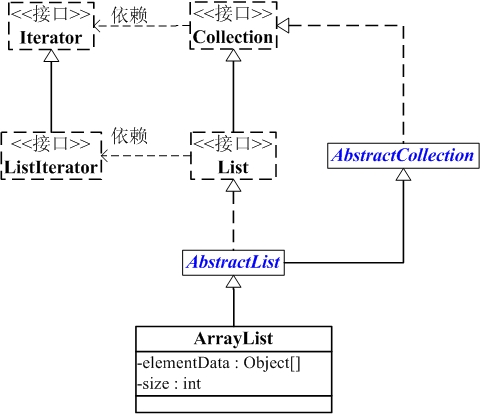
ArrayList介绍
public class ArrayList<E> extends AbstractList<E>implements List<E>, RandomAccess, Cloneable, java.io.Serializable
ArrayList是一个List的具体实现类,它的底层主要由数组(动态数组组成),ArrayList继承了AbstractList类,提供了最基本的增删改查,比较等功能,它实现了RandomAccess接口,这意味着ArrayList可以由元素序号快速获取元素(与数组相似),ArrayList也可实现序列化。
特别的,ArrayList是线程不安全的,也就是说在多线程使用时需要进行同步处理,ArrayList的元素是有序存储的,它允许元素值为null.
ArrayList源码解析
数据成员介绍
private static final int DEFAULT_CAPACITY = 10;
容量的初始值为10;
transient Object[] elementData;
这实则上是一个动态数组,它的初值由构造器赋值,若赋值为空数组,则默认容量为10,且这个数组不参与序列化;
private static final Object[] EMPTY_ELEMENTDATA = {};
private static final Object[] DEFAULTCAPACITY_EMPTY_ELEMENTDATA = {};
这是两个空常量数组,都是用于对空对象的实例化,不同的是下面这个是在空构造里的空数组。
private int size;
size表示集合中的元素个数。
方法介绍
构造方法
1. 空构造方法
public ArrayList() {
        this.elementData = DEFAULTCAPACITY_EMPTY_ELEMENTDATA;
    }
这个空构造函数代表若new对象时没有传参数,那么构造方法便会将空常量数组赋给elementData ,此时ArrayList的默认容量为10,这里似乎并没有给出具体的空间大小,因为此时的开辟空间是在add()中实现的。
2. 指定容量的构造方法
public ArrayList(int initialCapacity) {
        if (initialCapacity > 0) {
            this.elementData = new Object[initialCapacity];
        } else if (initialCapacity == 0) {
            this.elementData = EMPTY_ELEMENTDATA;
        } else {
            throw new IllegalArgumentException("Illegal Capacity: "+
                                               initialCapacity);
        }
    }
这个构造函数有一个给定的参数,若这个参数大于0,则将参数大小作为容量来初始化底层的elementData数组,若为0,则将空常量数组赋给底层数组,若两者都不满足,则抛出非法初始容量。
3. 将一个Collection赋给ArrayList
public ArrayList(Collection<? extends E> c) {
        elementData = c.toArray();
        if ((size = elementData.length) != 0) {
            // c.toArray might (incorrectly) not return Object[] (see 6260652)
            if (elementData.getClass() != Object[].class)
                elementData = Arrays.copyOf(elementData, size, Object[].class);
        } else {
            // replace with empty array.
            this.elementData = EMPTY_ELEMENTDATA;
        }
    }
此构造函数参数为容器Collection,首先将它转为数组赋给底层数组,再对底层数组进行判断,若数组不为Object[],则拷贝一个Object[]赋给底层数组,若容器容量为0,则将空常量数组赋给底层数组。
增加元素
1. add(E e)
public boolean add(E e) {
        ensureCapacityInternal(size + 1);  // Increments modCount!!
        elementData[size++] = e;
        return true;
    }
add方法为集合中添加元素的方法,这是第一种添加方法,即每次往集合末尾添加一个元素,这个方法第一行为ensureCapacityInternal方法,下面我们来分析一下这个方法:
private void ensureCapacityInternal(int minCapacity) {
        if (elementData == DEFAULTCAPACITY_EMPTY_ELEMENTDATA) {
            minCapacity = Math.max(DEFAULT_CAPACITY, minCapacity);
        }

        ensureExplicitCapacity(minCapacity);
    }
这个方法主要作用为判断底层数组是否为默认空常量数组,即实例化时调用的构造方法为空构造,若满足条件,则开辟一块容量为默认值(10)或minCapacity(即为size+1)的空间给ArrayList,再调用ensureExplicitCapacity方法来判断集合是否需要扩容,下面我们看下ensureExplicitCapacity这个方法:
private void ensureExplicitCapacity(int minCapacity) {
        modCount++;

        // overflow-conscious code
        if (minCapacity - elementData.length > 0)
            grow(minCapacity);
    }
这个方法只有一个作用,那就是判断当前数组是否需要扩容,如果minCapacity大于原数组的大小,那就需要调用扩容方法(grow)来进行扩容,我们将会在介绍完add方法之后进行介绍。此中的modCount为修改次数(注意:它不能被序列化)
2. add(int index, E element)
public void add(int index, E element) {
        rangeCheckForAdd(index);

        ensureCapacityInternal(size + 1);  // Increments modCount!!
        System.arraycopy(elementData, index, elementData, index + 1,
                         size - index);
        elementData[index] = element;
        size++;
    }
此方法为给定位置将元素插入,实现原理与往数组中插入元素相同,都是将要插入元素后的元素后移,再进行插入,只不过这里的后移操作交由数组拷贝方法完成,拷贝后的新数组将原数组index之后的所有元素后移一个单位,然后再执行插入操作。
3. addAll(Collection<? extends E> c)
public boolean addAll(Collection<? extends E> c) {
        Object[] a = c.toArray();
        int numNew = a.length;
        ensureCapacityInternal(size + numNew);  // Increments modCount
        System.arraycopy(a, 0, elementData, size, numNew);
        size += numNew;
        return numNew != 0;
    }
这个方法是将一个Collection添加至ArrayList中,首先将这个Collection转化为数组,再判断ArrayList是否需要扩容,再将这个集合添加至集合末尾。
还有一个方法是往指定位置插入集合,这里我就不再叙述了。
ArrayList的扩容机制
private static final int MAX_ARRAY_SIZE = Integer.MAX_VALUE - 8;

private void grow(int minCapacity) {
        // overflow-conscious code
        int oldCapacity = elementData.length;
        int newCapacity = oldCapacity + (oldCapacity >> 1);
        if (newCapacity - minCapacity < 0)
            newCapacity = minCapacity;
        if (newCapacity - MAX_ARRAY_SIZE > 0)
            newCapacity = hugeCapacity(minCapacity);
        // minCapacity is usually close to size, so this is a win:
        elementData = Arrays.copyOf(elementData, newCapacity);
    }
ArrayList中的扩容时的新容量遵循“新的容量=旧的容量(原数组的长度)+旧的容量/2”,然后再由扩容方法判断具体容量为多少,第一种为新扩容后容量太小,则将其容量扩为minCapacity,第二种为扩容后容量太大(此时以达到扩容极限,无法继续扩容),则调用hugeCapacity方法来进行最终容量的确认,下面我们来看看这个方法:
private static int hugeCapacity(int minCapacity) {
        if (minCapacity < 0) // overflow
            throw new OutOfMemoryError();
        return (minCapacity > MAX_ARRAY_SIZE) ?
            Integer.MAX_VALUE :
            MAX_ARRAY_SIZE;
    }
我们可以看到这里用到了一个三目,使新的容量最大不会超过MAX_VALUE,也就是这个“0x7fffffff”,事实上,这也是ArrayList所能达到的最大容量。最后再将新的容量作为新数组的长度来申请空间以完成扩容。
移除元素
1. 移除指定位置的元素
public E remove(int index) {
        rangeCheck(index);

        modCount++;
        E oldValue = elementData(index);

        int numMoved = size - index - 1;
        if (numMoved > 0)
            System.arraycopy(elementData, index+1, elementData, index,
                             numMoved);
        elementData[--size] = null; // clear to let GC do its work

        return oldValue;
    }
这个方法为移除指定位置的元素,它的实现方法与数组移除元素相同,即将要删除元素后的元素向前移动一个单位,这里的numMoved为前移元素的个数,
2. 移除指定值第一次出现位置上的元素
public boolean remove(Object o) {
        if (o == null) {
            for (int index = 0; index < size; index++)
                if (elementData[index] == null) {
                    fastRemove(index);
                    return true;
                }
        } else {
            for (int index = 0; index < size; index++)
                if (o.equals(elementData[index])) {
                    fastRemove(index);
                    return true;
                }
        }
        return false;
    }
此方法删除的是给定值第一次出现位置的元素,首先判断给定值是否为空,可能有人会在这里问,这个判断是不是多此一举了,好像只要一个循环就可以了,但java中拿equals判断null会出问题,当给定的值不为null时,当然是false,但假若是null,则会报空指针异常(神奇吧),所以此处只能分开来写(==当然也不行了,它还会判断hashcode是否相同),下面我们介绍在这个方法中实现删除的fastRemove方法。
3. 快速删除
private void fastRemove(int index) {
        modCount++;
        int numMoved = size - index - 1;
        if (numMoved > 0)
            System.arraycopy(elementData, index+1, elementData, index,
                             numMoved);
        elementData[--size] = null; // clear to let GC do its work
    }
这个方法功能如它的名字一样,快速删除,不需判断位置的合法性(因为在调用它的方法中已经判断过或者说确认过位置的合法性),也不需要返回被删除的元素,它所需要做的只有删除元素,这个方法实现很简单,计算出前移元素的个数,然后前移覆盖掉删除元素,最后将数组长度改正确即可,注意,此为私有方法,它主要为其它删除方法服务。
4. 删除给定区间的元素
protected void removeRange(int fromIndex, int toIndex) {
        modCount++;
        int numMoved = size - toIndex;
        System.arraycopy(elementData, toIndex, elementData, fromIndex,
                         numMoved);

        // clear to let GC do its work
        int newSize = size - (toIndex-fromIndex);
        for (int i = newSize; i < size; i++) {
            elementData[i] = null;
        }
        size = newSize;
    }
这个方法实现原理很简单,就是将给定区间后的元素向前移动以覆盖删除元素,注意最后要更改集合元素个数。
5. 批量删除元素
public boolean removeAll(Collection<?> c) {
        Objects.requireNonNull(c);
        return batchRemove(c, false);
    }
首先此方法需要判断要删除集合的合法性,即是否为空,然后调用batchRemove()方法进行批量移动以进行删除,下面是batchRemove()方法详解。
6. 批量移动元素
private boolean batchRemove(Collection<?> c, boolean complement) {
        final Object[] elementData = this.elementData;
        int r = 0, w = 0;
        boolean modified = false;
        try {
            for (; r < size; r++)
                if (c.contains(elementData[r]) == complement)
                    elementData[w++] = elementData[r];
        } finally {
            // Preserve behavioral compatibility with AbstractCollection,
            // even if c.contains() throws.
            if (r != size) {
                System.arraycopy(elementData, r,
                                 elementData, w,
                                 size - r);
                w += size - r;
            }
            if (w != size) {
                // clear to let GC do its work
                for (int i = w; i < size; i++)
                    elementData[i] = null;
                modCount += size - w;
                size = w;
                modified = true;
            }
        }
        return modified;
    }
这个方法乍一看很多,但其实很简单,首先w是新数组(即删除所需元素之后的数组)的长度,try块内的作用是将不需删除的元素保存下来,放入数组中,而finally中的第一个if语句是处理当出现异常时,将出现异常的元素(r)之后的元素复制到新数组中,而第二个if的作用指的是将w之后的元素置空,以方便GC进行回收,提高效率。
修改元素
public E set(int index, E element) {
        rangeCheck(index);

        E oldValue = elementData(index);
        elementData[index] = element;
        return oldValue;
    }
ArrayList由于底层是数组,所以在增删元素方面效率较低(牵扯到modCount的修改及数组的复制),而在改查方面由于数组的特性,所以较为方便。
此方法就是由传入的位置及元素来修改原集合内的元素,需要注意的是,此方法并不牵扯到modCount的修改。
查找元素
1. 通过元素查找位置
public int indexOf(Object o) {
        if (o == null) {
            for (int i = 0; i < size; i++)
                if (elementData[i]==null)
                    return i;
        } else {
            for (int i = 0; i < size; i++)
                if (o.equals(elementData[i]))
                    return i;
        }
        return -1;
    }

 public int lastIndexOf(Object o) {
        if (o == null) {
            for (int i = size-1; i >= 0; i--)
                if (elementData[i]==null)
                    return i;
        } else {
            for (int i = size-1; i >= 0; i--)
                if (o.equals(elementData[i]))
                    return i;
        }
        return -1;
    }
这两个方法一个是从前往后查找元素,一个是从后往前,需要注意的是查找元素也不涉及modCount的修改。
2. 通过位置查找元素
public E get(int index) {
        rangeCheck(index);

        return elementData(index);
    }

E elementData(int index) {
        return (E) elementData[index];
    }
清空元素
public void clear() {
        modCount++;

        // clear to let GC do its work
        for (int i = 0; i < size; i++)
            elementData[i] = null;

        size = 0;
    }
没什么好说的,注意会修改modCount。
迭代器
Iterator
public Iterator<E> iterator() {
        return new Itr();
    }

private class Itr implements Iterator<E> {
        int cursor;       // index of next element to return
        int lastRet = -1; // index of last element returned; -1 if no such
        int expectedModCount = modCount;

        public boolean hasNext() {
            return cursor != size;
        }

        @SuppressWarnings("unchecked")
        public E next() {
            checkForComodification();
            int i = cursor;
            if (i >= size)
                throw new NoSuchElementException();
            Object[] elementData = ArrayList.this.elementData;
            if (i >= elementData.length)
                throw new ConcurrentModificationException();
            cursor = i + 1;
            return (E) elementData[lastRet = i];
        }

        public void remove() {
            if (lastRet < 0)
                throw new IllegalStateException();
            checkForComodification();

            try {
                ArrayList.this.remove(lastRet);
                cursor = lastRet;
                lastRet = -1;
                expectedModCount = modCount;
            } catch (IndexOutOfBoundsException ex) {
                throw new ConcurrentModificationException();
            }
        }

        @Override
        @SuppressWarnings("unchecked")
        public void forEachRemaining(Consumer<? super E> consumer) {
            Objects.requireNonNull(consumer);
            final int size = ArrayList.this.size;
            int i = cursor;
            if (i >= size) {
                return;
            }
            final Object[] elementData = ArrayList.this.elementData;
            if (i >= elementData.length) {
                throw new ConcurrentModificationException();
            }
            while (i != size && modCount == expectedModCount) {
                consumer.accept((E) elementData[i++]);
            }
            // update once at end of iteration to reduce heap write traffic
            cursor = i;
            lastRet = i - 1;
            checkForComodification();
        }

        final void checkForComodification() {
            if (modCount != expectedModCount)
                throw new ConcurrentModificationException();
        }
    }
这个私有内部类Itr实现了Iterator,其中hashnext方法的作用是判断迭代是否完成,next方法则是迭代下一个元素,这个方法的第一句调用了checkForComodification(),checkForComodification()的作用是判断是否存在并发修改(即ArrayList调用了非Itr内部类的增删元素的方法),next方法中的第一个if是判断是否有越界(即cursor已到达集合尾部),第二个if则是判断是否有并发修改从而导致集合结构变化,使得迭代器与集合不同步,从而产生越界。
接下来我们来研究下为何会产生ConcurrentModificationException()异常,我们知道,在Itr外部增加或删除元素时,会修改modCount,只有调用Itr这个内部类时,才会将修改过的modCount赋给expectedModCount,而如果在迭代过程中出现了调用ArrayList自身的非Itr的add或remove方法,那么在修改modCount时并不会修改expectedmodCount,从而对迭代过程造成影响,所以会产生ConcurrentModificationException()异常(这就是fail-fast,快速失败)。
而remove方法实现了在迭代过程中删除元素,lastRet代表的是上一个迭代的元素,而cursor代表将要迭代的元素,为什么这个方法不会引发ConcurrentModificationException()呢?因为expectedModCount在这个方法中被修改为与当前的modCount一样的值。
此外ArrayList还实现了一个private class ListItr extends Itr implements ListIterator<E> ,这个迭代器增加了向前遍历public E previous()及增加元素public void add(E e) 、修改元素public void set(E e) 都非常有趣,有兴趣的可以去瞅瞅,但需要注意的是每当修改集合结构时,都需要修改expectedModCount,以此保证迭代内外一致性。
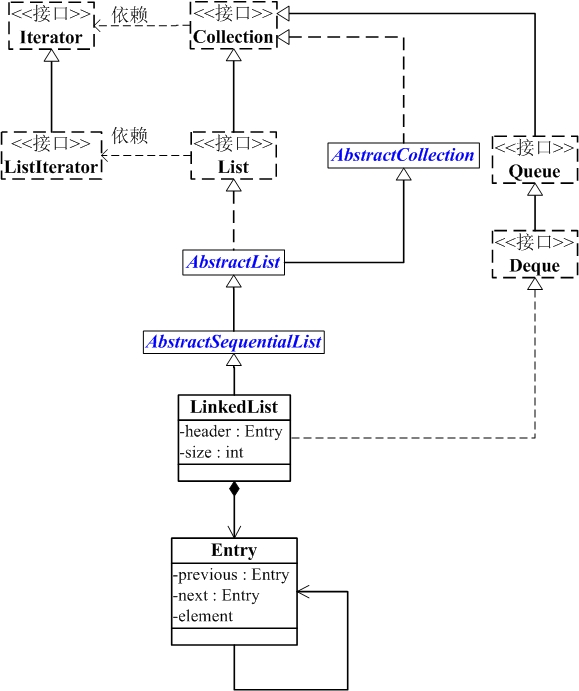
LinkedList
LinkedList介绍
从图中可以看出LinkedList与ArrayList的一个区别,ArrayList是直接继承于AbstractList,而LinkedList是继承自AbstractSequentialList,并且LinkedList还实现了Deque接口,这表示LinkedList可以作为队列来使用,它与ArrayList的另一个区别是底层的实现,LinkedList底层为双向链表,所以在增删元素上它有天然的优势,而不用像ArrayList涉及到数组的复制,但在改查元素上就没有ArrayList那么便捷了,因为它涉及元素的定位。
LinkedList允许元素为null,与ArrayList相同,它也是线程不安全的。
LinkedList源码解析
数据成员介绍
transient int size = 0;
元素数量(结点数量)
transient Node<E> first;
链表头结点,这里的Node类会在之后说明
transient Node<E> last;
链表尾结点
方法介绍
构造方法
在看构造方法之前我们先来看下Node类。
private static class Node<E> {
        E item;
        Node<E> next;
        Node<E> prev;

        Node(Node<E> prev, E element, Node<E> next) {
            this.item = element;
            this.next = next;
            this.prev = prev;
        }
    }
这是一个私有内部类,它的作用是构建这个链表的每一个结点,从此可以看出,这是一个双向链表。
1. 空构造
public LinkedList() {
    }
这个空构造其实就是建一个空的双向链表。
2. 将一个集合作为参数
public LinkedList(Collection<? extends E> c) {
        this();
        addAll(c);
    }
这个构造为以现有集合元素构建一个LinkedList,首先先创建一个空链表,再将Collection作为参数添加到链表中,具体方法addAll()之后介绍。
增加元素
1. addAll
public boolean addAll(Collection<? extends E> c) {
        return addAll(size, c);
    }
public boolean addAll(int index, Collection<? extends E> c) {
        checkPositionIndex(index);

        Object[] a = c.toArray();
        int numNew = a.length;
        if (numNew == 0)
            return false;

        Node<E> pred, succ;
        if (index == size) {
            succ = null;
            pred = last;
        } else {
            succ = node(index);
            pred = succ.prev;
        }

        for (Object o : a) {
            @SuppressWarnings("unchecked") E e = (E) o;
            Node<E> newNode = new Node<>(pred, e, null);
            if (pred == null)
                first = newNode;
            else
                pred.next = newNode;
            pred = newNode;
        }

        if (succ == null) {
            last = pred;
        } else {
            pred.next = succ;
            succ.prev = pred;
        }

        size += numNew;
        modCount++;
        return true;
    }
接着上文的构造说起,首先第一个addAll方法是作为没有传入插入元素位置时,自动插入到尾部的作用而存在的,真正实现是在第二个方法中。
第二个addAll是以index为插入下标来进行元素的插入,首先第一步是喜闻乐见的检查插入位置合法性,然后与ArrayList批量插入一样,将Collection转为数组,其中numNew是新增元素的数量,然后有两个结点pred,succ,这两个结点是作为index这个位置要插入结点的直接前驱和直接后继的,接着就是初始化pred和succ,如果要插入在集合末尾,那么就将直接后继succ置空,直接前驱pred为原集合的最后一个结点,如果是其他位置的话,就将succ置为现在index位置上的结点,pred为succ的前一个结点,这里涉及到一个非常巧妙的查找结点的方法,请看:
Node<E> node(int index) {
        // assert isElementIndex(index);

        if (index < (size >> 1)) {
            Node<E> x = first;
            for (int i = 0; i < index; i++)
                x = x.next;
            return x;
        } else {
            Node<E> x = last;
            for (int i = size - 1; i > index; i--)
                x = x.prev;
            return x;
        }
    }
这个方法巧妙的是它将index的位置做了一个判断,如果index在前半部分,那么就从头结点开始遍历,反之从尾结点开始。
我们接着说,接下来就是插入步骤,由于是批量插入,所以此处用了一个加强循环,这个循环的作用就是将每个结点与其直接前驱结点(pred)连接起来(注意插入要分为头插与中间尾插),然后就是循环之后,将最后一个插入的结点与直接后继结点(succ)连接起来,这里注意要分为尾部与中间,尾部只需修改尾结点,中间要注意此时的pred指向插入的最后一个结点。
最后修改size与modCount(与ArrayList相同哒)。
2. add(E e)
public boolean add(E e) {
        linkLast(e);
        return true;
    }
void linkLast(E e) {
        final Node<E> l = last;
        final Node<E> newNode = new Node<>(l, e, null);
        last = newNode;
        if (l == null)
            first = newNode;
        else
            l.next = newNode;
        size++;
        modCount++;
    }
插入单个元素,默认插入尾部,即调用linklast这个方法,其中l是尾结点,插入时要注意这个LinkedList是否是一个空链表,还有就是要修改size与modCount。
3. add(int index, E element)
public void add(int index, E element) {
        checkPositionIndex(index);

        if (index == size)
            linkLast(element);
        else
            linkBefore(element, node(index));
    }
void linkBefore(E e, Node<E> succ) {
        // assert succ != null;
        final Node<E> pred = succ.prev;
        final Node<E> newNode = new Node<>(pred, e, succ);
        succ.prev = newNode;
        if (pred == null)
            first = newNode;
        else
            pred.next = newNode;
        size++;
        modCount++;
    }
这个其实没啥好说的,就是给定位置插入结点,注意插入要分头结点还是其他结点,还有要修改size和modCount。
还有两个增加元素的方法addFirst(E e) 和addLast(E e) ,见名知意,没啥子好说的。
至此添加元素的方法就介绍完了,与ArrayList相比,无疑提高了效率,但在其中查找对应位置的结点(node(int index))时,虽然巧妙的运用了双向链表的特性,但仍要遍历链表,这是LinkedList较ArrayList的缺点。
删除元素
1. remove(Object o)
public boolean remove(Object o) {
        if (o == null) {
            for (Node<E> x = first; x != null; x = x.next) {
                if (x.item == null) {
                    unlink(x);
                    return true;
                }
            }
        } else {
            for (Node<E> x = first; x != null; x = x.next) {
                if (o.equals(x.item)) {
                    unlink(x);
                    return true;
                }
            }
        }
        return false;
    }
此方法为给定一个需要删除的元素,然后从头结点遍历整个LinkedList(还有个是从尾结点往前遍历的removeLastOccurrence(Object o)),找到它,并调用unlink删除它,下面我们来看看unlink这个方法。
E unlink(Node<E> x) {
        // assert x != null;
        final E element = x.item;
        final Node<E> next = x.next;
        final Node<E> prev = x.prev;

        if (prev == null) {
            first = next;
        } else {
            prev.next = next;
            x.prev = null;
        }

        if (next == null) {
            last = prev;
        } else {
            next.prev = prev;
            x.next = null;
        }

        x.item = null;
        size--;
        modCount++;
        return element;
    }
这个方法就是常规的从一个双向链表中删除一个结点,首先修改x的直接前驱结点的后继指向,注意头结点只需修改头指针first,还有就是将x的前驱指向置为null(方便垃圾回收),然后修改x的直接后继结点的前驱指向,注意尾结点只需修改尾结点last,照例,将x的next置null,最后将x的item置为null,并且修改结点个数(size)和modCount,将被删除的元素返回。
2. remove(int index)
public E remove(int index) {
        checkElementIndex(index);
        return unlink(node(index));
    }
这个删除方法是给定结点位置,找到并删除它,第一步,喜闻乐见,检查位置合法性,然后先调用node()这个方法,找到这个结点并把它作为参数传给unlink(),删除它。
还有两个方法removeFirst() 和 removeLast(),都是见名之意,在此不再赘述。
总的来说,LinkedList删除元素比ArrayList提高了太多效率,但是仍要注意modCount的修改。
修改元素
set(int index, E element)
public E set(int index, E element) {
        checkElementIndex(index);
        Node<E> x = node(index);
        E oldVal = x.item;
        x.item = element;
        return oldVal;
    }
给定位置及要修改的元素,嗯,第一步检查位置合法性,然后调用node(int index) 找到对应的结点,然后先将旧值保存起来,再将新值赋给结点数据域,最后将旧值返回。
查找元素
1. get
public E getFirst() {
        final Node<E> f = first;
        if (f == null)
            throw new NoSuchElementException();
        return f.item;
    }
public E getLast() {
        final Node<E> l = last;
        if (l == null)
            throw new NoSuchElementException();
        return l.item;
    }
public E get(int index) {
        checkElementIndex(index);
        return node(index).item;
    }
这三个get方法分别是获取头结点的数据域,尾结点的数据域,以及指定位置的结点的数据域,注意获取头尾结点时要判断LinkedList是否为空。
2. indexOf
public int indexOf(Object o) {
        int index = 0;
        if (o == null) {
            for (Node<E> x = first; x != null; x = x.next) {
                if (x.item == null)
                    return index;
                index++;
            }
        } else {
            for (Node<E> x = first; x != null; x = x.next) {
                if (o.equals(x.item))
                    return index;
                index++;
            }
        }
        return -1;
    }
public int lastIndexOf(Object o) {
        int index = size;
        if (o == null) {
            for (Node<E> x = last; x != null; x = x.prev) {
                index--;
                if (x.item == null)
                    return index;
            }
        } else {
            for (Node<E> x = last; x != null; x = x.prev) {
                index--;
                if (o.equals(x.item))
                    return index;
            }
        }
        return -1;
    }
这两个方法都是通过给定元素去查找相应的位置,由于List允许有重复元素的存在,所以分为两个方法,第一个方法为从头结点向后遍历查找元素,第二个方法则是从尾结点向前查找元素。
在通过元素查找位置时,LinkedList与ArrayList都需进行遍历查找,但在通过位置查找元素时,ArrayList明显优于LinkedList。
清空元素
public void clear() {
        // Clearing all of the links between nodes is "unnecessary", but:
        // - helps a generational GC if the discarded nodes inhabit
        //   more than one generation
        // - is sure to free memory even if there is a reachable Iterator
        for (Node<E> x = first; x != null; ) {
            Node<E> next = x.next;
            x.item = null;
            x.next = null;
            x.prev = null;
            x = next;
        }
        first = last = null;
        size = 0;
        modCount++;
    }
这个方法是清空整个LinkedList,注意头结点first与尾结点last及size、modCount都要修改。
迭代器
public ListIterator<E> listIterator(int index) {
        checkPositionIndex(index);
        return new ListItr(index);
    }
private class ListItr implements ListIterator<E> {
        private Node<E> lastReturned;
        private Node<E> next;
        private int nextIndex;
        private int expectedModCount = modCount;

        ListItr(int index) {
            // assert isPositionIndex(index);
            next = (index == size) ? null : node(index);
            nextIndex = index;
        }

        public boolean hasNext() {
            return nextIndex < size;
        }

        public E next() {
            checkForComodification();
            if (!hasNext())
                throw new NoSuchElementException();

            lastReturned = next;
            next = next.next;
            nextIndex++;
            return lastReturned.item;
        }

        public boolean hasPrevious() {
            return nextIndex > 0;
        }

        public E previous() {
            checkForComodification();
            if (!hasPrevious())
                throw new NoSuchElementException();

            lastReturned = next = (next == null) ? last : next.prev;
            nextIndex--;
            return lastReturned.item;
        }

        public int nextIndex() {
            return nextIndex;
        }

        public int previousIndex() {
            return nextIndex - 1;
        }

        public void remove() {
            checkForComodification();
            if (lastReturned == null)
                throw new IllegalStateException();

            Node<E> lastNext = lastReturned.next;
            unlink(lastReturned);
            if (next == lastReturned)
                next = lastNext;
            else
                nextIndex--;
            lastReturned = null;
            expectedModCount++;
        }

        public void set(E e) {
            if (lastReturned == null)
                throw new IllegalStateException();
            checkForComodification();
            lastReturned.item = e;
        }

        public void add(E e) {
            checkForComodification();
            lastReturned = null;
            if (next == null)
                linkLast(e);
            else
                linkBefore(e, next);
            nextIndex++;
            expectedModCount++;
        }

        public void forEachRemaining(Consumer<? super E> action) {
            Objects.requireNonNull(action);
            while (modCount == expectedModCount && nextIndex < size) {
                action.accept(next.item);
                lastReturned = next;
                next = next.next;
                nextIndex++;
            }
            checkForComodification();
        }

        final void checkForComodification() {
            if (modCount != expectedModCount)
                throw new ConcurrentModificationException();
        }
    }
LinkedList只有ListIterator(所以这个内部类好长啊。。。)。
介绍一下,lastReturned 当前要返回的结点,next 下一个结点,然后和ArrayList一样,有期望修改数expectedModCount,需要注意的是两个三目运算符,第一个在构造里的,是找到index位置(默认为0)的结点,如果index为size,那么就给它置为null,第二个是在向前遍历里,如果当前的next为null,那么代表它的直接前驱为尾结点,否则就赋为它的前一个结点。
还有,由于它包含了remove方法及add方法,所以LinkedList也是有快速失败机制的。


 4286
4286


 被折叠的 条评论
为什么被折叠?
被折叠的 条评论
为什么被折叠?
 到【灌水乐园】发言


