


简单粗暴的形成底部导航:直接上代码
一。布局文件
<FrameLayout
        android:id="@+id/fl_container"
        android:layout_width="match_parent"
        android:layout_height="0dp"
        android:layout_weight="1"
        android:background="@color/white"/>

    <RadioGroup
        android:id="@+id/radioGroup"
        android:layout_width="match_parent"
        android:layout_height="48dp"
        android:orientation="horizontal"
        android:background="#fff"
        android:checkedButton="@id/rb_1">

        <RadioButton
            android:id="@+id/rb_1"
            android:layout_width="0dp"
            android:layout_height="match_parent"
            android:layout_weight="1"
            android:button="@null"
            android:gravity="center"
            android:text="RadioB1"
            android:checked="true"
            android:textColor="@drawable/selector_radio_button" />
        <RadioButton
            android:id="@+id/rb_2"
            android:layout_width="0dp"
            android:layout_height="match_parent"
            android:layout_weight="1"
            android:button="@null"
            android:gravity="center"
            android:text="RadioB2"
            android:checked="false"
            android:textColor="@drawable/selector_radio_button"/>
        <RadioButton
            android:id="@+id/rb_3"
            android:layout_width="0dp"
            android:layout_height="match_parent"
            android:layout_weight="1"
            android:button="@null"
            android:text="RadioB3"
            android:gravity="center"
            android:checked="false"
            android:textColor="@drawable/selector_radio_button"/>
        <RadioButton
            android:id="@+id/rb_4"
            android:layout_width="0dp"
            android:layout_height="match_parent"
            android:layout_weight="1"
            android:button="@null"
            android:text="RadioB4"
            android:gravity="center"
            android:checked="false"
            android:textColor="@drawable/selector_radio_button"/>
    </RadioGroup>
2.MainActivity中的代码
 private RadioButton rb_1;
    private RadioButton rb_2;
    private RadioButton rb_3;
    private RadioButton rb_4;

     private FirstFragment firstFragment ;
     private SecondFragment secondFragment;
     private ThirdFragment thirdFragment ;
     private FouthFragment fouthFragment;
    private RadioGroup radioGroup;
    private FrameLayout fl_container;
    private List<Fragment>fragmentList = new ArrayList<>();

    @Override
    protected void onCreate(Bundle savedInstanceState) {
        super.onCreate(savedInstanceState);
        setContentView(R.layout.activity_main);
        initView();
        initData();
        initListener();
        setDefaultFragment();

    }


    private void setDefaultFragment() {
        FragmentTransaction transaction = getSupportFragmentManager().beginTransaction();
        transaction.replace(R.id.fl_container , firstFragment);
        transaction.commit();
    }

    private void initListener() {
        radioGroup.setOnCheckedChangeListener(new RadioGroup.OnCheckedChangeListener() {
            @Override
            public void onCheckedChanged(RadioGroup radioGroup, int checkedId) {
                switch(checkedId){
                    case R.id.rb_1:
                        addFragment(firstFragment);
                        break;
                    case R.id.rb_2:
                        addFragment(secondFragment);
                        break;
                    case R.id.rb_3:
                        addFragment(thirdFragment);
                        break;
                    case R.id.rb_4:
                        addFragment(fouthFragment);
                        break;
                }
            }
        });
    }
  //添加fragment,但是使用replace方法有个蛋疼的问题,当前的fragment切换之后会销毁之前的fragment,从网络请求数据的话会显示不流畅的数据加载,可以用hide和show方替换掉
    private void addFragment(Fragment fragment) {
        FragmentTransaction transaction = getSupportFragmentManager().beginTransaction();
        transaction.replace(R.id.fl_container ,fragment);
        transaction.commit();
    }

    private void initData() {
        firstFragment = new FirstFragment();
        secondFragment = new SecondFragment();
        thirdFragment = new ThirdFragment();
        fouthFragment = new FouthFragment();
        fragmentList.add(firstFragment );
        fragmentList.add(secondFragment );
        fragmentList.add(thirdFragment );
        fragmentList.add(fouthFragment );


    }

    private void initView() {
        rb_1 = findViewById(R.id.rb_1);
        rb_2 = findViewById(R.id.rb_2);
        rb_3 = findViewById(R.id.rb_3);
        rb_4 = findViewById(R.id.rb_4);
        radioGroup = findViewById(R.id.radioGroup);
        fl_container = findViewById(R.id.fl_container);

    }
3.用hide和show方法替换replace方法
private void addFragment(Fragment fragment) {
        FragmentTransaction transaction = getSupportFragmentManager().beginTransaction();
        // transaction.replace(R.id.fl_container ,fragment);
        if(currentFragment != fragment) {
            transaction.hide(currentFragment);
            currentFragment = fragment;
            if (!currentFragment.isAdded()) {
                transaction.add(R.id.fl_container , fragment).show(fragment).commit();
            }else {
                transaction.show(fragment).commit();
            }
        }
    }
注:setDefaultFragment()方法里要加一句代码:currentFragment = firstFragment;4.fragment生命周期
a.第一次创建

b.按home键


c.从home键回到界面

d.退出项目的时候


总结
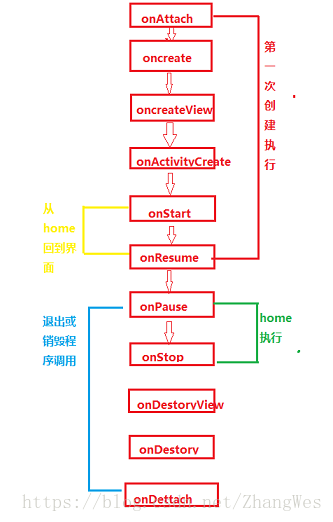
onAttach():一般是给fragment里面添加回调接口的,在fragment和activity建立联系的时候调用
onCreate():初始化资源文件
onCreateView():首次绘制界面调用,绘制fragment的UI,一般initView(),返回一个view
onActivityCreate():设置一些数据,initData()一般写在这里。
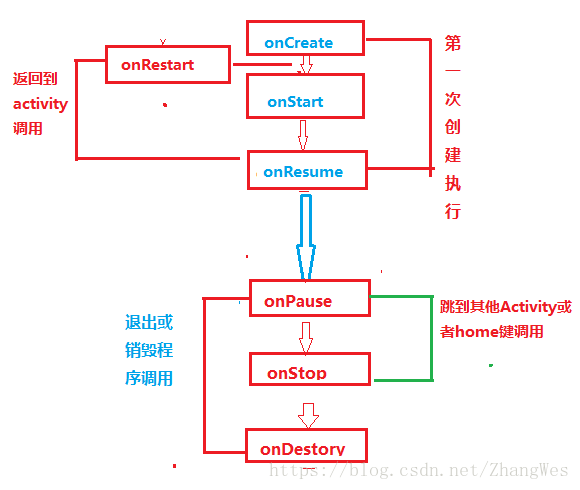
5.Activity的生命周期


 4115
4115


 被折叠的 条评论
为什么被折叠?
被折叠的 条评论
为什么被折叠?
 到【灌水乐园】发言


