


文章目录
一.props / $emit
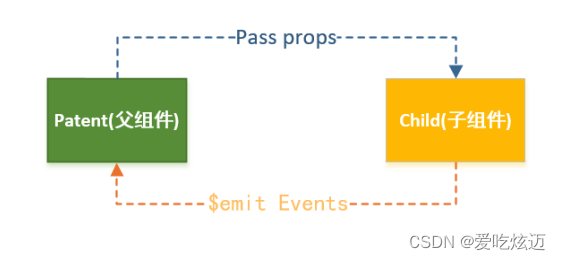
1.父组件传递给子组件:通过props属性
在开发中很常见的就是父子组件之间通信,比如父组件有一些数据,需要子组件来进行展示:
这个时候我们可以通过props来完成组件之间的通信。
- 什么是Props?
- Props是你可以在组件上注册一些自定义的attribute;
- 父组件给这些attribute赋值,子组件通过attribute的名称获取到对应的值;
- Props有两种常见的用法:
- 方式一:字符串数组,数组中的字符串就是attribute的名称;
- 方式二:对象类型,对象类型我们可以在指定attribute名称的同时,指定它需要传递的类型、是否是必须的、默认值等等;
举个栗子:展示jack的个人信息
//父组件:
<template>
  <div class="app">
    <show-info name="jack" age="18"></show-info>
  </div>
</template>

<script>
import ShowInfo from './showInfo.vue'

export default {
  components: {
    ShowInfo
  }
}
</script>
// 子组件
<template>
  <div class="son">
    <h2>姓名:{{ name }}</h2>
    <h2>年龄:{{ age }}</h2>
  </div>
</template>

<script>
export default {
  // 用法一:数组形式
  props: ['name', 'age']
  // 用法二:对象形式
  props: {
    name: {
      type: String,
      default: '我是name的默认值'
    },
    age: {
      type: Number,
      default: 0
    }
  }
}
</script>
Props数组用法
数组用法中我们只能说明传入的attribute的名称,并不能对其进行任何形式的限制
缺点:
- 不能指定默认值,意思就是在父组件没有传递值的时候,我们希望能够展示默认值
- 不能对类型进行验证
Props对象用法
当使用对象语法的时候,我们可以对传入的内容限制更多:
- 指定传入的attribute的类型 => type
- type的类型都可以是:
String,Number,Boolean,Array,Object,Date,Function,Symbol
- type的类型都可以是:
- 指定传入的attribute是否是必传的 => required
- 指定没有传入时,attribute的默认值 => default
- 如果type是
Object/Array时,需要编写default函数,函数返回默认值
- 如果type是
2.子组件传递给父组件:通过$emit触发事件
什么情况下子组件需要传递内容到父组件呢?
- 当子组件有一些事件发生的时候,比如在组件中发生了点击,父组件需要切换内容;
- 当子组件有一些内容想要传递给父组件的时候;
如何完成子组件传递给父组件
- 首先,我们需要在子组件中定义好在某些情况下触发的事件名称;
- 其次,在父组件中以v-on的方式传入要监听的事件名称,并且绑定到对应的方法中;
- 最后,在子组件中发生某个事件的时候,根据事件名称触发对应的事件;
举个栗子:子组件中有个按钮表示+100,点击按钮时父组件中的counter就+100
//父组件
<template>
  <div class="app">
    <h2>当前计数:{{ counter }}</h2>

    <!-- 自定义add-counter,并且监听内部的add事件 -->
    <add-counter @add="addCounter"></add-counter>
  </div>
</template>

<script>
import AddCounter from './AddCounter.vue'

export default {
  components: {
    AddCounter
  },
  data() {
    return {
      counter: 0
    }
  },
  methods: {
    addCounter(count) {
      this.counter += count
    }
  }
}
</script>
//子组件
<template>
  <div class="add">
    <button @click="btnClick">+100</button>
  </div>
</template>

<script>
export default {
  // emits的数组语法
  emits: ['add'],
  methods: {
    btnClick() {
      // 让子组件发出去一个自定义事件
      // 第一个参数自定义的事件名称
      // 第二个参数是传递的参数
      this.$emit('add', 100)
    }
  }
}
</script>

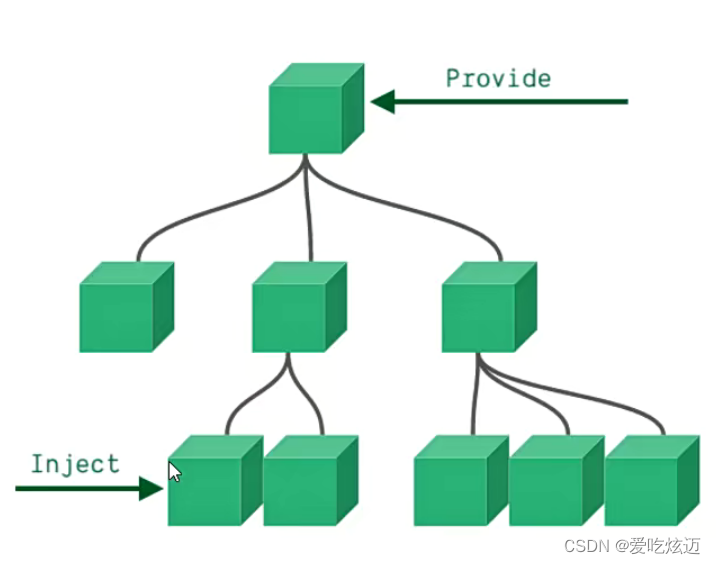
二.Provide / Inject
Provide / Inject用于非父子组件之间共享数据:
- 比如有一些深度嵌套的组件,子组件想要获取父组件的部分内容;
- 在这种情况下,如果我们仍然将props沿着组件链逐级传递下去,就会非常的麻烦:
对于这种情况下,我们可以使用Provide和Inject:
- 无论层级结构有多深,父组件都可以作为其所有子组件的依赖提供者;
- 父组件有一个provide选项来提供数据;
- 子组件有一个inject选项来开始使用这些数据;
实际上,你可以将依赖注入看作是“long range props”,除了:
- 父组件不需要知道哪些子组件使用它provide的property
- 子组件不需要知道inject的property来自哪里
// App.vue

<template>
  <div class="app">
    <bpp-com></bpp-com>
  </div>
</template>

<script>
import { computed } from 'vue'
import BppCom from './BppCom.vue'

export default {
  components: {
    BppCom
  },
  data() {
    return {
      message: 'good boy'
    }
  },
  provide() {
    return {
    // 情况一:数据写死
      name: 'jack',
      age: 18,
      // 情况二:数据来自data中
      // 使message变成响应式的
      message: computed(() => this.message)
    }
  }
}
</script>
// BppCom.vue
<template>
  <div class="bpp">
    <cpp-com></cpp-com>
  </div>
</template>

<script>
import CppCom from './CppCom.vue'

export default {
  components: {
    CppCom
  }
}
</script>
// CppCom.vue
<template>
  <div class="cpp">
    <h2>信息:{{ name }}-{{ age }}-{{ message }}</h2>
  </div>
</template>

<script>
export default {
  inject: ['name', 'age', 'message']
}
</script>
三.全局事件总线
eventBus 又称为事件总线,在vue中可以使用它来作为沟通桥梁的概念, 就像是所有组件共用相同的事件中心,可以向该中心注册发送事件或接收事件, 所以组件都可以通知其他组件。
缺点: 当项目较大,就容易造成难以维护的灾难
在Vue的项目中使用eventBus来实现组件之间的数据通信具体步骤:通过使用Vue3-Bus插件 / 自己封装的库
- 安装
// 方式一:Vue3-Bus插件
npm install --save vue3-eventbus

// 方式二:自己封装的库
npm install hy-event-store
- 挂载
// 方式一:Vue3-Bus插件
import eventBus from 'vue3-eventbus'
app.use(eventBus)

// 方式二:自己封装的库
// utils/event-bus.js
import { HYEventBus } from 'hy-event-store'
const eventBus = new HYEventBus()
export default eventBus
- 使用
接收事件
// App.vue

<template>
  <div class="app">
  // 用于测试event-bus组件通信效果
    <h2>{{ message }}</h2>
    <bpp-com></bpp-com>

    // 用于测试移除事件监听的效果
    <RemoveCom v-if="isRemove"></RemoveCom>
    <button @click="isRemove = false">是否显示remove组件</button>
  </div>
</template>

<script>
import BppCom from './BppCom.vue'
import RemoveCom from './RemoveCom.vue'
// import eventBus from 'vue3-eventbus'
import eventBus from './utils/event-bus'

export default {
  components: {
    BppCom,
    RemoveCom
  },
  data() {
    return {
      message: 'Jack Info',
      isRemove: true
    }
  },
  created() {
    // 事件监听
    eventBus.on('jackInfo', (name, age, height) => {
      console.log('app中的事件监听', name, age, height)
      this.message = `name:${name},age:${age},height:${height}`
    })
  }
}
</script>
// BppCom.vue
<template>
  <div class="bpp">
    <cpp-com></cpp-com>
  </div>
</template>

<script>
import CppCom from './CppCom.vue'

export default {
  components: {
    CppCom
  }
}
</script>
发送事件
// CppCom.vue
<template>
  <div class="cpp">
    <button @click="btnClick">按钮</button>
  </div>
</template>

<script>
// import eventBus from 'vue3-eventbus'
import eventBus from './utils/event-bus'

export default {
  methods: {
    btnClick() {
      eventBus.emit('jackInfo', 'why', 18, 1.88)
    }
  }
}
</script>
移除事件监听
// RemoveCom.vue
<template>
  <div class="remove">
    <h2>remove组件</h2>
  </div>
</template>

<script>
// import eventBus from 'vue3-eventbus'
import eventBus from './utils/event-bus'

export default {
  methods: {
    jackInfoHandler() {
      console.log('在remove组件中监听JackInfo事件')
    }
  },
  created() {
    eventBus.on('jackInfo', this.jackInfoHandler)
  },
  unmounted() {
    eventBus.off('jackInfo', this.jackInfoHandler)
  }
}
</script>

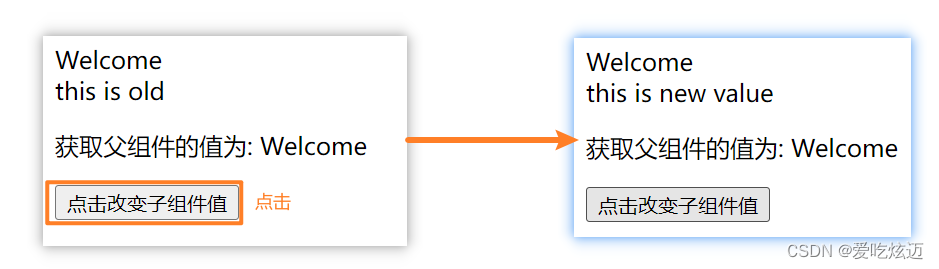
四. $refs / $parent
$ parent
指定已创建的实例之父实例,在两者之间建立父子关系。子实例可以用
this.$parent访问父实例,子实例被推入父实例的$children数组中。
注意:
- 要节制地使用
$parent和$children它们的主要目的是作为访问组件的应急方法。更推荐用props和events实现父子组件通信. - Vue2中,在父组件中通过
this.$children和this.$refs调用的效果没有太大差别 值得注意的是Vue3移除了this中的$children属性
// 父组件:App.vue
<template>
  <div class="hello_world">
    <div>{{ msg }}</div>

    <bpp-com ref="child"></bpp-com>
    <button @click="changeA">点击改变子组件值</button>
  </div>
</template>

<script>
import BppCom from './BppCom.vue'
export default {
  components: { BppCom },
  data() {
    return {
      msg: 'Welcome'
    }
  },

  methods: {
    changeA() {
      // 获取到子组件A
      console.log('页面的$children', this.$children)
      // console.log('页面的$children', this.$refs.child.messageA)
      this.$refs.child.messageA = 'this is new value'
    }
  }
}
</script>
// 子组件:BppCom.vue
<template>
  <div class="com_a">
    <span>{{ messageA }}</span>
    <p>获取父组件的值为: {{ parentVal }}</p>
  </div>
</template>

<script>
export default {
  data() {
    return {
      messageA: 'this is old'
    }
  },
  computed: {
    parentVal() {
      return this.$parent.msg
    }
  }
}
</script>
五.$attrs与 $listeners
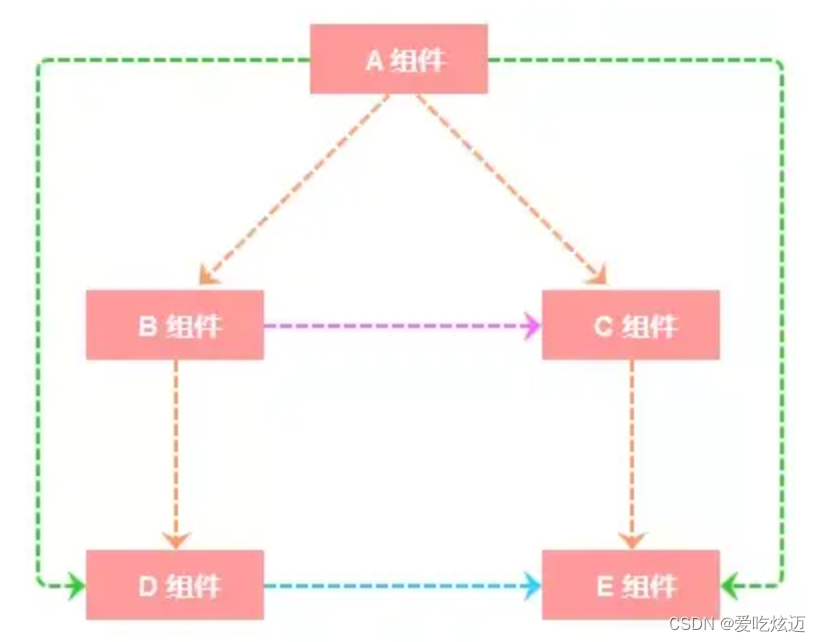
如上图:A组件与D组件是隔代关系, 那它们之前进行通信有哪些方式呢?
- 使用
props绑定来进行一级一级的信息传递, 如果D组件中状态改变需要传递数据给A, 使用事件系统一级级往上传递。 - 使用
eventBus,这种情况下还是比较适合使用,但是碰到多人合作开发时,代码维护性较低, 可读性也低。 - 使用
Vuex来进行数据管理,但是如果仅仅是传递数据,而不做中间处理,使用Vuex处理感觉有点大材小用了。
为此Vue2.4 版本提供了另一种方法----$attrs/$listeners
-
$attrs:包含了父作用域中不被 prop 所识别 (且获取) 的特性绑定 (class 和 style 除外)。当一个组件没有声明任何 prop 时,这里会包含所有父作用域的绑定 (class 和 style 除外),并且可以通过 v-bind=“$attrs” 传入内部组件。通常配合 inheritAttrs 选项一起使用。 -
$listeners:包含了父作用域中的 (不含 .native 修饰器的) v-on 事件监听器。它可以通过 v-on=“$listeners” 传入内部组件
接下来看一个跨级通信的例子:
// App.vue
<template>
  <div>
    <bpp-com
      :name="name"
      :age="age"
      :gender="gender"
      :height="height"
      title="程序员成长指北"
    ></bpp-com>
  </div>
</template>
<script>
import BppCom from './BppCom.vue'
export default {
  components: { BppCom },
  data() {
    return {
      name: 'zhang',
      age: '18',
      gender: '女',
      height: '158'
    }
  }
}
</script>
// BppCom.vue
<template>
  <div class="BppCom">
    <p>name: {{ name }}</p>
    <p>BppCom的$attrs: {{ $attrs }}</p>
    <cpp-com v-bind="$attrs"></cpp-com>
  </div>
</template>
<script>
import CppCom from './CppCom.vue'
export default {
  components: {
    CppCom
  },
  inheritAttrs: false, // 可以关闭自动挂载到组件根元素上的没有在props声明的属性
  props: {
    name: String // name作为props属性绑定
  },
  created() {
    console.log(this.$attrs)
    // { "age": "18", "gender": "女", "height": "158", "title": "程序员成长指北" }
  }
}
</script>
// CppCom.vue
<template>
  <div class="CppCom">
    <p>age: {{ age }}</p>
    <p>CppCom的$attrs: {{ $attrs }}</p>
  </div>
</template>
<script>
export default {
  props: {
    age: String
  },
  inheritAttrs: false, // 可以关闭自动挂载到组件根元素上的没有在props声明的属性
  created() {
    console.log(this.$attrs)
    // { "gender": "女", "height": "158", "title": "程序员成长指北" }
  }
}
</script>
六. vuex
vuex的基本使用


 1万+
1万+


 被折叠的 条评论
为什么被折叠?
被折叠的 条评论
为什么被折叠?
 到【灌水乐园】发言


