


在 Arduino 项目中,我们常常使用 TFT 屏幕来展示信息。默认的英文字符显示非常方便,但如果想要在屏幕上显示中文,就需要自定义字体字库。
本篇教程将带你一步步使用 TFT_eSPI 库,通过字体生成工具和处理脚本,自制适合自己项目的中文字体文件,最终实现在 Arduino 项目中用中文文字“优雅地”输出到 TFT 屏幕上!
目录
-
安装 Arduino IDE
-
安装 TFT_eSPI 库并配置开发板
-
制作自定义中文字体文件
-
在代码中加载和使用中文字库
第一步:安装 Arduino IDE
关于 Arduino IDE 的安装教程网络上已经非常多,这里不赘述。我使用的是 Arduino IDE 2.3.5,你也可以使用更新版本,方法相同。
第二步:安装 TFT_eSPI 库并配置开发板
安装库
-
打开 Arduino IDE
-
点击顶部菜单栏中的:工具 → 管理库
-
在搜索框中输入:
TFT_eSPI -
安装由 Bodmer 编写的库(就是我们需要的)
安装完成后,可以在以下路径中找到库的安装位置(以 Windows 为例):
C:\Users\Administrator\Documents\Arduino\libraries\TFT_eSPI
配置开发板
选择你使用的开发板(例如 ESP32-S3),并正确配置好 TFT 屏幕的引脚和驱动方式(这部分通常通过 User_Setup.h 或 User_Setup_Select.h 文件完成)。
第三步:自制中文字体字库
TFT_eSPI 库内置了一个字体生成工具,虽然原始教程是英文的,但操作不复杂,我们一步步来。
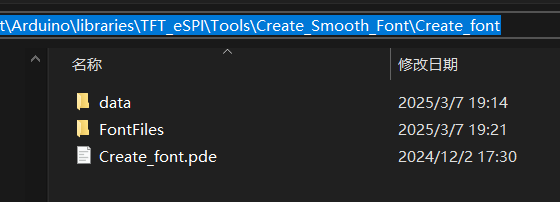
1. 找到字体生成工具
路径如下(以 Windows 为例):
TFT_eSPI\Tools\Create_Smooth_Font\Create_font
你也可以在 Arduino IDE 中通过:
文件 → 示例 → TFT_eSPI → Tools → Create_Smooth_Font → Create_font
打开该项目。
2. 安装 Processing 软件
字体生成脚本是通过 Processing 平台运行的。
-
安装完成后,用它打开
Create_font.pde文件。 -
3. 修改 Create_font.pde 代码
// 导入桌面操作库,用于完成后自动打开文件夹
import java.awt.Desktop;

// =============== 用户配置区域 =============== //
int fontNumber = -1;    // 使用系统字体列表中的编号(查看生成的System_Font_List.txt)
String fontName = "simkai"; // 字体名称(楷体示例),注意需与实际字体文件匹配
String fontType = ".ttf";   // 字体文件扩展名(系统字体时留空)

int  fontSize = 56;         // 生成字体的磅值大小(用于设备)
int displayFontSize = 56;   // 预览窗口显示字号

boolean createHeaderFile = true; // 是否生成C头文件
boolean openFolder = true;       // 完成后自动打开文件夹

// 定义需要包含的Unicode区块(起始,结束)
static final int[] unicodeBlocks = {
  0x0030, 0x0039, // 示例:数字0-9(按此格式添加更多范围)
  // 0x4E00, 0x9FFF, // 中文常用字范围(需要时取消注释)
};

// 添加特定Unicode字符(十六进制值)
static final int[] specificUnicodes = {
  // 可在此添加特殊符号代码,如:0x2665(❤)
};

// ============== 程序核心逻辑 ============== //
int firstUnicode = 0; // 当前处理的Unicode起始值
int lastUnicode  = 0; // 当前处理的Unicode结束值

PFont myFont;         // Processing字体对象
PrintWriter logOutput;// 日志文件输出

void setup() {
  // 初始化日志文件
  logOutput = createWriter("FontFiles/System_Font_List.txt");

  // 设置窗口尺寸
  size(1000, 800);

  // 获取系统字体列表并输出
  String[] fontList = PFont.list();
  printArray(fontList); // 控制台输出字体列表

  // 将字体列表写入文件
  for (int x = 0; x < fontList.length; x++) {
    logOutput.print("[" + x + "] ");
    logOutput.println(fontList[x]);
  }
  logOutput.flush(); // 确保数据写入文件
  logOutput.close(); // 关闭文件流

  // 根据编号或名称设置字体
  if (fontNumber >= 0) { // 使用系统字体时
    // fontName = fontList[fontNumber]; // 自动获取字体名
    fontType = ""; // 系统字体无扩展名
  }

  // 计算总字符数量
  char[] charset;
  int index = 0, count = 0;
  int blockCount = unicodeBlocks.length;

  // 遍历所有Unicode区块
  for (int i = 0; i < blockCount; i+=2) {
    firstUnicode = unicodeBlocks[i];
    lastUnicode  = unicodeBlocks[i+1];

    // 错误检查:结束码小于开始码
    if (lastUnicode < firstUnicode) {
      delay(100);
      System.err.println("错误:Unicode范围设置无效!");
      System.err.print("起始码: 0x" + hex(firstUnicode, 4));
      System.err.println(", 结束码: 0x" + hex(lastUnicode, 4));
      while (true); // 暂停程序
    }
    count += (lastUnicode - firstUnicode + 1); // 累加字符数量
  }

  count += specificUnicodes.length; // 加上特定字符数量

  // 输出统计信息
  println("\n=====================");
  println("正在创建字体文件...");
  println("包含的Unicode区块数  = " + (blockCount/2));
  println("包含的特定字符数量   = " + specificUnicodes.length);
  println("总字符数           = " + count);

  // 检查有效字符数量
  if (count == 0) {
    delay(100);
    System.err.println("错误:未定义任何Unicode范围或字符!");
    while (true); // 暂停程序
  }

  // 创建字符集数组
  charset = new char[count];

  // 填充区块字符
  for (int i = 0; i < blockCount; i+=2) {
    firstUnicode = unicodeBlocks[i];
    lastUnicode  = unicodeBlocks[i+1];

    // 将范围内的每个Unicode转为字符
    for (int code = firstUnicode; code <= lastUnicode; code++) {
      charset[index++] = Character.toChars(code)[0];
    }
  }

  // 添加特定字符
  for (int code : specificUnicodes) {
    charset[index++] = Character.toChars(code)[0];
  }

  // 创建抗锯齿字体
  boolean smooth = true;
  myFont = createFont(fontName+fontType, displayFontSize, smooth, charset);

  // 设置文本显示参数
  fill(0);
  textFont(myFont);
  translate(displayFontSize/2, displayFontSize); // 设置边距

  // 在窗口显示字符集
  int gapx = displayFontSize*10/8; // 水平间距
  int gapy = displayFontSize*10/8; // 垂直间距
  index = 0; // 重置索引

  textSize(displayFontSize);

  // 网格布局显示字符
  for (int y = 0; y < height-gapy; y += gapy) {
    int x = 0;
    while (x < width) {
      char currentChar = charset[index];
      float charWidth = textWidth(currentChar) + 2;

      // 换行检查
      if ( (x + charWidth) > (width - gapx) ) break;

      // 绘制字符
      text(new String(new char[]{currentChar}), x, y);

      x += charWidth; // 移动光标
      index++;        // 下一个字符
      if (index >= count) break;
    }
    if (index >= count) break;
  }

  // 生成字体文件
  PFont font = createFont(fontName+fontType, fontSize, smooth, charset);
  String fontFileName = "FontFiles/" + fontName + fontSize + ".vlw";

  try {
    print("正在保存字体文件... ");

    // 创建输出流并保存
    OutputStream output = createOutput(fontFileName);
    font.save(output);
    output.close();

    println("完成!");

    // 自动打开文件夹
    if (openFolder) {
      Desktop.getDesktop().open(new File(sketchPath()+"/FontFiles"));
    }

    System.err.println("注意:缺失字符将显示为方框");
  }
  catch(IOException e) {
    println("\n错误:字体文件创建失败!");
  }

  // 生成C头文件
  if (!createHeaderFile) return;

  try {
    print("正在生成C头文件...");

    // 读取字体数据并转换为十六进制数组
    InputStream input = createInputRaw(fontFileName);
    PrintWriter headerOutput = createWriter("FontFiles/" + fontName + fontSize + ".h");

    // 写入头文件信息
    headerOutput.println("#include <pgmspace.h>");
    headerOutput.println();
    headerOutput.println("const uint8_t " + fontName + fontSize + "[] PROGMEM = {");

    // 转换字节数据为十六进制格式
    int byteCount = 0;
    int data = input.read();
    while (data != -1) {
      headerOutput.print("0x");
      headerOutput.print(hex(data, 2));

      // 格式控制:每行16个字节
      if (byteCount++ < 15) {
        headerOutput.print(", ");
      } else {
        headerOutput.println(",");
        byteCount = 0;
      }
      data = input.read();
    }

    headerOutput.println("\n};"); // 结束数组声明
    headerOutput.close();
    input.close();

    println("头文件生成完成!");
  }
  catch(IOException e) {
    println("\n错误:头文件创建失败!");
  }
}
重点修改以下几行内容:
String fontName = "simfang"; // 字体名称,不带 .ttf 后缀

String fontType = ".ttf"; // 字体文件类型

int fontSize = 12; // 字体大小,建议中文至少为12像素

int displayFontSize = 12;

static final int[] unicodeBlocks = { 0x0030, 0x0039 };

// 添加0~9数字的Unicode编码范围

static final int[] specificUnicodes = {  }; // 特定字符的 Unicode
推荐使用在线工具将中文转为 Unicode: Unicode编码转换 - 站长工具
4. 准备字体文件
将你要使用的 .ttf 字体文件(如 simfang.ttf)复制到 Create_font 文件夹下的 data 目录中。
在 Windows 系统中,字体文件通常存储在以下默认路径中:
C:\Windows\Fonts手动备份字体:复制 C:\Windows\Fonts 中的文件即可,但注意部分字体可能有版权限制。
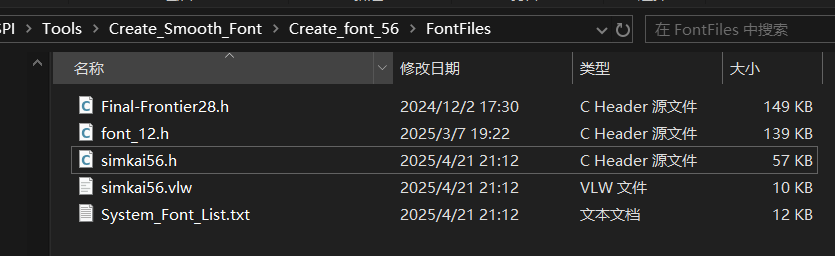
5. 生成字库
点击 Processing 的 “运行” 按钮。
成功后:
-
会弹出一张预览字体的图片
-
在
FontFiles文件夹下生成.vlw文件,例如simfang56.vlw -
第四步:转换字库文件为 Arduino 可用格式
1. 使用 hex 工具转换文件格式
将 .vlw 字体文件转换为 .h 文件格式:
-
在线工具推荐:File to hex converter
-
或者使用
bin2hex.exe命令行工具
将生成的字节数组保存为 font_56.h 文件:
#include <pgmspace.h> const uint8_t font_56[] PROGMEM = { 0x00, 0x00, 0x00, 0x0C, 0x00, 0x00, ... // 中间省略大量数据 };
在代码中使用自定义字库
#include "font/font_56.h" // 导入字体文件
tft.loadFont(font_56); // 加载字体
tft.drawString("中文字体", 0, 0); // 显示“字体”在坐标(0,0)
tft.unloadFont(); // 用完后释放字体占用的内存
总结
通过以上步骤,我们成功自定义了一个支持中文的字体文件,并成功在 TFT 屏幕上显示了“中文字体”这两个汉字。
这是一个十分实用的技巧,适用于需要中文显示的物联网界面、小型设备菜单、智能终端等项目。如果你也遇到过在 Arduino 项目中“如何显示中文”的困扰,希望这篇文章对你有所帮助!


 1万+
1万+

 被折叠的 条评论
为什么被折叠?
被折叠的 条评论
为什么被折叠?
 到【灌水乐园】发言


