


第四周 Face Recognition
人脸识别问题通常分为两类:
Face Verification(人脸验证):“判断是否为本人?”例如在机场你可以通过机器扫描进行验证并且通过,有些手机能够使用人脸解锁功能。这些都是1:1匹配问题。
Face Recognition(人脸识别):“这个人是谁?”在进入办公室时无需其他ID卡通过人脸识别就可以进入。这个是1:k匹配问题。
FaceNet可以将人脸图像编码为一个128位数字的向量进行学习,通过比较两个向量确认两张照片是否属于同一个人
在这个作业中,你将使用一个预先训练的模型,该模型使用“通道最后”的约定来表示ConvNet激活
Packages
from tensorflow.keras.models import Sequential
from tensorflow.keras.layers import Conv2D, ZeroPadding2D, Activation, Input, concatenate
from tensorflow.keras.models import Model
from tensorflow.keras.layers import BatchNormalization
from tensorflow.keras.layers import MaxPooling2D, AveragePooling2D
from tensorflow.keras.layers import Concatenate
from tensorflow.keras.layers import Lambda, Flatten, Dense
from tensorflow.keras.initializers import glorot_uniform
from tensorflow.keras.layers import Layer
from tensorflow.keras import backend as K
K.set_image_data_format('channels_last')
import os
import numpy as np
from numpy import genfromtxt
import pandas as pd
import tensorflow as tf
import PIL

%matplotlib inline
%load_ext autoreload
%autoreload 2
Naive Face Verification
在人脸验证中,你将对两个图片进行判断去验证是否是同一个人。有个简单的方法就是对图片中每一个像素进行比较。如果图像之间的像素差距低于阈值,则可能是同一个人。

这样做的算法实现效果是非常不好的,因为像素值会因为光照的变化在人脸头部会有微小的变化而发生很大的变化。
我们可以使用一种编码对于图片,f(img),对每张图片进行编码就可以更准确的去判断两张照片是否属于同一个人。
Encoding Face Images into a 128-Dimensional Vector
Using a ConvNet to Compute Encodings
FaceNet模型需要大量的数据和长时间的训练,因为,遵循在应用深度学习设置中常见的实践,我们要加载其他人已经训练过的权值。
关键信息如下:
- 网络使用了160x160维度的RGB图片输入,具体来说是(m,nH,nW,nC)=(m,160,160,3)
- 使用96x96的输入图像,你需要将160x160缩小到该shape值,这一步需要使用
img_to_encoding()函数实现 - 输出的数据是(m,128)的已经编码的m个128位的向量
下面是人脸识别模型的创建
from tensorflow.keras.models import model_from_json

json_file = open('keras-facenet-h5/model.json', 'r')
loaded_model_json = json_file.read()
json_file.close()
model = model_from_json(loaded_model_json)
model.load_weights('keras-facenet-h5/model.h5')
看一下模型输入和输出的数据:
print(model.inputs)
print(model.outputs)

可以看出输入的是(160x160x3)输出的是128向量
通过使用128神经元全连接层作为最后一层,该模型确保输出是大小为128的编码向量,然后使用比较两个人脸图像的编码如下:

因此,如果满足下面两个条件的话,编码是一个比较好的方法:
- 同一个人的两个图像的编码非常相似。
- 两个不同人物的图像的编码非常不同。
三元组损失函数将上面的形式实现,它会试图将同一个人的两个图像(对于给定的图和正例)的编码“拉近”,同时将两个不同的人的图像(对于给定的图和负例)进一步“分离”。
The Triplet Loss
对于给定的图像x,编码为f(x),其中f为神经网络的计算函数

使用三元组图像(A,P,N)进行训练:
- A一个人的图像
- P同一人的另一张图像
- N不同人的另一张图像
要保证一下算式成立:

并且希望三元组损失变为最小:

需要注意: - 对于(1)是给定三元组A与正例P之间的距离的平方,我们要让他变小
- 对于(2)是定三元组A与反例N之间的距离的平方,要让他变大
- α是间距,需要我们动手实现
Exercise 1 - triplet_loss
要先计算:
然后计算:
计算每一个样本值:
最后通过取带零的最大值计算整个公式:
def triplet_loss(y_true, y_pred, alpha = 0.2):
    """
    Implementation of the triplet loss as defined by formula (3)
    实现三元组损失函数
    Arguments:
    true标签
    y_true -- true labels, required when you define a loss in Keras, you don't need it in this function.
    pythonlist类型有三个参数
    y_pred -- python list containing three objects:
            anchor -- the encodings for the anchor images, of shape (None, 128)   A
            positive -- the encodings for the positive images, of shape (None, 128)   P
            negative -- the encodings for the negative images, of shape (None, 128)   N

    Returns:
    损失值实数
    loss -- real number, value of the loss
    """
    anchor, positive, negative = y_pred[0], y_pred[1], y_pred[2]

    ### START CODE HERE
    #(≈ 4 lines)
    # Step 1: Compute the (encoding) distance between the anchor and the positive
    # 使用tf.subtract对A P张量相减,使用tf.subtract对相减后的张量中的元素求平方,使用reduce_sum对张量进行求和最后的到一个数
    pos_dist =  tf.reduce_sum(tf.square(tf.subtract(anchor,positive)),axis=-1)
    # Step 2: Compute the (encoding) distance between the anchor and the negative
    neg_dist = tf.reduce_sum(tf.square(tf.subtract(anchor,negative)),axis=-1)
    # Step 3: subtract the two previous distances and add alpha.
    basic_loss = tf.add(tf.subtract(pos_dist,neg_dist),alpha)
    # Step 4: Take the maximum of basic_loss and 0.0. Sum over the training examples.
    loss = tf.reduce_sum(tf.maximum(basic_loss,0))
    ### END CODE HERE

    return loss
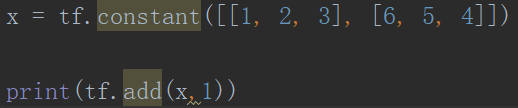
在上面代码中需要对作者提示的函数tf.reduce_sum(),tf.square(), tf.subtract(), tf.add(), tf.maximum()
tf.reduce_sum():
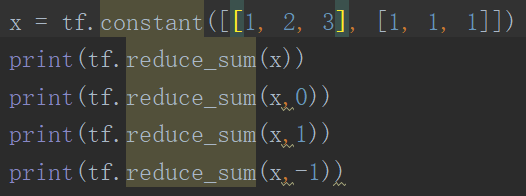
在pycharm进行模拟实验
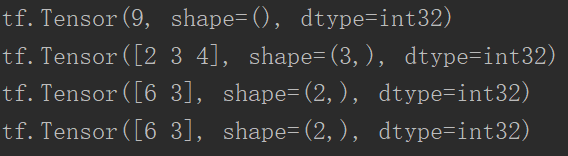
可以看出使用tf.reduce_sum()时是张量中的元素进行相加其中asix参数十分重要,如果没有asix参数的话最后是一个值
tf.square():该函数是将张量中的元素进行平方,针对的是张量中的元素个体比如说[1,2]---->[1,4]
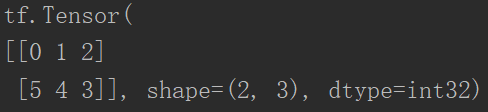
tf.subtract():该函数是将张量中的对应元素相减
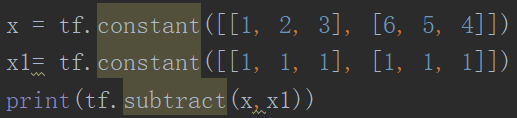
结果
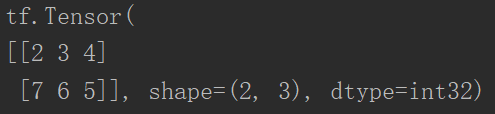
tf.add():与上面tf.reduce_sum()相加不同,add是将参数中的两个数或张量中的元素相加,而tf.reduce_sum()用axis参数可以对内部的元素进行相加
tf.maximum():返回最大值,其中有两个输入参数

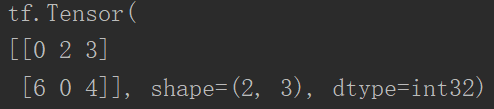
相当于在对应位置只取两个张量中最大的数,这里的0可以理解为(2,3)shape的元素为0的张量
Loading the Pre-trained Model
FaceNet是通过最小化三元组损失来训练的,但是由于训练需要大量的数据和时间,所以我们不会从头训练,相反,我们会加载一个已经训练好了的模型,运行下列代码来加载模型,可能会需要几分钟的时间。
FRmodel = model
这里有一些3个人之间的编码距离的例子:

Applying the Model
Face Verification
我们构建一个数据库,里面包含了允许进入的人员的编码向量,我们使用img_to_encoding(image_path, model)函数来生成编码,它会根据图像来进行模型的前向传播。
我们这里的数据库使用的是一个字典来表示,这个字典将每个人的名字映射到他们面部的128维编码上。
#tf.keras.backend.set_image_data_format('channels_last')
def img_to_encoding(image_path, model):
    img = tf.keras.preprocessing.image.load_img(image_path, target_size=(160, 160))
    img = np.around(np.array(img) / 255.0, decimals=12)
    x_train = np.expand_dims(img, axis=0)
    embedding = model.predict_on_batch(x_train)
    return embedding / np.linalg.norm(embedding, ord=2)
database = {}
database["danielle"] = img_to_encoding("images/danielle.png", FRmodel)
database["younes"] = img_to_encoding("images/younes.jpg", FRmodel)
database["tian"] = img_to_encoding("images/tian.jpg", FRmodel)
database["andrew"] = img_to_encoding("images/andrew.jpg", FRmodel)
database["kian"] = img_to_encoding("images/kian.jpg", FRmodel)
database["dan"] = img_to_encoding("images/dan.jpg", FRmodel)
database["sebastiano"] = img_to_encoding("images/sebastiano.jpg", FRmodel)
database["bertrand"] = img_to_encoding("images/bertrand.jpg", FRmodel)
database["kevin"] = img_to_encoding("images/kevin.jpg", FRmodel)
database["felix"] = img_to_encoding("images/felix.jpg", FRmodel)
database["benoit"] = img_to_encoding("images/benoit.jpg", FRmodel)
database["arnaud"] = img_to_encoding("images/arnaud.jpg", FRmodel)
上传 Danielle和Kian的图片
danielle = tf.keras.preprocessing.image.load_img("images/danielle.png", target_size=(160, 160))
kian = tf.keras.preprocessing.image.load_img("images/kian.jpg", target_size=(160, 160))
看一下shape
np.around(np.array(kian) / 255.0, decimals=12).shape

这里的shape为(160,160,3)
将两个人图片分分别打印出来

verify
我们实现一个verify()函数来验证摄像头的照片(image_path)是否与身份证上的名称匹配,这个部分可由以下步骤构成:
- 根据image_path来计算编码。
- 计算与存储在数据库中的身份图像的编码的差距。
- 如果差距小于0.7,那么就打开门,否则就不开门。
如上所述,我们使用L2(np.linalg.norm)来计算差距。(注意:在本实现中,将L2的误差(而不是L2误差的平方)与阈值0.7进行比较。)
def verify(image_path, identity, database, model):
    """
    Function that verifies if the person on the "image_path" image is "identity".
    验证“image_path”图片编码与"identity"进行验证
    Arguments:
        image_path -- path to an image 图片路径
        字符类型,想要验证的人的名字。
        identity -- string, name of the person you'd like to verify the identity. Has to be an employee who works in the office.
        字典类型,包含了成员的名字信息与对应的编码。
        database -- python dictionary mapping names of allowed people's names (strings) to their encodings (vectors).
        在Keras的模型的实例。
        model -- your Inception model instance in Keras

    Returns:
        摄像头的图片与数据库中的图片的编码的差距。
        dist -- distance between the image_path and the image of "identity" in the database.
        是否该开门。
        door_open -- True, if the door should open. False otherwise.
    """
    ### START CODE HERE  img_to_encoding(image_path, model)
    # Step 1: Compute the encoding for the image. Use img_to_encoding() see example above. (≈ 1 line)
    # 计算图像的编码
    encoding = img_to_encoding(image_path, model)
    # Step 2: Compute distance with identity's image (≈ 1 line)
    # 计算与数据库中保存的编码的差距
    dist = np.linalg.norm(encoding - database[identity])
    # Step 3: Open the door if dist < 0.7, else don't open (≈ 3 lines)
    if dist < 0.7:
        print("It's " + str(identity) + ", welcome in!")
        door_open = True
    else:
        print("It's not " + str(identity) + ", please go away")
        door_open = False
    ### END CODE HERE
    return dist, door_open
函数是将图片的路径、人的名字和数据库还有模型输入进去去验证是否开门,并返回了一个dist差距
Face Recognition
我们将实现一个人脸识别系统,该系统将图像作为输入,并确定它是否是授权人员之一(如果是,是谁),与之前的人脸验证系统不同,我们不再将一个人的名字作为输入的一部分。
Exercise 3 - who_is_it
实现一个who_is_it()他的步骤如下:
- 根据
image_path计算图像的编码。 - 从数据库中找到与目标编码距离最小的编码
- 将
min_dist变量初始化为一个足够大的数字(100)。这有助于跟踪最接近输入编码的编码。 - 遍历数据库中的名字与编码,可以使用(name, db_enc) in database.items()语句
- 计算目标编码与当前数据库编码之间的L2差距。如果差距小于min_dist,那么就更新名字与编码到identity与min_dist中。
def who_is_it(image_path, database, model):
    """
    Implements face recognition for the office by finding who is the person on the image_path image.
    指定的图片实现人脸识别功能
    Arguments:
        image_path -- path to an image 图片的路径
        有名字和编码的字典
        database -- database containing image encodings along with the name of the person on the image
        model -- your Inception model instance in Keras

    Returns:
        在数据库中指定最相近的的编码
        min_dist -- the minimum distance between image_path encoding and the encodings from the database
        min_dist编码对应的名字string类型
        identity -- string, the name prediction for the person on image_path
    """

    ### START CODE HERE

    ## Step 1: Compute the target "encoding" for the image. Use img_to_encoding() see example above. ## (≈ 1 line)
    # 首先先得到要检测人的编码
    encoding =  img_to_encoding(image_path, model)

    ## Step 2: Find the closest encoding ##

    # Initialize "min_dist" to a large value, say 100 (≈1 line)
    min_dist = 100

    # Loop over the database dictionary's names and encodings.
    # 这个db_enc是encoding编码
    for (name, db_enc) in database.items():

        # Compute L2 distance between the target "encoding" and the current db_enc from the database. (≈ 1 line)
        dist = np.linalg.norm(encoding - db_enc)

        # If this distance is less than the min_dist, then set min_dist to dist, and identity to name. (≈ 3 lines)
        if dist<min_dist:
            min_dist = dist
            identity = name
    ### END CODE HERE

    if min_dist > 0.7:
        print("Not in the database.")
    else:
        print ("it's " + str(identity) + ", the distance is " + str(min_dist))

    return min_dist, identity
对于以上函数是人脸识别的功能,先得到被测人的图像信息编码,然后通过循环在数据库中每个图像的编码进行比较,用判断语句得到最终的结果
在上面两段代码中要记住两个函数的功能:img_to_encoding 和np.linalg.norm
img_to_encoding:让图片输出为编码格式
np.linalg.norm:对编码进行比较为数字
记住:
- 人脸验证解决了更容易的1:1匹配问题,人脸识别解决了更难的1∶k匹配问题。
- 三重损失是训练神经网络学习人脸图像编码的一种有效的损失函数。
- 相同的编码可用于验证和识别。测量两个图像编码之间的距离可以确定它们是否是同一个人的图片。


 4469
4469


 被折叠的 条评论
为什么被折叠?
被折叠的 条评论
为什么被折叠?
 到【灌水乐园】发言


