


上篇文章简单介绍了SpringCloud系列OpenFeign的基本用法以及Demo搭建(Spring Cloud实战:OpenFeign远程调用与服务治理-CSDN博客),今天继续讲解下SpringCloud Gateway实战指南!在分享之前继续回顾下本次SpringCloud的专题要讲的内容:
本教程demo源码已放入附件内
适合人群与前置条件
本教程适合已经掌握SpringBoot基础知识的开发者。本次Demo使用的是Spring Cloud Hoxton版本,建议先阅读本系列前文或直接获取完整源码!
内容概览
- 初识Spring Cloud Gateway
- 网关在微服务中的核心作用
- 快速上手Gateway配置
- 深度解析配置参数
- 生产环境最佳实践
技术背景
Spring Cloud Gateway作为新一代微服务网关,基于Spring WebFlux技术栈开发,旨在替代传统的Zuul网关。其核心优势在于采用了响应式编程模型(Reactor模式),底层基于Netty高性能通信框架,相比Zuul使用的传统Servlet IO模型具有更出色的性能表现。
🌈
小贴士:WebFlux和Netty是当前云原生领域的热门技术,值得深入学习。
核心特性
官方文档列出的主要特性:
- 基于Spring生态最新技术栈:Spring Framework 5 + Project Reactor + Spring Boot 2.0
- 支持基于任意请求属性的路由匹配
- 专为路由设计的断言(Predicates)和过滤器(Filters)机制
- 无缝集成断路器模式
- 支持服务发现客户端集成
- 提供请求限流、路径重写等高级功能
- 断言和过滤器编写简单直观
与Zuul相比,两者功能相似但底层实现差异显著,Gateway采用了更现代的响应式架构。
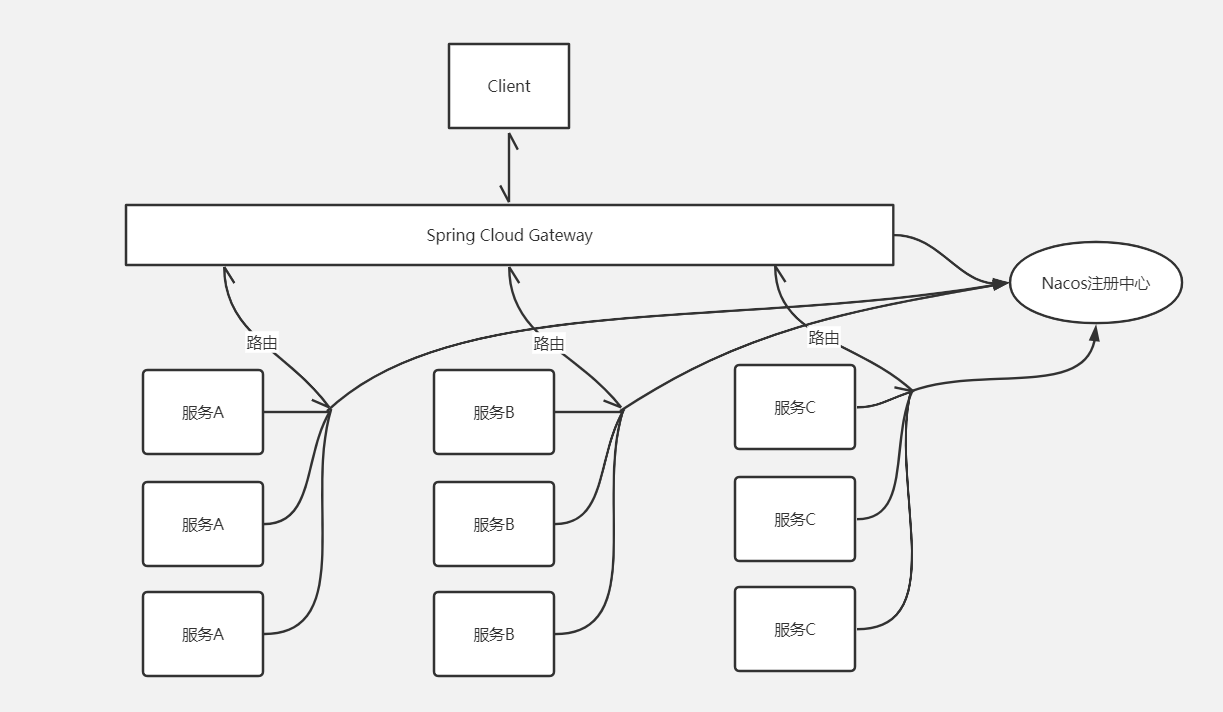
微服务架构中的网关角色
在微服务体系中,网关承担着至关重要的角色:
- 服务路由:智能转发请求到对应微服务
- 流量控制:实现请求限流保护后端服务
- 路径处理:支持URL重写等操作
- 安全防护:统一认证鉴权入口
上图清晰展示了Spring Cloud Gateway在整体架构中的核心位置。
实战配置指南
1. 创建Gateway模块
新建SpringBoot项目,添加关键依赖:
<!-- 服务发现 -->
<dependency>
    <groupId>com.alibaba.cloud</groupId>
    <artifactId>spring-cloud-starter-alibaba-nacos-discovery</artifactId>
</dependency>
<!-- Gateway核心 -->
<dependency>
    <groupId>org.springframework.cloud</groupId>
    <artifactId>spring-cloud-starter-gateway</artifactId>
</dependency>
<!-- WebFlux支持 -->
<dependency>
    <groupId>org.springframework.boot</groupId>
    <artifactId>spring-boot-starter-webflux</artifactId>
</dependency>
2. 基础配置示例
server:
  port: 15010

spring:
  application:
    name: winter-gateway
  cloud:
    nacos:
      discovery:
        server-addr: 118.25.36.41:8848
    gateway:
      discovery:
        locator:
          enabled: false
      routes:
        - id: provider-service
          uri: lb://winter-nacos-provider
          predicates:
            - Path=/provider/**
          filters:
            - StripPrefix=1
3. 启动类配置
@EnableDiscoveryClient
@SpringBootApplication
public class GatewayApplication {
    public static void main(String[] args) {
        SpringApplication.run(GatewayApplication.class, args);
    }
}
4. 测试验证
启动各服务后,访问:
http://127.0.0.1:15010/consumer/nacos/echo/hello
预期返回:Hello Nacos Discovery hello
5. 跨域解决方案
spring:
  cloud:
    gateway:
      globalcors:
        cors-configurations:
          '[/**]':
            allowedOrigins: "*"
            allowedMethods:
              - GET
              - POST
              - PUT
              - DELETE
配置深度解析
以示例配置为例:
- id:自定义路由标识,需保持唯一性
- uri:目标服务地址,
lb://表示负载均衡 - predicates:路由匹配条件,支持多种逻辑组合
- filters:请求处理链,
StripPrefix=1表示去除第一级路径
示例解析:
原始请求 /provider/nacos/echo/hello →
处理后请求 http://provider-service/nacos/echo/hello
进阶学习建议
后续我们将探讨:
- 网关层集成Swagger文档方案
- 统一认证鉴权实现
- 底层原理深度剖析
🌈
通过本教程,您已经掌握了Spring Cloud Gateway的基础用法。在实际项目中,网关的合理配置能显著提升系统稳定性和安全性。


 被折叠的 条评论
为什么被折叠?
被折叠的 条评论
为什么被折叠?
 到【灌水乐园】发言


