


前言
最近了解了一下vue的命令式组件,就想着能不能用vue3编写一个类似Element-plus的确认框,以下是代码案例,弹框样式什么的都从简了
一、搭建项目
这里使用的是vue3+vite搭建的项目。
二、编写代码
1.编写弹框组件
<!--
 * @Author       : Cheng Chao(2205593667@qq.com)
 * @Version      : V1.0
 * @Date         : 2024-03-04 16:06:55
 * @Description  :
-->
<template>
   <div class="task">
        <div class="message-box">
        <div class="header">
            {{ header }}
        </div>
        <div class="content">
            {{ content }}
            <slot></slot>
        </div>
       <div class="flex">
        <button @click="onConfirm" >{{ confirmText }}</button>
        <button @click="onCancle" >{{ cancleText }}</button>
       </div>
    </div>
    </div>
</template>
<script setup>
const props = defineProps({
    header:{
        type:String,
        default:'这是头部信息'
    },
    content:{
        type:String,
        default:'这是内容信息'
    },
    confirmText:{
        type:String,
        default:'',
    },
    cancleText:{
        type:String,
        default:'',
    },
    onConfirm:Function,
    onCancle:Function
})
</script>
<style  scoped>
.task {
    position: fixed;
    z-index: 99;
    width: 100%;
    height: 100%;
    top: 0;
    left: 0;
    background-color: rgba(0,0,0,0.5);
    display: flex;
    align-items: center;
    justify-content: center;

}
.message-box {
        background-color: white;
        padding: 20px;
    }
    .flex {
        display: flex;
        align-items: center;
        justify-content: flex-end;
    }
</style>
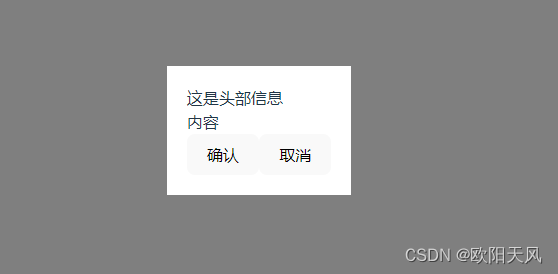
这里的样式极其简陋,大概就是下面的样式,可自行修改
2.编写显示弹框的逻辑
首先,用过Element-plus的都知道,本身的确认框是直接调用ElMessageBox.confirm这个方法的,页面上并没有引入组件,所以我们不能使用常规组件引入的方式使用;那么这里就应该使用命令式组件的方法,
所谓命令式在 Vue 3 中,"命令式组件"指的是直接通过 JavaScript 代码来操作和控制组件的行为,而不是通过模板或者声明式方式。在命令式组件中,开发者可以直接调用组件的方法、修改组件的属性、添加/删除组件等,而不必通过模板中的指令来触发。 回答来自gpt
那么如何编写呢,看下面示例
import ElMessage from "./ElMessage.vue";
import { render, createVNode } from "vue";
- 引入我们之前写好的弹框组件,引入vue的render和createVNode,因为我们需要通过createVNode创建节点和在页面去渲染
ElMessage.confirm = (props) => {
	return new Promise((reslove, reject) => {})
}
- 给组件定义一个方法confirm事件(事件名称自己定义),可能初学者有疑问,ElMessage不是一个页面吗怎么能定义方法;其实对于vue来说,你在真正渲染之前这些都是可以看作是一个js对象,所以添加方法是没有问题的
- confirm方法返回的是一个promise对象,因为有then和catch方法
 const container = document.createElement("div");
    const messageBox = createVNode(ElMessage, {
      ...props,
      onConfirm,
      onCancle,
    });
- 在页面中创建一个节点,用于挂载当前的弹框组件,props就是我们常规组件中defineProps定义的属性
open();
    //

    function open() {
      render(messageBox, container);
      document.body.appendChild(container);
    }

    function onConfirm() {

      console.log("确认");
      reslove();
      unmountVue();
    }
    function onCancle() {

      console.log("取消");
      unmountVue();
      reject();
    }
    function unmountVue() {
      render(null, container);
      container.remove();
    }

  });
- 分别定义一些事件,open函数用于组件的渲染和将创建的元素添加到body里面,onConfirm定义的是当点击确认事件的时候执行的函数,我们将promise resolve(then)出去,onCancle点击取消执行的函数,需要reject(catch),unmountVue函数就是将我们挂载的页面移除
下面是js的完整代码
/**
 * @Author       : Cheng Chao(2205593667@qq.com)
 * @Version      : V1.0
 * @Date         : 2024-03-04 16:13:03
 * @Description  :
 */
import ElMessage from "./ElMessage.vue";
import { render, createVNode } from "vue";

ElMessage.confirm = (props) => {
  return new Promise((reslove, reject) => {
    const container = document.createElement("div");
    const messageBox = createVNode(ElMessage, {
      ...props,
      onConfirm,
      onCancle,
    });
    open();
    //

    function open() {
      render(messageBox, container);
      document.body.appendChild(container);
    }

    function onConfirm() {

      console.log("确认");
      reslove();
      unmountVue();
    }
    function onCancle() {

      console.log("取消");
      unmountVue();
      reject();
    }
    function unmountVue() {
      render(null, container);
      container.remove();
    }

  });
};

export default ElMessage;
3.如何使用
导入上面的js文件
import ElMessage from './components/ElMessage/index.js'
通过一个按钮触发confirm事件
const ElMessageAppear =() => {
  // console.log(ElMessage.confirm())
  ElMessage.confirm(
    {
      confirmText:'确认',
      cancleText:'取消',
      content:'内容'
    }
  ).then(() => {console.log('13213232')}).catch(() => {
    console.log(1312)
  })
}
当点击取消按钮,会打印1312,当点击确认按钮,回打印13213232
总结
以上就是通过命令式组件实现一个类似Element-plus的确认弹框方法,如有建议欢迎留言


 421
421


 被折叠的 条评论
为什么被折叠?
被折叠的 条评论
为什么被折叠?
 到【灌水乐园】发言


