


设计模式学习专栏五--------命令模式
场景
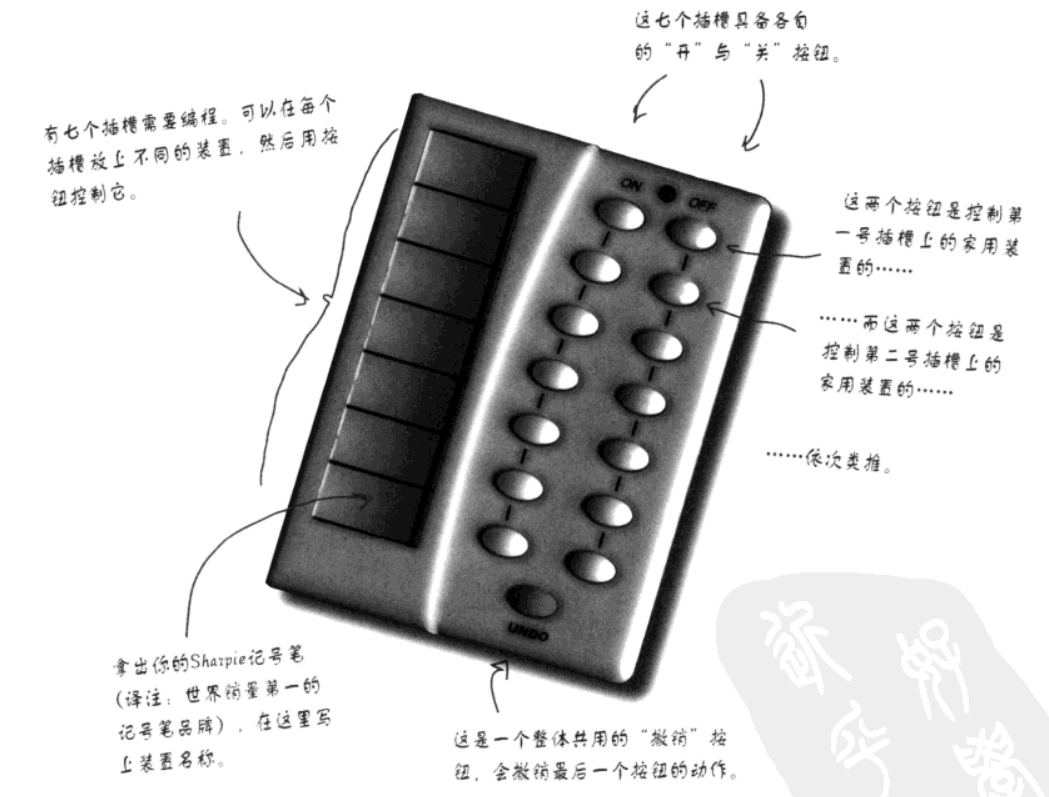
设计一个智能遥控器,遥控器上有7个插槽 , 每个插槽(某设备具体供应商)对应两个按钮 on , off ,以及一个全局的撤销操作undo.
较差的实现方式
判断每个插槽对应的具体厂商是谁, 然后做出对应的动作
if(slot1 == Light){
    light.on()
}else if(slot1 == Hottub){
    hottub.on()
}else if(slot1 == TV){
    tv.on();
}
...-
出现的问题
-
遥控器和具体的设备厂商耦合到了一起 , 遥控器需要 认识 某个插槽当前对应设备的厂商
-
当加入/删除 新的设备厂商时, 当前代码都需要进行改动
-
如何解决
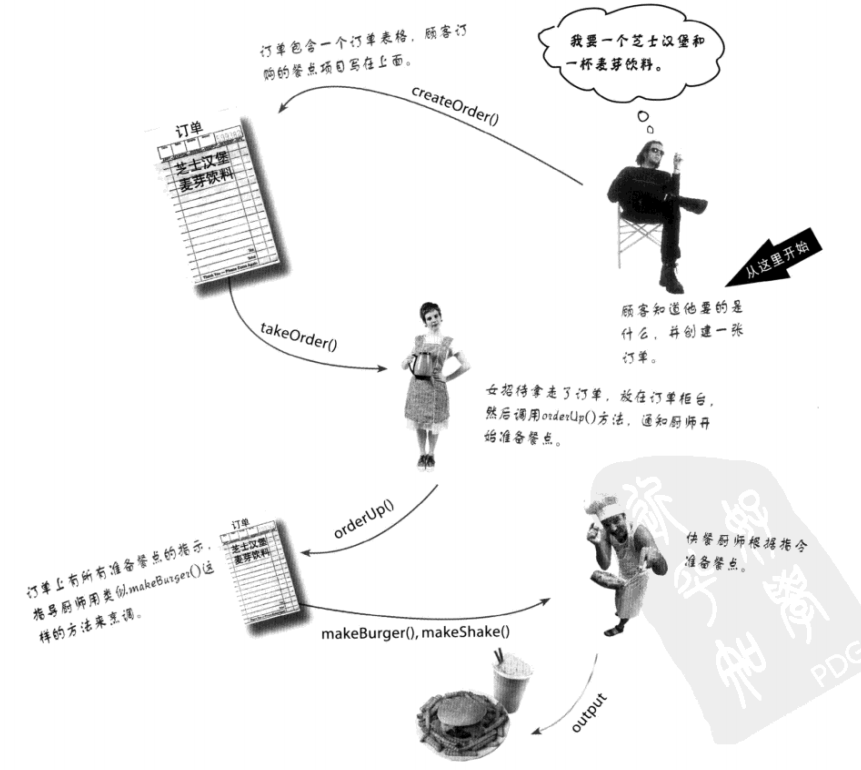
对象村餐厅的例子
-
一张订单封装了 准备餐点的请求
-
女招待的工作是接收订单 , 然后调用订单的OrderUp()方法 , 女招待不需要担心订单的内容是什么, 或者由谁来准备餐点 , 她只需要指导,订单由一个OrderUp()方法可以调用即可.
-
快餐厨师具有准备餐点的知识 . 他只要看到订单就知道如何准备餐点 . 厨师和女招侍之间从不需要直接沟通.
把餐厅想象成设计模式的一种模型 , 这个模型允许通过"封装请求的命令"(订单)将 "发出请求的对象"(女招待, "订单来啦") 和 "接收与执行这些请求的对象"(厨师) 分隔开 .
从餐厅到命令模式
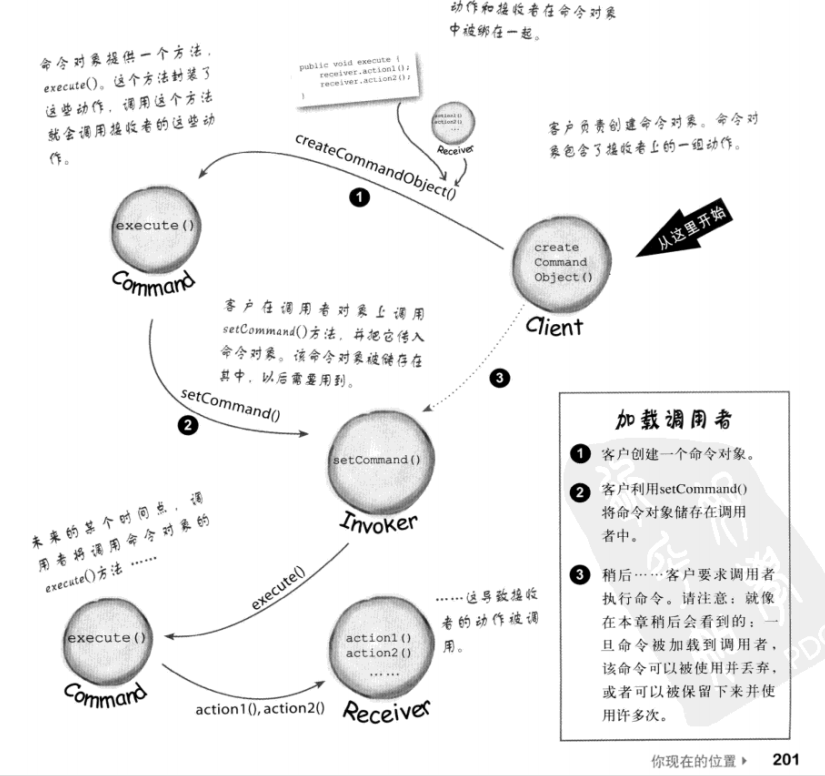
命令模式总览
定义:
将请求封装成对象(订单),将发出请求的对象(服务员/按钮)和执行请求的对象(厨师/具体供应商)解耦 , 也可以支持撤销操作
-
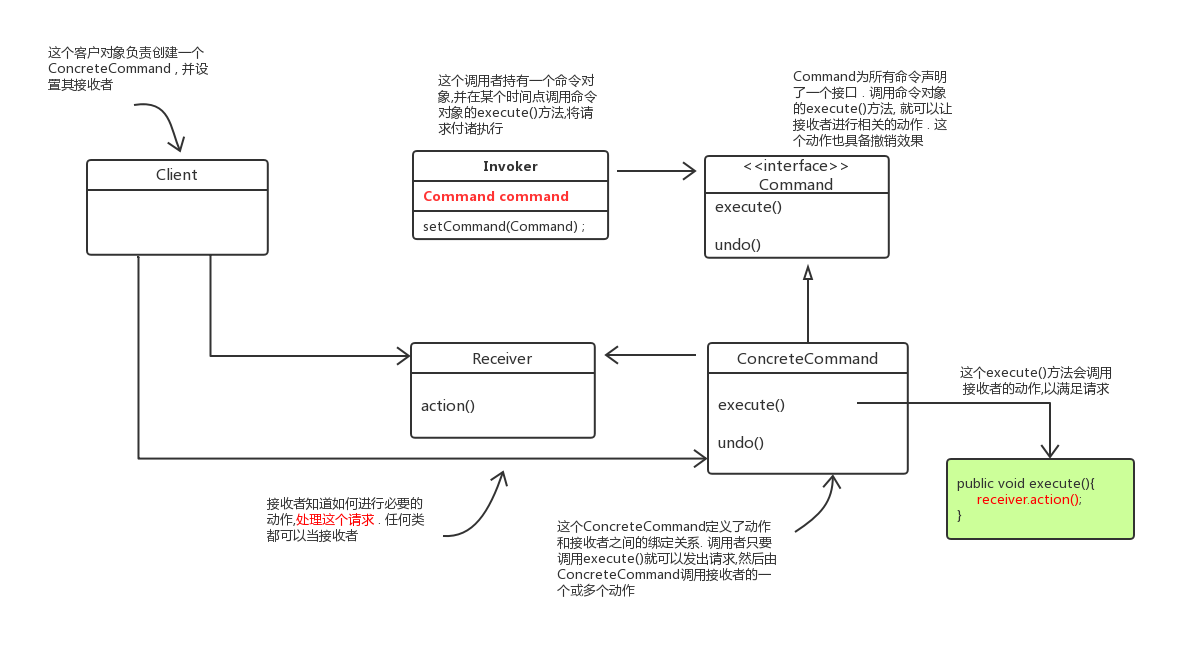
类图
-
模式的理解
-
角色
-
封装请求的命令对象(订单) : 一个命令对象通过在特定接收者上绑定一组动作来封装一个请求
receiver.action1(), 该对象之暴露一个execute()方法, 当此方法被调用时, 接收者就会进行对应的动作 . 从女招待的角度来看, 它不需要知道具体哪个 接收者进行了什么动作,只知道如果调用execute()方法 , 请求的目的就能达到了 -
发出请求的对象(女招待) : ①负责接收命令对象 ②在合适的时候调用命令对象的execute()方法
-
执行请求的对象(厨师) : 真正执行请求的接收者
-
-
细节
-
"撤销操作" 只需在Invocker中定义变量
Command undoCommand保存撤销操作即可 . 如果要联系撤销, 则可以用栈的形式存储执行过的命令public class LightOnCommand implements Command { Light light; public LightOnCommand(Light light) { this.light = light; } public void execute() { light.on(); } public void undo() { light.off(); } }public class RemoteControlWithUndo { Command[] onCommands; Command[] offCommands; Command undoCommand; //记录上一次命令 public RemoteControlWithUndo() { onCommands = new Command[7]; offCommands = new Command[7]; Command noCommand = new NoCommand(); for(int i=0;i<7;i++) { onCommands[i] = noCommand; offCommands[i] = noCommand; } undoCommand = noCommand; } public void setCommand(int slot, Command onCommand, Command offCommand) { onCommands[slot] = onCommand; offCommands[slot] = offCommand; } public void onButtonWasPushed(int slot) { onCommands[slot].execute(); undoCommand = onCommands[slot]; //记录上一次命令 } public void offButtonWasPushed(int slot) { offCommands[slot].execute(); undoCommand = offCommands[slot]; //记录上一次命令 } public void undoButtonWasPushed() { undoCommand.undo(); //执行撤销命令 } } -
"Party模式" : 封装一次请求中的批量操作 (按下一个按钮,同时弄暗灯光 , 打开音响和电视,设置好DVD)
public class MacroCommand implements Command {
    Command[] commands;

    public MacroCommand(Command[] commands) {
        this.commands = commands;
    }

    public void execute() {
        for (int i = 0; i < commands.length; i++) {
            commands[i].execute();
        }
    }
}
-
-
使用场景
-
队列请求 (日志安排 , 线程池 , 工作队列)
-
以线程池为例 , 将线程需要执行的动作封装进Runnable对象中
-
线程池 以 阻塞队列存储Runnable对象
-
当线程空闲时 , 从队列中取出Runnable对象 , 并执行Runnable中重写的Run()方法
-
总结 : 即线程池中的线程不需要知道具体的执行者是谁,干了什么,只需要在空闲时从队列中取出命令对象Runnable并调用run()方法即可
-
-
日志请求
-
当每个命令被执行时, 会被储存在磁盘中
-
在系统死机后, 重新加载存储的命令,并以准备的次序执行
-
-
-
案例代码部分

-
命令对象Command
public interface Command { public void execute(); public void undo(); } -
具体命令对象--开灯
public class LightOnCommand implements Command { Light light; int level; public LightOnCommand(Light light) { this.light = light; } public void execute() { level = light.getLevel(); light.on(); } public void undo() { light.dim(level); } } -
具体命令对象 --关灯
public class LightOffCommand implements Command { Light light; int level; public LightOffCommand(Light light) { this.light = light; } public void execute() { level = light.getLevel(); light.off(); } public void undo() { light.dim(level); } } -
设备厂商 -- Receiver
public class Light { String location; int level; public Light(String location) { this.location = location; } public void on() { level = 100; System.out.println("Light is on"); } public void off() { level = 0; System.out.println("Light is off"); } public void dim(int level) { this.level = level; if (level == 0) { off(); } else { System.out.println("Light is dimmed to " + level + "%"); } } public int getLevel() { return level; } } -
调用者Invoker --远程遥控器
public class RemoteControlWithUndo { Command[] onCommands; Command[] offCommands; Command undoCommand; public RemoteControlWithUndo() { onCommands = new Command[7]; offCommands = new Command[7]; Command noCommand = new NoCommand(); for(int i=0;i<7;i++) { onCommands[i] = noCommand; offCommands[i] = noCommand; } undoCommand = noCommand; } public void setCommand(int slot, Command onCommand, Command offCommand) { onCommands[slot] = onCommand; offCommands[slot] = offCommand; } public void onButtonWasPushed(int slot) { onCommands[slot].execute(); undoCommand = onCommands[slot]; } public void offButtonWasPushed(int slot) { offCommands[slot].execute(); undoCommand = offCommands[slot]; } public void undoButtonWasPushed() { undoCommand.undo(); } } -
主程序
public class RemoteLoader { public static void main(String[] args) { RemoteControlWithUndo remoteControl = new RemoteControlWithUndo(); Light livingRoomLight = new Light("Living Room"); LightOnCommand livingRoomLightOn = new LightOnCommand(livingRoomLight); LightOffCommand livingRoomLightOff = new LightOffCommand(livingRoomLight); remoteControl.setCommand(0, livingRoomLightOn, livingRoomLightOff); remoteControl.onButtonWasPushed(0); remoteControl.offButtonWasPushed(0); System.out.println(remoteControl); remoteControl.undoButtonWasPushed(); //撤销操作 System.out.println(remoteControl); //此时应该是开灯状态 } }
-
输出结果
Light is on Light is off ------ Remote Control ------- [slot 0] headfirst.designpatterns.command.undo.LightOnCommand headfirst.designpatterns.command.undo.LightOffCommand [slot 1] headfirst.designpatterns.command.undo.NoCommand headfirst.designpatterns.command.undo.NoCommand [slot 2] headfirst.designpatterns.command.undo.NoCommand headfirst.designpatterns.command.undo.NoCommand [slot 3] headfirst.designpatterns.command.undo.NoCommand headfirst.designpatterns.command.undo.NoCommand [slot 4] headfirst.designpatterns.command.undo.NoCommand headfirst.designpatterns.command.undo.NoCommand [slot 5] headfirst.designpatterns.command.undo.NoCommand headfirst.designpatterns.command.undo.NoCommand [slot 6] headfirst.designpatterns.command.undo.NoCommand headfirst.designpatterns.command.undo.NoCommand [undo] headfirst.designpatterns.command.undo.LightOffCommand Light is dimmed to 100% //撤销操作 ==> 开灯状态 ------ Remote Control ------- [slot 0] headfirst.designpatterns.command.undo.LightOnCommand headfirst.designpatterns.command.undo.LightOffCommand [slot 1] headfirst.designpatterns.command.undo.NoCommand headfirst.designpatterns.command.undo.NoCommand [slot 2] headfirst.designpatterns.command.undo.NoCommand headfirst.designpatterns.command.undo.NoCommand [slot 3] headfirst.designpatterns.command.undo.NoCommand headfirst.designpatterns.command.undo.NoCommand [slot 4] headfirst.designpatterns.command.undo.NoCommand headfirst.designpatterns.command.undo.NoCommand [slot 5] headfirst.designpatterns.command.undo.NoCommand headfirst.designpatterns.command.undo.NoCommand [slot 6] headfirst.designpatterns.command.undo.NoCommand headfirst.designpatterns.command.undo.NoCommand [undo] headfirst.designpatterns.command.undo.LightOffCommand
参考
书籍: HeadFirst设计模式
代码参考地址: 我就是那个地址


 114
114


 被折叠的 条评论
为什么被折叠?
被折叠的 条评论
为什么被折叠?
 到【灌水乐园】发言


