


组件式开发,融入android
**
引言
**
在app中经常能看到底部弹出式菜单的应用,比如手机qq和微信中头像的选择。这一组件非常常用。所以,将这一组件进行封装后,就可以像使用android 原生view 一样方便地使用这一功能,极大地提高了程序的可扩展性和可维护性。
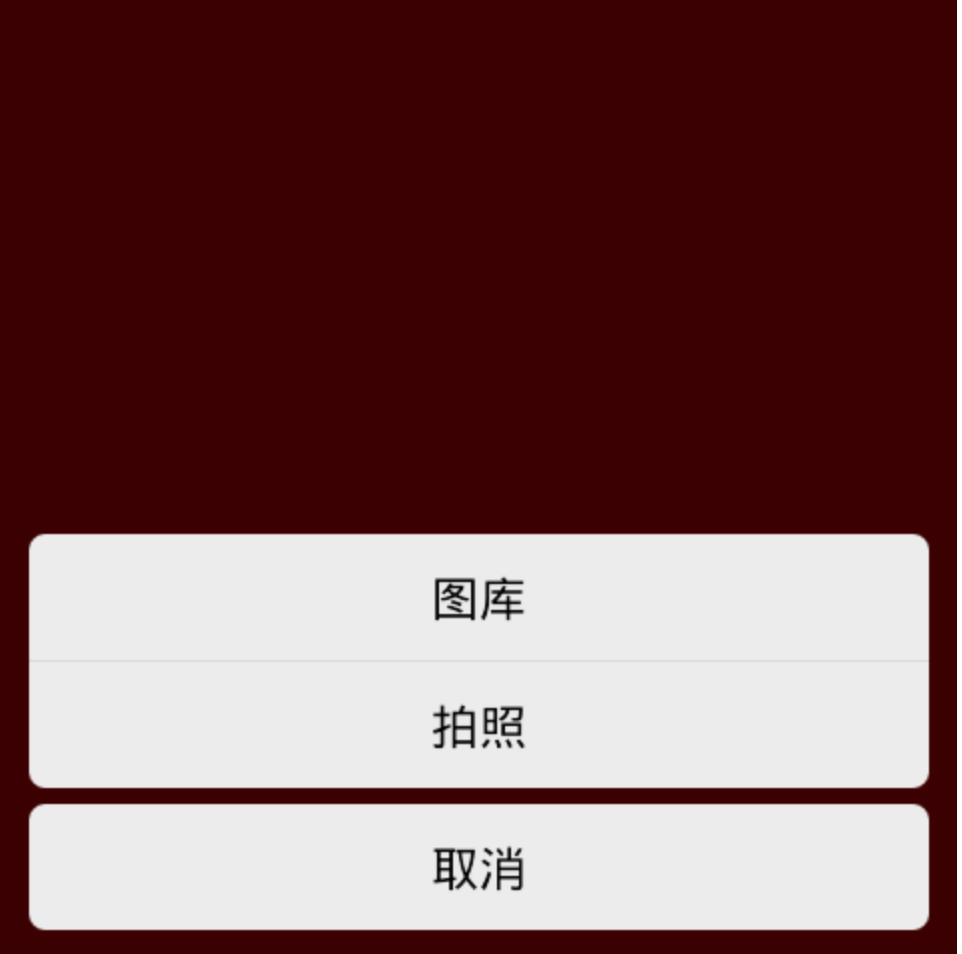
(一)效果实现
第一步,我们需要将底部弹出式菜单的效果实现出来。
在android中,菜单一般可以使用dialog和popupwindow两种方式实现。这里使用popupwindow来实现我们的效果。
popupwindow 实现弹出框代码:
View view = mInflater.inflate(R.layout.bottom_pop_window, null);
mPopupWindow = new PopupWindow(view, ScreenUtil.getScreenWidth(mContext), LinearLayout.LayoutParams.WRAP_CONTENT);
        //监听PopupWindow的dismiss,当dismiss时屏幕恢复亮度
        mPopupWindow.setOnDismissListener(new PopupWindow.OnDismissListener() {
            @Override
            public void onDismiss() {

                params.alpha = 1.0f;
                window.setAttributes(params);
            }
        });
        mPopupWindow.setWidth(LayoutParams.MATCH_PARENT);
       mPopupWindow.setHeight(LayoutParams.WRAP_CONTENT);
        mPopupWindow.setBackgroundDrawable(new BitmapDrawable());
        mPopupWindow.setTouchable(true);
        mPopupWindow.setFocusable(true);
        mPopupWindow.setOutsideTouchable(true);
        // 动画效果 从底部弹起
        mPopupWindow.setAnimationStyle(R.style.popWindow_animation);
其中bottom_pop_window.xml 为自定义的布局。
bottom_pop_window.xml
<LinearLayout xmlns:android="http://schemas.android.com/apk/res/android"
    android:layout_width="match_parent"
    android:layout_height="wrap_content"
    android:layout_alignParentBottom="true"
    android:orientation="vertical"
    android:padding="@dimen/mg_20">

    <TextView
        android:id="@+id/tv_take_photo"
        android:layout_width="match_parent"
        android:layout_height="wrap_content"
        android:background="@color/white"
        android:gravity="center"
        android:padding="@dimen/mg_15"
        android:textColor="@color/black_65"
        android:textSize="@dimen/ts_2" />

    <View style="@style/zg_single_line" />

    <TextView
        android:id="@+id/tv_choose_photo"
        android:layout_width="match_parent"
        android:layout_height="wrap_content"
        android:background="@color/white"
        android:gravity="center"
        android:padding="@dimen/mg_15"
        android:textColor="@color/black_65"
        android:textSize="@dimen/ts_2" />

    <TextView
        android:id="@+id/tv_cancel"
        android:layout_width="match_parent"
        android:layout_height="wrap_content"
        android:layout_marginTop="@dimen/mg_15"
        android:background="@color/white"
        android:gravity="center"
        android:padding="@dimen/mg_15"
        android:text="@string/ddc_dialog_cancel"
        android:textColor="@color/black_65"
        android:textSize="@dimen/ts_2" />
</LinearLayout>
一般的底部菜单弹出时,屏幕会变暗,当菜单消失时,屏幕亮度恢复。dialog是自带这种效果,但是popupwindow 没有,所以我们需要自己来实现这种效果。具体实现步骤是:
- 获得windowManager对象:
WindowManager windowManager = context.getWindowManager();
2.获得Window对象和window的 LayoutParams对象: Window window = context.getWindow();
LayoutParams params =
context.getWindow().getAttributes();- 改变 params.alpha = 1.0f来调节屏幕亮度。
( 二 ) 封装组件
仅仅实现了效果是不够的,试想每次用到这个控件的时候,都需要写一大堆的代码,其中很多都是重复的,毫无必要。我们完全可以抽离出其中相同的部分代码,对这段代码进行封装,将不同部分的代码暴露出来,供外部自行定义。
**
分析
**
分析一下,每次使用这个组件的时候,不同的地方无非就是 按钮中的文字以及点击按钮后的相应事件。而相同的地方就是对话框的创建和消失的处理。所以,我们可以将不同的部分剥离出来,作为接口供外部自行回调。
**
封装ing
**
首先创建一个BottomPopView类,将popupwindow的创建和一系列初始化操作封装到内部进行,提供一些回调方法,供外部自定义按钮的文字和事件即可。
BottomPopView.class
public abstract class BottomPopView {
    private Context mContext;
    private View anchor;
    private LayoutInflater mInflater;
    private TextView mTvTop;
    private TextView mTvBottom;
    private TextView mTvCancel;
    private PopupWindow mPopupWindow;
    LayoutParams params;
    WindowManager windowManager;
    Window window;

    /**
     * @param context
     * @param anchor  依附在哪个View下面
     */
    public BottomPopView(Activity context, View anchor) {
        this.mContext = context;
        this.mInflater = LayoutInflater.from(context);
        this.anchor = anchor;
        windowManager = context.getWindowManager();
        window = context.getWindow();
        params = context.getWindow().getAttributes();
        init();
    }

    public void init() {
        View view = mInflater.inflate(R.layout.bottom_pop_window, null);
        params.dimAmount = 0.5f;
        window.addFlags(LayoutParams.FLAG_DIM_BEHIND);
        mTvBottom = (TextView) view.findViewById(R.id.tv_choose_photo);
        mTvTop = (TextView) view.findViewById(R.id.tv_take_photo);
        mTvCancel = (TextView) view.findViewById(R.id.tv_cancel);
        mTvTop.setOnClickListener(new View.OnClickListener() {

            @Override
            public void onClick(View arg0) {
                // TODO Auto-generated method stub
                onTopButtonClick();
            }
        });
        mTvBottom.setOnClickListener(new View.OnClickListener() {

            @Override
            public void onClick(View arg0) {
                // TODO Auto-generated method stub
                onBottomButtonClick();
            }
        });
        mTvCancel.setOnClickListener(new View.OnClickListener() {
            @Override
            public void onClick(View v) {
                dismiss();
            }
        });

        mPopupWindow = new PopupWindow(view, ScreenUtil.getScreenWidth(mContext), LinearLayout.LayoutParams.WRAP_CONTENT);
        //监听PopupWindow的dismiss,当dismiss时屏幕恢复亮度
        mPopupWindow.setOnDismissListener(new PopupWindow.OnDismissListener() {
            @Override
            public void onDismiss() {
                params.alpha = 1.0f;
                window.setAttributes(params);
            }
        });
        mPopupWindow.setWidth(LayoutParams.MATCH_PARENT);
        mPopupWindow.setHeight(LayoutParams.WRAP_CONTENT);
        mPopupWindow.setBackgroundDrawable(new BitmapDrawable());
        mPopupWindow.setTouchable(true);
        mPopupWindow.setFocusable(true);
        mPopupWindow.setOutsideTouchable(true);
        // 动画效果 从底部弹起
        mPopupWindow.setAnimationStyle(R.style.popWindow_animation);
    }

    /**
     * 显示底部对话框
     */
    public void show() {
        mPopupWindow.showAtLocation(anchor, Gravity.BOTTOM, 0, 0);
        params.alpha = 0.5f;
        window.setAttributes(params);
    }

    /**
     * 第一个按钮被点击的回调
     */
    public abstract void onTopButtonClick();

    /**
     * 第二个按钮被点击的回调
     */
    public abstract void onBottomButtonClick();

    public void setTopText(String text) {
        mTvTop.setText(text);
    }

    public void setBottomText(String text) {
        mTvBottom.setText(text);
    }
    public void dismiss(){
        if(mPopupWindow!=null && mPopupWindow.isShowing()){
            mPopupWindow.dismiss();
        }
    }
}
我们提供 setTopText和setBottomText方法来让外部设置按钮的文字;onTopButtonClick和onBottomButtonClick回调方法让外部实现按钮的点击事件。
像系统原生View一样使用
接下来,使用我们的BottomPopView相当简单,就如同使用系统的Dialog一样轻松。
  //底部弹出的布局 照相和选择图片
        bottomPopView = new BottomPopView(this, root) {
            @Override
            public void onTopButtonClick() {
                //拍照
                takePhoto();
            }

            @Override
            public void onBottomButtonClick() {
                //选择本地图片
                choosePhoto();
            }
        };
        bottomPopView.setTopText("拍照");
        bottomPopView.setBottomText("选择图片");
        // 显示底部菜单
        bottomPopView.show();
好了 ,以后再想要使用底部弹出菜单,只需要以上几行代码就可以轻松搞定了。


 3635
3635

 被折叠的 条评论
为什么被折叠?
被折叠的 条评论
为什么被折叠?
 到【灌水乐园】发言


