


目录
学习目标:
-
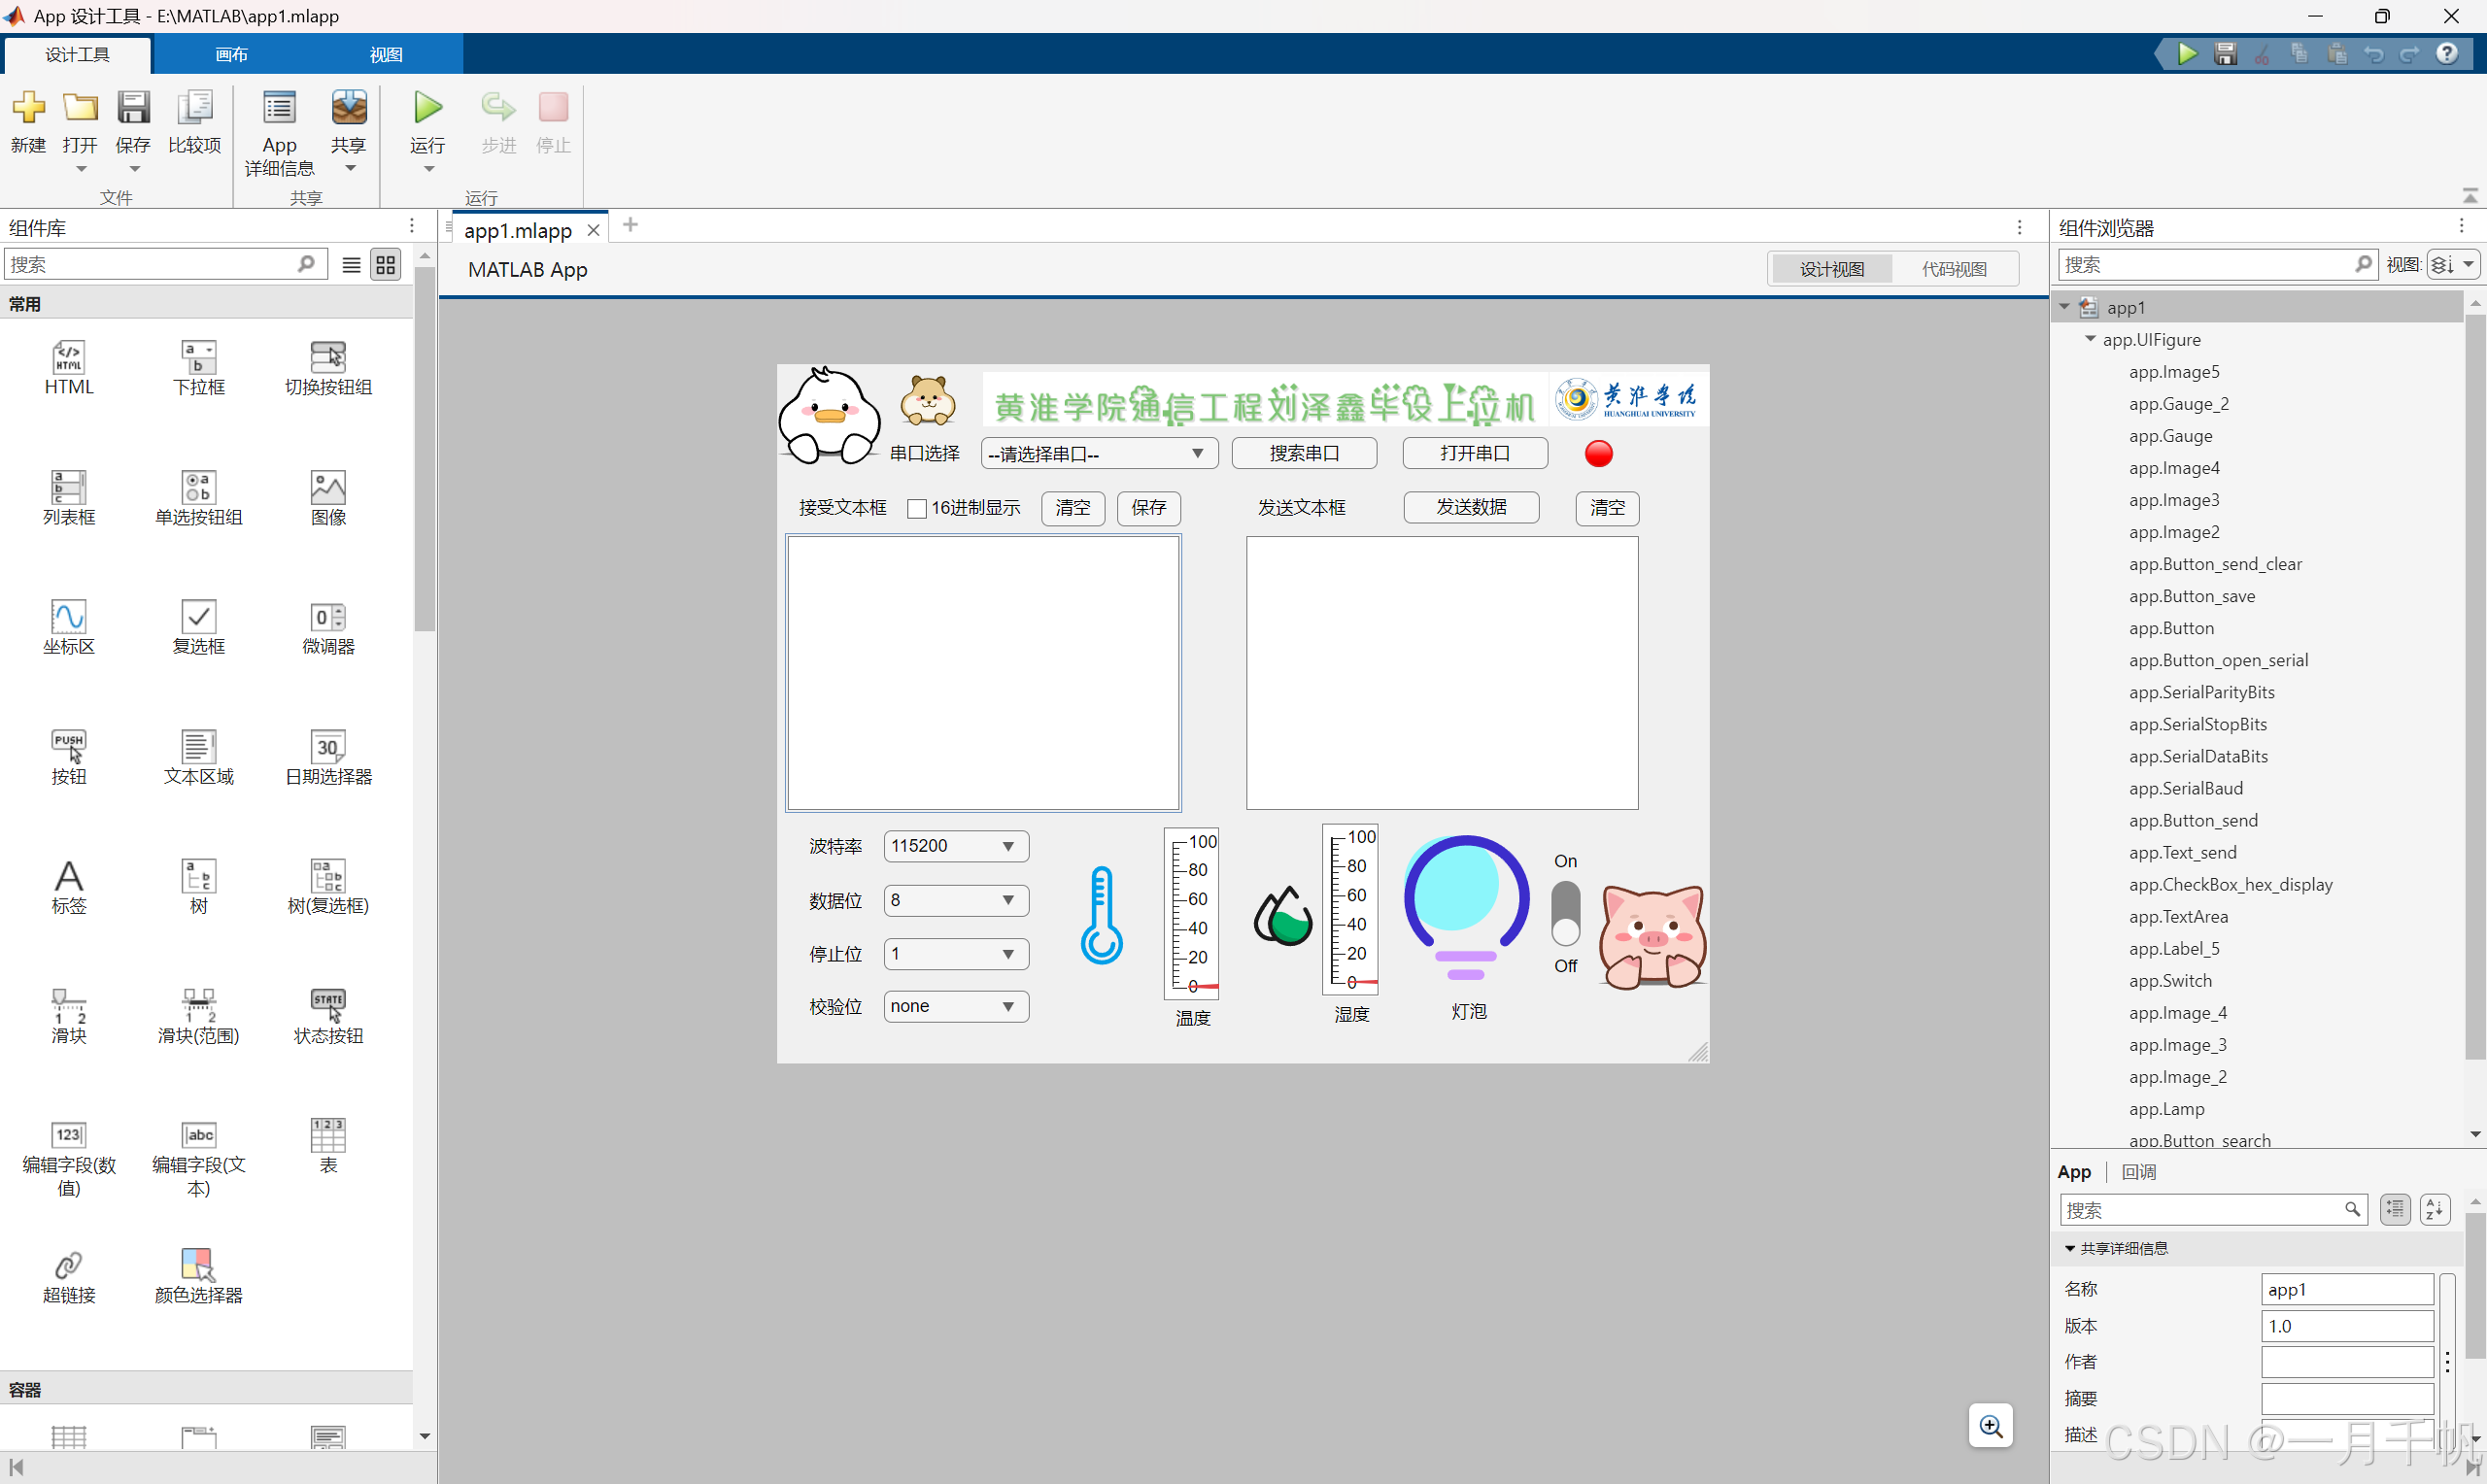
掌握MATLAB App Designer界面设计基础
-
理解串口通信协议(UART)基本原理
-
实现MATLAB与硬件设备的双向数据通信
-
开发具备实时数据显示、控制指令发送的上位机
-
掌握数据解析、可视化与异常处理技巧
学习内容:
阶段 1:环境搭建与基础概念
-
学习内容:
-
MATLAB App Designer界面布局(按钮、坐标区、下拉菜单、编辑框)
-
串口通信基础:波特率、数据位、停止位、校验位
-
serialport对象的使用与参数配置
-
-
关键代码:
matlab

% 创建串口对象
s = serialport("COM3", 115200);
configureTerminator(s, "CR/LF"); % 设置终止符
阶段 2:界面设计与回调函数
-
学习内容:
-
使用App Designer拖拽式设计工具(自行设计)
-
按钮回调函数实现串口开关控制
-
实时数据显示(文本框、波形图)
-
串口通信函数:
function serialconfig(app)
    % 获取所有可用串口列表,并将其设置为 app 中串口选择下拉框的选项
    app.SerialPortNumber.Items = serialportlist("all");

    % 检查打开串口按钮的状态
    % app.Button_open_serial.Value 为 1 表示按钮处于按下状态(即要打开串口),为 0 表示未按下(即要关闭串口)
    if any(app.Button_open_serial.Value)
        % 如果之前已经创建了串口对象,先删除该对象
        delete(app.SerialObject);

        % 将指示灯颜色设置为绿色,表示串口处于打开状态
        app.Lamp.Color = 'g';

        % 修改打开串口按钮的文本为“关闭串口”
        app.Button_open_serial.Text = '关闭串口';

        try
            % 尝试创建一个新的串口对象
            % app.SerialPortNumber.Value 为用户选择的串口号
            % str2double(app.SerialBaud.Value) 将用户输入的波特率字符串转换为数值
            % "DataBits" 指定数据位,同样将用户输入的数据位字符串转换为数值
            % "StopBits" 指定停止位,将用户输入的停止位字符串转换为数值
            % "Parity" 指定校验位,使用用户选择的校验位字符串
            app.SerialObject = serialport(app.SerialPortNumber.Value, ...
                str2double(app.SerialBaud.Value), ...
                "DataBits", str2double(app.SerialDataBits.Value), ...
                "StopBits", str2double(app.SerialStopBits.Value), ...
                "Parity", app.SerialParityBits.Value);

            % 配置串口对象的终止符为“CR/LF”(回车换行)
            % 当接收到回车换行符时,表示一次数据接收完成
            configureTerminator(app.SerialObject, "CR/LF");

            % 配置串口对象的回调函数
            % 当接收到终止符时,调用 app 对象的 serialcallback 方法进行数据处理
            configureCallback(app.SerialObject, "terminator", @app.serialcallback);
        catch
            % 如果创建串口对象过程中出现异常,弹出消息框提示串口打开失败
            msgbox('串口打开失败');

            % 将指示灯颜色设置为红色,表示串口打开失败
            app.Lamp.Color = 'r';

            % 修改打开串口按钮的文本为“打开串口”
            app.Button_open_serial.Text = '打开串口';

            % 删除之前创建的串口对象,确保对象被正确清理
            delete(app.SerialObject);
        end
    else
        % 如果打开串口按钮未按下,即要关闭串口
        % 删除之前创建的串口对象
        delete(app.SerialObject);

        % 将指示灯颜色设置为红色,表示串口处于关闭状态
        app.Lamp.Color = 'r';

        % 修改打开串口按钮的文本为“打开串口”
        app.Button_open_serial.Text = '打开串口';
    end
end
这段代码的主要功能是实现串口的打开和关闭操作,同时更新界面上的指示灯和按钮文本状态。在打开串口时,会根据用户选择的串口号、波特率、数据位、停止位和校验位来创建串口对象,并配置终止符和回调函数。如果打开过程中出现异常,会弹出提示框并恢复界面状态。关闭串口时,会删除串口对象并更新界面。
串口回调函数:
function serialcallback(app, src, ~)
    % 根据复选框的状态决定数据显示方式
    % app.CheckBox_hex_display.Value 为 0 表示以普通文本形式显示数据
    % app.CheckBox_hex_display.Value 为 1 表示以十六进制形式显示数据
    if app.CheckBox_hex_display.Value == 0
        try
            % 从串口对象 src 中读取一行数据
            data = readline(src);

            % 去除读取数据首尾的空白字符(如回车符、换行符等)
            cleanData = strtrim(data);

            % app.flag 为 1 表示这是首次接收到的数据,需要覆盖文本区域原有的内容
            if app.flag == 1
                app.TextArea.Value = cleanData;
                % 将 app.flag 置为 0,后续接收的数据将追加到文本区域
                app.flag = 0;
            else
                % 检查去除空白后的读取数据是否为空
                if ~isempty(cleanData)
                    % 将读取的数据追加到 app.TextArea.Value 中
                    app.TextArea.Value = [app.TextArea.Value; cleanData];
                end
            end

            % 将文本区域滚动到最新数据的位置,方便查看最新接收的数据
            app.TextArea.scroll('bottom');
        catch ME
            % 处理可能出现的异常,将异常信息打印到命令窗口
            fprintf('Error in serialcallback: %s\n', ME.message);
        end
    elseif app.CheckBox_hex_display.Value == 1
        % 从串口对象 src 中读取一行数据
        data = readline(src);

        % 去除读取数据首尾的空白字符(如回车符、换行符等)
        cleanData = strtrim(data);

        % app.flag 为 1 表示这是首次接收到的数据,需要覆盖文本区域原有的内容
        if app.flag == 1
            app.TextArea.Value = cleanData;
            % 将 app.flag 置为 0,后续接收的数据将追加到文本区域
            app.flag = 0;
        else
            % 检查去除空白后的读取数据是否为空
            if ~isempty(cleanData)
                % 使用换行符('\r' 和 '\n')分割多行数据
                % 'CollapseDelimiters', true 表示合并连续的分隔符
                newLines = strsplit(cleanData, {'\r', '\n'}, 'CollapseDelimiters', true);
                % 移除分割后为空的单元格
                newLines = newLines(~cellfun(@isempty, newLines));

                % 初始化一个与 newLines 大小相同的单元格数组,用于存储处理后的数据
                processedLines = cell(size(newLines));
                % 遍历分割后的每一行数据
                for i = 1:length(newLines)
                    % 获取当前行的原始字符串
                    rawStr = newLines{i};

                    % 将原始字符串转换为十六进制表示,每个字节用两位十六进制数表示
                    hexArray = dec2hex(uint8(rawStr), 2);
                    % 将十六进制数组转换为以空格分隔的字符串
                    hexStr = strjoin(cellstr(hexArray), ' ');

                    % 检查原始字符串中的字符是否都为可打印的 ASCII 字符(ASCII 码范围 32 到 126)
                    if all(uint8(rawStr) >= 32 & uint8(rawStr) <= 126)
                        % 如果是可打印的 ASCII 字符,构建包含原始字符串和十六进制表示的显示字符串
                        processedLines{i} = sprintf('%s [HEX: %s]', rawStr, hexStr);
                    else
                        % 如果包含非可打印的 ASCII 字符,构建仅包含十六进制表示的显示字符串
                        processedLines{i} = sprintf('[BINARY] HEX: %s', hexStr);
                    end
                end

                % 将处理后的数据追加到 app.TextArea.Value 中
                app.TextArea.Value = [app.TextArea.Value; processedLines'];
            end

            % 设置文本区域最多保留的行数
            maxLines = 200;
            % 如果文本区域的行数超过最大行数,只保留最后 maxLines 行数据
            if numel(app.TextArea.Value) > maxLines
                app.TextArea.Value = app.TextArea.Value(end - maxLines + 1:end);
            end

            % 将文本区域滚动到最新数据的位置,方便查看最新接收的数据
            app.TextArea.scroll('bottom');
        end

        % 强制刷新界面,确保界面及时更新显示最新的数据
        drawnow limitrate;
    end
end
这个函数是串口数据接收的回调函数,当串口接收到以回车换行符结尾的数据时会触发该函数。函数根据复选框的状态,决定将接收到的数据以普通文本形式还是十六进制形式显示在文本区域中。同时,还处理了数据追加、滚动显示和行数限制等功能。
完整项目示例(本工程源码):
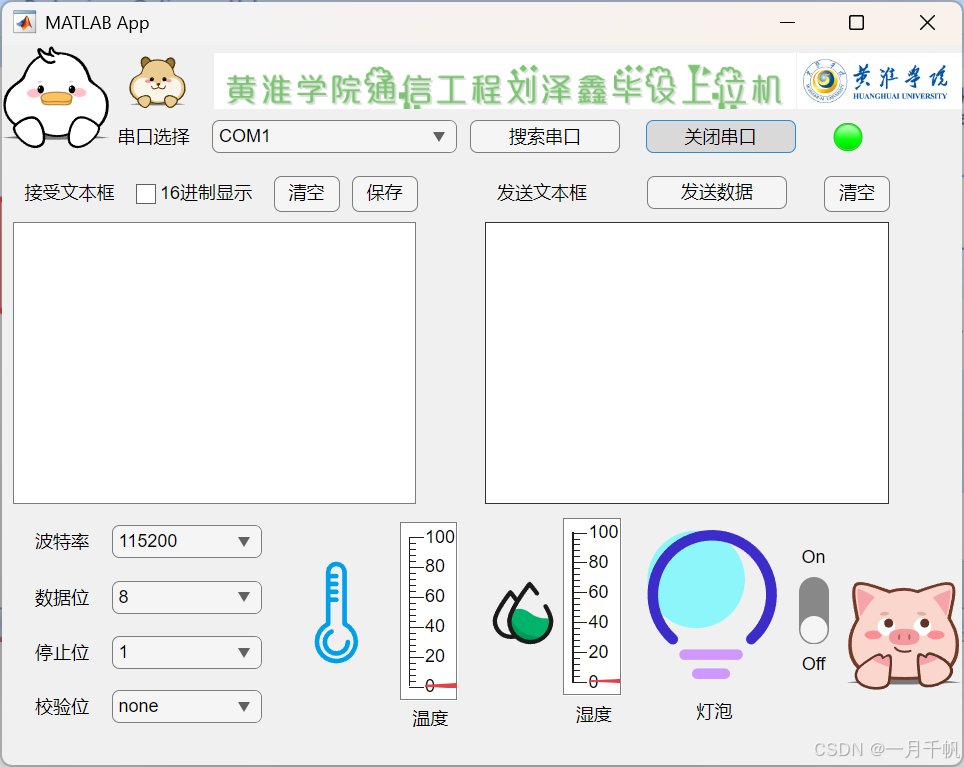
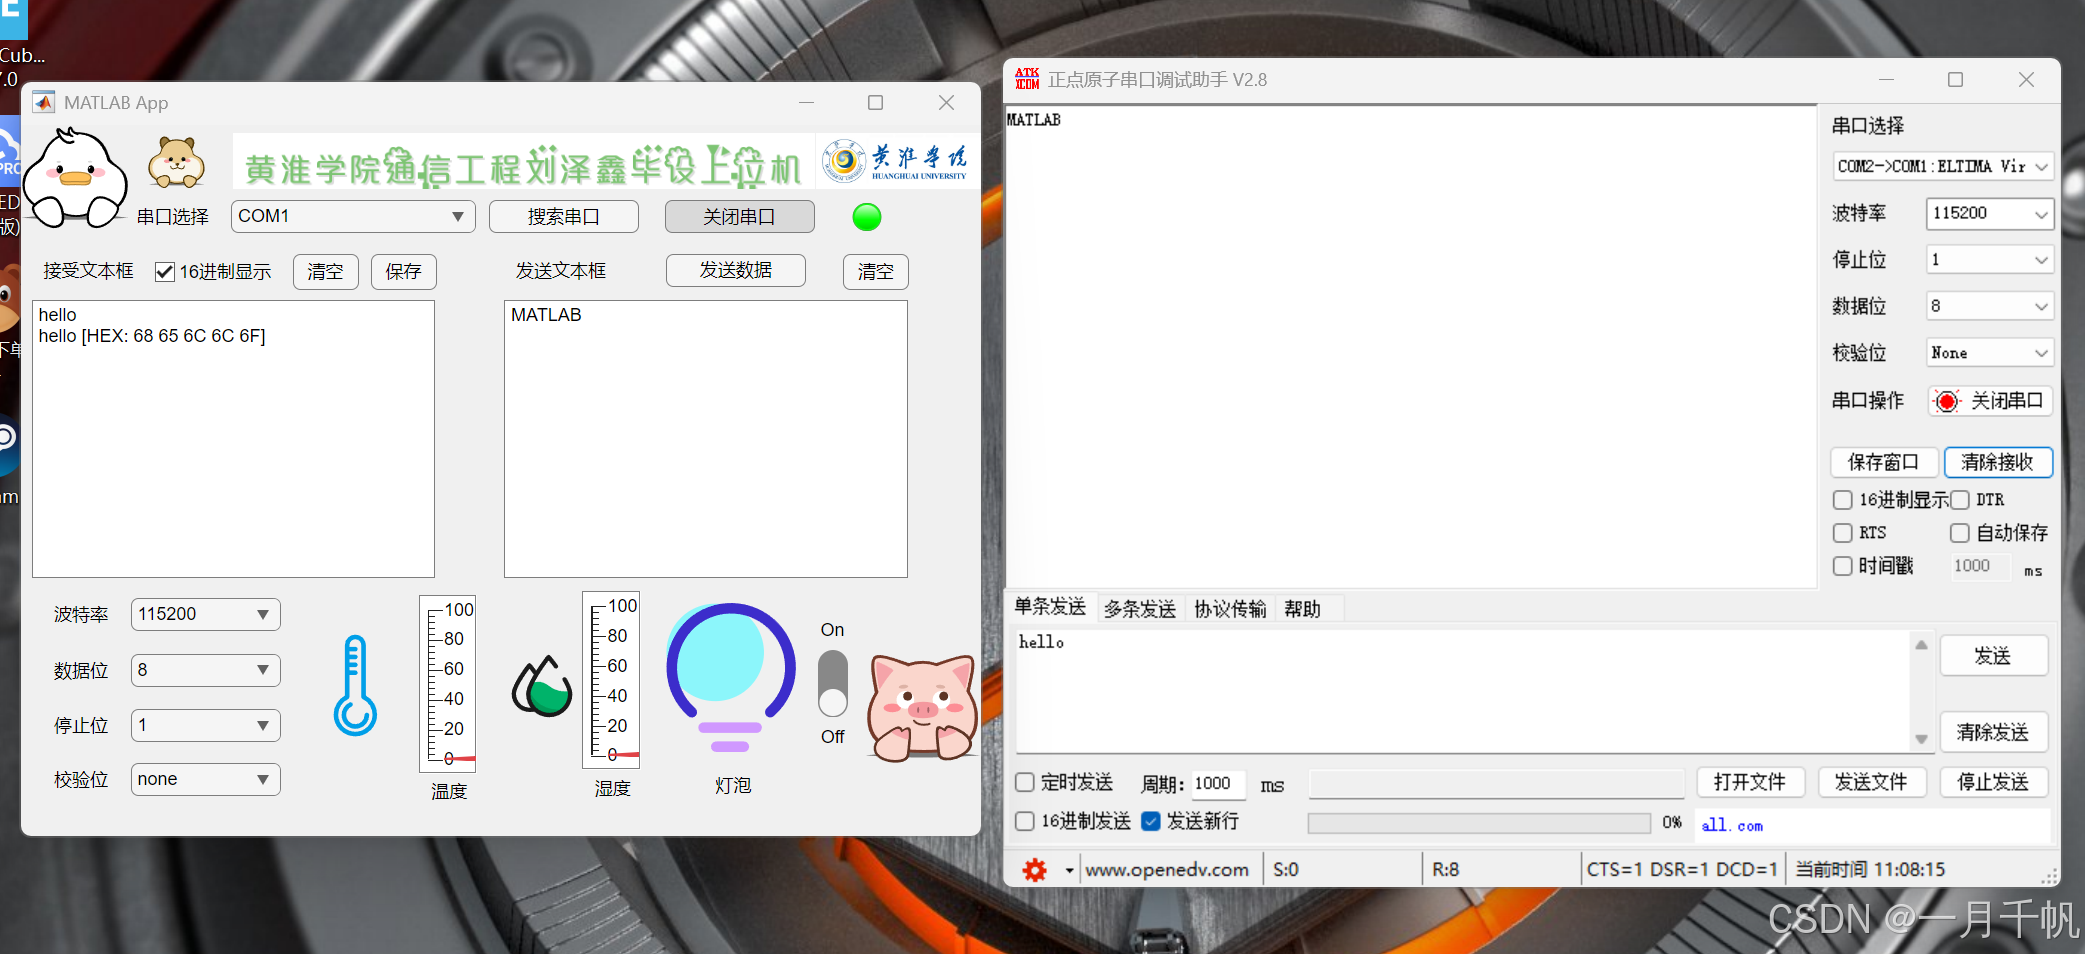
该应用程序提供了一个用户界面,允许用户选择串口、配置串口参数(如波特率、数据位、停止位、校验位等),打开和关闭串口,发送和接收数据,支持普通文本和十六进制显示,还可以保存接收到的数据,并且有一些状态指示灯和简单的图形展示。
matlab
% 定义一个名为 app1 的类,继承自 matlab.apps.AppBase
classdef app1 < matlab.apps.AppBase
% Properties that correspond to app components
% 定义公共属性,对应应用程序中的各个组件
properties (Access = public)
UIFigure matlab.ui.Figure % 应用程序的主窗口
Image5 matlab.ui.control.Image % 图片组件 5
Gauge_2 matlab.ui.control.LinearGauge % 线性仪表盘 2
Label_13 matlab.ui.control.Label % 标签 13
Gauge matlab.ui.control.LinearGauge % 线性仪表盘
Label_12 matlab.ui.control.Label % 标签 12
Image4 matlab.ui.control.Image % 图片组件 4
Image3 matlab.ui.control.Image % 图片组件 3
Image2 matlab.ui.control.Image % 图片组件 2
Button_send_clear matlab.ui.control.Button % 发送文本框清空按钮
Button_save matlab.ui.control.Button % 保存数据按钮
Button matlab.ui.control.Button % 清空接收文本框按钮
Button_open_serial matlab.ui.control.StateButton % 打开/关闭串口按钮
SerialParityBits matlab.ui.control.DropDown % 校验位选择下拉框
Label_11 matlab.ui.control.Label % 标签 11
SerialStopBits matlab.ui.control.DropDown % 停止位选择下拉框
Label_10 matlab.ui.control.Label % 标签 10
SerialDataBits matlab.ui.control.DropDown % 数据位选择下拉框
Label_9 matlab.ui.control.Label % 标签 9
SerialBaud matlab.ui.control.DropDown % 波特率选择下拉框
Label_8 matlab.ui.control.Label % 标签 8
Button_send matlab.ui.control.Button % 发送数据按钮
Text_send matlab.ui.control.TextArea % 发送文本框
Label_7 matlab.ui.control.Label % 标签 7
CheckBox_hex_display matlab.ui.control.CheckBox % 十六进制显示复选框
TextArea matlab.ui.control.TextArea % 接收文本框
Label_6 matlab.ui.control.Label % 标签 6
Label_5 matlab.ui.control.Label % 标签 5
Switch matlab.ui.control.Switch % 开关组件
Image_4 matlab.ui.control.Image % 图片组件 4
Image_3 matlab.ui.control.Image % 图片组件 3
Image_2 matlab.ui.control.Image % 图片组件 2
Lamp matlab.ui.control.Lamp % 指示灯
Button_search matlab.ui.control.Button % 搜索串口按钮
SerialPortNumber matlab.ui.control.DropDown % 串口号选择下拉框
Label matlab.ui.control.Label % 标签
Image matlab.ui.control.Image % 图片组件
end
% 定义私有属性,用于存储应用程序内部使用的数据
properties (Access = private)
flag = 1; % 标志位,用于判断是否是首次接收数据
SerialObject; % 串口对象,用于与串口进行通信
Str_Data; % 可能用于存储接收到的数据字符串,此处未详细使用
end
% 定义私有方法,用于实现应用程序的内部功能
methods (Access = private)
% 串口配置函数,用于打开和关闭串口
function serialconfig(app)
% 获取所有可用串口列表,并将其设置为串口选择下拉框的选项
app.SerialPortNumber.Items = serialportlist("all");
% 检查打开串口按钮的状态,为 1 表示要打开串口
if any(app.Button_open_serial.Value)
% 如果之前已经创建了串口对象,先删除该对象
delete(app.SerialObject);
% 将指示灯颜色设置为绿色,表示串口处于打开状态
app.Lamp.Color = 'g';
% 修改打开串口按钮的文本为“关闭串口”
app.Button_open_serial.Text = '关闭串口';
try
% 尝试创建一个新的串口对象
app.SerialObject = serialport(app.SerialPortNumber.Value, ...
str2double(app.SerialBaud.Value), ...
"DataBits", str2double(app.SerialDataBits.Value), ...
"StopBits", str2double(app.SerialStopBits.Value), ...
"Parity", app.SerialParityBits.Value);
% 配置串口对象的终止符为“CR/LF”(回车换行)
configureTerminator(app.SerialObject, "CR/LF");
% 配置串口对象的回调函数,当接收到终止符时调用 serialcallback 函数
configureCallback(app.SerialObject, "terminator", @app.serialcallback);
catch
% 如果创建串口对象过程中出现异常,弹出消息框提示串口打开失败
msgbox('串口打开失败');
% 将指示灯颜色设置为红色,表示串口打开失败
app.Lamp.Color = 'r';
% 修改打开串口按钮的文本为“打开串口”
app.Button_open_serial.Text = '打开串口';
% 删除之前创建的串口对象,确保对象被正确清理
delete(app.SerialObject);
end
else
% 如果打开串口按钮未按下,即要关闭串口
% 删除之前创建的串口对象
delete(app.SerialObject);
% 将指示灯颜色设置为红色,表示串口处于关闭状态
app.Lamp.Color = 'r';
% 修改打开串口按钮的文本为“打开串口”
app.Button_open_serial.Text = '打开串口';
end
end
% 串口数据接收回调函数,当串口接收到数据时调用
function serialcallback(app, src, ~)
% 根据复选框的状态决定数据显示方式
if app.CheckBox_hex_display.Value == 0
try
% 从串口对象 src 中读取一行数据
data = readline(src);
% 去除读取数据首尾的空白字符(如回车符、换行符等)
cleanData = strtrim(data);
% 如果是首次接收数据,覆盖接收文本框原有的内容
if app.flag == 1
app.TextArea.Value = cleanData;
% 将标志位设置为 0,后续接收的数据将追加到文本区域
app.flag = 0;
else
% 检查去除空白后的读取数据是否为空
if ~isempty(cleanData)
% 将读取的数据追加到接收文本框中
app.TextArea.Value = [app.TextArea.Value; cleanData];
end
end
% 将文本区域滚动到最新数据的位置,方便查看最新接收的数据
app.TextArea.scroll('bottom');
catch ME
% 处理可能出现的异常,将异常信息打印到命令窗口
fprintf('Error in serialcallback: %s\n', ME.message);
end
elseif app.CheckBox_hex_display.Value == 1
% 从串口对象 src 中读取一行数据
data = readline(src);
% 去除读取数据首尾的空白字符(如回车符、换行符等)
cleanData = strtrim(data);
% 如果是首次接收数据,覆盖接收文本框原有的内容
if app.flag == 1
app.TextArea.Value = cleanData;
% 将标志位设置为 0,后续接收的数据将追加到文本区域
app.flag = 0;
else
% 检查去除空白后的读取数据是否为空
if ~isempty(cleanData)
% 使用换行符('\r' 和 '\n')分割多行数据
newLines = strsplit(cleanData, {'\r', '\n'}, 'CollapseDelimiters', true);
% 移除分割后为空的单元格
newLines = newLines(~cellfun(@isempty, newLines));
% 初始化一个与 newLines 大小相同的单元格数组,用于存储处理后的数据
processedLines = cell(size(newLines));
% 遍历分割后的每一行数据
for i = 1:length(newLines)
% 获取当前行的原始字符串
rawStr = newLines{i};
% 将原始字符串转换为十六进制表示,每个字节用两位十六进制数表示
hexArray = dec2hex(uint8(rawStr), 2);
% 将十六进制数组转换为以空格分隔的字符串
hexStr = strjoin(cellstr(hexArray), ' ');
% 检查原始字符串中的字符是否都为可打印的 ASCII 字符(ASCII 码范围 32 到 126)
if all(uint8(rawStr) >= 32 & uint8(rawStr) <= 126)
% 如果是可打印的 ASCII 字符,构建包含原始字符串和十六进制表示的显示字符串
processedLines{i} = sprintf('%s [HEX: %s]', rawStr, hexStr);
else
% 如果包含非可打印的 ASCII 字符,构建仅包含十六进制表示的显示字符串
processedLines{i} = sprintf('[BINARY] HEX: %s', hexStr);
end
end
% 将处理后的数据追加到接收文本框中
app.TextArea.Value = [app.TextArea.Value; processedLines'];
end
% 设置文本区域最多保留的行数
maxLines = 200;
% 如果文本区域的行数超过最大行数,只保留最后 maxLines 行数据
if numel(app.TextArea.Value) > maxLines
app.TextArea.Value = app.TextArea.Value(end - maxLines + 1:end);
end
% 将文本区域滚动到最新数据的位置,方便查看最新接收的数据
app.TextArea.scroll('bottom');
end
% 强制刷新界面,确保界面及时更新显示最新的数据
drawnow limitrate;
end
end
end
% 定义私有方法,用于处理组件的事件回调
methods (Access = private)
% 应用程序启动时执行的函数
function startupFcn(app)
% 获取所有可用串口列表,并将其设置为串口选择下拉框的选项
app.SerialPortNumber.Items = serialportlist("all");
% 将指示灯颜色设置为红色,表示串口处于关闭状态
app.Lamp.Color = 'r';
% 设置打开串口按钮的文本为“打开串口”
app.Button_open_serial.Text = "打开串口";
% 清空接收文本框
app.TextArea.Value = '';
% 清空发送文本框
app.Text_send.Value = '';
end
% 搜索串口按钮被按下时执行的函数
function Button_searchPushed(app, event)
% 获取所有可用串口列表,并将其设置为串口选择下拉框的选项
app.SerialPortNumber.Items = serialportlist("all");
end
% 开关组件值改变时执行的函数
function SwitchValueChanged(app, event)
% 获取开关组件的当前值
value = app.Switch.Value;
% 根据开关的值设置指示灯的颜色
switch lower(value)
case "off"
app.Lamp.Color = 'r'
case "on"
app.Lamp.Color = 'g'
end
end
% 主窗口关闭请求时执行的函数
function UIFigureCloseRequest(app, event)
% 删除应用程序对象
delete(app);
end
% 串口号选择下拉框值改变时执行的函数
function SerialPortNumberValueChanged(app, event)
% 获取串口号选择下拉框的当前值
value = app.SerialPortNumber.Value;
end
% 打开/关闭串口按钮值改变时执行的函数
function Button_open_serialValueChanged(app, event)
% 隐藏主窗口
app1.UIFigure.Visible = 'off';
% 调用串口配置函数
serialconfig(app);
end
% 波特率选择下拉框值改变时执行的函数
function SerialBaudValueChanged(app, event)
% 获取波特率选择下拉框的当前值
value = app.SerialBaud.Value;
end
% 接收文本框值改变时执行的函数
function TextAreaValueChanged(app, event)
% 获取接收文本框的当前值
value = app.TextArea.Value;
end
% 清空接收文本框按钮被按下时执行的函数
function ButtonPushed(app, event)
% 清空接收文本框
app.TextArea.Value = '';
% 将标志位设置为 1,表示下一次接收数据时覆盖原有内容
app.flag = 1;
end
% 串口号选择下拉框打开时执行的函数
function SerialPortNumberDropDownOpening(app, event)
% 调用串口配置函数
serialconfig(app);
end
% 波特率选择下拉框打开时执行的函数
function SerialBaudDropDownOpening(app, event)
% 调用串口配置函数
serialconfig(app);
end
% 数据位选择下拉框打开时执行的函数
function SerialDataBitsDropDownOpening(app, event)
% 调用串口配置函数
serialconfig(app);
end
% 停止位选择下拉框打开时执行的函数
function SerialStopBitsDropDownOpening(app, event)
% 调用串口配置函数
serialconfig(app);
end
% 校验位选择下拉框打开时执行的函数
function SerialParityBitsDropDownOpening(app, event)
% 调用串口配置函数
serialconfig(app);
end
% 发送数据按钮被按下时执行的函数
function Button_sendPushed(app, event)
% 获取发送文本框中的数据
textCells = app.Text_send.Value;
% 获取数据的行数
numLines = numel(textCells);
% 初始化要发送的数据
data = [];
% 拼接数据并添加换行符
for i = 1:numLines
line = textCells{i};
data = [data, uint8(line)];
% 前 n-1 行添加 CRLF 换行符
if i < numLines
data = [data, 13, 10];
end
end
% 检查串口状态
if ~isvalid(app.SerialObject) || ~strcmpi(app.SerialObject.Status, 'open')
% 如果串口未连接或已关闭,弹出错误对话框
errordlg('串口未连接或已关闭!', '错误');
return;
end
% 发送数据
if ~isempty(data)
try
write(app.SerialObject, data, 'uint8');
catch ME
% 如果发送过程中出现异常,弹出错误对话框
errordlg(['发送失败: ' ME.message], '错误');
end
end
end
% 保存数据按钮被按下时执行的函数
function Button_savePushed(app, event)
% 获取接收文本框中的数据
text = app.TextArea.Value;
% 获取数据的行数
arr = length(text);
% 根据十六进制显示复选框的状态选择保存文件的类型
if app.CheckBox_hex_display.Value == 0
% 保存为普通文本文件
fid = fopen('data.txt', 'w+');
for i = 1:arr
fprintf(fid, '%s\r\n', text{i}); % 换行
end
fclose(fid);
elseif app.CheckBox_hex_display.Value == 1
% 保存为十六进制文本文件
fid = fopen('data_hex.txt', 'w+');
for i = 1:arr
fprintf(fid, '%s\r\n', text{i}); % 换行
end
fclose(fid);
end
end
% 清空发送文本框按钮被按下时执行的函数
function Button_send_clearPushed(app, event)
% 清空发送文本框
app.Text_send.Value = '';
end
end
% 定义私有方法,用于创建应用程序的用户界面组件
methods (Access = private)
% 创建 UIFigure 和组件
function createComponents(app)
% 获取当前 .mlapp 文件所在的路径,用于定位图片文件
pathToMLAPP = fileparts(mfilename('fullpath'));
% 创建 UIFigure 并在所有组件创建完成前隐藏它
app.UIFigure = uifigure('Visible', 'off');
app.UIFigure.Position = [100 100 640 480];
app.UIFigure.Name = 'MATLAB App';
% 为主窗口的关闭请求事件绑定回调函数
app.UIFigure.CloseRequestFcn = createCallbackFcn(app, @UIFigureCloseRequest, true);
% 创建 Image 组件
app.Image = uiimage(app.UIFigure);
app.Image.Position = [1 409 72 72];
app.Image.ImageSource = '可达鸭.svg';
% 创建 Label 组件,用于提示串口选择
app.Label = uilabel(app.UIFigure);
app.Label.HorizontalAlignment = 'right';
app.Label.Position = [73 409 53 22];
app.Label.Text = '串口选择';
% 创建 SerialPortNumber 下拉框,让用户选择串口号
app.SerialPortNumber = uidropdown(app.UIFigure);
app.SerialPortNumber.Items = {'--请选择串口--'};
% 为下拉框打开和值改变事件分别绑定回调函数
app.SerialPortNumber.DropDownOpeningFcn = createCallbackFcn(app, @SerialPortNumberDropDownOpening, true);
app.SerialPortNumber.ValueChangedFcn = createCallbackFcn(app, @SerialPortNumberValueChanged, true);
app.SerialPortNumber.Position = [141 409 163 22];
app.SerialPortNumber.Value = '--请选择串口--';
% 创建 Button_search 按钮,用于搜索可用串口
app.Button_search = uibutton(app.UIFigure, 'push');
app.Button_search.ButtonPushedFcn = createCallbackFcn(app, @Button_searchPushed, true);
app.Button_search.Position = [313 409 100 22];
app.Button_search.Text = '搜索串口';
% 创建 Lamp 指示灯,用于显示串口连接状态
app.Lamp = uilamp(app.UIFigure);
app.Lamp.Position = [555 410 20 20];
app.Lamp.Color = [1 0 0];
% 创建 Image_2 组件,显示温度相关的图片
app.Image_2 = uiimage(app.UIFigure);
app.Image_2.Position = [189 44 70 117];
app.Image_2.ImageSource = '温度.svg';
% 创建 Image_3 组件,显示湿度相关的图片
app.Image_3 = uiimage(app.UIFigure);
app.Image_3.Position = [324 44 48 117];
app.Image_3.ImageSource = '湿度.svg';
% 创建 Image_4 组件,显示灯泡相关的图片
app.Image_4 = uiimage(app.UIFigure);
app.Image_4.Position = [425 53 99 110];
app.Image_4.ImageSource = '灯泡.svg';
% 创建 Switch 开关组件,可能用于控制某个设备
app.Switch = uiswitch(app.UIFigure, 'slider');
app.Switch.Orientation = 'vertical';
app.Switch.ValueChangedFcn = createCallbackFcn(app, @SwitchValueChanged, true);
app.Switch.Position = [532 81 20 45];
% 创建 Label_5 组件,为灯泡图片添加文字说明
app.Label_5 = uilabel(app.UIFigure);
app.Label_5.Position = [464 26 29 22];
app.Label_5.Text = '灯泡';
% 创建 Label_6 组件,提示接收文本框的用途
app.Label_6 = uilabel(app.UIFigure);
app.Label_6.HorizontalAlignment = 'right';
app.Label_6.Position = [11 372 65 22];
app.Label_6.Text = '接受文本框';
% 创建 TextArea 组件,用于显示接收到的串口数据
app.TextArea = uitextarea(app.UIFigure);
app.TextArea.ValueChangedFcn = createCallbackFcn(app, @TextAreaValueChanged, true);
app.TextArea.Position = [8 175 269 188];
% 创建 CheckBox_hex_display 复选框,用于选择是否以十六进制显示数据
app.CheckBox_hex_display = uicheckbox(app.UIFigure);
app.CheckBox_hex_display.Text = '16进制显示';
app.CheckBox_hex_display.Position = [90 371 83 22];
% 创建 Label_7 组件,提示发送文本框的用途
app.Label_7 = uilabel(app.UIFigure);
app.Label_7.HorizontalAlignment = 'right';
app.Label_7.Position = [326 372 65 22];
app.Label_7.Text = '发送文本框';
% 创建 Text_send 组件,让用户输入要发送的数据
app.Text_send = uitextarea(app.UIFigure);
app.Text_send.Position = [323 175 269 188];
% 创建 Button_send 按钮,用于发送数据
app.Button_send = uibutton(app.UIFigure, 'push');
app.Button_send.ButtonPushedFcn = createCallbackFcn(app, @Button_sendPushed, true);
app.Button_send.Position = [431 372 93 22];
app.Button_send.Text = '发送数据';
% 创建 Label_8 组件,提示波特率选择
app.Label_8 = uilabel(app.UIFigure);
app.Label_8.HorizontalAlignment = 'right';
app.Label_8.Position = [18 139 41 22];
app.Label_8.Text = '波特率';
% 创建 SerialBaud 下拉框,让用户选择波特率
app.SerialBaud = uidropdown(app.UIFigure);
app.SerialBaud.Items = {'9600', '115200'};
% 为下拉框打开和值改变事件分别绑定回调函数
app.SerialBaud.DropDownOpeningFcn = createCallbackFcn(app, @SerialBaudDropDownOpening, true);
app.SerialBaud.ValueChangedFcn = createCallbackFcn(app, @SerialBaudValueChanged, true);
app.SerialBaud.Position = [74 139 100 22];
app.SerialBaud.Value = '115200';
% 创建 Label_9 组件,提示数据位选择
app.Label_9 = uilabel(app.UIFigure);
app.Label_9.HorizontalAlignment = 'right';
app.Label_9.Position = [18 102 41 22];
app.Label_9.Text = '数据位';
% 创建 SerialDataBits 下拉框,让用户选择数据位
app.SerialDataBits = uidropdown(app.UIFigure);
app.SerialDataBits.Items = {'8', '7', '6', '5'};
app.SerialDataBits.DropDownOpeningFcn = createCallbackFcn(app, @SerialDataBitsDropDownOpening, true);
app.SerialDataBits.Position = [74 102 100 22];
app.SerialDataBits.Value = '8';
% 创建 Label_10 组件,提示停止位选择
app.Label_10 = uilabel(app.UIFigure);
app.Label_10.HorizontalAlignment = 'right';
app.Label_10.Position = [18 65 41 22];
app.Label_10.Text = '停止位';
% 创建 SerialStopBits 下拉框,让用户选择停止位
app.SerialStopBits = uidropdown(app.UIFigure);
app.SerialStopBits.Items = {'1', '1.5', '2'};
app.SerialStopBits.DropDownOpeningFcn = createCallbackFcn(app, @SerialStopBitsDropDownOpening, true);
app.SerialStopBits.Position = [74 65 100 22];
app.SerialStopBits.Value = '1';
% 创建 Label_11 组件,提示校验位选择
app.Label_11 = uilabel(app.UIFigure);
app.Label_11.HorizontalAlignment = 'right';
app.Label_11.Position = [18 29 41 22];
app.Label_11.Text = '校验位';
% 创建 SerialParityBits 下拉框,让用户选择校验位
app.SerialParityBits = uidropdown(app.UIFigure);
app.SerialParityBits.Items = {'none', 'even', 'odd'};
app.SerialParityBits.DropDownOpeningFcn = createCallbackFcn(app, @SerialParityBitsDropDownOpening, true);
app.SerialParityBits.Position = [74 29 100 22];
app.SerialParityBits.Value = 'none';
% 创建 Button_open_serial 按钮,用于打开或关闭串口
app.Button_open_serial = uibutton(app.UIFigure, 'state');
app.Button_open_serial.ValueChangedFcn = createCallbackFcn(app, @Button_open_serialValueChanged, true);
app.Button_open_serial.Text = '打开串口';
app.Button_open_serial.Position = [430 409 100 22];
% 创建 Button 按钮,用于清空接收文本框
app.Button = uibutton(app.UIFigure, 'push');
app.Button.ButtonPushedFcn = createCallbackFcn(app, @ButtonPushed, true);
app.Button.Position = [182 370 44 24];
app.Button.Text = '清空';
% 创建 Button_save 按钮,用于保存接收到的数据
app.Button_save = uibutton(app.UIFigure, 'push');
app.Button_save.ButtonPushedFcn = createCallbackFcn(app, @Button_savePushed, true);
app.Button_save.Position = [234 370 44 24];
app.Button_save.Text = '保存';
% 创建 Button_send_clear 按钮,用于清空发送文本框
app.Button_send_clear = uibutton(app.UIFigure, 'push');
app.Button_send_clear.ButtonPushedFcn = createCallbackFcn(app, @Button_send_clearPushed, true);
app.Button_send_clear.Position = [549 370 44 24];
app.Button_send_clear.Text = '清空';
% 创建 Image2 组件,显示指定图片
app.Image2 = uiimage(app.UIFigure);
app.Image2.Position = [142 438 388 38];
app.Image2.ImageSource = fullfile(pathToMLAPP, 'liuzexin.png');
% 创建 Image3 组件,显示指定图片
app.Image3 = uiimage(app.UIFigure);
app.Image3.Position = [531 438 110 38];
app.Image3.ImageSource = fullfile(pathToMLAPP, '黄淮学院.jpg');
% 创建 Image4 组件,显示指定图片
app.Image4 = uiimage(app.UIFigure);
app.Image4.Position = [76 438 57 38];
app.Image4.ImageSource = fullfile(pathToMLAPP, '仓鼠.svg');
% 创建 Label_12 组件,为温度仪表盘添加文字说明
app.Label_12 = uilabel(app.UIFigure);
app.Label_12.HorizontalAlignment = 'center';
app.Label_12.Position = [272 21 29 22];
app.Label_12.Text = '温度';
% 创建 Gauge 组件,用于显示温度数据
app.Gauge = uigauge(app.UIFigure, 'linear');
app.Gauge.Orientation = 'vertical';
app.Gauge.Position = [266 44 39 119];
% 创建 Label_13 组件,为湿度仪表盘添加文字说明
app.Label_13 = uilabel(app.UIFigure);
app.Label_13.HorizontalAlignment = 'center';
app.Label_13.Position = [381 24 29 22];
app.Label_13.Text = '湿度';
% 创建 Gauge_2 组件,用于显示湿度数据
app.Gauge_2 = uigauge(app.UIFigure, 'linear');
app.Gauge_2.Orientation = 'vertical';
app.Gauge_2.Position = [375 47 39 119];
% 创建 Image5 组件,显示指定图片
app.Image5 = uiimage(app.UIFigure);
app.Image5.Position = [563 29 78 121];
app.Image5.ImageSource = fullfile(pathToMLAPP, '荷兰猪.svg');
% 所有组件创建完成后,显示主窗口
app.UIFigure.Visible = 'on';
end
end
% 定义公共方法,用于应用程序的创建和删除操作
methods (Access = public)
% 构造函数,用于创建应用程序对象
function app = app1
% 创建 UIFigure 和各个组件
createComponents(app)
% 向 App Designer 注册该应用程序
registerApp(app, app.UIFigure)
% 执行应用程序启动时的初始化函数
runStartupFcn(app, @startupFcn)
% 如果没有输出参数,清除 app 变量以避免内存泄漏
if nargout == 0
clear app
end
end
% 应用程序删除前执行的函数
function delete(app)
% 当应用程序被删除时,同时删除主窗口
delete(app.UIFigure)
end
end
end它主要包含以下几个部分:
属性定义:包括公共属性和私有属性,公共属性对应界面上的各种组件,私有属性用于存储应用程序内部的状态和数据。
私有方法:实现了串口配置、数据接收处理、组件事件回调等核心功能。
组件创建方法:负责创建应用程序的用户界面组件,并设置其初始属性和事件回调函数。
公共方法:包括构造函数和删除函数,用于创建和销毁应用程序对象。
用户可以通过这个应用程序方便地进行串口通信,选择串口、配置参数、发送和接收数据,并且可以选择以普通文本或十六进制形式显示接收到的数据,还能保存数据到文件。同时,界面上有指示灯显示串口连接状态,以及一些图片和仪表盘用于美化界面和显示相关信息。
学习产出(测试):
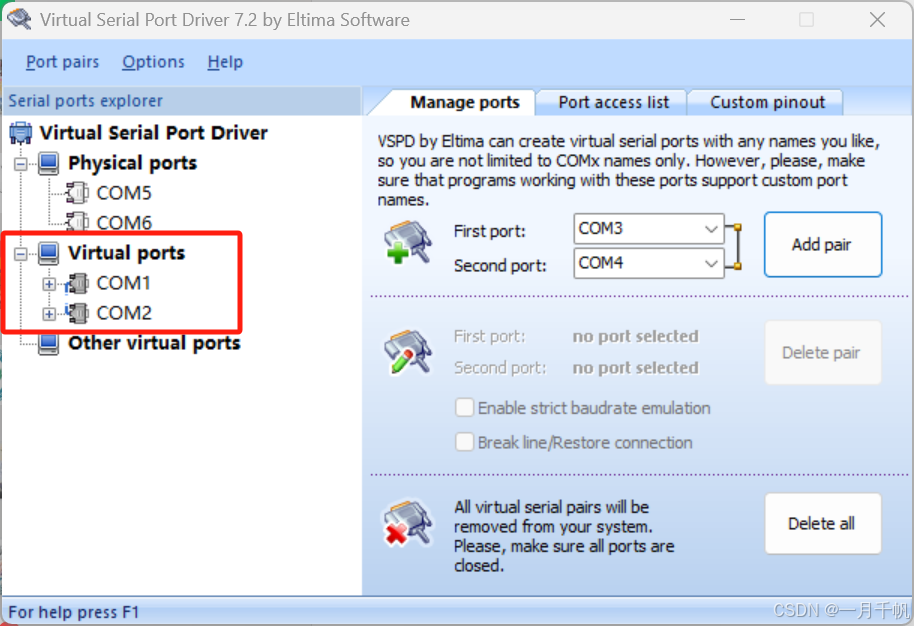
虚拟串口:此时COM1与COM2相连
打开上位机串口:
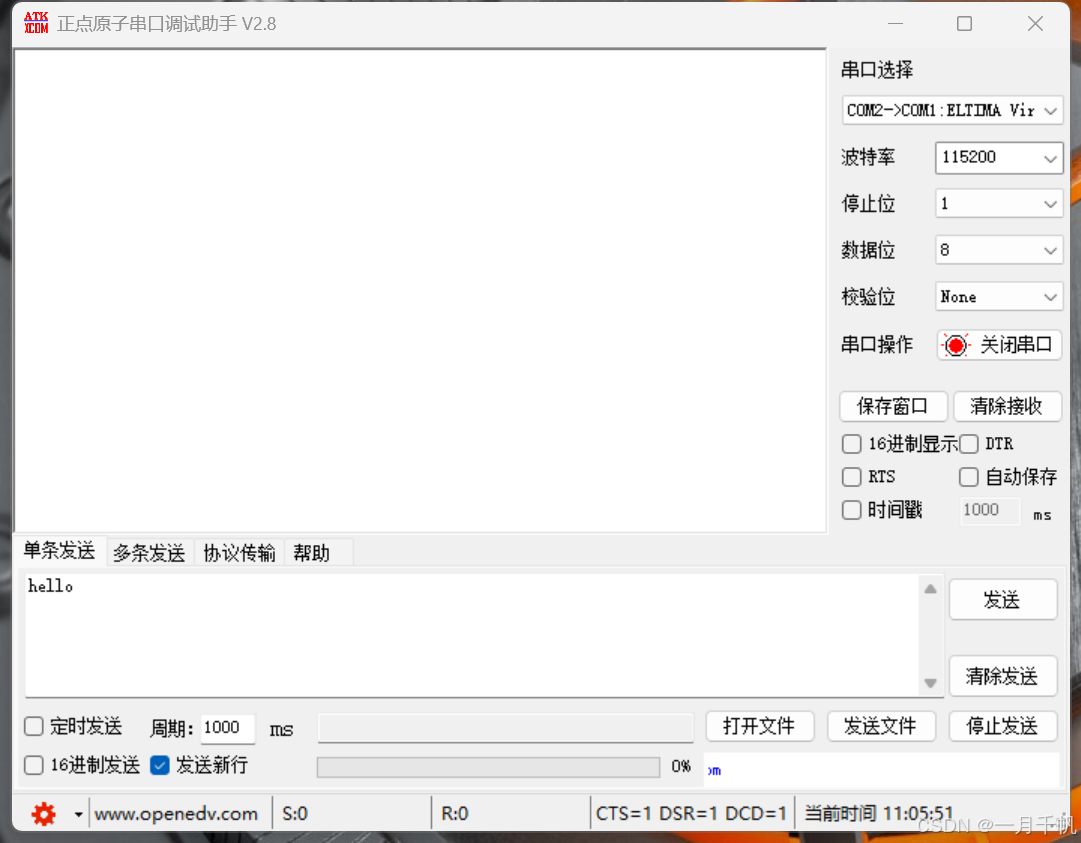
打开下位机串口:
上位机接受测试:

上位机接受十六进制测试:

上位机发送测试:


 3万+
3万+

 被折叠的 条评论
为什么被折叠?
被折叠的 条评论
为什么被折叠?
 到【灌水乐园】发言


