


转自:http://moduscreate.com/building-a-custom-phonegap-plugin-for-ios/
源代码:https://github.com/ModusCreateOrg/custom-cordova-plugin-blog
Building a custom PhoneGap plugin for iOS
Many of us are used to developing mobile HTML5 applications with various frameworks and have wanted to dive into hybrid application development. Of those who actually create hybrid mobile HTML5 applications, very few of us actually make full use of this flexible application model. In this blog post, I will walk you through the first of a few steps in creating a custom PhoneGap plugin for iOS.
The goal of the following exercise is to enable the web app filesystem access through our custom component built into the PhoneGap wrapper. That way we will be able to use native code through JavaScript and enjoy the best of both worlds.
We’ll develop a class named FileWriter that will obtain a JSON date value from the browser and write it to the iOS file system. If you’ve never coded an ounce of Objective C, don’t worry. I’ll be explaining quite a bit along the way.
This article is designed as a step-by-step process, but if you just want to read the raw code and jump right in, I have the project available for you to download here:https://github.com/ModusCreateOrg/custom-cordova-plugin-blog.
What you’ll need
Before we can break ground, you’re going to need a few things.
- An OS X powered computer. (This should go without saying)
- Download & install XCode
- Download and extract PhoneGap (docs)
- Configure Safari to allow remote debugging.
With those things out of the way, we can get down to business.
Steps we’ll take
- Create the PhoneGap project
- Create the plugin
- Implement the plugin via JavaScript method calls
This seems simple enough, right? The first step entails dropping down to a command line shell and running the PhoneGap create function to create the project. The second step is more involved, requiring us to actually create an Objective-C class and then implement it. 
1. Create the PhoneGap project
To create the PhoneGap project, you’ll need to drop down to your shell. We’ll be using the PhoneGap create command.
Here’s the syntax for the create command.
#Change dir to your project directory
Usage: ~/Downloads/phonegap-2.9.0/lib/ios/bin/create [--shared] [--arc] <path_to_new_project> <package_name> <project_name>
    --shared (optional): Link directly against the shared copy of the CordovaLib instead of a copy of it.
    --arc (optional): Enable ARC.
    <path_to_new_project>: Path to your new Cordova iOS project
    <package_name>: Package name, following reverse-domain style convention
    <project_name>: Project name
To make things easy, I’ve listed the steps below:
#Change dir to your project directory
cd /www/pgplugin

# Create the PhoneGap project:
# I've typed out the path to the PhoneGap extracted files
# and use the iOS project binaries
~/Downloads/phonegap-2.9.0/lib/ios/bin/create . CustomPlugin CustomPlugin
You won’t get any output from PhoneGap’s create method, so in order to see what’s in the directory, you’re going to have to look at its contents.
#Look at the directory contents
ls -l
total 0
drwxr-xr-x   7 jgarcia  wheel  238 Aug  8 10:51 CordovaLib
drwxr-xr-x@ 10 jgarcia  wheel  340 Aug  8 10:51 CustomPlugin
drwxr-xr-x@  3 jgarcia  wheel  102 Aug  8 10:51 CustomPlugin.xcodeproj
drwxr-xr-x@  9 jgarcia  wheel  306 Aug  8 10:51 cordova
drwxr-xr-x@ 10 jgarcia  wheel  340 Aug  8 10:51 www
Launching the project for the first time
In order to launch the project, you’re going to need to open the project with XCode. The easiest way to do it at this point is to enter open CustomPlugin.xcodeproj/ in your shell and XCode will automatically launch, opening the project.

At this point, you’re going to want to run the project, but the scheme might be set as “iPad 5.0″ by default. 
The iPad simulator can take up a ton of space and get in our way for this project, so we should change the scheme to iPhone 6.1. To do this, click on the “Set active scheme button”

… and select ‘iPhone 6.1′.

From here, you can hit the “Run” button, or hit ⌘R on your keyboard and you’ll see the simulator pop up with the welcome screen from PhoneGap

Our project is now setup and we’re ready to roll into phase two: Building the plugin!
2. Adding the plugin structure to the project
We’re going to build the plugin from the bottom up. That is, we’re going to write some Objective-C code to support JavaScript calls via the PhoneGap bridge.
The first step is to open XCode and click on the Show the Project Navigator button: 
Next, expand the CustomPlugin project and click on “config.xml”. This is going to open up the configuration file that we’ll need to edit to tell PhoneGap that we’re adding a new feature (plugin) to the project.

Next, scroll down in the editor to the end of the file and add a new line at line under the closing </feature> tag at line 112:

Inject the following XML…
<!-- My custom plugin -->
<feature name="FileWriter">
    <param name="ios-package" value="FileWriter" />
</feature>
… So that config.xml now looks like the following: 
Next, we’ll create the class that will be responsible to listening to the calls from PhoneGap’s JavaScript bridge. To do this expand the Classes, right click on it and choose New File.

From there, a window drawer will appear, requesting what type of file you’d like to create. Choose Cocoa Touch and Objective-C class menu items and press Next.

From there, focus on the Class name input field, enter FileWriter and press next. Then select the Subclass of input field and enter CDVPlugin. 
Click on Create to actually create the your class’s header and class file. 
You should be able to see that the FileWriter.h and FileWriter.m files in the file explorer.

Why two files? Well, in short Objective-C class definitions are split into two files. The header file (.h) and the class file itself (.m). The header file is used to describe the class, while the class file itself contains the actual code for the class. We’ll have to edit both files to create the custom plugin. If you want to read more on the Objective-C programming language, check out this article from Apple.
All right. We’re ready to start writing some Objective-C!
Creating the plugin code
The first step is to edit the FileWriter.h header file and replace the entire file contents with the following:
#import <Cordova/CDV.h>

@interface FileWriter : CDVPlugin

// This will return the file contents in a JSON object via the getFileContents utility method
- (void) cordovaGetFileContents:(CDVInvokedUrlCommand *)command;

// This will accept a String and call setFileContents to persist the String on to disk
- (void) cordovaSetFileContents:(CDVInvokedUrlCommand *)command;

#pragma mark - Util_Methods

// Pure native code to persist data
- (void) setFileContents;

// Native code to load data from disk and return the String.
- (NSString *) getFileContents;

@end
The code above is broken up into two main sections: 1) the interface methods that we’ll be calling from the PhoneGap JavaScript bridge, which are prefixed with cordova, and 2) utility methods that will be used internally by the interface methods.
Note: I tend to prefix method names with cordova so that I know that they will be called via the JS bridge, but it’s not required by any means. Also, I split up functionality between the interface methods and methods that will do the work. The reason being you can move reusable work to instance level methods, such as writing contents to a file. Also, this is a good way to demonstrate how we can do native Objective C work within the Cordova plugin framework.
The next step is to fill in the code for FileWriter.m. I’ve added comments to the code to make it a relatively easy read.
@implementation FileWriter
- (void) cordovaGetFileContents:(CDVInvokedUrlCommand *)command {

    // Retrieve the date String from the file via a utility method
    NSString *dateStr = [self getFileContents];

    // Create an object that will be serialized into a JSON object.
    // This object contains the date String contents and a success property.
    NSDictionary *jsonObj = [ [NSDictionary alloc]
                               initWithObjectsAndKeys :
                                 dateStr, @"dateStr",
                                 @"true", @"success",
                                 nil
                            ];

    // Create an instance of CDVPluginResult, with an OK status code.
    // Set the return message as the Dictionary object (jsonObj)...
    // ... to be serialized as JSON in the browser
    CDVPluginResult *pluginResult = [ CDVPluginResult
                                      resultWithStatus    : CDVCommandStatus_OK
                                      messageAsDictionary : jsonObj
                                    ];

    // Execute sendPluginResult on this plugin's commandDelegate, passing in the ...
    // ... instance of CDVPluginResult
    [self.commandDelegate sendPluginResult:pluginResult callbackId:command.callbackId];
}

- (void) cordovaSetFileContents:(CDVInvokedUrlCommand *)command {
    // Retrieve the JavaScript-created date String from the CDVInvokedUrlCommand instance.
    // When we implement the JavaScript caller to this function, we'll see how we'll
    // pass an array (command.arguments), which will contain a single String.
    NSString *dateStr = [command.arguments objectAtIndex:0];

    // We call our setFileContents utility method, passing in the date String
    // retrieved from the command.arguments array.
    [self setFileContents: dateStr];

    // Create an object with a simple success property.
    NSDictionary *jsonObj = [ [NSDictionary alloc]
                               initWithObjectsAndKeys :
                                  @"true", @"success",
                                  nil
                            ];

    CDVPluginResult *pluginResult = [ CDVPluginResult
                                      resultWithStatus    : CDVCommandStatus_OK
                                      messageAsDictionary : jsonObj
                                    ];

    [self.commandDelegate sendPluginResult:pluginResult callbackId:command.callbackId];
}

#pragma mark - Util_Methods
// Dives into the file system and writes the file contents.
// Notice fileContents as the first argument, which is of type NSString
- (void) setFileContents:(NSString *)fileContents {

    // Create an array of directory Paths, to allow us to get the documents directory
    NSArray *paths = NSSearchPathForDirectoriesInDomains(NSDocumentDirectory, NSUserDomainMask, YES);

    // The documents directory is the first item
    NSString *documentsDirectory = [paths objectAtIndex:0];

    // Create a string that prepends the documents directory path to a text file name
    // using NSString's stringWithFormat method.
    NSString *fileName = [NSString stringWithFormat:@"%@/myTextFile.txt", documentsDirectory];

    // Here we save contents to disk by executing the writeToFile method of
    // the fileContents String, which is the first argument to this function.
    [fileContents writeToFile : fileName
                  atomically  : NO
                  encoding    : NSStringEncodingConversionAllowLossy
                  error       : nil];
}

//Dives into the file system and returns contents of the file
- (NSString *) getFileContents{

    // These next three lines should be familiar to you.
    NSArray *paths = NSSearchPathForDirectoriesInDomains(NSDocumentDirectory, NSUserDomainMask, YES);

    NSString *documentsDirectory = [paths objectAtIndex:0];

    NSString *fileName = [NSString stringWithFormat:@"%@/myTextFile.txt", documentsDirectory];

    // Allocate a string and initialize it with the contents of the file via
    // the initWithContentsOfFile instance method.
    NSString *fileContents = [[NSString alloc]
                               initWithContentsOfFile : fileName
                               usedEncoding           : nil
                               error                  : nil
                             ];

    // Return the file contents String to the caller (cordovaGetFileContents)
    return fileContents;
}

@end
In the last bit, we’ll have to write some HTML and JavaScript to allow us to interface with our Objective-C code.
3. Adding the supporting HTML
Open the index.html file located in www/ of the project with XCode or your editor of choice.
Locate the following block:
<div class="app">
    <h1>Apache Cordova</h1>
    <div id="deviceready" class="blink">
        <p class="event listening">Connecting to Device</p>
        <p class="event received">Device is Ready</p>
    </div>
</div>
… and replace it with:
<div class="app">
    <div id="fileContentsDiv">...</div>
    <button id='getFileContents'>GET file contents</button>
    <button id='setFileContents'>SET file contents</button>
</div>
What that’s going to do is allow us to have two buttons to tap on providing means to persist and retrieve data as well as a container to display the data obtained from the file. You can see what the HTML edits look like by hitting ⌘R on your keyboard to launch the application.

Lastly, we’ll have to inject the JavaScript that will tie the buttons in with the PhoneGap calls.
Writing the JavaScript
Before we add the JavaScript to close things out, I want you to take a glance at the pattern for calling PhoneGap plugin methods:
cordova.exec(
    callbackFn,     // A callback function that deals with the JSON object from the CDVPluginResult instance
    errorFn,        // An error handler
    'TargetClass',  // What class to target messages to (method calls = message in ObjC)
    'methodToCall', // Which method to call
    [ 'array', 'of', 'arguments'] // These go in the CDVInvokedUrlCommand instance's.arguments property
);
To complete this project, we’ll need to open up www/js/index.js and locate the onDeviceReady method. Replace it with the following code. I’ve commented it so you can read line by line what I’m doing and where things line up with the FileWriterObjective-C class we just wrote.
onDeviceReady: function() {
    var contentsDiv    = document.getElementById('fileContentsDiv'),
        getContentsBtn = document.getElementById('getFileContents'),
        setContentsBtn = document.getElementById('setFileContents');

    //Set file contents
    setContentsBtn.addEventListener('click', function() {

        // Create a Date string. It will look something like: "2013-08-13T22:04:58.811Z"
        var dateStr = new Date().toJSON();

        // Ask cordova to execute a method on our FileWriter class
        cordova.exec(
            // Register the callback handler
            function callback(data) {
                contentsDiv.innerHTML = 'File contents set.';
                console.log('Wrote date ' + dateStr);
            },
            // Register the errorHandler
            function errorHandler(err) {
                alert('Error');
            },
            // Define what class to route messages to
            'FileWriter',
            // Execute this method on the above class
            'cordovaSetFileContents',
            // An array containing one String (our newly created Date String).
            [ dateStr ]
        );

    });

    //Get file contents
    getContentsBtn.addEventListener('click', function() {

        cordova.exec(
            function callback(data) {
                // data comes from the NSDictionary instance (jsonObj) from our Objective C code.
                // Take a look at the cordovaGetFileContents method from FileWriter.m and you'll see
                // where we add dateStr as a property to that Dictionary object.
                var msg = 'Current file contents: <br />' + data.dateStr;
                contentsDiv.innerHTML = msg;
            },
            function errorHandler(err) {
                alert('Error');
            },
            'FileWriter',
            'cordovaGetFileContents',
            [  ]
        );

    });
},
We can see that the JavaScript is pretty straightforward. We register click event handlers on the buttons, which invoke the cordova* methods we defined in our FileWriter class. The final step in this process is to get this bad boy to work!
Run the project by hitting ⌘R on your keyboard. You’ll be greeted by the project running.

From there, click SET file contents and then GET file contents. What you’ll see is that the UI updates accordingly and you’ll see the date time stamp that was written to disk.

But in order to really see if something is on disk, we’re going to have to go digging a little bit. We’ll need to find out where the app files are located in your computer. To do this, hit ⇧⌘C in XCode to reveal the Console & Log. Take a look at the log, and you’ll see something similar to the following:

The two lines that are most important in this case are Finishing load of:... and Wrote date .... The first Finishing load line comes from PhoneGap, and tells you that the index.html file was located successfully by the UIWebView instance. To find the text file, we’ll need to navigate to ~/Library/Application Support/iPhone Simulator/6.1/Applications in Finder, enter the folder that matches the application ID that you see in the log. There, you’ll see the CustomPlugin compiled app and a Documents directory.
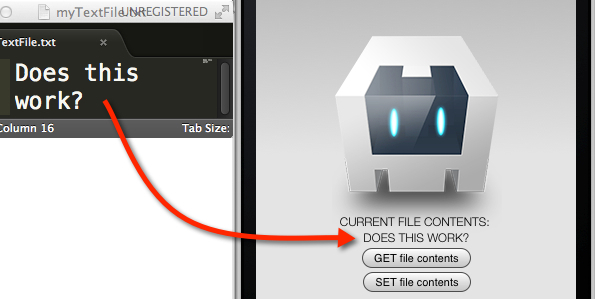
If you expand the Documents directory, you’ll see myTextFile.txt. 
Go ahead and edit that file. You’ll see that it contains the JSON date value. 
Change the file and save your edits. Then press GET file contents in your app. You’ll see that the file contents are read by FileWriter and displayed.

There you go! Everything works as designed.
A quick word about app security
In case you’re worried about app security, don’t fret. What we did was purely for a great learning experience. All applications in iOS are sandboxed, meaning they only have access to their “container” directory. This article from Apple explains it very well.
Closing
We spent a lot of time going over how to create a simple PhoneGap iOS plugin that hooks into native Objective-C functionality to write files to the file system. I hope you had as much fun following this article as I had developing the code for and writing it.
See it live
This post is a summary of my ModUX talk on Building Custom PhoneGap Plugins for iOS. If you can be in Amsterdam on September 20th 2013, then I’d love to hear about your PhoneGap experiences.
Please share
Do you think this article would be useful to your friends? Please share your thoughts, comments, and questions in the comment box below. Thanks for reading! 


 1万+
1万+

 被折叠的 条评论
为什么被折叠?
被折叠的 条评论
为什么被折叠?
 到【灌水乐园】发言


