


Mybatis 官方提供了 mybatis-spring-boot-starter
https://github.com/mybatis/spring-boot-starter
http://www.mybatis.org/spring-boot-starter/mybatis-spring-boot-autoconfigure/
Example
使用spring boot 的starter pom
需要导入 mybatis-spring-boot-starter 和 数据库连接相关的配置
pom.xml
<project xmlns="http://maven.apache.org/POM/4.0.0" xmlns:xsi="http://www.w3.org/2001/XMLSchema-instance"
	xsi:schemaLocation="http://maven.apache.org/POM/4.0.0 http://maven.apache.org/xsd/maven-4.0.0.xsd">
	<modelVersion>4.0.0</modelVersion>

	<groupId>com.ibigsea</groupId>
	<artifactId>bootdao</artifactId>
	<version>0.0.1-SNAPSHOT</version>
	<packaging>jar</packaging>

	<name>bootdao</name>
	<url>http://maven.apache.org</url>

	<properties>
		<project.build.sourceEncoding>UTF-8</project.build.sourceEncoding>
		<boot.version>1.3.1.RELEASE</boot.version>
	</properties>

	<dependencies>
		<dependency>
			<groupId>org.springframework.boot</groupId>
			<artifactId>spring-boot-starter-web</artifactId>
			<version>${boot.version}</version>
		</dependency>
		<dependency>
			<groupId>org.mybatis.spring.boot</groupId>
			<artifactId>mybatis-spring-boot-starter</artifactId>
			<version>1.1.1</version>
		</dependency>
		<!-- mysql 驱动 -->
		<dependency>
			<groupId>mysql</groupId>
			<artifactId>mysql-connector-java</artifactId>
			<version>5.1.38</version>
		</dependency>
		<!-- 数据库连接池 -->
		<dependency>
			<groupId>com.alibaba</groupId>
			<artifactId>druid</artifactId>
			<version>1.0.5</version>
		</dependency>
		<dependency>
			<groupId>org.springframework.boot</groupId>
			<artifactId>spring-boot-starter-test</artifactId>
			<version>${boot.version}</version>
			<scope>test</scope>
		</dependency>
	</dependencies>

	<build>
		<plugins>
			<plugin>
				<groupId>org.springframework.boot</groupId>
				<artifactId>spring-boot-maven-plugin</artifactId>
			</plugin>
		</plugins>
	</build>

</project>是不是很方便,mybatis的starter pom里面依赖了mybatis和spring相关的jar
只需导入一个就OK了

这里采用的是阿里巴巴的druid数据连接池
为了方便使用 yml配置文件
application.yml
---
spring:
  profiles : dev
  datasource:
    name: mydb
    type: com.alibaba.druid.pool.DruidDataSource
    url: jdbc:mysql://127.0.0.1:3306/mytestdb
    username: root
    password: 123456
    driver-class-name: com.mysql.jdbc.Driver
    minIdle: 1
    maxActive: 2
    initialSize: 1
    timeBetweenEvictionRunsMillis: 3000
    minEvictableIdleTimeMillis: 300000
    validationQuery: SELECT 'ZTM' FROM DUAL
    testWhileIdle: true
    testOnBorrow: false
    testOnReturn: false


mybatis:
  mapperLocations: classpath*:com/ibigsea/bootdao/mapper/*.xml
  typeAliasesPackage: com.ibigsea.bootdao.entity
User.java
package com.ibigsea.bootdao.entity;

import java.io.Serializable;

public class User implements Serializable {

	private static final long serialVersionUID = 8809101560720973267L;

	private Integer id;

	private String userName;

	private Integer age;

	public Integer getId() {
		return id;
	}

	public void setId(Integer id) {
		this.id = id;
	}

	public String getUserName() {
		return userName;
	}

	public void setUserName(String userName) {
		this.userName = userName;
	}

	public Integer getAge() {
		return age;
	}

	public void setAge(Integer age) {
		this.age = age;
	}

	@Override
	public String toString() {
		return "User [id=" + id + ", userName=" + userName + ", age=" + age + "]";
	}


}
UserMapper.java
package com.ibigsea.bootdao.mapper;

import java.util.List;

import org.apache.ibatis.annotations.Mapper;

import com.ibigsea.bootdao.entity.User;

@Mapper
public interface UserMapper {

	int save(User user);

	User selectById(Integer id);

	int updateById(User user);

	int deleteById(Integer id);

	List<User> queryAll();

}<p>UserMapper.xml</p><?xml version="1.0" encoding="UTF-8" ?>
<!DOCTYPE mapper PUBLIC "-//mybatis.org//DTD Mapper 3.0//EN" "http://mybatis.org/dtd/mybatis-3-mapper.dtd" >
<mapper namespace="com.ibigsea.bootdao.mapper.UserMapper" >
<insert id="save" parameterType="com.ibigsea.bootdao.entity.User">
insert into t_user(username,age) values(#{userName,jdbcType=VARCHAR},#{age,jdbcType=NUMERIC})
</insert>
<select id="selectById" resultType="com.ibigsea.bootdao.entity.User">
select * from t_user where id = #{id,jdbcType=NUMERIC}
</select>
<update id="updateById" parameterType="com.ibigsea.bootdao.entity.User">
update t_user set
username = #{userName,jdbcType=VARCHAR} ,
age = #{age,jdbcType=NUMERIC}
where id = #{id,jdbcType=NUMERIC}
</update>
<delete id="deleteById">
delete from t_user where id = #{id,jdbcType=NUMERIC}
</delete>
<select id="queryAll" resultType="com.ibigsea.bootdao.entity.User">
select * from t_user
</select>
</mapper>启动类 App.class
package com.ibigsea.bootdao;

import org.springframework.boot.autoconfigure.SpringBootApplication;

/**
 * Hello world!
 *
 */
@SpringBootApplication
//启注解事务管理
@EnableTransactionManagement
public class App {
	public static void main(String[] args) {
		System.out.println("Hello World!");
	}
}这里使用test来测试
package com.ibigsea.bootdao;

import org.junit.Test;
import org.junit.runner.RunWith;
import org.springframework.beans.factory.annotation.Autowired;
import org.springframework.boot.test.SpringApplicationConfiguration;
import org.springframework.test.context.ActiveProfiles;
import org.springframework.test.context.junit4.SpringJUnit4ClassRunner;

import com.ibigsea.bootdao.entity.User;
import com.ibigsea.bootdao.mapper.UserMapper;

@RunWith(SpringJUnit4ClassRunner.class)
@SpringApplicationConfiguration(classes = {App.class})
//相当于  --spring.profiles.active=dev
@ActiveProfiles(value="dev")
public class AppTest {

	@Autowired
	private UserMapper mapper;

	@Test
	public void testInsert(){
		User user = new User();
		user.setUserName("张三");
		user.setAge(23);
		mapper.save(user);
		System.out.println("插入用户信息"+user.getUserName());
	}

}运行结果:

Ok 数据库这边也有数据了
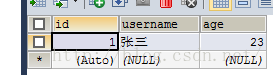
表结构这边就不提供了 , 就一个很简单的表 自己创建一个就可以了
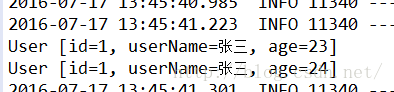
查询:
@Test
	public void testSelect(){
		User user = mapper.selectById(1);
		System.out.println(user);
	}
update
@Test
	public void testUpdate(){
		User user = mapper.selectById(1);
		System.out.println(user);
		user.setAge(24);
		mapper.updateById(user);
		user = mapper.selectById(1);
		System.out.println(user);

	}
Mybatis相关的配置

MybatisAutoConfiguration
Spring boot 在运行的时候会进行自动配置
读取到 mybatis-spring-boot-autoconfigure 里面的spring.factories,然后自动配置
就是下面这个类
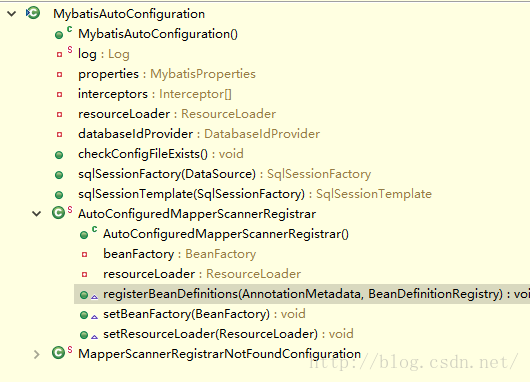

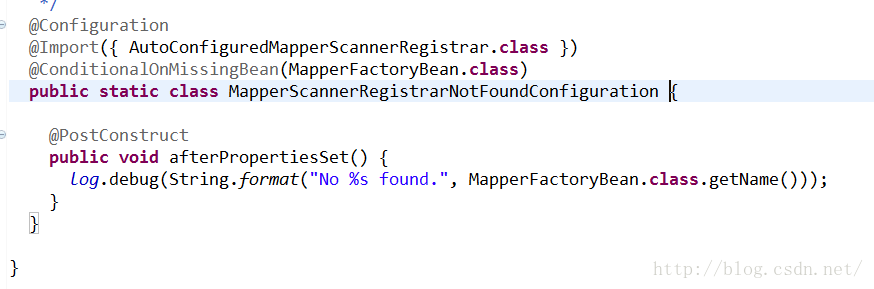
这个方法使用了PostConstruct注解,在初始化的时候去加载mybatis的配置文件,然后创建SqlSessionFactory等
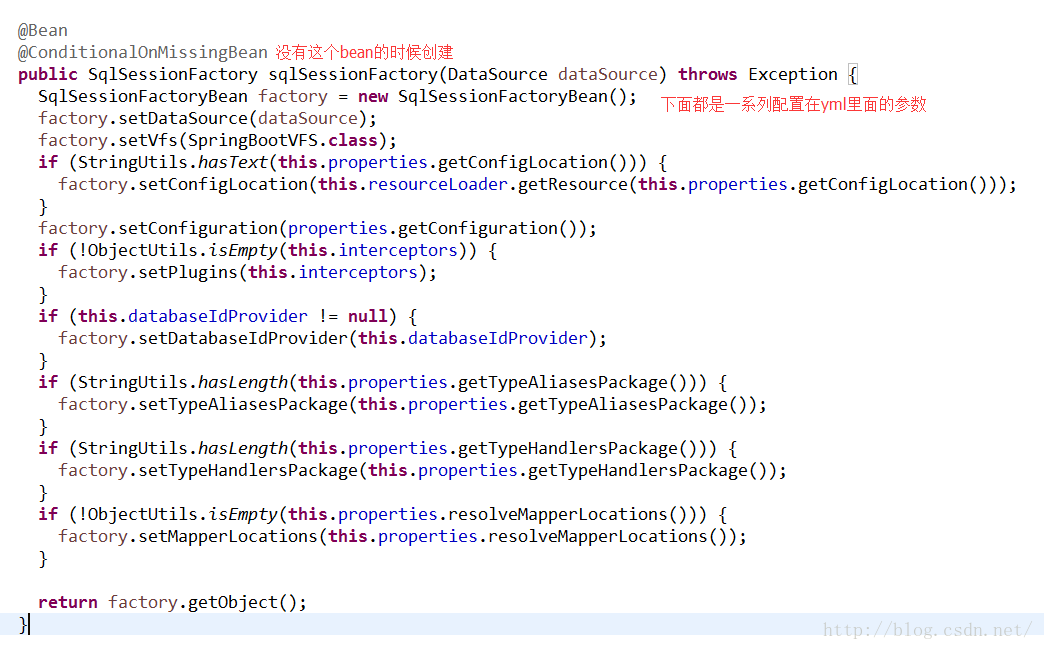

Mybatis自动配置会自动创建 sqlSessionFactory和SqlSessionTemplate
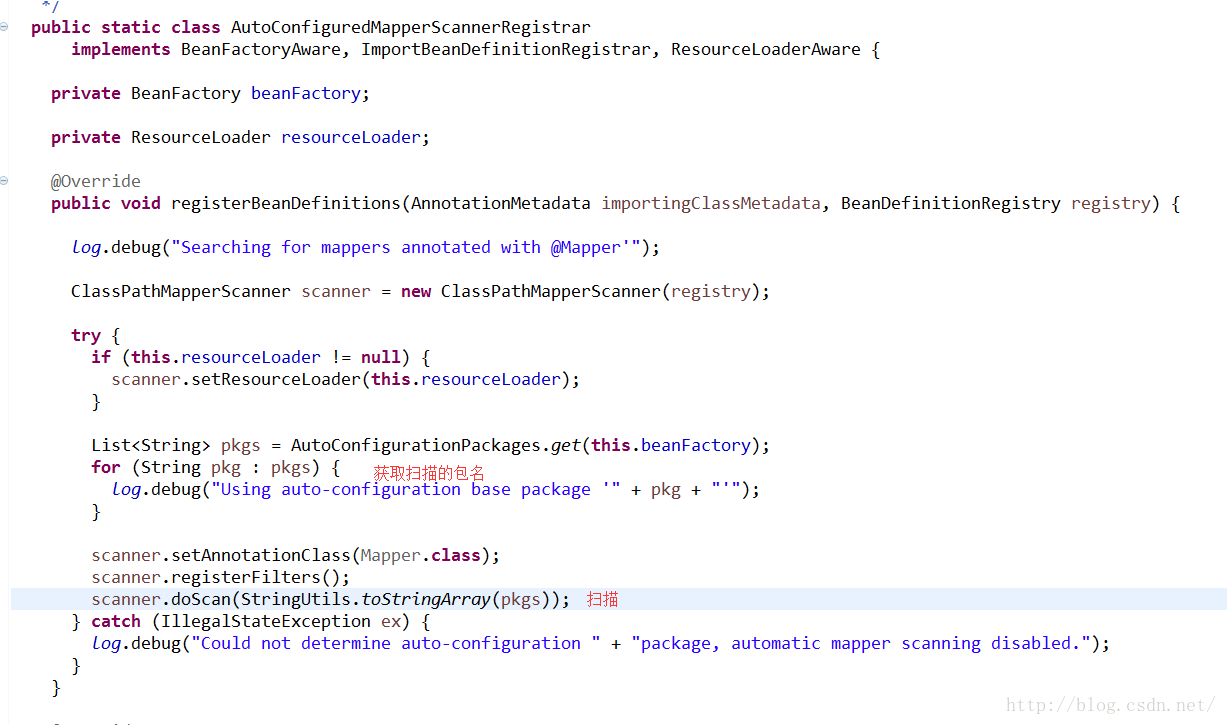
这个东西 就是 加载在注解了@Mapper的类
如果不喜欢在mapper上面加注解的话,也可以通过@MapperScan
这样子:

这样就OK啦
关于事务方面
在启动类上面添加
@EnableTransactionManagement注解
然后在类上面或者方法上面添加@Transactional注解
package com.ibigsea.bootdao.service;

import org.springframework.beans.factory.annotation.Autowired;
import org.springframework.stereotype.Service;
import org.springframework.transaction.annotation.Transactional;

import com.ibigsea.bootdao.entity.User;
import com.ibigsea.bootdao.mapper.UserMapper;

@Service("userService")
//在方法和类上面都可以
@Transactional
public class UserService {
@Autowired
private UserMapper mapper;
public void insetUser() throws Exception {
User user = new User();
user.setUserName("李四");
user.setAge(23);
mapper.save(user);
System.out.println("插入用户信息"+user.getUserName());
if (user.getUserName().equals("李四")) {
throw new IllegalArgumentException("出现异常QAQ");
}
user = new User();
user.setUserName("李四11111");
user.setAge(23);
mapper.save(user);
}
}
@RunWith(SpringJUnit4ClassRunner.class)
@SpringApplicationConfiguration(classes = {App.class})
//相当于  --spring.profiles.active=dev
@ActiveProfiles(value="dev")
@EnableTransactionManagement
public class AppTest {


	@Autowired
	private UserService userService;


	@Test
	public void testTransactional() throws Exception {
		userService.insetUser();
	}

}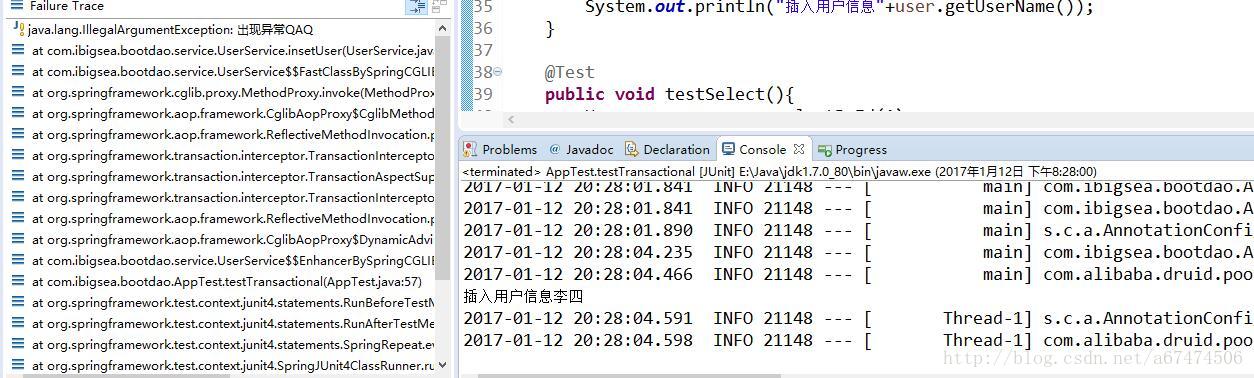
数据库结果

我们吧@Transactional注解去掉 或者去掉 @EnableTransactionManagement注解
测试下看看
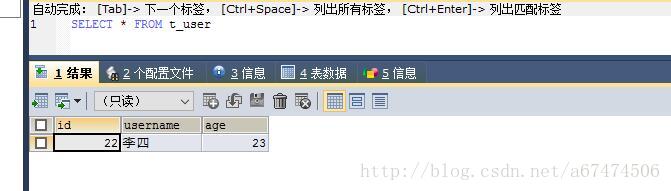
数据被插入~~~~~


 3347
3347


 被折叠的 条评论
为什么被折叠?
被折叠的 条评论
为什么被折叠?
 到【灌水乐园】发言


