


大屏iPhone的发布,感觉是时候必须使用autolayout布局的,最近看了很多的文章,开始尝试使用autolayout布局.UITableView是项目中最常用的控件,所以我决定从使用autolayout布局UITableViewCell开始,期间出现了很多问题,通过搜索,询问其他人好在都解决了,把解决的过程贴出来,可以帮助其他遇到相同问题的人,也相当于自己做笔记吧.
首先自定义UITableViewCell,然后创建子控件
_projectImageView = [[UIImageView alloc] init];
    _projectImageView.backgroundColor = [UIColor redColor];
    _projectImageView.translatesAutoresizingMaskIntoConstraints = NO; //如果使用自动布局的话,这个必须设置
    [self.contentView addSubview:_projectImageView];
    _projectTitleLabel = [[UILabel alloc] init];
    _projectTitleLabel.lineBreakMode = NSLineBreakByCharWrapping;
    _projectTitleLabel.numberOfLines = 2;
    _projectTitleLabel.text = @"全国大型IT项目管理巡回讲座";
    _projectTitleLabel.translatesAutoresizingMaskIntoConstraints = NO;
    [self.contentView addSubview:_projectTitleLabel];
    _projectTimeLabel = [[UILabel alloc] init];
    _projectTimeLabel.text = @"时间:1月15日13时-1月15日15时";
    _projectTimeLabel.translatesAutoresizingMaskIntoConstraints = NO;
    [self.contentView addSubview:_projectTimeLabel];
    _projectPriceLabel = [[UILabel alloc] init];
    _projectPriceLabel.text = @"费用:免费";
    _projectPriceLabel.translatesAutoresizingMaskIntoConstraints = NO;
    [self.contentView addSubview:_projectPriceLabel];
    _projectAddrLabel = [[UILabel alloc] init];
    _projectAddrLabel.text = @"地点:在线";
    _projectAddrLabel.translatesAutoresizingMaskIntoConstraints = NO;
    [self.contentView addSubview:_projectAddrLabel];
    _attentionBtn = [[UIButton alloc] init];
    _attentionBtn.backgroundColor = [UIColor purpleColor];
    [_attentionBtn setTitle:@"关注" forState:UIControlStateNormal];
    _attentionBtn.translatesAutoresizingMaskIntoConstraints = NO;
    [self.contentView addSubview:_attentionBtn];
    _addCalenderBtn = [[UIButton alloc] init];
    _addCalenderBtn.backgroundColor = [UIColor blueColor];
    _addCalenderBtn.translatesAutoresizingMaskIntoConstraints = NO;
    [_addCalenderBtn setTitle:@"日历" forState:UIControlStateNormal];
[self.contentView addSubview:_addCalenderBtn];NSDictionary * views = NSDictionaryOfVariableBindings(_projectImageView,_projectTitleLabel,_projectTimeLabel,_projectAddrLabel,_projectPriceLabel,_addCalenderBtn,_attentionBtn);
NSString * vlf0 = @"|-10-[_projectImageView(80)]-10-[_projectTitleLabel]-10-|";
NSString * vlf1 = @"V:|-10-[_projectImageView(100)]-(>=10@750)-[_attentionBtn]";
NSString * vlf2 = @"V:|-10-[_projectTitleLabel]-5-[_projectTimeLabel]-5-[_projectAddrLabel]-5-[_projectPriceLabel]-(>=5)-[_attentionBtn]-10-|";
NSString * vlf3 = @"|-10-[_attentionBtn(_addCalenderBtn)]-[_addCalenderBtn]-10-|";
NSString * vlf4 = @"|-10-[_projectImageView]-10-[_projectTimeLabel]-10-|";
NSString * vlf5 = @"|-10-[_projectImageView]-10-[_projectAddrLabel]-10-|";
NSString * vlf6 = @"|-10-[_projectImageView]-10-[_projectPriceLabel]-10-|";
NSString * vlf7 = @"V:|-10-[_projectTitleLabel]-5-[_projectTimeLabel]-5-[_projectAddrLabel]-5-[_projectPriceLabel]-(>=5)-[_addCalenderBtn(_attentionBtn)]-10-|";
[self.contentView addConstraints:[NSLayoutConstraint constraintsWithVisualFormat:vlf1 options:0 metrics:nil views:views]];
[self.contentView addConstraints:[NSLayoutConstraint constraintsWithVisualFormat:vlf6 options:0 metrics:nil views:views]];
[self.contentView addConstraints:[NSLayoutConstraint constraintsWithVisualFormat:vlf0 options:0 metrics:nil views:views]];
[self.contentView addConstraints:[NSLayoutConstraint constraintsWithVisualFormat:vlf3 options:0 metrics:nil views:views]];
[self.contentView addConstraints:[NSLayoutConstraint constraintsWithVisualFormat:vlf4 options:0 metrics:nil views:views]];
[self.contentView addConstraints:[NSLayoutConstraint constraintsWithVisualFormat:vlf5 options:0 metrics:nil views:views]];
[self.contentView addConstraints:[NSLayoutConstraint constraintsWithVisualFormat:vlf2 options:0 metrics:nil views:views]];
[self.contentView addConstraints:[NSLayoutConstraint constraintsWithVisualFormat:vlf7 options:0 metrics:nil views:views]];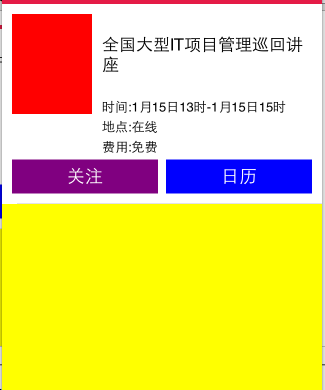
,嗯,高度太大了,标题和时间之间的距离太大了,如果能取得cell自动布局之后的高度就好了,通过查询得到方法,参考文章,如果想要取得cell自动布局的高度,约束条件必须从父视图的左边界到右边界,上边界到下边界布局完整,如果最下面的控件,不设置到下边界的距离,那么系统不能确定父视图的高度,systemLayoutSizeFittingSize返回的size则会是{0,0}
- (CGFloat)tableView:(UITableView *)tableView heightForRowAtIndexPath:(NSIndexPath *)indexPath {
    [_headerCell setNeedsUpdateConstraints];
    [_headerCell updateConstraintsIfNeeded];
    [_headerCell.contentView setNeedsLayout];
    [_headerCell.contentView layoutIfNeeded];
    CGFloat height = [_headerCell.contentView systemLayoutSizeFittingSize:UILayoutFittingCompressedSize].height;
    return height;
}
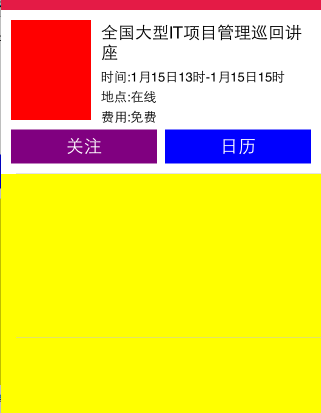
嗯,现在效果好多了,但是我只用了一个全局的cell,我需要不用全局cell,使用cell的重用机制
- (CGFloat)tableView:(UITableView *)tableView heightForRowAtIndexPath:(NSIndexPath *)indexPath {
CustomCell * cell = (CustomCell *)[self tableView:_tableView cellForRowAtIndexPath:indexPath];- (NSInteger)tableView:(UITableView *)tableView numberOfRowsInSection:(NSInteger)section {
return 100;
}- (UITableViewCell *)tableView:(UITableView *)tableView cellForRowAtIndexPath:(NSIndexPath *)indexPath {
CustomCell * cell = [_tableView dequeueReusableCellWithIdentifier:kHeaderIndentifier];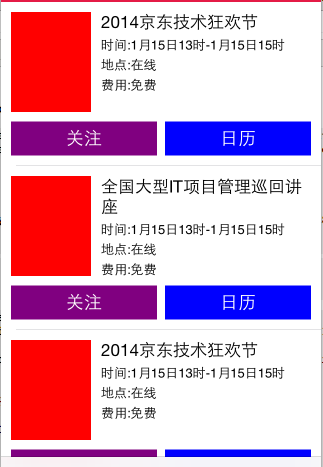
效果很好,已经实现了,但是我们还能更简单一些,在iOS8中苹果已经为我们做了更多,在viewDidLoad加上下面的方法
[self.tableViewregisterClass:[CustomCellclass]forCellReuseIdentifier:kHeaderIndentifier];
修改方法- (UITableViewCell *)tableView:(UITableView *)tableView cellForRowAtIndexPath:(NSIndexPath *)indexPath {
//CustomCell * cell = [_tableView dequeueReusableCellWithIdentifier:kHeaderIndentifier];
CustomCell * cell = [_tableView dequeueReusableCellWithIdentifier:kHeaderIndentifier forIndexPath:indexPath];
// if (cell == nil) {
// cell = [[CustomCell alloc] initWithStyle:UITableViewCellStyleDefault reuseIdentifier:kHeaderIndentifier];
// }
if (indexPath.row %2 == 0) {
cell.projectTitleLabel.text = @"2014京东技术狂欢节";
} else {
cell.projectTitleLabel.text = @"全国大型IT项目管理巡回讲座";
}
return cell;
}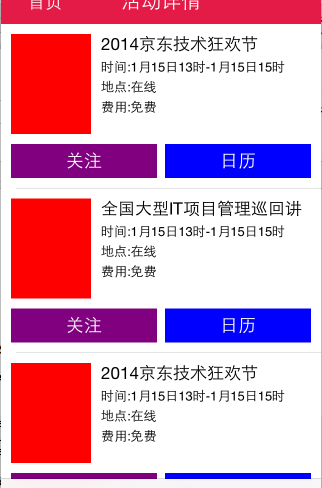
为什么标题只剩下一行了,这可不是我想要的效果,在找找原因,UILabel 6.0后多了preferredMaxLayoutWidth,我们就使用它,在自定义的cell中添加方法
-(void)layoutSubviews {
    [super layoutSubviews];
    _projectTitleLabel.preferredMaxLayoutWidth = CGRectGetWidth(_projectTitleLabel.frame);
    _projectTimeLabel.preferredMaxLayoutWidth = CGRectGetWidth(_projectTimeLabel.frame);
    _projectPriceLabel.preferredMaxLayoutWidth = CGRectGetWidth(_projectPriceLabel.frame);
    _projectAddrLabel.preferredMaxLayoutWidth = CGRectGetWidth(_projectAddrLabel.frame);
    [super layoutSubviews];
}
完成


 642
642

 被折叠的 条评论
为什么被折叠?
被折叠的 条评论
为什么被折叠?
 到【灌水乐园】发言


