


CollectionView 和tableView类似,不同的地方在于tableView中每行只能有一个cell,
collection 允许有多列数据
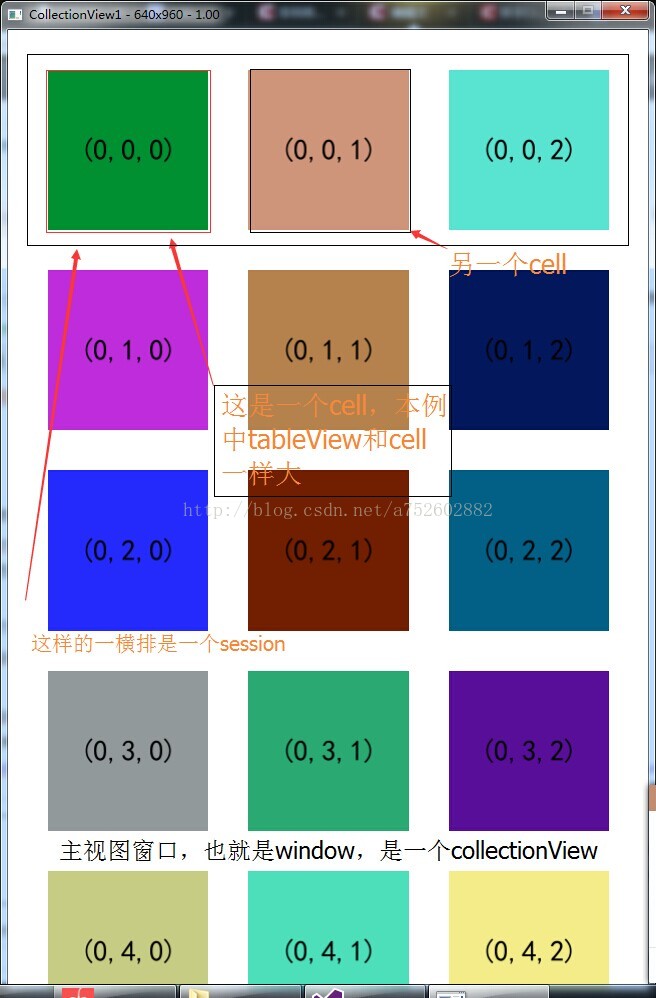
session写错了,也解释错了,section组代号(文章结尾)
collectionView 是 view的派生类,创建的方法也是单例模式:
CACollectionView*p_Conllection = CACollectionView::createWithFrame(this->getView()->getBounds());
设置过各种属性后,把添加到视图(一般来说是window主窗口)
和tableview一样,以下的函数都是虚函数,分别来自CACollectionViewDelegate,
CACollectionViewDataSource两个类
要对conllectionView进行一系列操作,就要涉及到相关的两个类
CACollectionViewDelegate(响应事件), CACollectionViewDataSource(数据代理)
CACollectionViewDelegate:
void FirstViewController::collectionViewDidSelectCellAtIndexPath(CACollectionView *collectionView, unsigned int section, unsigned int row, unsigned int item)
{
CCLog(UTF8("选中"));
}
void FirstViewController::collectionViewDidDeselectCellAtIndexPath(CACollectionView *collectionView, unsigned int section, unsigned int row, unsigned int item)
{
CCLog(UTF8("取消选中"));
}
CACollectionViewDataSource:
//形参表解释: collectionView是指的在viewDidLoad()这个函数中创建的CACollectionView
cellSize指的是cell大小,section理解为组的意思(下文解释),row是行,item是一行中的第几个
CACollectionViewCell* FirstViewController::collectionCellAtIndex(CACollectionView *collectionView, \
const CCSize& cellSize, unsigned int section, unsigned int row, unsigned int item){
//如果cell个数>=40
if (row*3+item>=colorArr.size())
{
return NULL;
}
CADipSize _size = cellSize;
//collection
//其实这样写效果一样CACollectionViewCell* p_Cell = NULL;每次调用这个函数的时候都没有一个叫做CrossApp的cell,每次都调用了if循环中的语句
CACollectionViewCell* p_Cell = collectionView->dequeueReusableCellWithIdentifier("CrossApp");
if (p_Cell==NULL)
{
p_Cell = CACollectionViewCell::create("CrossApp");
//创建一个和cell一样大的CAView视图,设置tag=99
CAView* itemImage = CAView::createWithFrame(CADipRect(0,0,_size.width,_size.height));
itemImage->setTag(99);
p_Cell->addSubview(itemImage);
//创建一个大小为150,40的CALable ,设置在当前cell的中心
CADipSize itemsize = itemImage->getBounds().size;
CALabel* itemText = CALabel::createWithCenter(CADipRect(itemsize.width*0.5, itemsize.height*0.5, 150, 40));
itemText->setTag(100);
itemText->setFontSize(_px(29));
itemText->setTextAlignment(CATextAlignmentCenter);
itemText->setVerticalTextAlignmet(CAVerticalTextAlignmentCenter);
itemImage->addSubview(itemText);
}
//获得View,设置view的颜色
CAView* itemImageView = p_Cell->getSubviewByTag(99);
itemImageView->setColor(colorArr.at(row*3+item));
//调试的语句
CCLog("%d", row * 3 + item);
//获得当前View下的lable ,设置lable的文字
char pos[20] = "";
sprintf(pos,"(%d,%d,%d)",section,row,item);
CALabel* itemText =(CALabel*)p_Cell->getSubviewByTag(99)->getSubviewByTag(100);
itemText->setText(pos);
return p_Cell;
}
//sections=1 指着是 有一个collectionView,如果为2就会产生2组collectionView
第一组sections全为0,第二组全为1,(循环多少次collectionView)
unsigned int FirstViewController::numberOfSections(CACollectionView *collectionView)
{
return 1;
}
//一个collectionView有多少行
unsigned int FirstViewController::numberOfRowsInSection(CACollectionView *collectionView, unsigned int section)
{
return colorArr.size() % 3 == 0 ? colorArr.size() / 3 : colorArr.size() / 3 + 1;
}
//一行row 有多少个
unsigned int FirstViewController::numberOfItemsInRowsInSection(CACollectionView *collectionView, unsigned int section, unsigned int row)
{
return 3;
}
//设置cell的高度height
unsigned int FirstViewController::collectionViewHeightForRowAtIndexPath(CACollectionView* collectionView, unsigned int section, unsigned int row)
{
return (this->getView()->getBounds().size.width - _px(40) * 4) / 3;
}
ps:为什么不控制cell的高度呢?CCSize& cellSize.width=window的宽度-cell个数*3-_px(40)*3


 1473
1473

 被折叠的 条评论
为什么被折叠?
被折叠的 条评论
为什么被折叠?
 到【灌水乐园】发言


