


一 zabbix功能简介
1.zabbix三大监控组件
- zabbix server
- web gui
- database
- zabbix_server
- zabbix proxy
- agent client
2.监控流程
- agent client安装在被监控的主机
- agent负责定期收集客户端本地各项数据,并发送到server端
- zabbix server收到数据,将数据存储到数据库中
- 用户基于zabbix web看到图形数据
3.zabbix组件功能
- zabbix server 负责接收agent发送的报告信息的核心组件,所有配置、统计数据、操作数据由其组织进行
- database storage 用于存储所有的配置信息,以及存储有zabbix client收集到的数据
- web interface zabbix的gui接口,通常与server运行在同一台主机上
- proxy 用于分布式监控环境,为减轻server压力,代理server收集部分被监控端的监控数据并统一发送给server
- zabbix agent 部署在被监控主机上,负责收集本地数据并发往server端或者proxy端
4.5个监控程序
- zabbix_server 服务端守护进程,用于接收zabbix_agentd/zabbix_get/zabbix_sender/zabbix_proxy的数据
- zabbix_agentd 客户端守护进程,负责收集客户端本地数据,cpu/mem/disk/io/network等
- zabbix_get zabbix数据获取工具,在server端或者proxy端执行获取远程客户端信息的命令
- zabbix_sender zabbix数据发送工具,在client端使用并发送数据给server或者proxy,耗时长,通常用脚本执行完毕后用于主动提交数据
- zabbix_proxy zabbix分布式代理守护进程,分布式监控架构需要另外部署
5.常见3种监控方式
- agent 以zabbix_agent客户端插件监控OS状态
- SNMP 监控网络设备
- IPMI 智能平台管理接口(intelligent platform management interface),监控设备物理特性,设备加电即可监控
agent主被动模式
在client配置文件中修改参数
- 主动模式 默认,StartAgents=1
- agent主动请求server获取监控项列表
- 主动将监控项需要检测的数据发送给server/proxy
- agent首先向参数ServerActive配置的IP请求获取active items
- 获取并提交active items数据给server/proxy
- 被动模式 StartAgents=0
- Server向agent请求获取监控项的数据
- agent返回数据
- server打开一个TCP连接,server发送请求agent.ping
- agent接收到请求并响应
- server处理接收到的数据
6.监控名词
- host 被监控的对象,可以是主机、设备
- host group host的组,批量操作
- item 监控项,items值有独立的keys进行识别
- trigger 触发器,为某个item设置触发器,达到触发条件执行actie动作
- action 动作,对于特定时间预先定义处理方法,可以发送信息提醒或者发送命令
- event 事件,引起触发器称之为一个事件
- escalation 报警升级,发送警报或执行远程命令的自定义方案,比如多长时间发送多少次告警
- media 发送通知发送,常用email
- notification 提醒,通过media设置的方式向用户发送有关事件的信息
- template 模板,快速应用item、trigger、graph、screen、application给host或者host group
- web scennario web场景,用于检车web站点,监控http头部代码
- frontend web前段,zabbix的web接口
- graph 监控图像
二 zabbix部署
https://excellmedia.dl.sourceforge.net/project/zabbix/ZABBIX%20Latest%20Stable/3.4.7/zabbix-3.4.7.tar.gz
http://www.techoism.com/install-zabbix-server-on-centosrhel-765/
1.系统环境
- OS版本:centos7.1
- mysql版本:5.6.39
- zabbix版本:3.2.6
2.下载zabbix
wget https://excellmedia.dl.sourceforge.net/project/zabbix/ZABBIX%20Latest%20Stable/3.4.7/zabbix-3.4.7.tar.gz3.server和client都安装依赖包和创建zabbix用户
yum -y install curl curl-devel net-snmp net-snmp-devel perl-DBI libevent libevent-devel libxml2 libxml2-devel
groupadd zabbix
useradd -g zabbix zabbix
usermod -s /sbin/nologin zabbix
For all of the Zabbix daemon processes, an unprivileged user is required. If a Zabbix daemon is started from an unprivileged user account, it will run as that user.
However, if a daemon is started from a 'root' account, it will switch to a 'zabbix' user account, which must be present. To create such a user account (in its own group, “zabbix”) on Linux systems
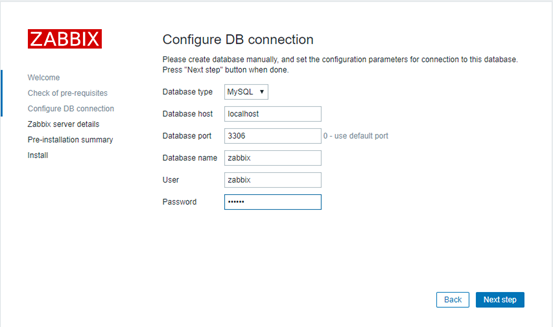
4.server端配置
1.创建数据库
create database zabbix default charset=utf8;
grant all on zabbix.* to 'zabbix'@'localhost' identified by 'zabbix';
2.解压zabbix并导入sql到DB
sql脚本在zabbix-3.4.7/database/mysql/
tar -zxvf zabbix-3.4.7.tar.gz
mysql -uzabbix -pzabbix zabbix < zabbix-3.4.7/database/mysql/schema.sql
mysql -uzabbix -pzabbix zabbix < zabbix-3.4.7/database/mysql/images.sql
mysql -uzabbix -pzabbix zabbix < zabbix-3.4.7/database/mysql/data.sql
3.编译安装zabbix server
./configure --help 查看帮助
cd zabbix-3.4.7
./configure --prefix=/usr/local/zabbix --enable-server --enable-agent --with-mysql --enable-ipv6 --with-net-snmp --with-libcurl --with-libxml2
make && make install
ln -s /usr/local/zabbix/sbin/zabbix_* /usr/local/sbin/
configure完毕后提示直接make install
***********************************************************
*            Now run 'make install'                       *
*                                                         *
*            Thank you for using Zabbix!                  *
*              <http://www.zabbix.com>                    *
***********************************************************
4.改配置
cd /usr/local/zabbix/etc
cp -rp zabbix_server.conf zabbix_server.conf.bak
vi zabbix_server.conf
LogFile=/tmp/zabbix_server.log
DBHost=localhost
DBName=zabbix
DBUser=zabbix
DBPassword=zabbix
5.拷贝启动
[root@mysql01 tru64]# pwd
/dvd/zabbix-3.4.7/misc/init.d/tru64
[root@mysql01 tru64]# cp /dvd/zabbix-3.4.7/misc/init.d/tru64/zabbix_server /etc/init.d/
[root@mysql01 tru64]# chmod o+x /etc/init.d//zabbix_server
[root@mysql01 tru64]# cd /etc/init.d
[root@mysql01 init.d]# ls -l|grep zabbix_server
-rw-r--r-x  1 root root  1521 Feb 26 23:00 zabbix_server
6.配置interface web
- 安装php5.6
yum install http://repo.webtatic.com/yum/el7/epel-release.rpm -y
yum install https://mirror.webtatic.com/yum/el7/webtatic-release.rpm -y
yum install php70w php70w-mysql php70w-bcmath php70w-mbstring php70w-gd php70w-xml httpd httpd-devel httpd-tools -y
yum install php56w.x86_64 php56w-cli.x86_64 php56w-common.x86.64 php56w-gd.x86_64 php56w-ldap.x86_64 php56w-mbstring.x86_64 php56w-mcrypt.x86_64 php56w-mysql.x86_64 php56w-pdo.x86_64 httpd httpd-devel httpd-tools -y
- 拷贝frontends到apache站点
[root@mysql01 html]# mkdir /var/www/html/zabbix/
[root@mysql01 html]# cp -rp /dvd/zabbix-3.4.7/frontends/php/* /var/www/html/zabbix/- 更改php.ini
cp -rp /etc/php.ini /etc/php.ini.bak
sed -i 's/\;date.timezone =/date.timezone=PRC/g' /etc/php.ini
sed -i '/max_input_time =/s/60/300/' /etc/php.ini
sed -i '/mbstring.func_overload = 0/a\mbstring.func_overload = 1' /etc/php.ini
sed -i '/post_max_size =/s/8M/32M/' /etc/php.ini
sed -i 's/max_execution_time = 30/max_execution_time = 300/g' /etc/php.ini
7.启动zabbix_server、apache
/etc/init.d/zabbix_server start
systemctl start httpd.service
-c --config config-file Path to the configuration file default: "/usr/local/zabbix/etc/zabbix_server.conf"
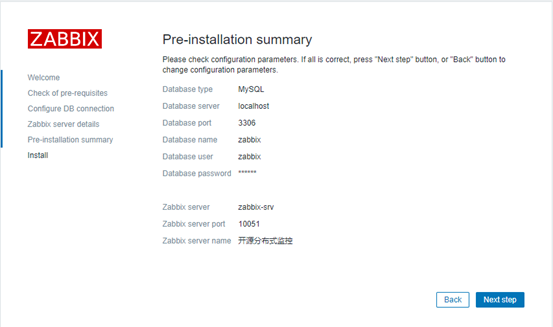
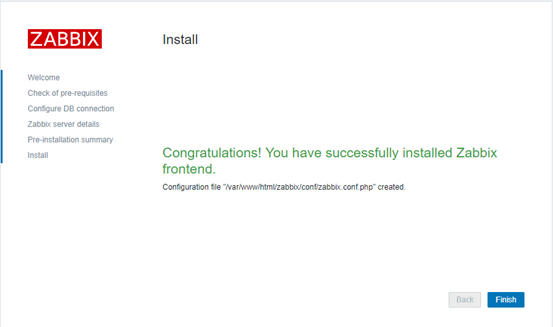
8.初始化zabbix
http://192.168.3.4/zabbix/
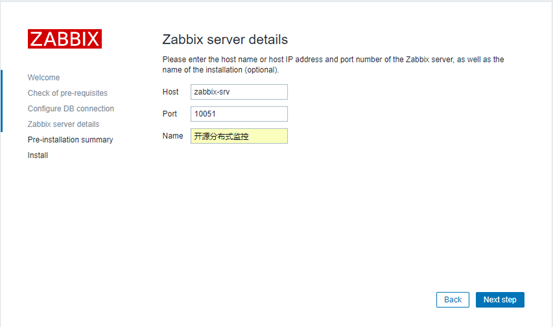
name会在网页标题了显示
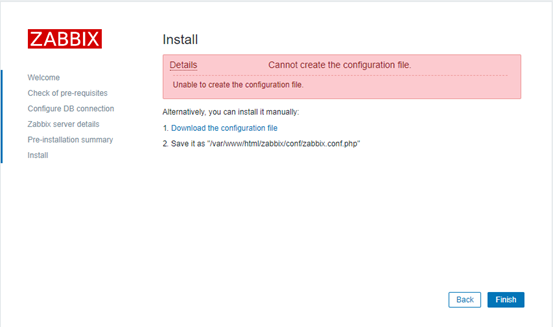
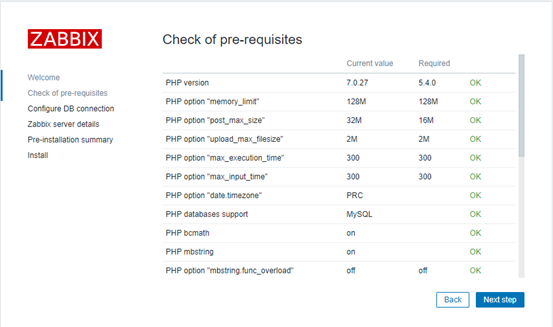
9.初始化时候的错误处理
1.php依赖报错处理:yum install php70w-mysql php70w-bcmath php70w-mbstring php70w-gd php70w-xml -y
At least one of MySQL, PostgreSQL, Oracle or IBM DB2 should be supported.
PHP bcmath extension missing (PHP configuration parameter --enable-bcmath).
PHP mbstring extension missing (PHP configuration parameter --enable-mbstring).
PHP gd extension missing (PHP configuration parameter --with-gd).
PHP gd PNG image support missing.
PHP gd JPEG image support missing.
PHP gd FreeType support missing.
PHP xmlwriter extension missing.
PHP xmlreader extension missing.
2.DB connection报错处理:修改zabbix_server.confDBSocket=/data/my3306/run/mysql.sock 无效
Error connecting to database: Can't connect to local MySQL server through socket '/var/lib/mysql/mysql.sock' (2)最终修改方法:ln -s /data/my3306/run/mysql.sock /var/lib/mysql/mysql.sock
3.第二天换了一台机器重新装又报权限不足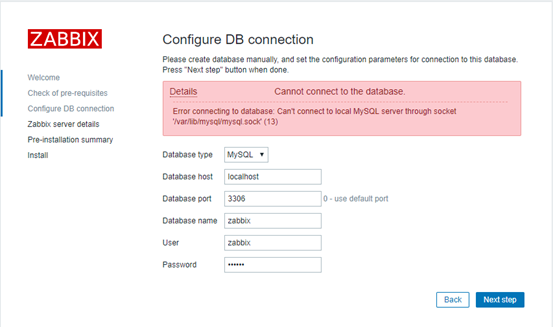
Error connecting to database: Can't connect to local MySQL server through socket '/var/lib/mysql/mysql.sock' (2)处理:
[root@mysql01 my3306]# mkdir /var/lib/mysql
[root@mysql01 my3306]# ln -s /data/my3306/run/mysql.sock /var/lib/mysql/mysql.sock
原因:
getsebool -a | grep httpd
httpd_can_network_connect_db --> off
处理 /usr/sbin/setsebool -P httpd_can_network_connect_db on,用localhost依然不行
根本原因:
[root@docker02 dvd]# getenforce
Enforcing
[root@docker02 dvd]# setenforce 0
[root@docker02 dvd]# getenforce
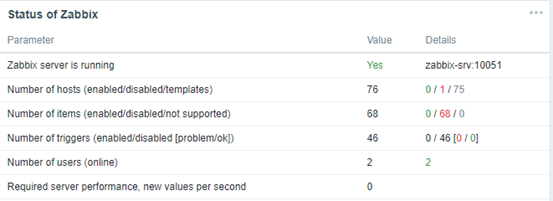
Permissive4.登录首页最下方提醒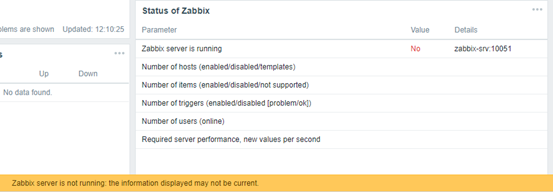
Zabbix server is not running: the information displayed may not be current
[root@docker02 selinux]# getsebool -a | grep httpd
httpd_anon_write --> off
httpd_builtin_scripting --> on
httpd_can_check_spam --> off
httpd_can_connect_ftp --> off
httpd_can_connect_ldap --> off
httpd_can_connect_mythtv --> off
httpd_can_connect_zabbix --> off
开启后依然提醒not running /usr/sbin/setsebool -P httpd_can_connect_zabbix on
https://sysads.co.uk/2013/11/08/zabbix-server-running-alert/
修改/var/www/html/zabbix/conf/zabbix.conf.php,下面参数需要和/etc/hosts对应
$ZBX_SERVER = 'zabbix-srv';10.server上启动agent
- 定位到Configuration-host-enable Zabbix server
- 报错
111 conneciton refused server log报错如下:
12116:20180227:134001.811 temporarily disabling Zabbix agent checks on host "Zabbix server": host unavailable- 启动zabbix_agentd即可正常
/etc/init.d/zabbix_agentd start
[root@docker02 tru64]# pwd
/dvd/zabbix-3.4.7/misc/init.d/tru64
[root@docker02 tru64]# cp zabbix_agentd /etc/init.d/
[root@docker02 tru64]# chmod o+x /etc/init.d/zabbix_agentd
[root@docker02 tru64]# /etc/init.d/zabbix_agentd start
5.agent客户端配置
1.解压源码编译安装zabbix agent
./configure --prefix=/usr/local/zabbix --enable-agent
make && make install
ln -s /usr/local/zabbix/sbin/zabbix_* /usr/local/sbin/
2.修改zabbix_agentd.conf
- 指定server IP
- 设置本地hostname,IP或者DNS
vi /usr/local/zabbix/etc/zabbix_agentd.conf
Server=172.16.3.154
ServerActive=172.16.3.154
Hostname=docker01
默认主动模式
$ cat zabbix_Agentd.conf
Server=X.X.X.X #如果设置为纯被动模式,则应该注释掉这一条指令
ServerActive=X.X.X.X #主动模式的server IP地址
Hostname= #在WebUI上声明主机时所使用相同的主机名(区分大小写),不配置则使用主机名。
StartAgents=0 #客户端Agent模式,设置为0表示关闭被动模式。被监控端的zabbix_agentd不监听本地端口,netstat无法查看到zabbix_agentd监听的端口。
3.创建zabbix用户并拷贝启动
[root@docker01 tru64]# groupadd zabbix
[root@docker01 tru64]# useradd -g zabbix zabbix
[root@docker01 tru64]# usermod -s /sbin/nologin zabbix
[root@docker01 tru64]# pwd
/dvd/zabbix-3.4.7/misc/init.d/tru64
[root@docker01 tru64]# cp zabbix_agentd /etc/init.d/
[root@docker01 tru64]# chmod o+x /etc/init.d/zabbix_agentd
[root@docker01 tru64]# /etc/init.d/zabbix_agentd start
4.在server端添加客户端监控
5.server无法监控agent时,可在server用命令获取items key测试
[root@docker02 etc]# /usr/local/zabbix/bin/zabbix_get -s 172.16.3.153 -k system.uname
Linux docker01 3.10.0-229.el7.x86_64 #1 SMP Fri Mar 6 11:36:42 UTC 2015 x86_64


 220
220


 被折叠的 条评论
为什么被折叠?
被折叠的 条评论
为什么被折叠?
 到【灌水乐园】发言


