


前言
- 中文文档地址
- 项目最开始使用的是高德地图组件,不过为了兼容离线地图,那高德地图就用不了了,老大叫我去学习Leaflet,只能硬着头皮上了。
- 网上关于Leaflet的教程很少,至少比关于高德的少得多,有些就写了怎么挂载地图实例,而且貌似大多都是用的基于vue封装的Vue2Leafet 组件
- 关于高德地图的一些学习记录,点这里
- 其实学习Leaflet框架已经大半年了,做前端的都是学了又忘-忘了又学,所以趁着还熟悉赶紧写写文档记下来
在本文中,我尽量的与高德地图作对比,不过由于使用Leaflet后,高德地图我很久没有维护了,所以看看就好。- 学习一个新东西的时候,啃官方文档是非常有必要的,建议先看一遍官方文档-1.6.0,不过只有英文,用浏览器自带翻译一下就好(PS:由于是国外网站,网不好有可能需要翻墙)
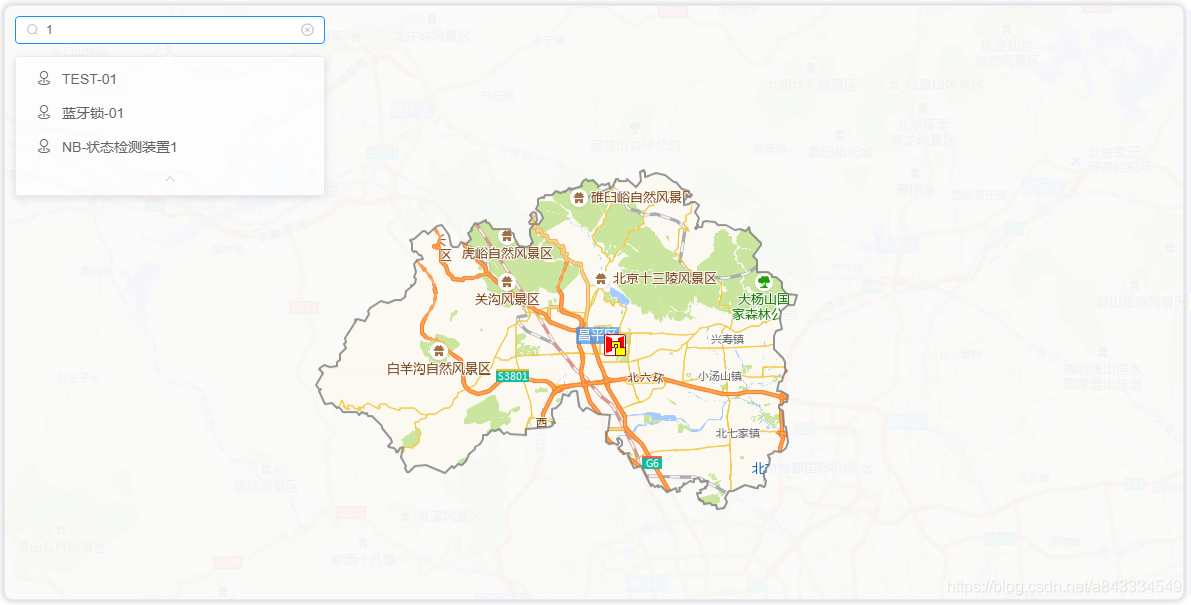
- 先贴上html模板、实际地图效果
<template>
  <div class="leaflet-map-panel"
       ref="leaflet-map-panel"
       v-loading="loading">
    <!-- 地图容器 -->
    <div id="map-container"
         ref="map">
    </div>
    <!-- 搜索输入框 -->
    <poi-search @select="jumpToTargetMarker"></poi-search>
    <!-- 信息窗体 -->
    <div style="display:none">
      <infowindow ref="infowindow"
                  :deviceInfo="showDeviceInfo">
      </infowindow>
    </div>
  </div>
</template>
写在开头的友情提示 - Leaflet与高德最重要的一个区别就是:
传入经纬度时,一定是纬度(lat)在前经度(lng)在后!这个和高德的顺序是反的!!!
传入经纬度时,一定是纬度(lat)在前经度(lng)在后!这个和高德的顺序是反的!!!
传入经纬度时,一定是纬度(lat)在前经度(lng)在后!这个和高德的顺序是反的!!!
1 Leaflet安装
npm 安装
npm i leaflet --save
or
index.html加入以下代码
..
<body>
	...
    <link rel="stylesheet" href="https://unpkg.com/leaflet@1.6.0/dist/leaflet.css" />
    <script src="https://unpkg.com/leaflet@1.6.0/dist/leaflet.js"></script>
	...
</body>
...
个人建议使用npm安装,因为我在使用index.html导入时,在发布版下会报“L未定义”的错误
官方文档
2 地图相关
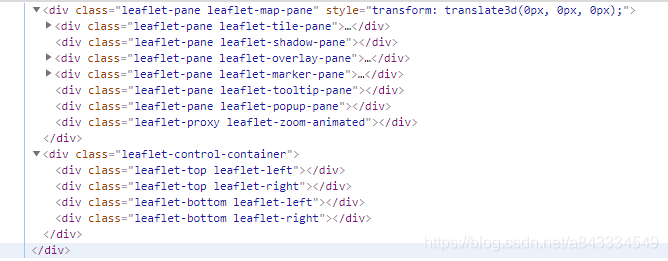
2.1 图层结构分析
- leaflet-map-pane: 地图层
- leaflet-tile-pane: 瓦片数据层
- leaflet-shadow-pane: 阴影层
- leaflet-overlay-pane: 覆盖层?IE下拖动地图不松开的时候可以看见,具体不知道干啥的
- leaflet-marker-pane: 标记点层
- leaflet-tooltip-pane: 提示框层
- leaflet-popup-pane: 弹出框层
- leaflet-zoom-animated: 缩放动画层
- leaflet-control-container: 内置控件层,如缩放控件这种
2.2 创建/挂载地图实例
- 这部分比较简单,'autopanstart’事件是信息窗体自适应移动产生的,对其进行了优化处理,防止在移动过程中触发地图相关事件
- 官方文档
    // https://www.cnblogs.com/yingyigongzi/p/10810110.html
    // https://www.cnblogs.com/zhonglinke/p/11525965.html
    async mapInit() {
      try {
        // 第一个参数为元素id
        this.map.instance = new L.map('map-container', {
          // 顺序反的反的!!
          center: [this.mapParams.location.lat, this.mapParams.location.lng], // 初始化地图中心点
          zoom: 16, // 初始化地图层级
          minZoom: 8,
          zoomControl: false,
          attributionControl: false
        })

        this.map.markerLayer = new L.featureGroup()
        this.map.markerLayer.addTo(this.map.instance)

        this.map.otherLayer = new L.featureGroup()
        this.map.otherLayer.addTo(this.map.instance)

        // 绑定地图click事件
        this.map.instance.on('click', this.mapClick)
        // 绑定地图移动与缩放事件,就不贴出来了
        this.mapRegisterEvent()
        // 处理弹出窗自适应事件
        this.map.instance.on('autopanstart', () => {
          console.log('autopan start')
          this.flag.autoPaning = true
          this.mapUnregisterEvent()
          this.map.instance.once('moveend', () => {
            console.log('autopan end')
            this.flag.autoPaning = false
            this.mapRegisterEvent()
          })
        })
        this.initRecord.mapInit.value = true
      } catch (error) {
        console.error('mapInit error: ', error)
        this.$Message(`${this.$t('gisMap.map.error.init')}: ${error}`, 'error')
        this.initRecord.mapInit.value = false
        this.initRecord.mapInit.result = error
        throw error
      }
    },
2.3 加载瓦片层
- 瓦片层实际上就是一堆png图片而已
- 高德是不需要这个步骤的,内部已经给你处理了,Leaflet是需要手动添加的
- 根据业务需求,做了三种情况处理:离线、在线、自定义地图
- 对于在线地图(“Oneline”)类型,使用了Leaflet.ChineseTmsProviders插件,提供了大多常用的国内地图厂商URL,我在他的基础上进行了调整
- 初学习的话只需要看Custom情况的处理即可,可直接使用注释中的内容
- 友情提示:在线地图必须传入的参数subdomains;离线地图必须传入的参数:layers、format
- 官方文档-在线地图,官方文档-离线地图
// 在线地图
const tile = new L.tileLayer(
  'webrd0{s}.is.autonavi.com/appmaptile?&size=1&scale=1&style=8&x={x}&y={y}&z={z}',
   { subdomains: [ '1', '2', '3', '4' ], format:'image/png'})
tile .addTo(地图实例)

// 离线地图
const wms = new L.tileLayer.wms(
      url,// wms地址
      options // 参数
)
wms.addTo(地图实例)
    async mapLoadTile() {
      try {
        switch (this.mapParams.useMapType) {
          case 'Offline':
            if (!this.mapParams.mapTileOptions['layers'])
              this.$Message(
                `'MapTileOptions.layers' ${this.$t(
                  'gisMap.map.warning.noCfg'
                )}`,
                'warning'
              )
            this.map.tileLayer = new L.tileLayer.wms(
              this.mapParams.getUrl(this.lang),
              this.mapParams.getOptions()
            )
            break
          case 'Online':
            if (!this.mapParams.mapTileOptions['subdomains']) {
              this.$Message(`'MapTileOptions.subdomains' ${this.$t( 'gisMap.map.warning.noCfg')}`,'warning')
            }
            this.mapParams.mapTileOptions.format = this.mapParams.mapTileOptions
              .format
              ? this.mapParams.mapTileOptions.format
              : 'image/png'
            this.map.tileLayer = new L.tileLayer(
              // 直接替换注释即可
              // '//webrd0{s}.is.autonavi.com/appmaptile?&size=1&scale=1&style=8&x={x}&y={y}&z={z}'
              this.mapParams.getUrl(this.lang),
              // { subdomains: [ '1', '2', '3', '4' ], format:'image/png'}
              this.mapParams.getOptions()
            )
            break
          default:
            throw `Unknow UseMapType '${this.mapParams.useMapType}'\r\nOnly support: 'Offline','Online','Custom'`
        }
        // 添加到地图
        this.map.tileLayer.addTo(this.map.instance)
        this.initRecord.tile.value = true
      } catch (error) {
        this.initRecord.tile.value = false
        if (error) {
          this.initRecord.tile.result = error
          this.$Message(
            `${this.$t('gisMap.map.error.loadTile')}: ${error}`,
            'error'
          )
        }
        throw error
      }
    },
2.4 加载遮罩层
- 加载遮罩层必须要边界数组,在这里是从我们自己后台服务获取的,实际上也是从高德那边拿到的数据存到自己数据库中的;
- 其实一开始是调用高德的AMap.DistrictSearch接口,考虑到内网部署后,改为调自己服务的接口了,边界数据在单独的工程管理中调用高德接口保存到数据库;
- 如果你的项目可以访问互联网,可以参考我之前的文章,AMap.DistrictSearch接口,稍微改改就行
- 遮罩层请根据你的实际需求调整,我这里是填充边界的外多边形,内多边形则不需要outer、pathArray 变量,可以看下高德官方教程,列出了很多场景
- 官方文档
// 为地图加载遮罩,只显示默认区域
    async mapLoadMask() {
      try {
        const re = await districtApi.getPolyline(this.mapParams.adCode)
        // 内多边形数组
        var boundaries = JSON.parse(re)
        // 外多边形数组
        var outer = [
          [90, -360],
          [-90, -360],
          [-90, 360],
          [90, 360]
        ]
        var pathArray = [outer]
        pathArray.push.apply(pathArray, boundaries)
        // https://leafletjs.com/reference-1.6.0.html#polyline
        var polygon = new L.polygon(pathArray, {
          // 线条颜色,使用16进制颜色代码赋值。默认值为#006600
          color: 'rgb(122,122,122)',
          // 线条宽度
          weight: 2,
          // 轮廓线透明度,取值范围[0,1],0表示完全透明,1表示不透明。默认为0.9
          opacity: 0.8,

          // 是否用颜色填充路径
          fill: true,
          // 多边形填充颜色,使用16进制颜色代码赋值,如:#FFAA00
          fillColor: 'rgba(250, 250, 250, 0.95)',
          // 多边形填充透明度,取值范围[0,1],0表示完全透明,1表示不透明。默认为0.9
          fillOpacity: 1
          // 轮廓线样式,实线:solid,虚线:dashed
          //strokeStyle: 'dashed',
          // 勾勒形状轮廓的虚线和间隙的样式,此属性在strokeStyle 为dashed 时有效, 此属性在
          // ie9+浏览器有效 取值:
          // 实线:[0,0,0]
          // 虚线:[10,10] ,[10,10] 表示10个像素的实线和10个像素的空白(如此反复)组成的虚线
          // 点画线:[10,2,10], [10,2,10] 表示10个像素的实线和2个像素的空白 + 10个像素的实
          // 线和10个像素的空白 (如此反复)组成的虚线
          // strokeDasharray: [0, 0, 0]
        })
        polygon.addTo(this.map.instance)

        console.log('蒙版绘制polygon完成')
        this.map.maskLayer = polygon
        this.initRecord.mask.value = true
      } catch (error) {
        this.initRecord.mask.value = false
        if (error) {
          this.initRecord.mask.result = error
          this.$Message(
            `${this.$t('gisMap.map.error.loadMask')}: ${error}`,
            'error'
          )
        } else {
          this.$Message(this.$t('gisMap.map.error.loadMask'), 'error')
        }
        throw error
      } finally {
        this.loading = false
      }
    },
感觉Leaflet的遮罩刷新逻辑有点问题,拖动的时候不会立即刷新,要拖动结束才会刷新,不过影响不大吧,此问题已找到解决方法,在地图的move事件中加入以下代码,maskLayer是遮罩层(L.polygon)实例
this.map.instance.on('move', (e) => {
    if (this.map.maskLayer)
      // 会损失性能,自己斟酌把
       this.map.maskLayer._renderer._update()  //扒对象实例扒到的,_renderer是渲染出来的path
 })
2.5 地图移动/缩放事件处理
- 这里我把moveend、zoomend两个事件绑定到了一个函数中处理
- 对于移动距离小于设定值、地图正在处理其他事务时,不触发填充标记点
- 官方文档
    mapRegisterEvent() {
      this.map.instance.on('moveend', this.mapViewChange)
      this.map.instance.on('zoomend', this.mapViewChange)
    },
    mapUnregisterEvent() {
      this.map.instance.off('moveend', this.mapViewChange)
      this.map.instance.off('zoomend', this.mapViewChange)
    },
    async mapViewChange() {
      const zoom = this.map.instance.getZoom() // 获取当前地图缩放级别
      const center = this.map.instance.getCenter() // 获取当前地图中心位置
      const boud = this.map.instance.getBounds()
      this.map.otherLayer.clearLayers()
      console.log('当前缩放级别:', zoom)
      console.log('当前中心位置:', center)
      console.log('当前边界:', boud)
      if (this.mapParams.searchDistance === 0) {
        ...
      } else if (this.mapParams.searchDistance === -1) {
        ...
      } else if (this.flag.clickMarker && this.flag.autoPaning) {
        return
      } else if (
        this.lastCenter.lat &&
        this.lastCenter.lng &&
        this.map.instance.distance(center, this.lastCenter) <=
          this.mapParams.minMoveDistance
      ) {
        console.log('移动的距离小于' + this.mapParams.minMoveDistance)
        return
      }
      this.fillMarkerDeb()
    },
3 标记点
3.1 创建/挂载标记点
- L.marker的图标只有L.icon和L.divIcon两种类型,L.icon扩展性太弱,这里我使用的是L.divIcon
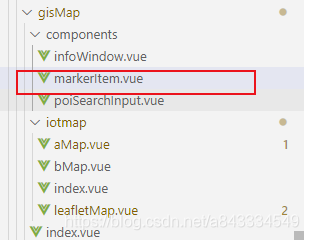
- L.divIcon的特点是可以自己设置内部html,这时候vue的组件化功能就可以派上用场了,在下面markerItem 就是一个vue组件
- 创建一个标记点时,我为其增加了两个自定义属性,两个自定义方法,这个可以根据你的需求更改
- 在这里我建议把riseOnHover设为true(鼠标移动到标记点时自动置顶),这个功能不错
- 为何要组件化?往后看你就明白了
import _markerItem from '../components/markerItem'
const markerItem = Vue.extend(_markerItem)
    // ##标记点相关

    createMarker(deviceInfo) {
      // https://leafletjs.com/reference-1.6.0.html#marker
      const marker = new L.marker([deviceInfo.lat, deviceInfo.lng], {
        title: deviceInfo.name,
        // 鼠标在marker上方时,是否置顶
        riseOnHover: true
      })
      marker.data = deviceInfo
      marker.props = {
        isTop: false,
        loading: false,
        animationName: 'uiot-map-marker_add'
      }
      marker.setAnimation = function (name) {
        // if (this.props.animationName) {
        //   this._icon.classList.remove(this.props.animationName)
        // }
        this.props.animationName = `uiot-map-marker_${name}`
        // this._icon.classList.add(this.props.animationName)
      }
      marker.setLoading = function (val) {
        // console.log(this._icon)
        this.props.loading = val
      }
      marker.setTitle = function (title) {
        this._icon.setAttribute('title', title)
      }
      marker.show = function () {
        this._icon.style.display = ''
      }
      marker.hide = function () {
        this._icon.style.display = 'none'
      }
      marker.setTop = function () {
        if (this._map?.$lastTopMarker) {
          if (this._map.$lastTopMarker._leaflet_id === this._leaflet_id) {
            console.log('setTop 不用置顶', this._map.$lastTopMarker)
            return
          } else {
            console.log('setTop 还原', this._map.$lastTopMarker)
            this._map.$lastTopMarker.setZIndexOffset(0)
          }
        }
        this.setZIndexOffset(240)
        this._map.$lastTopMarker = this
      }
      const markerVue = new MarkerConstructor({
        propsData: {
          marker: marker
        }
      }).$mount()
      marker._vue = markerVue
      marker.setIcon(
        new L.divIcon({
          html: markerVue.$el
        })
      )
      marker.on('click', this.markerClick)
      marker.addTo(this.map.markerLayer)
      return marker
    },
L.marker是没有提供设置title的接口,比较可惜,如果你需要修改标记点title,建议使el-tooltip或者其他组件,最近发现是修改icon的dom节点的title属性即可,为标记点实例添加以下方法即可(或者手动调用_icon.setAttribute这个方法)(2020-11-20)
      marker.setTitle = function (title) {
        //_icon就是图标的dom节点
        this._icon.setAttribute('title', title)
      }
3.2 将标记点独立为组件
- 就和写普通组件一样的,在我的高德教程里已经说过怎么组件化信息窗体了
- 外层一个div包裹用于呈现动画、loading效果,内层img显示图标
- marker.props.animationName是标记点动画名称,marker.props.loading设置是否呈现loading效果,后面会用到
<template>
  <div :class="['marker__wrap',marker.props.animationName]"
       v-loading="loading"
       ref="panel">
    <img :id="marker.data.id"
         :class="['marker-icon']"
         :src="markerIcon" />
  </div>
</template>
export default {
  name: 'MarkerItem',
  props: ['marker'],
  mounted() {
    // setTimeout(() => {
    //   if (this.marker.props.animationName === 'uiot-map-marker_add')
    //     this.marker.props.animationName = 'uiot-map-marker_none'
    // }, 500)
  },
  computed: {
    loading() {
      return this.marker.props.loading
    },
    markerIcon() {
      return getMarkerIcon(this.marker.data)
    }
  }
}
.leaflet-div-icon {
  margin: 0 !important;
  width: auto !important;
  height: auto !important;
  background: transparent !important;
  border: none !important;
  .marker-icon-panel {
    float: left;
    display: flex;
    // IE需要设置宽度或者最小宽度,不然显示不出来
    height: auto;
    width: auto;
    min-width: 22px;
    .marker-icon {
      flex: auto;
    }
  }
}
3.3 点击标记点置顶
- 场景:如果一块区域内,一堆标记点重叠,用户点击一个标记点后,应当让这个标记点置顶
- 在高德地图中,创建标记点时只需设置topWhenClick属性为true即可,如下

- 然而L.marker只有一个riseOnHover属性,开启该功能鼠标移至标记点上方后标记点将被置顶,想要实现点击置顶,则需要自己写
- 实现此功能需要借助一个变量保存上一次被置顶的标记点,置顶时调用setZIndexOffset(偏移值),还原时调用setZIndexOffset(0)
- 说下我遇到的坑: 在最开始做这个功能时,假如我置顶调用setZIndexOffset(500),还原时我就应该调用setZIndexOffset(-500),然而这样会出问题的,导致还原出错了,因为setZIndexOffset是修改的z-index的偏移量,调用setZIndexOffset(0)就是还原成默认的了
- 搭配内置的riseOnHover一起使用非常nice
      // 代码见3.1的setTop方法
      marker.setTop = function () {
        if (this._map?.$lastTopMarker) {
          if (this._map.$lastTopMarker._leaflet_id === this._leaflet_id) {
            console.log('setTop 不用置顶', this._map.$lastTopMarker)
            return
          } else {
            console.log('setTop 还原', this._map.$lastTopMarker)
            this._map.$lastTopMarker.setZIndexOffset(0)
          }
        }
        this.setZIndexOffset(240)
        this._map.$lastTopMarker = this
      }
- 效果如下
3.4 标记点动画/Loading
- 使用组件化的目的就是为此,不然没法修改marker的class
- 高德在这块是写好了的,直接设置animation属性就行,如下图,文档链接
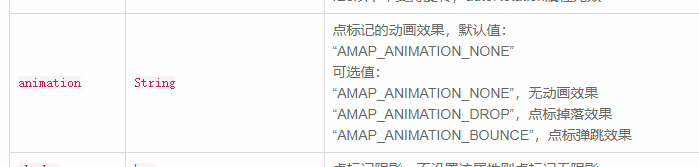
- leaflet就需要自己写了,在3.1中我已经给标记点添加了props属性,在标记点组件的div中class也绑定了props.animationName的值,那么接下来只需要写css代码即可,我使用的是loading.io的动画库,在他的基础上做了修改
.uiot-map-marker_none {
  animation: none;
}
.uiot-map-marker_flashing {
  animation: flashing 400ms infinite;
  animation-fill-mode: forwards;
}
.uiot-map-marker_bounce {
  animation: bounce 1000ms infinite;
  animation-fill-mode: forwards;
}
- 在需要使用动画的地方调用setAnimation方法,并在一段延时后取消动画(取决于你的动画时长)
let timeout = this.getAnimationTime(animation)
this.dicMarker[id].setAnimation(animation)
console.log('开始动画', this.dicMarker[id])
this.lastJumping.timer = setTimeout(() => {
	this.lastJumping.clear()
	console.log('取消动画', this.dicMarker[id])
	this.dicMarker[id].setAnimation('none')
	this.flag.jumpMarker = false
	//this.mapRegisterEvent()
	this.showMarker(this.dicMarker[id].data)
}, timeout)
- 动画效果如下,有那种弹跳的伸缩效果了
- 使用loading就很简单了,3.2中外层div的v-loading属性已经绑定了相关变量,调用标记点实例的setLoading方法即可
marker实例.setLoading(false or true)
- Loading效果如下

4 信息窗体
4.1 创建/挂载信息窗体
    createInfoWindow() {
      // https://blog.csdn.net/qq_39512863/article/details/90483781
      // https://leafletjs.com/reference-1.6.0.html#popup
      this.mapInfoWindow = new L.popup({
        // 是否自动调整窗体到视野内(当信息窗体超出视野范围时,通过该属性设置是否自动平移地图,使信息窗体完全显示)
        autoPaning: true,
        // 开启keepInView,在切后台时可能会导致一直触发autupandstart事件,建议关闭
        // keepInView: true,
        // 弹出位置偏移量,可根据标记点图标大小修改
        offset: new L.point(10, 0)
      })
      console.log('createInfoWindow', this.$refs.infowindow)
      this.mapInfoWindow.setContent(this.$refs.infowindow.$el)
      // this.mapInfoWindow.on('popupclose', this.infoWindowClosed)
      this.map.instance.on('popupclose', this.infoWindowClosed)
    },
4.2 展示标记点信息
- 请注意看finally中我的注释,很重要的一点,因为在打开信息窗体时,需要从后台获取扩展属性,那么填充后信息窗体的宽/高度就变了,如果不用nextTick,则获取到的高度是上一次高度,实际上vue的v-show指令也有这种情况(v-show就是控制display属性)
    async showMarker(info, latlng) {
      if (info && info.id) {
        if (
          this.dicMarker[info.id] &&
          this.dicMarker[info.id].props.loading === false
        ) {
          this.dicMarker[info.id].setLoading(true)
          this.mapInfoWindow.setLatLng(latlng ? latlng : [info.lat, info.lng])
          try {
            var extend = await markerApi.queryProps(info.id)
            this.showDeviceInfo.error = false
            this.showDeviceInfo.extend = extend ? extend : {}
          } catch (error) {
            console.error('showMarker error: ', error)
            this.showDeviceInfo.error = true
          } finally {
            this.showDeviceInfo.baseInfo = info
            if (this.dicMarker[info.id]) {
              this.dicMarker[info.id].setLoading(false)
            }
            this.$nextTick(() => {
              // 如果直接open, leaflet获取不到infowindow的实际高度的(获取到也是上一次的)
              // 所以一定要加上nextTick
              this.mapInfoWindow.update()
              this.mapInfoWindow.openOn(this.map.instance)
            })
          }
        }
      }
    },
- 如果不加nextTick,就是下面这种情况
- 第一次打开信息窗体,显示不全,因为扩展属性的高度没被计算进去,
- 第二次打开你发现完全显示了,但是这并不是当前信息窗体的高度,而是上一次的,之所以完全显示,是因为上一次点击的标记点扩展属性也是三行,高度相同
后语
- 有什么问题留言即可,如果这篇文章对你有用就点个赞把
- 更新记录:
- 2020-07-28 编写
- 2020-11-20 标记点的title可修改,调用 $(marker实例)._icon.setAttribute方法,具体见标记点标题无法修改问题
- 2020-11-20 遮罩层在地图移动时可更新,调用 $(遮罩层实例)._renderer._update方法,具体见遮罩层刷新问题
- 2022-03-09 更新第三章


 4685
4685


 被折叠的 条评论
为什么被折叠?
被折叠的 条评论
为什么被折叠?
 到【灌水乐园】发言


