


像我们后端程序员做前端的话,有时候真不需要知道什么原理,直接塞就好了
我们选用基于hiprint 的vue-plugin-hiprint来打印
目的是为了实现点击某些行的数据,然后点击某个按钮直接弹出下面的打印
别光看不点赞啊,能解决大问题就回来给我点个赞啊!!!
此链接 的开源插件大佬是原创,我且拿来使用梳理一下
插件进阶功能请移步: 链接
插件模板制作页面: 链接
首先安装2个依赖
npm install vue-plugin-hiprint
npm i jquery --save-d
npm install vue-plugin-hiprint@0.0.55-beta3
这里是更新包,想获取最新包移步:https://github.com/CcSimple/vue-plugin-hiprint/blob/main/CHANGELOG.md
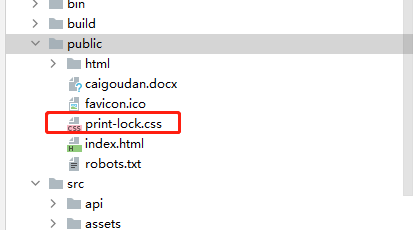
然后找到项目中的依赖文件夹node_modules/vue-plugin-hiprint/dist/中的print-lock.css文件,复制一份到自己项目的静态资源目录public下
然后在 public/index.html 中添加:
<link rel="stylesheet" type="text/css" media="print" href="<%= BASE_URL %>print-lock.css">

然后 main.js 中引入 依赖
import { hiPrintPlugin } from 'vue-plugin-hiprint'
//引入一维码
import JsBarcode from "jsbarcode";

Vue.use(hiPrintPlugin, '$pluginName')
import jquery from 'jquery'
Vue.prototype.$ = jquery
将下面的代码复制到自己项目中
methods: {
//打印部分
// 初始化
init() {
// 初始化 打印对象
const hiprintTemplate = new this.$pluginName.PrintTemplate()
this.hiprintTemplate = hiprintTemplate
},
// 获取打印机列表
getPrinterList() {
if (window.hiwebSocket.opened === false) {
this.$notify.error('打印机客户端未连接')
}
// 模板对象获取
const printerList_ = this.hiprintTemplate.getPrinterList()
console.info(printerList_)
},
// 使用 hiPrintPlugin 控件打印
confirmPrintPrint(row) {
// 如果在 main.js 中设置了取消自动连接客户端 是获取不到打印机列表的!!!
if (window.hiwebSocket.opened === false) {
this.$notify.error('打印机客户端未连接,请点击右上角头像下载打印客户端')
}
// 这一句代码 如果打印出来有问题 可以尝试加进去,没有出现 则不用加
// 初始化 provider
this.$pluginName.init({
providers: [defaultElementTypeProvider()]
})
// 这一句代码 如果打印出来有问题 可以尝试加进去,没有出现 则不用加
this.$pluginName.PrintElementTypeManager.buildByHtml(this.$('.ep-draggable-item'))
// 清空原内容
this.$('#printDivXm3').empty()
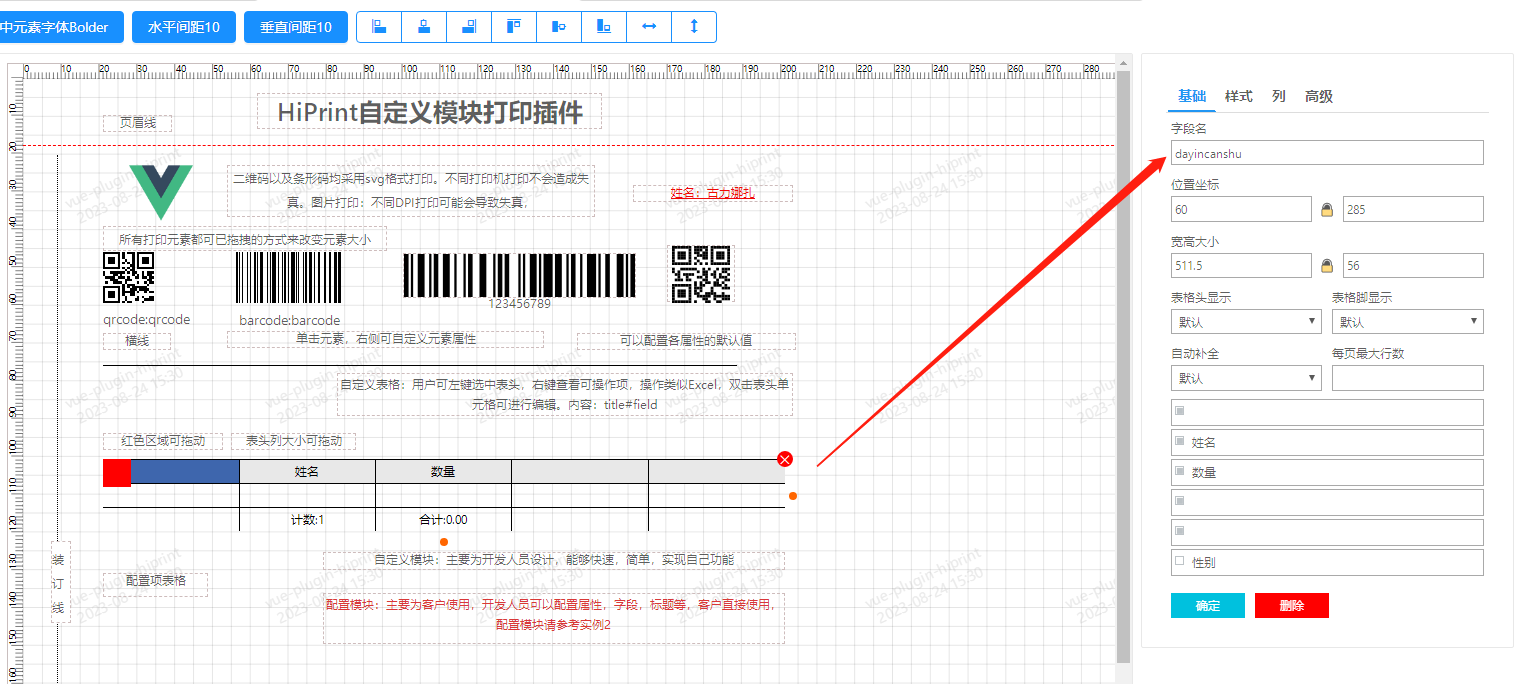
// 不使用全局对象, 使用模版打印,在线设计模版:https://ccsimple.gitee.io/vue-plugin-hiprint/
const hiprintTemplate = new this.$pluginName.PrintTemplate({
template:
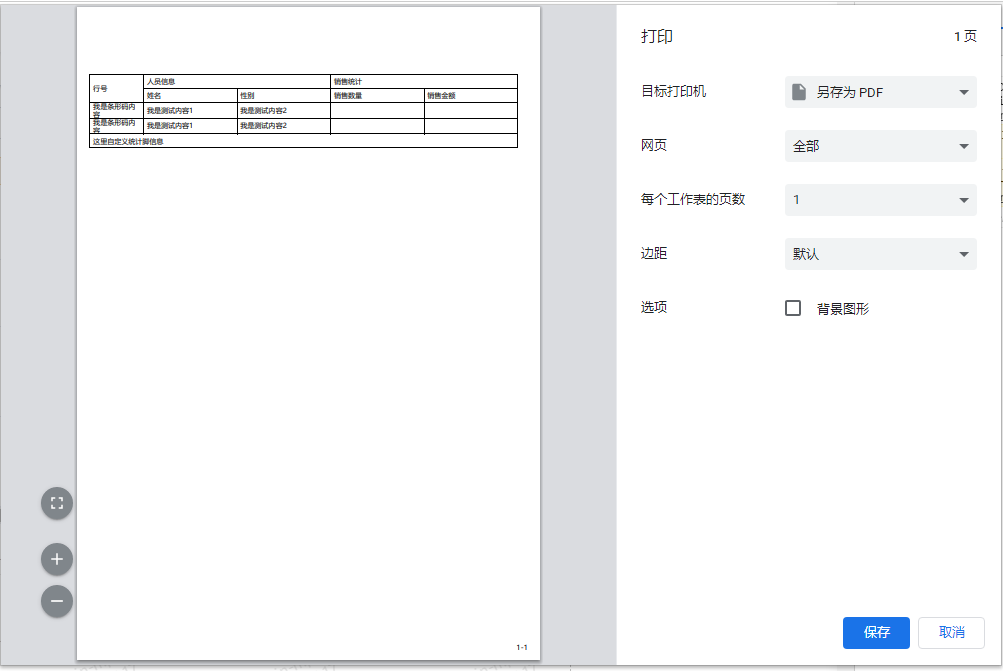
{"panels":[{"index":0,"name":1,"height":297,"width":210,"paperHeader":49.5,"paperFooter":780,"printElements":[{"options":{"left":17.5,"top":87.5,"height":72,"width":550,"field":"dayincanshu","groupFooterFormatter":"function(t,e){return\"这里自定义统计脚信息\"}","groupFieldsFormatter":"function(type,options,data){ return [\"name\"] }","coordinateSync":false,"widthHeightSync":false,"columns":[[{"width":70,"title":"行号","field":"id","checked":true,"columnId":"id","fixed":false,"rowspan":2,"colspan":1},{"width":100,"title":"人员信息","checked":true,"fixed":false,"rowspan":1,"colspan":2},{"width":100,"title":"销售统计","checked":true,"fixed":false,"rowspan":1,"colspan":2}],[{"width":120,"title":"姓名","field":"name","checked":true,"columnId":"name","fixed":false,"rowspan":1,"colspan":1,"align":"left"},{"width":120,"title":"性别","field":"gender","checked":true,"columnId":"gender","fixed":false,"rowspan":1,"colspan":1},{"width":120,"title":"销售数量","field":"count","checked":true,"columnId":"count","fixed":false,"rowspan":1,"colspan":1},{"width":120,"title":"销售金额","field":"amount","checked":true,"columnId":"amount","fixed":false,"rowspan":1,"colspan":1}]]},"printElementType":{"title":"表格","type":"table","editable":true,"columnDisplayEditable":true,"columnDisplayIndexEditable":true,"columnTitleEditable":true,"columnResizable":true,"columnAlignEditable":true,"isEnableEditField":true,"isEnableContextMenu":true,"isEnableInsertRow":true,"isEnableDeleteRow":true,"isEnableInsertColumn":true,"isEnableDeleteColumn":true,"isEnableMergeCell":true}}],"paperNumberLeft":565.5,"paperNumberTop":819,"paperNumberContinue":true,"watermarkOptions":{"content":"vue-plugin-hiprint","rotate":25,"timestamp":true,"format":"YYYY-MM-DD HH:mm"}}]}
})
// 挂载打印内容
hiprintTemplate.design('#printDivXm3')
// 打印数据,要和 上面 panel 内的 field 参数一致
const table = [{
id: '我是条形码内容',
name: '我是测试内容1',
gender: '我是测试内容2'
},
{
id: '我是条形码内容',
name: '我是测试内容1',
gender: '我是测试内容2'
},]
const contentToPrint = document.getElementById("contentToPrint");
var dayincanshu = {
// dayincanshu:this.dayincanshu
dayincanshu:table
}
hiprintTemplate.print(dayincanshu)
},}
注意这个字段名要匹配,就ok 了
2023.12.26日更新:
发现此插件可能与Raw Loader 加载器起冲突,导致线框无法加载。


 5897
5897


 被折叠的 条评论
为什么被折叠?
被折叠的 条评论
为什么被折叠?
 到【灌水乐园】发言


