


Nginx (engine x) 是一个高性能的HTTP和反向代理服务器,也是一个IMAP/POP3/SMTP服务器。
Nginx作为负载均衡服务器:Nginx 既可以在内部直接支持 Rails 和 PHP 程序对外进行服务,也可以支持作为 HTTP代理服务器对外进行服务。Nginx采用C进行编写,不论是系统资源开销还是CPU使用效率都比 Perlbal 要好很多。
处理静态文件,索引文件以及自动索引;打开文件描述符缓冲。
无缓存的反向代理加速,简单的负载均衡和容错。
FastCGI,简单的负载均衡和容错。
模块化的结构。包括 gzipping, byte ranges, chunked responses,以及 SSI-filter 等 filter。如果由 FastCG或其它代理服务器处理单页中存在的多个 SSI,则这项处理可以并行运行,而不需要相互等待。
原码安装三步骤
[root@server1 nginx-1.10.1]# ./configure --prefix=/opt/nginx --with-http_ssl_module --with-http_stub_status_module --with-threads --with-file-aio --add-module=/root/nginx-sticky-module-ng  ##解压
[root@server1 nginx-1.10.1]#make      ##编译
[root@server1 nginx-1.10.1]#make install   ##编译安装
```


<div class="se-preview-section-delimiter"></div>

#一.nginx的安装


<div class="se-preview-section-delimiter"></div>

####1.解压nginx软件包


<div class="se-preview-section-delimiter"></div>
[root@server1 ~]# ls
anaconda-ks.cfg install.log install.log.syslog nginx-1.14.0.tar.gz
[root@server1 ~]# tar zxf nginx-1.14.0.tar.gz

<div class="se-preview-section-delimiter"></div>
cd/nginx-1.14.0/src/core/
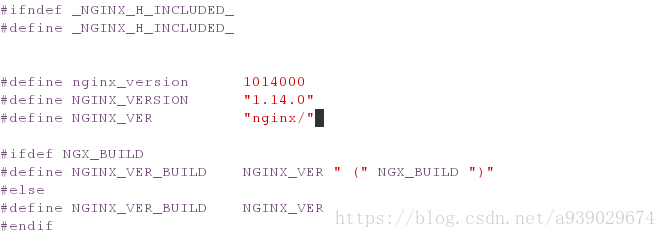
vim nginx.h ##可以修改默认配置文件修改名字/nginx-1.14.0/auto/cc
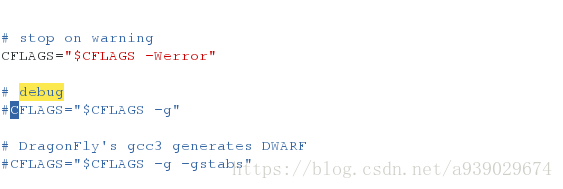
vim gcc ##/debug找到debug那一行 ,将下面的参数注释掉,这个是用来在生成文件的时候会大大压缩文件大小
<div class="se-preview-section-delimiter"></div>
##2.安装
<div class="se-preview-section-delimiter"></div>
root@server1 nginx-1.14.0]# ./configure –help ##打开配置功能
[root@server1 nginx-1.14.0]# ./configure –prefix=/usr/local/nginx –with-http_ssl_module –with-http_stub_status_module –with-threads –with-file-aio
##指定nginx的目录为/usr/local/nginx 并指定功能
这一次由于yum源不全,所以会失败
[root@server1 nginx-1.14.0]# yum install -y openssl-devel
[root@server1 nginx-1.14.0]# yum install -y pcre-devel
[root@server1 nginx-1.14.0]# yum install gcc -y
然后在进行非开原软件的岁三步骤:


<div class="se-preview-section-delimiter"></div>
[root@server1 nginx-1.14.0]# ./configure –prefix=/usr/local/nginx –with-http_ssl_module –with-http_stub_status_module –with-threads –with-file-aio ##将nginx安装到/usr/local/nginx目录
make
make install
测试:


<div class="se-preview-section-delimiter"></div>
[root@server1 nginx-1.14.0]# cd /usr/local/nginx/
[root@server1 nginx]# ls
conf html logs sbin
[root@server1 nginx]# du -sh
980K .
[root@server1 nginx]# cd sbin/
[root@server1 sbin]# pwd
/usr/local/nginx/sbin
[root@server1 sbin]# ls
nginx
[root@server1 sbin]# ln -s /usr/local/nginx/sbin/nginx /sbin/ ##做个软连接
[root@server1 sbin]# nginx -t ##查看nginx 的目录是否正确
nginx: the configuration file /usr/local/nginx/conf/nginx.conf syntax is ok
nginx: configuration file /usr/local/nginx/conf/nginx.conf test is successful
[root@server1 sbin]# nginx ##打开nginx服务
[root@server1 sbin]# cd ..
[root@server1 nginx]# ls
client_body_temp fastcgi_temp logs sbin uwsgi_temp
conf html proxy_temp scgi_temp
[root@server1 nginx]# cd html/ ##/usr/local/nginx/html 是所在目录
[root@server1 html]# ls
50x.html index.html
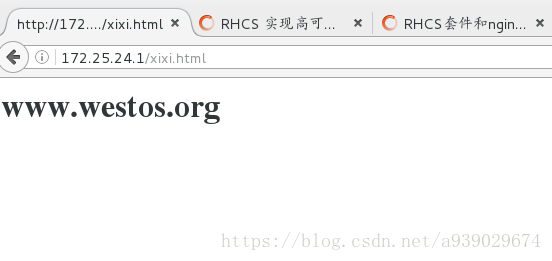
[root@server1 html]# vim xixi.html
在浏览器输入ip/文件名 测试
<div class="se-preview-section-delimiter"></div>
#二.用nginx实现负载均衡
<div class="se-preview-section-delimiter"></div>
[root@server1 ~]# cd /usr/local/nginx/
[root@server1 nginx]# ls
client_body_temp fastcgi_temp logs sbin uwsgi_temp
conf html proxy_temp scgi_temp
[root@server1 nginx]# cd conf/
[root@server1 conf]# ls
fastcgi.conf koi-win scgi_params
fastcgi.conf.default mime.types scgi_params.default
fastcgi_params mime.types.default uwsgi_params
fastcgi_params.default nginx.conf uwsgi_params.default
koi-utf nginx.conf.default win-utf
[root@server1 conf]# pwd
/usr/local/nginx/conf
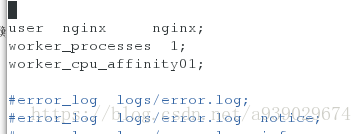
[root@server1 conf]# vim nginx.conf ##这是nginx的主配置文件
<div class="se-preview-section-delimiter"></div>
####user nginx nginx ; ##增加一个nginx的用户一个nginx组
<div class="se-preview-section-delimiter"></div>
####worker_processes 1; ##这个是跟cup数量匹配的
<div class="se-preview-section-delimiter"></div>
####worker_cpu_affinity 01; ##打开负载均衡,默认情况下nginx的负载均衡是关闭的

<div class="se-preview-section-delimiter"></div>
####worker_connections 65535; 修改这个最大的内存是65535
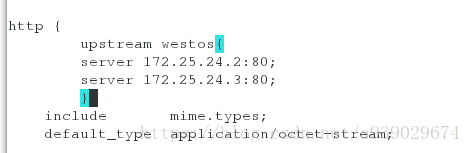
upstream westos
server 172.25.24.2:80; 在http下便添加下列
server 172.25.24.3:80; 在http下添加
<div class="se-preview-section-delimiter"></div>
root@server1 conf]# vim /etc/security/limits.conf ##

<div class="se-preview-section-delimiter"></div>
[root@server1 conf]# lscpu ##可以用来查看cpu的个数用来写主配置文件
Architecture: x86_64
CPU op-mode(s): 32-bit, 64-bit
Byte Order: Little Endian
CPU(s): 1
On-line CPU(s) list: 0
Thread(s) per core: 1
Core(s) per socket: 1
Socket(s): 1
NUMA node(s): 1
Vendor ID: GenuineIntel
CPU family: 6
Model: 42
Stepping: 1
CPU MHz: 2491.908
BogoMIPS: 4983.81
Hypervisor vendor: KVM
Virtualization type: full
L1d cache: 32K
L1i cache: 32K
L2 cache: 4096K
NUMA node0 CPU(s): 0
root@server1 conf]# useradd -M -d /usr/local/nginx/ nginx 建立一个nginx用户
[root@server1 conf]# id nginx
uid=500(nginx) gid=500(nginx) groups=500(nginx)
[root@server1 conf]# nginx -t ##查看是否有问题
nginx: the configuration file /usr/local/nginx/conf/nginx.conf syntax is ok
nginx: configuration file /usr/local/nginx/conf/nginx.conf test is successful
[root@server1 conf]# nginx -s reload ##刷新
<div class="se-preview-section-delimiter"></div>
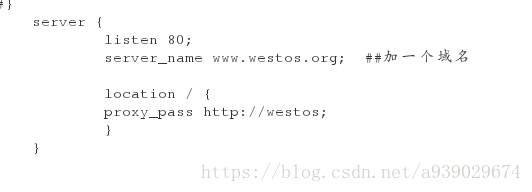
##测试负载均衡是否成功:
打开后端httpd:
<div class="se-preview-section-delimiter"></div>
[root@server3 ~]# /etc/init.d/httpd start
Starting httpd: httpd: Could not reliably determine the server’s fully qualified domain name, using 172.25.24.3 for ServerName
[ OK ]
[root@server3 ~]# cat /var/www/html/index.html
www.westos.org -server3
[root@server2 ~]# /etc/init.d/httpd start
Starting httpd: httpd: Could not reliably determine the server’s fully qualified domain name, using 172.25.24.2 for ServerName
[ OK ]
[root@server2 html]# cat /var/www/html/index.html
www.westos.ogr -server2
客户端测试(真机):
真机DNS解析


<div class="se-preview-section-delimiter"></div>
[root@foundation24 ~]# cat /etc/hosts
127.0.0.1 localhost localhost.localdomain localhost4 localhost4.localdomain4
::1 localhost localhost.localdomain localhost6 localhost6.localdomain6
172.25.24.1 www.westos.org bbs.westos.org westos.org
172.25.24.1 server1
172.25.24.2 server2
172.25.24.3 server3
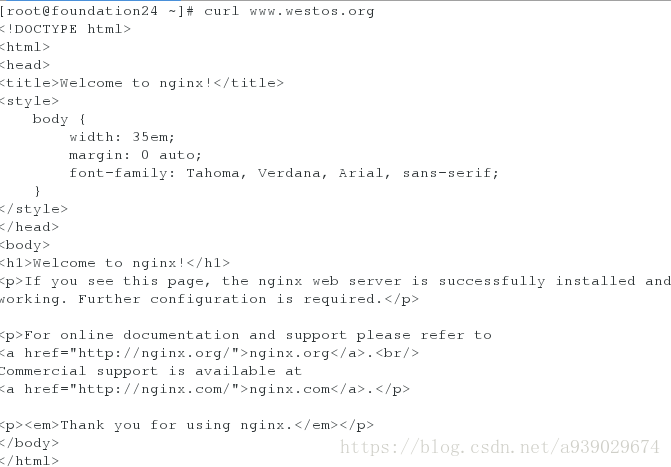
[root@foundation24 ~]# curl www.westos.org
www.westos.ogr -server2
[root@foundation24 ~]# curl www.westos.org
www.westos.org -server3
[root@foundation24 ~]# curl www.westos.org
www.westos.ogr -server2
[root@foundation24 ~]# curl www.westos.org
www.westos.org -server3
[root@foundation24 ~]# curl www.westos.org
www.westos.ogr -server2
[root@foundation24 ~]# curl www.westos.org
www.westos.org -server3
<div class="se-preview-section-delimiter"></div>

##ip_hash  ##地址锁定


<div class="se-preview-section-delimiter"></div>
[root@server1 conf]# vim nginx.conf
[root@server1 conf]# nginx -t
nginx: the configuration file /usr/local/nginx/conf/nginx.conf syntax is ok
nginx: configuration file /usr/local/nginx/conf/nginx.conf test is successful
[root@server1 conf]# nginx -s reload

<div class="se-preview-section-delimiter"></div>
####效果:
<div class="se-preview-section-delimiter"></div>
[root@foundation24 ~]# curl www.westos.org
www.westos.org - server2
[root@foundation24 ~]# curl www.westos.org
www.westos.org - server2
[root@foundation24 ~]# curl www.westos.org
www.westos.org - server2
[root@foundation24 ~]# curl www.westos.org
www.westos.org - server2
[root@foundation24 ~]# curl www.westos.org
www.westos.org - server2
[root@foundation24 ~]# curl www.westos.org
www.westos.org - server2
[root@foundation24 ~]# curl www.westos.org
www.westos.org - server2
<div class="se-preview-section-delimiter"></div>
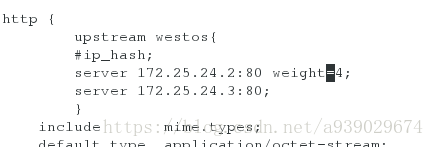
####偏重:
<div class="se-preview-section-delimiter"></div>
root@server1 conf]# vim nginx.conf
[root@server1 conf]# nginx -t
nginx: the configuration file /usr/local/nginx/conf/nginx.conf syntax is ok
nginx: configuration file /usr/local/nginx/conf/nginx.conf test is successful
[root@server1 conf]# nginx -s reload
<div class="se-preview-section-delimiter"></div>
####效果:
<div class="se-preview-section-delimiter"></div>
root@foundation24 ~]# curl www.westos.org
www.westos.ogr -server2
[root@foundation24 ~]# curl www.westos.org
www.westos.ogr -server2
[root@foundation24 ~]# curl www.westos.org
www.westos.ogr -server2
[root@foundation24 ~]# curl www.westos.org
www.westos.ogr -server2
[root@foundation24 ~]# curl www.westos.org
www.westos.org -server3
[root@foundation24 ~]# curl www.westos.org
www.westos.ogr -server2
[root@foundation24 ~]# curl www.westos.org
www.westos.ogr -server2
[root@foundation24 ~]# curl www.westos.org
www.westos.ogr -server2
[root@foundation24 ~]# curl www.westos.org
www.westos.ogr -server2
[root@foundation24 ~]# curl www.westos.org
www.westos.org -server3
<div class="se-preview-section-delimiter"></div>
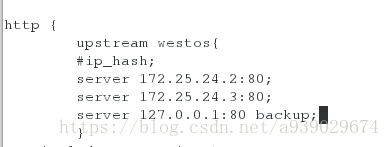
###备用:
backup
server 127.0.0.1:80 backup;
<div class="se-preview-section-delimiter"></div>
[root@server1 conf]# vim nginx.conf
[root@server1 conf]# nginx -t
nginx: the configuration file /usr/local/nginx/conf/nginx.conf syntax is ok
nginx: configuration file /usr/local/nginx/conf/nginx.conf test is successful
[root@server1 conf]# nginx -s reload
<div class="se-preview-section-delimiter"></div>
####效果:
<div class="se-preview-section-delimiter"></div>
#三.静态模块的加载
<div class="se-preview-section-delimiter"></div>
####1.安装nginx
<div class="se-preview-section-delimiter"></div>
[root@server1 ~]# tar zxf nginx-1.10.1.tar.gz
[root@server1 ~]# ls
anaconda-ks.cfg nginx-1.10.1 nginx-1.14.0.tar.gz
install.log nginx-1.10.1.tar.gz nginx-sticky-module-ng.tar.gz
install.log.syslog nginx-1.14.0
[root@server1 ~]# nginx -s stop
[root@server1 ~]# ls
anaconda-ks.cfg nginx-1.10.1 nginx-1.14.0.tar.gz
install.log nginx-1.10.1.tar.gz nginx-sticky-module-ng.tar.gz
install.log.syslog nginx-1.14.0
[root@server1 ~]# cd nginx-1.10.1
[root@server1 nginx-1.10.1]# cd
<div class="se-preview-section-delimiter"></div>

####2.解压模块安装包


<div class="se-preview-section-delimiter"></div>
[root@server1 ~]# tar zxf nginx-sticky-module-ng.tar.gz
[root@server1 ~]# ls
anaconda-ks.cfg nginx-1.10.1 nginx-1.14.0.tar.gz
install.log nginx-1.10.1.tar.gz nginx-sticky-module-ng
install.log.syslog nginx-1.14.0 nginx-sticky-module-ng.tar.gz
[root@server1 ~]# cd nginx-1.10.1
[root@server1 nginx-1.10.1]#
<div class="se-preview-section-delimiter"></div>

####3.安装nginx


<div class="se-preview-section-delimiter"></div>
[root@server1 nginx-1.10.1]# ./configure –prefix=/opt/nginx –with-http_ssl_module –with-http_stub_status_module –with-threads –with-file-aio –add-module=/root/nginx-sticky-module-ng #####–with-file-aio –add-module=/root/nginx-sticky-module-ng只有解压模块安装包才会生效
[root@server1 nginx-1.10.1]#make
[root@server1 nginx-1.10.1]#make install
<div class="se-preview-section-delimiter"></div>

####4.加载模块


<div class="se-preview-section-delimiter"></div>
[root@server1 conf]# cd /opt/nginx/conf/
[root@server1 conf]# ls
fastcgi.conf koi-win scgi_params
fastcgi.conf.default mime.types scgi_params.default
fastcgi_params mime.types.default uwsgi_params
fastcgi_params.default nginx.conf uwsgi_params.default
koi-utf nginx.conf.default win-utf
[root@server1 conf]# cp /usr/local/nginx/conf/nginx.conf .
cp: overwrite `./nginx.conf’? y
root@server1 conf]# vim nginx.conf
[root@server1 conf]# which nginx
/sbin/nginx
[root@server1 conf]# /opt/nginx/sbin/nginx ##打开nginx
[root@server1 conf]# vim nginx.conf
[root@server1 conf]# /opt/nginx/sbin/nginx -t ##测试
nginx: the configuration file /opt/nginx/conf/nginx.conf syntax is ok
nginx: configuration file /opt/nginx/conf/nginx.conf test is successful
[root@server1 conf]# /opt/nginx/sbin/nginx -s reload ##刷新
“`

测试:


 1219
1219

 被折叠的 条评论
为什么被折叠?
被折叠的 条评论
为什么被折叠?
 到【灌水乐园】发言


