


1 cacti前端构成
cacti首先进入的就是index页面,所以从index页面看起。
1.1 index页面
简单来看大致结构如下
1. include(“./include/auth.php”);auth_讲解
2. include(“./include/top_header.php”);top_header讲解
3. api_plugin_hook(‘console_before’);
4. 登陆默认首页的绘制。
5. api_plugin_hook(‘console_after’);
6. include(“./include/bottom_footer.php”);bottom_footer.讲解
关于第4点:
index页面所做的只是简单的
<ul>
    <li><a href="host.php">Create devices</a> for network</li>
    <li><a href="graphs_new.php">Create graphs</a> for your new devices</li>
    <li><a href="graph_view.php">View</a> your new graphs</li>
</ul>

而其他所有的menu,tab等集中在top_header.php中所绘制的
详情看top_header的讲解

现在在看完了cacti的边缘绘制问题,让我们先来看下menu所连接的各个页面所产生的业务功能。这个可以通过已经搭好的cacti主页面来观察来查询各个menu所对应的php页面,然后我们对下述页面依次做介绍。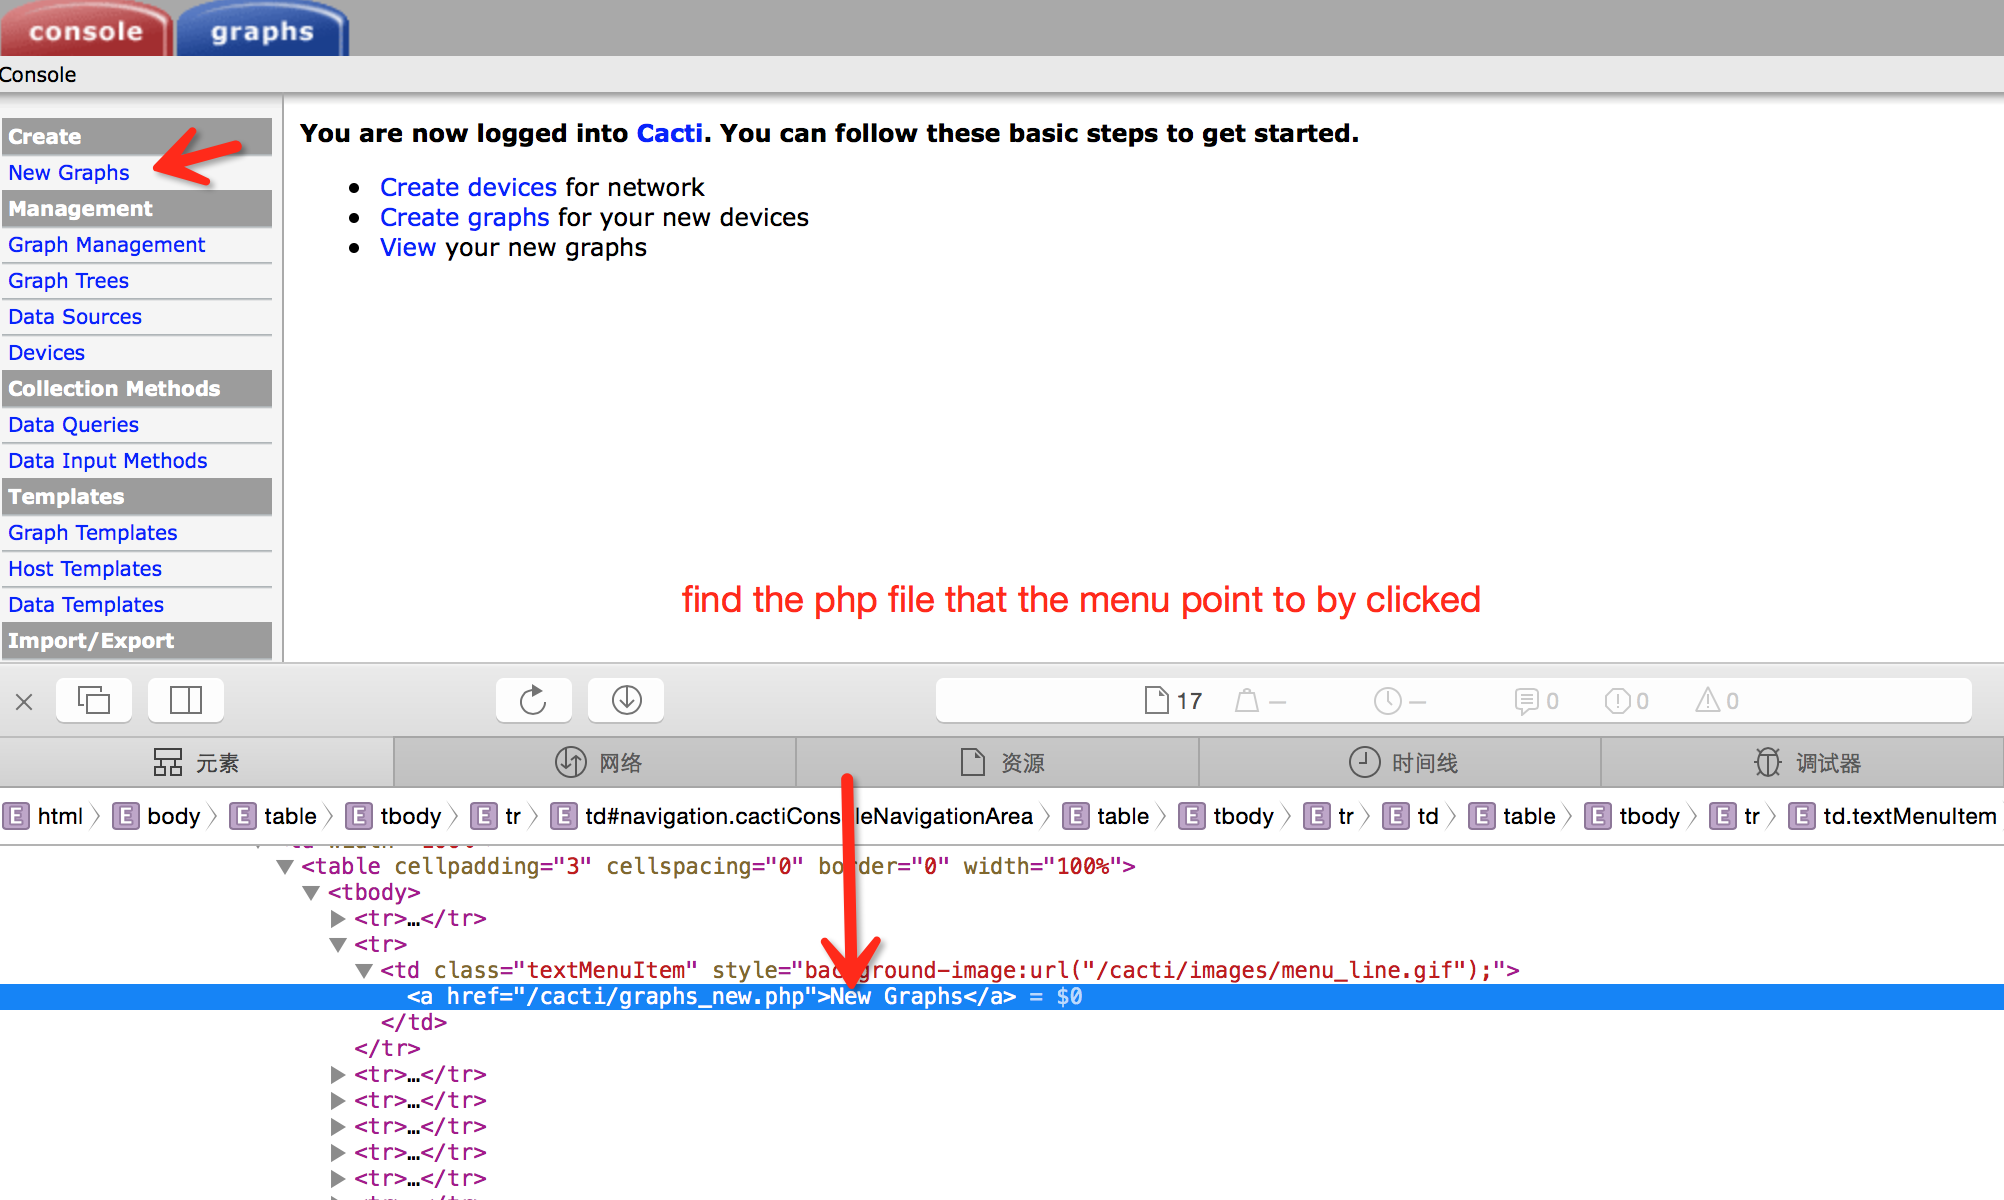
1.2 include_auth_php
- include(“./include/global.php”); 请参考global页面
- 检测是否是这是新的未安装cacti项目
- 验证auth_method,auth_method包含3种验证方式,介绍见下文
如果auth_method>0,也就是需要验证的话,api_plugin_hook_function(‘auth_alternate_realms’);
3种验证方式:
None - No authentication will be used, all users will have full access.    对应auth_method为0

Builtin Authentication - Cacti handles user authentication, which allows you to create users and give them rights to different areas within Cacti.    对应auth_method为1

Web Basic Authentication - Authentication is handled by the web server. Users can be added or created automatically on first login if the Template User is defined, otherwise the defined guest permissions will be used.       对应auth_method为2
验证步骤讲解:
$guest_account验证是否是guest用户,如果不是在观察$_SESSION["sess_user_id"]是否为空,为空的话就返回login页面,auth_login.php,否则根据当前$realm_id查询user_auth_realm表,
查询是否有权限查看,没有的话就会返回一个auth_deny.gif的图片,然后exit()掉。
如何获取当前$realm_id:
$realm_id = $user_auth_realm_filenames{basename($_SERVER["PHP_SELF"])};
对于第3步的read_config_option:方法说明
下述已传入config_name为auth_method为例:

read_config_option定义于function.php中,
首先读取了$config以及$database_default两个全局变量。
然后去settings表中根据传入的config_name去查询指定的settings记录,
if 有的话就设置config_array[config_name]的值为改记录的value值
else  read_default_config_option(config_name)

对于read_default_config_option的说明:
read_default_config_option同样位于functions.php中,它是读取$settings这个全局变量中的二层数组中名字为auth_method的default属性,打开global_settings.php查询auth_method,我们可以看到该方法定义于authentication数组的auth_method。default为1

综上我们可以知道最后得到的read_config_option("auth_method")值为1.
1.3 include_top_header_php
这个页面集中添加了js文件,后期自己做的js文件可以考虑放到这里。页面的其他工作包含如下,请结合下面图片一起参照:


根据图1.3.1可知top_header.php主要绘制了3个tr。
body中间定义了一个table
<table width="100%" cellspacing="0" cellpadding="0">.
这个最外层table的内部包含了3个主要的tr,下面讲述着3个tr分别的作用:
1. 绘制了console和graph等tab
2. 绘制了logged in
通过从$_SESSION["sess_user_id"]以及user_auth表获取到用户名:db_fetch_cell("select username from user_auth where id=" . $_SESSION["sess_user_id"])
3. 绘制了左边的menu,

下面着重讲一下1和3两点的做法
上边的tab绘制由以下两段代码完成:
1)<a><img alt="Console"></a><a><img alt="Graphs"></a>
2)api_plugin_hook('top_header_tabs');
如上可知默认是有两个tab标签也就是console和graph,那么(2)的作用是什么?
文件中的介绍是:This function executes a hook
其实就是执行了我们安装的插件的代码。插件的具体制作流程后面再说。先来大致看一下。下面就是插件的setup.php页面,我们只需要在install函数中放置下面的一句话,就会在我们的tab栏中加入一个叫做myown的tab,这是因为我们在安装插件的时候,cacti就会向plugin_hooks这个表中插入一条记录,如图1.3.2所示
function plugin_myown_install() {
   api_plugin_register_hook('myown', 'top_header_tabs',       'myown_show_tab',"setup.php");
}
然后当执行api_plugin_hook('top_header_tabs')的时候,
它就会去查询这条记录,并执行指定file文件下的function字段中所定义的函数。根据图1.3.2可知,执行的function名称为myown_show_tab,所以我们只需要在myown_show_tab方法中加入如下:
print '<a alt="myown"></a>';
就可以实现添加我们自定义tab的功能,并且我们也可以根据原理制作自己的plugin_hook函数。

左边的menu绘制:
1)draw_menu()
2)<a href='<?php echo $config['url_path']; ?>about.php'></a>

draw_menu()中通过从$_SESSION["sess_user_id"]以及user_auth_realm表中获取到用户有权限的范围区域$user_realms,然后通过global_array.php页面中早就已经存好的$menu全局变量,并根据$user_realms绘制出可以显示的menu集合。
循环位于while (list($header_name, $header_array) = each($user_menu))内

最后插了一张仙人掌的图片链接到about.php。


但是可以看到 经过上述的3点 table并没有绘制结束?

table还有tr要继续绘制,这个content就是main_content,例如index.php就是
<table width="100%" align="center">
    <tr>
        <td class="textArea">
            <strong>You are now logged into <a href="about.php">Cacti</a>. You can follow these basic steps to get
                started.</strong>

            <ul>
                <li><a href="host.php">Create devices</a> for network</li>
                <li><a href="graphs_new.php">Create graphs</a> for your new devices</li>
                <li><a href="graph_view.php">View</a> your new graphs</li>
            </ul>
        </td>
        <td class="textArea" align="right" valign="top">
            <strong>Version <?php print $config["cacti_version"];?></strong>
        </td>
    </tr>
</table>
这一段代码

这个结构可以让我们轻松的画出graph模块页面,只需要如下
1. include("./include/auth.php");
2. include("./include/top_header.php");
4. graph首页的绘制。
6. include("./include/bottom_footer.php")
这样可以统一包括tab以及menu等的一致性,并且可以良性的制作各个功能模块页面
1.4 include_bottom_footer_php
绘制了结束标签,如果有分页并且main_content是处于插件的content时,可能还会涉及到分页的绘制。
1.5 global_php页面
这是一个包含了大部分全局变量的页面,其实类似的还有其他以global_开头的页面,这里只以global页面做介绍
1. 默认的数据库的基本配置(由于插入的先后关系问题实际最后生效的配置在下面的config.php中)
2. $cacti_session_name
3. 默认的$url_path(由于插入的先后关系问题实际最后生效的配置在下面的config.php中)
4. include(dirname(__FILE__) . “/config.php”); 最后生效的配置文件
5. $no_http_header_files的设置
6. $config的设置
7. $colors的设置
8. 清除了所有的register_globals,such as “_GET”,”_POST”
9. 包含了很多的lib库以及include下的文件,下面来看看都有lib和include中部分php文件及其作用。
10. 熟悉的api_plugin_hook(“config_insert”);调用我们的所有自定义插件中的config_insert方法。
global包含了页面的全局变量以及工具类的初始化。
lib:
| file name | function |
|---|---|
| database.php | 定义了很多数据库操作,例如db_connect_real,db_close等 |
| functions.php | 定义了很多功能型函数,例如title_trim,read_graph_config_option等 |
| plugins.php | 定义了很多和plugin相关的功能型函数,例如do_hook,do_hook_function等 |
| html.php | 包含了所有组装控件的方法,即function |
| html_form.php | 包含了所有组装包含form控件的方法,即function |
| html_utility.php | html工具类 |
| html_validate.php | html表单验证类 |
| variables.php | 主要是一个变量处理类,用于把各处的变量替换为有实际意义的常量 |
| auth.php | 是一个用户权限判断的工具类 |
include:
| file name | function |
|---|---|
| global_constants.php | 定义了项目中常用的常量 |
| plugins.php | 定义了项目中使用plugin的函数use_plugin,创建了$plugin_hooks, $plugins_system, $plugins等全局变量 |
| global_arrays.php | 定义了项目以及pa的全局数组,其中pa包含数组为menu和realms |
| global_settings | 定义了全局设置 |
| global_form.php | 包含各个页面所用到的form表单array |
需要注意的地方是lib下的auth.php
记录以上的信息方便后期对cacti的用户系统做自定义调整
1. 其中包含了一个user_copy方法,从这个方法中可以看出,用户所拥有的数据包含如下表:
*user_auth
*user_auth_perms
*user_auth_realm
*settings_graphs
*settings_tree
最后
api_plugin_hook_function('copy_user', array('template_id' => $template_id, 'new_id' => $new_id));
关于这个api_plugin_hook_function我们已经十分熟悉,就是用来刷新用户插件的信息的,再次调用我们自定义的插件并实现了copy_user的hook的方法。

2. user_disable,user_enable方法,从这个方法中我们可以知道判断用户是否是禁用是通过enabled字段,为空就是禁用,为"on"就是启用,其实大多数option字段都是通过'on'来区分的。
3. get_graph_permissions_sql & get方法,从这个方法中我们可以知道对于graph权限的限制是由以下表作用的
*graph_templates_graph          图片表
*graph_local                    图片与host以及snmp映射表
*host                           host表,也就是device数据表
*graph_templates                图片模版表
*user_auth_perms                用户权限细节表
*user_auth                      用户权限表
sql如下:
$graphs = "select
    graph_templates_graph.local_graph_id
    from (graph_templates_graph,graph_local)
    left join host on (host.id=graph_local.host_id)
    left join graph_templates on (graph_templates.id=graph_local.graph_template_id)
    left join user_auth_perms on

((graph_templates_graph.local_graph_id=user_auth_perms.item_id
    and user_auth_perms.type=1
    and user_auth_perms.user_id=" . $_SESSION["sess_user_id"] . ") OR

    (host.id=user_auth_perms.item_id
    and user_auth_perms.type=3
    and user_auth_perms.user_id=" . $_SESSION["sess_user_id"] . ") OR

    (graph_templates.id=user_auth_perms.item_id
    and user_auth_perms.type=4
    and user_auth_perms.user_id=" . $_SESSION["sess_user_id"] . "))

    where graph_templates_graph.local_graph_id=graph_local.id
    " . (empty($sql_where) ? "" : "and $sql_where") . "
    and graph_templates_graph.local_graph_id=$local_graph_id
    group by graph_templates_graph.local_graph_id");

$sql_where可以自行去查看。
由上面的sql可以看出,对于graph的权限是由3个板块控制的
Graph
Device
Graph Template
回到user_auth_perms这个表,
当type为1时:graph_templates_graph.local_graph_id=user_auth_perms.item_id
当type为3时:
host.id=user_auth_perms.item_id
当type为4时
graph_templates.id=user_auth_perms.item_id
$sql_where:
(and user_auth_perms.type != 1 OR user_auth_perms.type is null)
这是去查询user_auth表取出三个字段
*policy_graphs,
*policy_hosts,
*policy_graph_templates
if ($policy_graphs == "1") {
        $sql_policy_and .= "$sql_and(user_auth_perms.type != 1 OR user_auth_perms.type is null)";
    }elseif ($policy_graphs == "2") {
        $sql_policy_or .= "$sql_or(user_auth_perms.type = 1 OR user_auth_perms.type is not null)";
    }
从上面的语句大概可以看出当判断
Graph
Device
Graph Template
的时候,当policy_graphs为1的话,可以不用考虑user_auth_perms.type里面的type为1的字段,为2的话就需要对user_auth_perms.type为1的数据进行考虑。
4. 对于is_tree_allowed方法分析和上面的一样
这个是用户graph permission板块的最后一项。
Tree
sql如下:
"select policy_trees from user_auth where id=" . $_SESSION["sess_user_id"]
判断如下:
if ((sizeof($trees) > 0) && ($current_user["policy_trees"] == "1")) {
        return false;
    /* policy == deny AND matches = ALLOW */
    }elseif ((sizeof($trees) > 0) && ($current_user["policy_trees"] == "2")) {
        return true;
    /* policy == allow AND no matches = ALLOW */
    }elseif ((sizeof($trees) == 0) && ($current_user["policy_trees"] == "1")) {
        return true;
    /* policy == deny AND no matches = DENY */
    }elseif ((sizeof($trees) == 0) && ($current_user["policy_trees"] == "2")) {
        return false;
    }
由上面的判断可知和前三个model的原理一样,这里不再赘述。
1.6 总结
经过上面的介绍,对于cacti的全局结构有了一个了解,下面以用户管理来介绍下具体的模块action工作流程。
cacti action flow
1.7 附录
1.7.1随笔
1)
\$_SERVER['PHP_SELF'] = /test.php/123456
而\$_SERVER['SCRIPT_NAME'] = /test.php
所以为了安全起见,为了指向自身,应该用\$_SERVER['SCRIPT_NAME']而不是\$_SERVER['PHP_SELF']。
2)
后期汉化工作可以从global开头的表中入手,可以提取出一些未汉化并插入在散碎php页面。
3)
后期的用户管理工作可以参考一下auth.php来了解到用户的具体构成
1. user_auth
2. user_auth_perms
3. user_auth_realm
4. settings_graphs
5. settings_tree
4).
我们可能会经常碰到一个方法read_config_option();
read_config_option方法查看config全局变量,没有查询数据库的settings表,在没有read_default_config_option()查询global_settings中的$settings
5)
php的function可以设置默认值,可用来规避一些空值的问题。
具体如下:
function draw_menu(\$user_menu = “”)
6)
可以使用input_validate_input_number()类似的官方已经写好的函数来做后期修改过程中的校验
7)
可以通过get_request_var类似的官方已经写好的函数来获取request,session,get,post的值,这些方法不仅简简单单的取值。
8)
list(\$key,\$value) 和each()一起使用是将数组当前指针所指向单元的键/值对分别赋值给变量\$key,\$value
php常见的循环数组方法
1.7.2常用function总结(待添加)
| function | explain |
|---|---|
| $_SERVER[‘PHP_SELF’] | /test.php/123456 |
| $_SERVER[‘SCRIPT_NAME’] | /test.php |
| basename() | basename(/znms-test/index.php) = index.php |
| in_array(param1,param2,param3) | / |
| header (“Location:index.php”) | 跳转页面 |
| gmdate($format,$timestamp=null) | Format a GMT/UTC date/time |
| session_name($name = null) | Get and/or set the current session name |
| session_start () | Initialize session data |
| session_unset () | Free all session variables |
| session_destroy () | Destroys all data registered to a session |
| ini_get ($varname) | Gets the value of a configuration option in php.ini |
| unset($var) | Destroys the specified variables |
| list($var1, …$_) | list($a, $b, $c) = $my_array; |
| die() | 函数输出一条消息,并退出当前脚本。 |
custom method
| function | explain |
|---|---|
| draw_edit_form | 绘制edit表单 |
| inject_form_variables(&$form_array, $arg1 = array(), $arg2 = array(), $arg3 = array(), $arg4 = array()) | inject_form_variables - replaces all variables contained in $form_array with their actual values |


 125
125

 被折叠的 条评论
为什么被折叠?
被折叠的 条评论
为什么被折叠?
 到【灌水乐园】发言


