


MVVM框架概念
1.概念
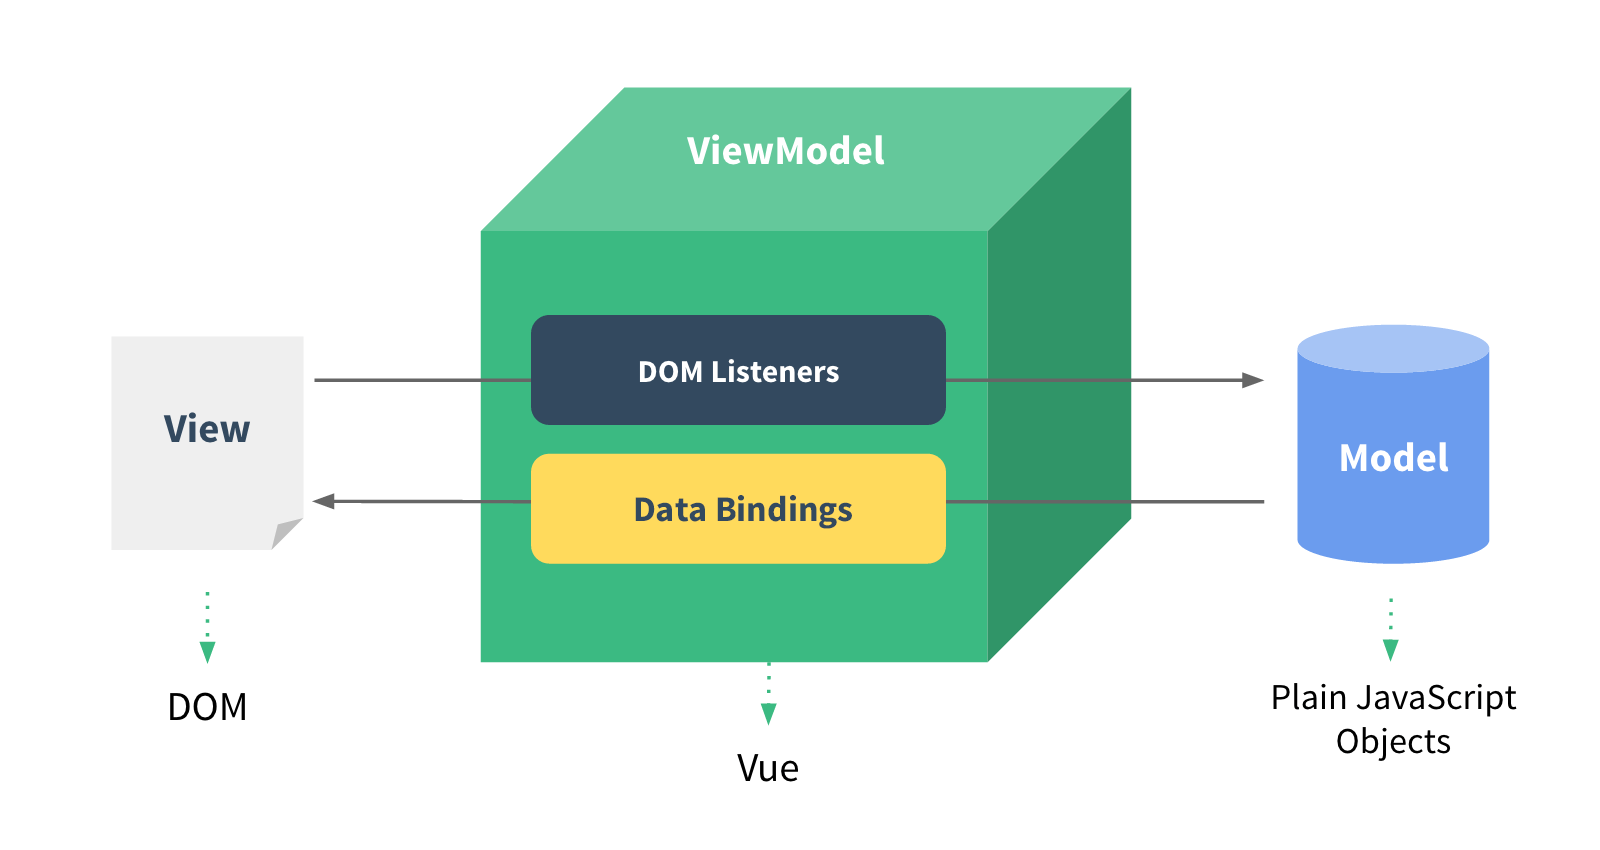
经典MVVM模型图,由 View、Model、ViewModel 三部分组成。
View:视图模版,负责将Model转化为UI,并展示;
Model:数据模型,根据业务逻辑操作数据;
ViewModel:通过*双向绑定*连接了View和Model;
2.原理
在MVVM的架构中 Vue.js 的原理是对数据(Model)进行劫持(Object.defineProperty( )),在数据发生变化时,数据会触发劫持时绑定的setter方法,对视图(View)进行更新。
3.对比
jQuery 的原理,如果数据发生变化,需要先获取对应的DOM元素,然后才能更新UI。数据以及业务逻辑和页面形成了强耦合。
MVVM 的原理则是监听数据,数据变化后只刷新对应的UI,只需要关心操作数据,不需要操作DOM。MVVM中核心就是数据双向绑定。
Vue数据双向绑定原理
1.原理
Vue数据双向绑定通过数据劫持以及发布者-订阅者模式的方式实现。
2.相关代码
Object.defineProperty()
通过defineProperty()劫持属性的getter/setter,结合发布者-订阅者的方式,发送消息给订阅者,触发对应的回调函数。通过指令(v-xxx)去对DOM进行封装。当数据发生变化,指令修改对应的DOM,数据驱动DOM的变化。反向,Vue也会监听操作,修改视图时,Vue监听到变化后,改变数据。数据的双向变化形成。
双向绑定实现
1.创建Observer
本质上是一个数据属性监听器,核心方法就是Object.defineProperty()。注意:是对所有属性进行监听,那么就意味着如果数据是一个复杂对象,那么就要进行递归遍历深层属性。
创建Observer:
// 为了实现数组的响应式,需要重写数组的原型方法
const originPrototype = Array.prototype; // 空数组
const newArrPrototype = Object.create(originPrototype)
const methods = [
    'push',
    'pop',
    'shift',
    'unshift',
    'splice',
    'sort',
    'reverse'
]
methods.forEach(method => {
    // 重新准备数组原型方法,放在newArrPrototype上
    newArrPrototype[method] = function(){
        // 获取原来的对应的原型方法
        originPrototype[method].apply(this, arguments);
    }
})

// 模拟defineReactive
let defineReactive = (obj, key, value) => {
    // 递归调用,判断value是否也是对象,用于把深层对象设置成响应式属性
    observer(value);

    // obj 传入对象; key监听的属性; value初始值;
    // 拦截传入的参数,进行判断,是否发生数据变化
    // defindReactive对数组的拦截无效,需要修改原型
    Object.defineProperty(obj, key, {
        get() {
            console.log('get: ' + key);
            return value;
        },
        set(newValue) {
            if (newValue !== value) {
                // 为了防止传进来的也是一个对象,set的时候也要调用observer
                observer(newValue);
                console.log('set: ' + key + ', value: ' + newValue);
                value = newValue;
            }
        }
    })
}

let observer = function(obj){
    // 数组相关的方法是需要单独处理的
    if(typeof obj === 'object' && obj != null){
        // 增加对数组的判断,数组需要特殊处理
        if(Array.isArray(obj)){
            // 重新指定对象原型
            obj.__proto__ = newArrPrototype;
            // 遍历数组元素,创建响应式
            for (let i = 0; i < obj.length; i++) {
                // 如果是多维数组,递归调用
                observer(obj[i])
            }
        }else{
            // 获取obj的所有key
            let allKey = Object.keys(obj);
            // 遍历所有key,让每个属性都变成响应式属性
            allKey.forEach(key => {
                defineReactive(obj, key, obj[key]);
            })
        }
    }
}
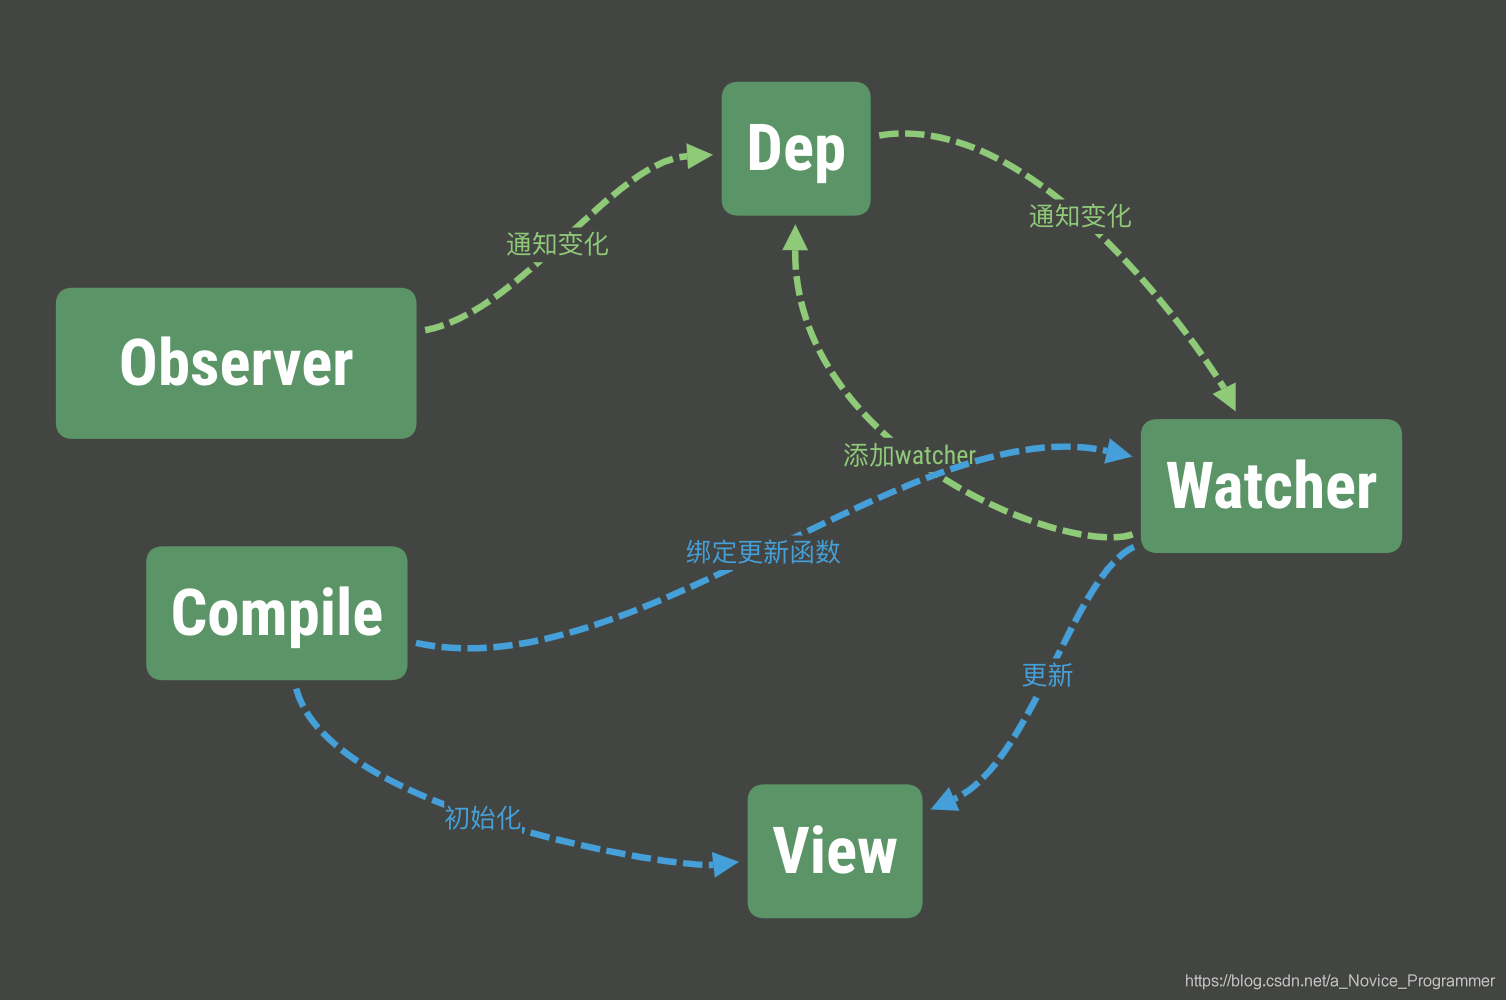
2.创建Dep并植入Oberver
在原理图中可以看出,对属性监听完成后,需要一个消息订阅器(Dep),Dep的作用就是收集所有的watcher。便于数据发生变化时,通知(notify)相关的watcher,去更新视图(View)。
那么创建Dep后,就需要改造上边创建的Observer:
// 植入Dep,管理订阅者(watcher)
// 创建劫持监听
class Observer {
    constructor(value) {
        this.value = value;
        // 判断value的类型:对象or数组
        if (typeof value === 'object' && value != null && !Array.isArray(value)) {
            this.walk(value)
        } else {
            // 判断value是数组类型
            // 为了实现数组的响应式,需要重写数组的原型方法
            const originPrototype = Array.prototype; // 空数组
            const newArrPrototype = Object.create(originPrototype)
            const methods = [
                'push',
                'pop',
                'shift',
                'unshift',
                'splice',
                'sort',
                'reverse'
            ]
            methods.forEach(method => {
                // 重新准备数组原型方法,放在newArrPrototype上
                newArrPrototype[method] = function(){
                    // 获取原来的对应的原型方法
                    originPrototype[method].apply(this, arguments);
                }
            })
           	// 重新指定对象原型
            obj.__proto__ = newArrPrototype;
            // 遍历数组元素,创建响应式
            for (let i = 0; i < obj.length; i++) {
                // 如果是多维数组,递归调用
                observer(obj[i])
            }
        }
    }
    // 对象
    walk(obj) {
        Object.keys(obj).forEach(key => {
            defineReactive(obj, key, obj[key]);
        })
    }
    // 数组
}
let observer = function (obj) {
    if (typeof obj === 'object' && obj != null) {
        // 创建Observer实例
        new Observer(obj);
    }
}

// 模拟defineReactive
let defineReactive = (obj, key, value) => {
    // 递归调用,判断value是否也是对象,用于把深层对象设置成响应式属性
    observer(value);

  	// ------------------------------------------------------
  	// 创建Dep,关联指定的key
    let dep = new Dep();
		// ------------------------------------------------------

    // obj 传入对象; key监听的属性; value初始值;
    // 拦截传入的参数,进行判断,是否发生数据变化
    // defindReactive对数组的拦截无效,需要修改原型
    Object.defineProperty(obj, key, {
        get() {
            console.log('get: ' + key);
          	// ------------------------------------------------------
          	// !!!!!!!!!!注意:在触发getter的时候,开始收集依赖。
          	// 也就是说,所有的依赖收集过程都发生在getter
          	if(收集依赖的条件){
              dep.addDep(订阅者)
            }
          	// ------------------------------------------------------
            return value;
        },
        set(newValue) {
            if (newValue !== value) {
                // 为了防止传进来的也是一个对象,set的时候也要调用observer
                observer(newValue);
                console.log('set: ' + key + ', value: ' + newValue);
                value = newValue;
            }
        }
    })
}
创建Dep:
// 依赖收集
// 管理某个key对应的所有的watcher
class Dep {
    constructor(){
        this.deps = [];
    }
    addDep(dep){
        this.deps.push(dep)
    }
    notify(){
        this.deps.forEach(dep => {
            console.log(dep);
            dep.update();
        })
    }
}
总结:Dep收集watcher放在了getter中,是让Watcher在初始化的时候进行触发。
3.创建Wacther
创建watcher的时候,即初始化watcher的时候,主动触发getter,将自己添加到Dep中:
class Watcher{
    constructor(vm, key, fn){
        this.vm = vm;
        this.key = key;
        this.updateFn = fn;

        // 当前watcher赋值给target
        Dep.target = this;
        // 因为依赖收集发生在getter阶段,所以主动触发getter,将对应key的watcher收集到dep中
        this.vm[this.key];
        // 当前key的依赖收集完成后,立即释放target
        Dep.target = null;

    }
    update(){
        this.updateFn.call(this.vm, this.vm[this.key]);
    }
}
Watcher创建完成后,那么需要对第二步中的Observer继续改造:
// 植入Dep,管理订阅者(watcher)
// 创建劫持监听
class Observer {
    constructor(value) {
        this.value = value;
        // 判断value的类型:对象or数组
        if (typeof value === 'object' && value != null && !Array.isArray(value)) {
            this.walk(value)
        } else {
            // 判断value是数组类型
            // 为了实现数组的响应式,需要重写数组的原型方法
            const originPrototype = Array.prototype; // 空数组
            const newArrPrototype = Object.create(originPrototype)
            const methods = [
                'push',
                'pop',
                'shift',
                'unshift',
                'splice',
                'sort',
                'reverse'
            ]
            methods.forEach(method => {
                // 重新准备数组原型方法,放在newArrPrototype上
                newArrPrototype[method] = function(){
                    // 获取原来的对应的原型方法
                    originPrototype[method].apply(this, arguments);
                }
            })
           	// 重新指定对象原型
            obj.__proto__ = newArrPrototype;
            // 遍历数组元素,创建响应式
            for (let i = 0; i < obj.length; i++) {
                // 如果是多维数组,递归调用
                observer(obj[i])
            }
        }
    }
    // 对象
    walk(obj) {
        Object.keys(obj).forEach(key => {
            defineReactive(obj, key, obj[key]);
        })
    }
    // 数组
}
let observer = function (obj) {
    if (typeof obj === 'object' && obj != null) {
        // 创建Observer实例
        new Observer(obj);
    }
}

// 模拟defineReactive
let defineReactive = (obj, key, value) => {
    // 递归调用,判断value是否也是对象,用于把深层对象设置成响应式属性
    observer(value);

  	// ------------------------------------------------------
  	// 创建Dep,关联指定的key
    let dep = new Dep();
		// ------------------------------------------------------

    // obj 传入对象; key监听的属性; value初始值;
    // 拦截传入的参数,进行判断,是否发生数据变化
    // defindReactive对数组的拦截无效,需要修改原型
    Object.defineProperty(obj, key, {
        get() {
            console.log('get: ' + key);
          	// ------------------------------------------------------
          	// !!!!!!!!!!注意:在触发getter的时候,开始收集依赖。
          	// 也就是说,所有的依赖收集过程都发生在getter
          	Dep.target && dep.addDep(Dep.target);
          	// ------------------------------------------------------
            return value;
        },
        set(newValue) {
            if (newValue !== value) {
                // 为了防止传进来的也是一个对象,set的时候也要调用observer
                observer(newValue);
                console.log('set: ' + key + ', value: ' + newValue);
                value = newValue;

          			// ------------------------------------------------------
              	// 在setter触发的时候,通知对应的watcher去更新view
              	dep.notify()
          			// ------------------------------------------------------
            }
        }
    })
}
至此为止,只需要将Observer和Watcher关联起来,就可以实现数据的双向绑定。
4.创建Compile
Compile的作用就是编译模版,包括模版上的指令;
在Compile的构造中需要两个参数,一个是el(new Vue的时候挂载到跟元素),一个是实例。
开始编译时(compile()),开始遍历节点进行判断,判断是什么节点以及是否存在子节点,如果存在递归遍历。
编译过程中,对于指定类型的节点开始进行初始化,此时,开始建立关联关系!
// 创建编译器
// 获取dom节点,遍历节点
// 判断节点类型:dom节点/文本节点
class Compiler {
    constructor(el, vm) {
        this.$el = document.querySelector(el);
        this.$vm = vm;

        if (this.$el) {
            this.compile(this.$el);
        }
    }
    compile(el) {
        // 获取子节点
        const childNodes = el.childNodes;
        // 遍历孩子节点,用于判断是dom节点还是文本节点
        Array.from(childNodes).forEach(node => {
            if (this.isElement(node)) {
                // console.log('元素节点');
                this.compileElement(node);
            } else if (this.isInter(node)) {
                // console.log('文本节点');
                this.compileText(node);
            }
            // 判断是否有子节点,递归调用
            if (node.childNodes && node.childNodes.length > 0) {
                this.compile(node);
            }
        })
    }
    isElement(node) {
        return node.nodeType === 1;
    }
    isInter(node) {
        // 判断插值文本{{}}
        return node.nodeType === 3 && /\{\{(.*)\}\}/.test(node.textContent);
    }
    compileText(node) {
        // 从实例中获取插值
        // 创建更新器后,会被抽取到公共方法中
        // node.textContent = this.$vm[RegExp.$1];
        // 创建更新器
        this.update(node, RegExp.$1, 'text');
    }
    compileElement(node) {
        // 遍历元素节点的属性
        const attrs = node.attributes;
        Array.from(attrs).forEach(attr => {
            // 获取指令名称
            const attrName = attr.name;
            // 判断是一般写法还是简写
            if (attrName.indexOf('-') > 0) {
                if (attrName.indexOf('on') > 0) {
                    const exp = attrName.substring(2, 4);
                    this[exp] && this[exp](attr, node);
                } else {
                    // 常规指令写法
                    const exp = attrName.substring(2);
                    this[exp] && this[exp](attr, node);
                }
            }
        })
    }
    update(node, exp, dir) {
        // 初始化操作
        const fn = this[dir+'Updater'];
        fn && fn(node, this.$vm[exp])

        // 更新操作
        // 在更新的时候创建一个watcher
      	// ----------------------------------------------------
      	// 创建了Observer和Watcher的关系
        new Watcher(this.$vm, exp, function(value){
            fn && fn(node, value);
            //textUpdater
        })
    }
    textUpdater(node, value){
        node.textContent = value;
    }
    text(attribute, node) {
        this.update(node, attribute.value, 'text');
    }
    // 更新函数!!!
    htmlUpdater(node, value){
        node.innerHTML = value;
    }
    html(attribute, node) {
        this.update(node, attribute.value, 'html');
    }
    on(attribute, node) {
        node.addEventListener('click', this.$vm[attribute.value])
    }

}
5.何时调用Compile
在new Vue的时候调用了Compile:
const app = new kVue({
  el: '#app',
  data: {
    counter: 0,
    str: '<span style="color: red">我是html代码</span>'
  },
  methods: {
    aa() {
      alert(1)
    }
  },
})
创建kVue类:
// 创建kVue的构造函数
class kVue {
    constructor(options) {
        // 保存options
        this.$options = options;
        this.$data = options.data;
        this.$methods = options.methods;
        // 实例化的时候只有data中的数据需要实现响应化
        // 处理响应化的时候需要判断传入的参数是对象还是数组
        observer(this.$data);

        // 代理this中的$data
        proxy(this, '$data');
        proxy(this, '$methods')

        // 编译
        new Compile(this.$options.el, this)
    }
}
总结
以上就实现了一个简单的数据的双向绑定,对于各种指令以及事件,可以自行扩展。


 2万+
2万+


 被折叠的 条评论
为什么被折叠?
被折叠的 条评论
为什么被折叠?
 到【灌水乐园】发言


