


“人怜花似旧,花不知人瘦”
序
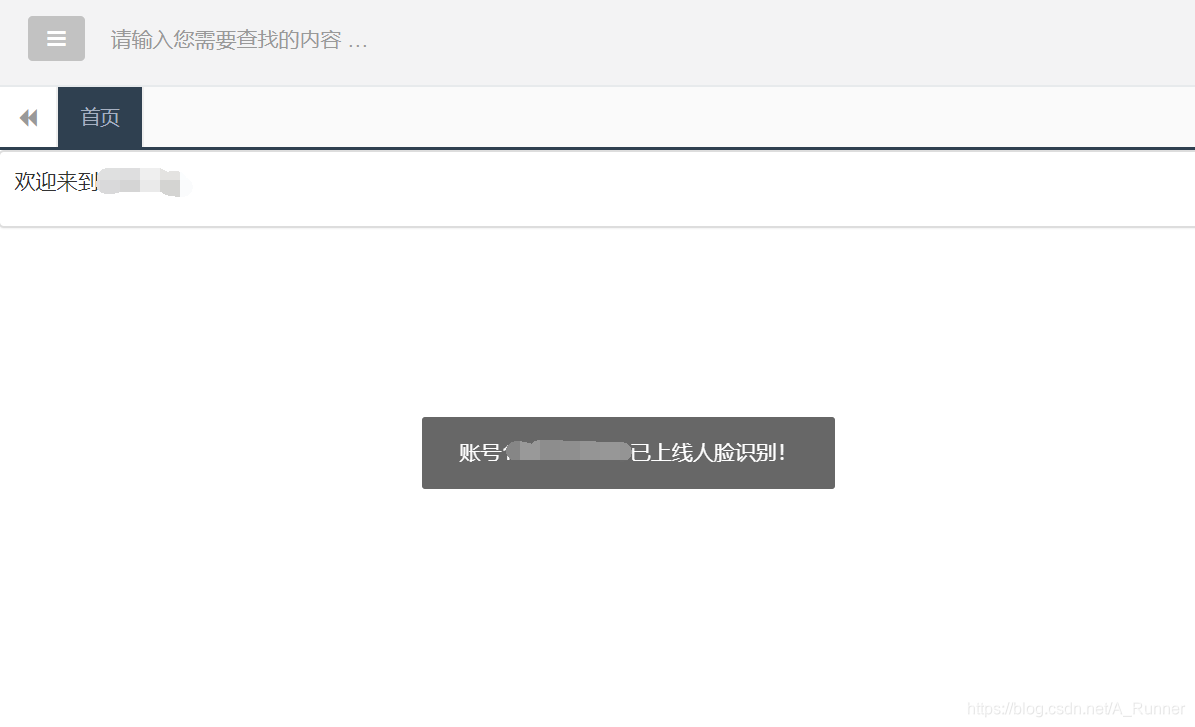
现在做的智能眼镜项目,在眼镜端上线时,需要在web页面做通知。
效果如下:
实现
- 在pom.xml文件引入dwr和logging的依赖
<dependency>
            <groupId>org.directwebremoting</groupId>
            <artifactId>dwr</artifactId>
            <version>3.0.2-RELEASE</version>
        </dependency>
        <dependency>
            <groupId>commons-logging</groupId>
            <artifactId>commons-logging</artifactId>
            <version>1.2</version>
        </dependency>
- 创建dwr的配置文件dwr-spring-config.xml
<?xml version="1.0" encoding="UTF-8"?>
<beans xmlns="http://www.springframework.org/schema/beans"
       xmlns:context="http://www.springframework.org/schema/context"
       xmlns:dwr="http://www.directwebremoting.org/schema/spring-dwr"
       xmlns:xsi="http://www.w3.org/2001/XMLSchema-instance"
       xsi:schemaLocation="http://www.springframework.org/schema/beans http://www.springframework.org/schema/beans/spring-beans-3.0.xsd
       http://www.springframework.org/schema/context http://www.springframework.org/schema/context/spring-context-3.0.xsd
       http://www.directwebremoting.org/schema/spring-dwr http://www.directwebremoting.org/schema/spring-dwr-3.0.xsd">

    <dwr:annotation-config/>
    <dwr:annotation-scan base-package="com.xxx.common.dwr" scanDataTransferObject="true" scanRemoteProxy="true"/>
    <dwr:configuration />
</beans>
- 在项目启动时引入该配置文件,例如我这里是springboot项目,则在启动文件上添加引入文件的注释:
@EnableAutoConfiguration(exclude = {
        org.springframework.boot.autoconfigure.security.servlet.SecurityAutoConfiguration.class
})
@EnableTransactionManagement
@ServletComponentScan
@MapperScan("com.xxx.*.dao")
@SpringBootApplication
@EnableCaching
@EnableSwagger2
//用于加载dwr配置上线通知的注解(这里需要注意:下面的文件上一定要加classpath,否则,在用maven--package打包时会报Caused by: java.io.FileNotFoundException: Could not open ServletContext resource [/dwr-spring-config.xml]的错)
@ImportResource(locations = "classpath:dwr-spring-config.xml")
public class Application {
    public static void main(String[] args) {
        SpringApplication.run(Application.class, args);
        System.out.println("ヾ(◍°∇°◍)ノ゙    启动成功      ヾ(◍°∇°◍)ノ゙\n" +
                " ______                    _   ______            \n" +
                "|_   _ \\                  / |_|_   _ `.          \n" +
                "  | |_) |   .--.    .--. `| |-' | | `. \\  .--.   \n" +
                "  |  __'. / .'`\\ \\/ .'`\\ \\| |   | |  | |/ .'`\\ \\ \n" +
                " _| |__) || \\__. || \\__. || |, _| |_.' /| \\__. | \n" +
                "|_______/  '.__.'  '.__.' \\__/|______.'  '.__.'  ");
    }

    /**
     * dwr消息推送的配置
     * @return
     */
    @Bean
    public ServletRegistrationBean servletRegistrationBean() {
        DwrSpringServlet servlet = new DwrSpringServlet();
        ServletRegistrationBean registrationBean = new ServletRegistrationBean(servlet, "/dwr/*");
        Map<String, String> initParameters = new HashMap<String, String>();
        initParameters.put("debug", "true");
        initParameters.put("activeReverseAjaxEnabled","true");
        /*initParameters.put("pollAndCometEnabled","true");
        initParameters.put("crossDomainSessionSecurity","false");
        initParameters.put("allowScriptTagRemoting","true");*/
        registrationBean.setInitParameters(initParameters);
        return registrationBean;
    }
}
- 创建MessagePush类,与页面建立连接
import org.directwebremoting.ScriptSession;
import org.directwebremoting.WebContextFactory;
import org.directwebremoting.annotations.RemoteMethod;
import org.directwebremoting.annotations.RemoteProxy;

import javax.servlet.ServletException;

@RemoteProxy(name = "MessagePush")
public class MessagePush {
    @RemoteMethod
    public void onPageLoad(String userId) {

        ScriptSession scriptSession = WebContextFactory.get().getScriptSession();
        scriptSession.setAttribute("userId", userId);
        System.out.println("测试dwr通知功能:" + userId);
        DwrScriptSessionManagerUtil dwrScriptSessionManagerUtil = new DwrScriptSessionManagerUtil();
        try {
            dwrScriptSessionManagerUtil.init();
        } catch (ServletException e) {
            e.printStackTrace();
        }
    }
}
- 创建MessagePush需要依赖的类:
import org.directwebremoting.*;
import org.directwebremoting.event.ScriptSessionEvent;
import org.directwebremoting.event.ScriptSessionListener;
import org.directwebremoting.extend.ScriptSessionManager;
import org.directwebremoting.servlet.DwrServlet;

import javax.servlet.ServletException;
import javax.servlet.http.HttpSession;


public class DwrScriptSessionManagerUtil extends DwrServlet {
    public void init() throws ServletException {

        Container container = ServerContextFactory.get().getContainer();

        ScriptSessionManager manager = container .getBean(ScriptSessionManager.class);

        ScriptSessionListener listener = new ScriptSessionListener() {

            public void sessionCreated(ScriptSessionEvent ev) {

                HttpSession session = WebContextFactory.get().getSession();

                String userId = (String) session.getAttribute("userId");

                System.out.println("a ScriptSession is created!");

                ev.getSession().setAttribute("userId", userId);

            }

            public void sessionDestroyed(ScriptSessionEvent ev) {

                System.out.println("a ScriptSession is distroyed");

            }

        };
        manager.addScriptSessionListener(listener);

    }
}
- 创建与页面交互的类:
import org.directwebremoting.Browser;
import org.directwebremoting.ScriptBuffer;
import org.directwebremoting.ScriptSession;

import javax.servlet.ServletException;
import java.util.Collection;
import java.util.List;

public class DwrUtil {

    /**
     * 调用页面javascript函数
     * @param functionName
     * @param args
     */
    public void invokeJavascriptFunction (String _funcName, List _args){
        final String funcName = _funcName;
        final List args = _args;
        DwrScriptSessionManagerUtil dwrScriptSessionManagerUtil = new DwrScriptSessionManagerUtil();
        try {
            dwrScriptSessionManagerUtil.init();
        } catch (ServletException e) {
            e.printStackTrace();
        }
       //全局通知
        Browser.withAllSessions(new Runnable(){
            private ScriptBuffer script = new ScriptBuffer();
            public void run(){
                //拼接javascript
                script = script.appendScript(funcName+"(");
                for(int i=0; i<args.size(); i++){
                    if(i != 0){
                        script = script.appendScript(",");
                    }
                    script = script.appendData(args.get(i));
                }
                script.appendScript(")");
                System.out.println(script.toString());
                Collection<ScriptSession> sessions = Browser.getTargetSessions();
                for (ScriptSession scriptSession : sessions){
                    scriptSession.addScript(script);
                }
            }
        });
    }
}
- 在页面添加js引用,只需添加下面的引用即可,没有物理文件无妨:
<!--以下JS用于全局通知上线功能,并且该JS没有物理文件-->
<script type='text/javascript' src='../dwr/engine.js'></script>
<script type="text/javascript" src="../dwr/util.js"></script>
<script type='text/javascript' src='../dwr/interface/MessagePush.js'></script>
- 在页面加载时与java程序建立连接:
<!--在body中添加onload函数-->
<body class="fixed-sidebar full-height-layout gray-bg"
      style="overflow: hidden" onload="dwr.engine.setActiveReverseAjax(true);dwr.engine.setNotifyServerOnPageUnload(true);onPageLoad();">

<script type="text/javascript">

    //心跳接口调用的方法,用来全局通知上线提醒
    function onlineReminder(mobile,apptype) {
        var type = "";
        if (apptype == "face") {
            type = "人脸识别!"
        } else{
            type = "远程协助!"
        }
        layer.msg("账号" + mobile + "已上线" + type);
        // layer.alert("账号" + mobile + "已上线" + type);
    }
 //页面初始化时调用,表示这个页面需要接受服务端调用
    function onPageLoad(){
        MessagePush.onPageLoad("测试");
    }
    </script>
- 在js中建方法,用于在java代码中调用
<script type="text/javascript">
    //心跳接口调用的方法,用来全局通知上线提醒
    function onlineReminder(mobile,apptype) {
        var type = "";
        if (apptype == "face") {
            type = "人脸识别!"
        } else{
            type = "远程协助!"
        }
        layer.msg("账号" + mobile + "已上线" + type);
        // layer.alert("账号" + mobile + "已上线" + type);
    }
    </script>
- java代码中调用上面JavaScript的onlineReminder方法:
//推送到web端,通知上线
 DwrUtil t = new DwrUtil();
   List args = new ArrayList();
   args.add(mobile);
   args.add(appType);
   t.invokeJavascriptFunction("onlineReminder",args);


 204
204


 被折叠的 条评论
为什么被折叠?
被折叠的 条评论
为什么被折叠?
 到【灌水乐园】发言


