


看了一下午的HashMap的实现原理,感觉很有必要记录下来,防止之后忘记。
一、HashMap的构成原理
1、HashMap结构
HashMap当中,存储最终数据的其实是一个HashMapEntry类型的数组:HashMapEntry<K, V>[] table。
而HashMapEntry对象其实是属于一种单向链表结构。
这样最终其实是构造了一种二维的结构。
我们看一下HashMapEntry类:
里面有四个元素,key,value,hash值以及指向的下一个节点的对象。
static class HashMapEntry<K, V> implements Entry<K, V> {
    final K key;
    V value;
    final int hash;
    HashMapEntry<K, V> next;

    HashMapEntry(K key, V value, int hash, HashMapEntry<K, V> next) {
        this.key = key;
        this.value = value;
        this.hash = hash;
        this.next = next;
    }

    public final K getKey() {
        return key;
    }

    public final V getValue() {
        return value;
    }

    public final V setValue(V value) {
        V oldValue = this.value;
        this.value = value;
        return oldValue;
    }

    @Override public final boolean equals(Object o) {
        if (!(o instanceof Entry)) {
            return false;
        }
        Entry<?, ?> e = (Entry<?, ?>) o;
        return Objects.equal(e.getKey(), key)
                && Objects.equal(e.getValue(), value);
    }

    @Override public final int hashCode() {
        return (key == null ? 0 : key.hashCode()) ^
                (value == null ? 0 : value.hashCode());
    }

    @Override public final String toString() {
        return key + "=" + value;
    }
}
2、查找key对应的对象
知道了HashMap是由数组构成的,那么再来看一看HashMap根据key值查找value的时候是如何去实现的。
public V get(Object key) {
    if (key == null) {
        HashMapEntry<K, V> e = entryForNullKey;
        return e == null ? null : e.value;
    }

    int hash = Collections.secondaryHash(key);
    HashMapEntry<K, V>[] tab = table;
    for (HashMapEntry<K, V> e = tab[hash & (tab.length - 1)];
            e != null; e = e.next) {
        K eKey = e.key;
        if (eKey == key || (e.hash == hash && key.equals(eKey))) {
            return e.value;
        }
    }
    return null;
}
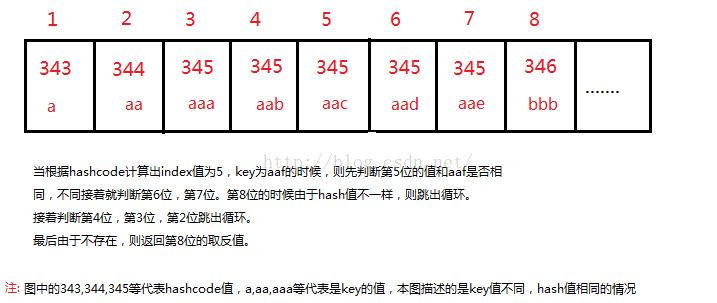
首先根据key值来计算出对应的hashcode值。
然后用hashcode值去和(数组长度-1)且操作。最终的结果肯定就是一个小于数组长度的某个数字。
比如hashcode为0x0007(16进制),数组长度为16,这样计算 7&15, 这样计算出来的index值就是7,该对象的值就位于该数组的第7个链表对象当中。
这时候很自然的一个问题就出来了,那么如果我是0x0017(16进制)呢,这样计算的出来的index肯定也是7,那么也就是位于该数组的第7个链表对象中。
这时候为什么使用数组和链表结合的优势就出来了,如果不是链表的话,根据hashcode得出相同index值的对象就无处存放了。
根据上面的代码
for (HashMapEntry<K, V> e = tab[hash & (tab.length - 1)];e != null; e = e.next)
的可知道,顺序的遍历链表,直到找到直到key相同返回。同时我们也可以得出结论,最极端的情况下,找到对应key值的元素需要遍历map.size()个的链接对象。
同样的原理,在不考虑数组扩容的情况下,添加对象也是一样的流程,根据hash值计算出index值,然后插入index对应的链表当中。
三、添加key对应的对象
首先先看源代码,
@Override public V put(K key, V value) {
    if (key == null) {
        return putValueForNullKey(value);
    }

    int hash = Collections.secondaryHash(key);
    HashMapEntry<K, V>[] tab = table;
    int index = hash & (tab.length - 1);
    for (HashMapEntry<K, V> e = tab[index]; e != null; e = e.next) {
        if (e.hash == hash && key.equals(e.key)) {
            preModify(e);
            V oldValue = e.value;
            e.value = value;
            return oldValue;
        }
    }

    // No entry for (non-null) key is present; create one
    modCount++;
    if (size++ > threshold) {
        tab = doubleCapacity();
        index = hash & (tab.length - 1);
    }
    addNewEntry(key, value, hash, index);
    return null;
}
// No entry for (non-null) key is present; create one 之前的代码基本上就是上面所说的,根据hashcode计算出index然后找到对应的链表。如果存在对应的key就直接重新赋值返回。
下面重点讲的就是数组的扩容。
这里顺便提一下threshold(临界值),初始创建的时候threshold为-1,当首次添加元素扩容之后threshold的值为数组长度的3/4。当size大于临界值的时候,数组扩容。
数组扩容,doubleCapacity()方法。
private HashMapEntry<K, V>[] doubleCapacity() {
    HashMapEntry<K, V>[] oldTable = table;
    int oldCapacity = oldTable.length;
    if (oldCapacity == MAXIMUM_CAPACITY) {
        return oldTable;
    }
    int newCapacity = oldCapacity * 2;
    HashMapEntry<K, V>[] newTable = makeTable(newCapacity);
    if (size == 0) {
        return newTable;
    }

    for (int j = 0; j < oldCapacity; j++) {
        /*
         * Rehash the bucket using the minimum number of field writes.
         * This is the most subtle and delicate code in the class.
         */
        HashMapEntry<K, V> e = oldTable[j];
        if (e == null) {
            continue;
        }
        int highBit = e.hash & oldCapacity;
        HashMapEntry<K, V> broken = null;
        newTable[j | highBit] = e;
        for (HashMapEntry<K, V> n = e.next; n != null; e = n, n = n.next) {
            int nextHighBit = n.hash & oldCapacity;
            if (nextHighBit != highBit) {
                if (broken == null)
                    newTable[j | nextHighBit] = n;
                else
                    broken.next = n;
                broken = e;
                highBit = nextHighBit;
            }
        }
        if (broken != null)
            broken.next = null;
    }
    return newTable;
}
上面这些代码的我们一行一行理解。
扩容的时候,首先new一个新的数组,数组长度是原来的两倍,下一步就是把老的数组的每一条链表对象添加到新的数组当中去。
这个过程看代码挺负责的,但是实际理解上还是蛮简单的。
就是一个和数组长度的且操作,然后放到数组对应的位置上。
举例:
如果hashcode为0x0013(16进制),原数组长度16的时候就放到第3个,扩容之后数组长度变成了32。
新数组的index位置:(19&15)|(19&16) = 19 。这其实就是newTable[j | highBit] = e; 这一行代码。
那么就会放到新数组的第19位。
首先如果初始化的时候没有设置容量capacity,并且这个数值是大于4小于2的31次方的。则会对这个值进行处理,找到大于该值并且最接近该值的2的N次方,就比如19的话则会设置容量为32。
if (capacity < MINIMUM_CAPACITY) {
capacity = MINIMUM_CAPACITY;
} else if (capacity > MAXIMUM_CAPACITY) {
capacity = MAXIMUM_CAPACITY;
} else {
capacity = Collections.roundUpToPowerOfTwo(capacity);
}
看了这个,自然也就想到了刚开始就设置容量的好处了。
如果我需要一个容纳96个元素的map,那么只要我把capacity初始值设置为128,那么就不会经历16到32到64再到128的三次扩容,这样来说是节省内存和运算成本的。
当然如果需要容纳97个元素的话,因为超过了capacity值的3/4,所以就需要设置为256了,否则也会经历一次扩容的。
二、ArrayMap的构成原理
1、arrayMap的存储结构。
arrayMap中主要存储的数据的是两个数据,
int[] mHashes;
Object[] mArray;
mHashs中存储出的是每个key的hash值,并且在这些key的hash值在数组当中是从小到大排序的。
mArray的数组长度是mHashs的两倍,每两个元素分别是key和value,这两元素对应mHashs中的hash值。mArray的结构如下图所示。

For Example
key2和value2分别位于数组的第2位和第3位(从0开始计算),对应的是hash值就是hash的2/2=1位,也就是mHashes[1];
@Override
public V get(Object key) {
    final int index = indexOfKey(key);
    return index >= 0 ? (V)mArray[(index<<1)+1] : null;
}
get方法其实就是一个计算index的过程,计算出来之后如果index大于0就代表存在,直接乘以2就是对应的key的值,乘以2加1就是对应的value的值。
接下来看一下indexOf(Object key,int hash)方法。
int indexOf(Object key, int hash) {
    final int N = mSize;

    // Important fast case: if nothing is in here, nothing to look for.
    if (N == 0) {
        return ~0;
    }

    int index = ContainerHelpers.binarySearch(mHashes, N, hash);

    // If the hash code wasn't found, then we have no entry for this key.
    if (index < 0) {
        return index;
    }

    // If the key at the returned index matches, that's what we want.
    if (key.equals(mArray[index<<1])) {
        return index;
    }

    // Search for a matching key after the index.
    int end;
    for (end = index + 1; end < N && mHashes[end] == hash; end++) {
        if (key.equals(mArray[end << 1])) return end;
    }

    // Search for a matching key before the index.
    for (int i = index - 1; i >= 0 && mHashes[i] == hash; i--) {
        if (key.equals(mArray[i << 1])) return i;
    }

    // Key not found -- return negative value indicating where a
    // new entry for this key should go.  We use the end of the
    // hash chain to reduce the number of array entries that will
    // need to be copied when inserting.
    return ~end;
}
这里的int index=ContaninerHelpers.bindarySearch(mHashes,N,hash)就是一个二分法查找。因为key的hash值是从小到大排列的,所以这里可以根据二分法来找对对应key的hash的位置index。
然后判断index值是否小于0,小于的时候就是代表不包含这个key值。
在判断key是否一致。这里我估计是考虑到了某些key不同,但是hashcode有可能相同的情况了。
再往下走,就是根据二分法找到对应位置的index值对应的key值和我们要找的key值不一致的情况了。
因为hash在数组当中是从小到大的顺序排列的,所以即使hash出现了相同的情况下,也是相邻的,
由于二分法查找只是找到对应的hashcode的值,但是如果存在多个相同的hashcode,但是key不一样的情况下,二分法只能定位到里面随机的一个,但是不可能知道这一个hashcode位于这些相同的hashcode值中的第几个。
所以,下面的方法就是以当前index+1为头,往后挨个寻找,
int end;
for (end = index + 1; end < N && mHashes[end] == hash; end++) {
    if (key.equals(mArray[end << 1])) return end;
}
如果找到最后一个hashcode一致但是key仍不一样,那就反过来以index-1位尾,向前挨个的寻找。
如果出现极端情况下,仍然没有找到对应的key的情况,那么是说明这个key真的不在arraymap当中,但是这个key对应的hashcode是存在于mHashes中的。
所以,这时候就返回~end,其实就是返回着一些hashcode的序列的最后一个+1。这样有了endindex就可以把这个key插入到着一些hashcodes中的最后一位了。
下图是帮助理解的:
其实indexOf方法是会被get和set方法都调用到的,所以这里既是不存在也返回index值,是为了方便put()时的插入操作。
3、arrayMap的set方法和扩容原理。
3.1、put方法的前几个步骤和get是一样的,这里只描述如果不存在这个key的情况。
不存在的这个对应的key的话,会返回一个~index,然后再取反其实就是我们需要插入这个key值的位置。
public V put(K key, V value) {
    final int hash;
    int index;
    if (key == null) {
        hash = 0;
        index = indexOfNull();
    } else {
        hash = key.hashCode();
        index = indexOf(key, hash);
    }
    if (index >= 0) {
        index = (index<<1) + 1;
        final V old = (V)mArray[index];
        mArray[index] = value;
        return old;
    }
3.2、下面就是扩容判断了
当size大于等于mHashes.length的时候,
进行一个判断,判断需要增加的数量的值n。
final int n = mSize >= (BASE_SIZE*2) ? (mSize+(mSize>>1)) : (mSize >= BASE_SIZE ? (BASE_SIZE*2) : BASE_SIZE);
两个三元表达式和在一起。
由于BASE_SIZE = 4,解释一下就是
先判断mSize值是否大于等于8,
如果是则n=mSize*1.5,
如果否则判断是否大于等于4,
是则n=8个,否则n=4个。
index = ~index;
if (mSize >= mHashes.length) {
    final int n = mSize >= (BASE_SIZE*2) ? (mSize+(mSize>>1))
            : (mSize >= BASE_SIZE ? (BASE_SIZE*2) : BASE_SIZE);

    if (DEBUG) Log.d(TAG, "put: grow from " + mHashes.length + " to " + n);

    final int[] ohashes = mHashes;
    final Object[] oarray = mArray;
    allocArrays(n);

    if (mHashes.length > 0) {
        if (DEBUG) Log.d(TAG, "put: copy 0-" + mSize + " to 0");
        System.arraycopy(ohashes, 0, mHashes, 0, ohashes.length);
        System.arraycopy(oarray, 0, mArray, 0, oarray.length);
    }

    freeArrays(ohashes, oarray, mSize);
}
这里代码的作用就是数组复制,如果需要扩容的话,把老的数组中的数据复制到了新的数组当中。
这里有一个freeArrays(ohashes, oarray, mSize);方法是用于内存回收的,下一小节再讲。
3.3、数组移位,插入数据。
我们上面的到了index值,就是需要插入新的数据的位置。自然的就需要把mHashes中index之后的所有的值都后移1位,对应的mArray全都是double移动。
put方法的前几个步骤和get是一样的,这里只描述如果不存在这个key的情况。
不存在的这个对应的key的话,会返回一个~index,然后再取反其实就是我们需要插入这个key值的位置。
if (index < mSize) {
    if (DEBUG) Log.d(TAG, "put: move " + index + "-" + (mSize-index)
            + " to " + (index+1));
    System.arraycopy(mHashes, index, mHashes, index + 1, mSize - index);
    System.arraycopy(mArray, index << 1, mArray, (index + 1) << 1, (mSize - index) << 1);
}
这样就空出来了index位置的对象,进行赋值。
put方法的前几个步骤和get是一样的,这里只描述如果不存在这个key的情况。
不存在的这个对应的key的话,会返回一个~index,然后再取反其实就是我们需要插入这个key值的位置。
mHashes[index] = hash;
mArray[index<<1] = key;
mArray[(index<<1)+1] = value;
mSize++;
4、arrayMap的内存优化
这个主要是两个方法来控制的。这两个方法看了好久才看明白。
原来关键点其实就是
freeArrays方法中,传入的是oldhashes和oldarray。以及新的mSize。
这两个方法的作用基本上就是当长度不够用,我们需要废弃掉老的数组,使用新的数组的时候,把老的数组(包含mHashes和mArray)的数据添加到oldArray当中,然后把oldArray赋值给mBaseCache(4个长度),如果再有新的ArrayMap创建数组空间的时候,如果还是申请4个的空间,那么优先使用缓存下来的这个。
同理,mTwiceBaseCache是缓存8个长度的数组空间的。
也就是说,这些缓存空间是留给其它的ArrayMap的,而不是当前的ArrayMap的。现在网上好多说法什么在数组扩容之后释放本身无用内存空间什么的其实是不准确。
private static void freeArrays(final int[] hashes, final Object[] array, final int size) {
    if (hashes.length == (BASE_SIZE*2)) {
        synchronized (ArrayMap.class) {
            if (mTwiceBaseCacheSize < CACHE_SIZE) {
                array[0] = mTwiceBaseCache;
                array[1] = hashes;
                for (int i=(size<<1)-1; i>=2; i--) {
                    array[i] = null;
                }
                mTwiceBaseCache = array;
                mTwiceBaseCacheSize++;
                if (DEBUG) Log.d(TAG, "Storing 2x cache " + array
                        + " now have " + mTwiceBaseCacheSize + " entries");
            }
        }
    } else if (hashes.length == BASE_SIZE) {
        synchronized (ArrayMap.class) {
            if (mBaseCacheSize < CACHE_SIZE) {
                array[0] = mBaseCache;
                array[1] = hashes;
                for (int i=(size<<1)-1; i>=2; i--) {
                    array[i] = null;
                }
                mBaseCache = array;
                mBaseCacheSize++;
                if (DEBUG) Log.d(TAG, "Storing 1x cache " + array
                        + " now have " + mBaseCacheSize + " entries");
            }
        }
    }
}
private void allocArrays(final int size) {
    if (mHashes == EMPTY_IMMUTABLE_INTS) {
        throw new UnsupportedOperationException("ArrayMap is immutable");
    }
    if (size == (BASE_SIZE*2)) {
        synchronized (ArrayMap.class) {
            if (mTwiceBaseCache != null) {
                final Object[] array = mTwiceBaseCache;
                mArray = array;
                mTwiceBaseCache = (Object[])array[0];
                mHashes = (int[])array[1];
                array[0] = array[1] = null;
                mTwiceBaseCacheSize--;
                if (DEBUG) Log.d(TAG, "Retrieving 2x cache " + mHashes
                        + " now have " + mTwiceBaseCacheSize + " entries");
                return;
            }
        }
    } else if (size == BASE_SIZE) {
        synchronized (ArrayMap.class) {
            if (mBaseCache != null) {
                final Object[] array = mBaseCache;
                mArray = array;
                mBaseCache = (Object[])array[0];
                mHashes = (int[])array[1];
                array[0] = array[1] = null;
                mBaseCacheSize--;
                if (DEBUG) Log.d(TAG, "Retrieving 1x cache " + mHashes
                        + " now have " + mBaseCacheSize + " entries");
                return;
            }
        }
    }

    mHashes = new int[size];
    mArray = new Object[size<<1];
}
三、HashMap和ArrayMap各自的优势
1.查找效率
HashMap因为其根据hashcode的值直接算出index,所以其查找效率是随着数组长度增大而增加的。
ArrayMap使用的是二分法查找,所以当数组长度每增加一倍时,就需要多进行一次判断,效率下降。
所以对于Map数量比较大的情况下,推荐使用
2.扩容数量
HashMap初始值16个长度,每次扩容的时候,直接申请双倍的数组空间。
ArrayMap每次扩容的时候,如果size长度大于8时申请size*1.5个长度,大于4小于8时申请8个,小于4时申请4个。
这样比较ArrayMap其实是申请了更少的内存空间,但是扩容的频率会更高。因此,如果当数据量比较大的时候,还是使用HashMap更合适,因为其扩容的次数要比ArrayMap少很多。
3.扩容效率
HashMap每次扩容的时候时重新计算每个数组成员的位置,然后放到新的位置。
ArrayMap则是直接使用System.arraycopy。
所以效率上肯定是ArrayMap更占优势。
这里需要说明一下,网上有一种传闻说因为ArrayMap使用System.arraycopy更省内存空间,这一点我真的没有看出来。arraycopy也是把老的数组的对象一个一个的赋给新的数组。当然效率上肯定arraycopy更高,因为是直接调用的c层的代码。
4.内存耗费
以ArrayMap采用了一种独特的方式,能够重复的利用因为数据扩容而遗留下来的数组空间,方便下一个ArrayMap的使用。而HashMap没有这种设计。
由于ArrayMap只缓存了长度是4和8的时候,所以如果频繁的使用到Map,而且数据量都比较小的时候,ArrayMap无疑是相当的节省内存的。
5.总结
综上所述,
数据量比较小,并且需要频繁的使用Map存储数据的时候,推荐使用ArrayMap。
而数据量比较大的时候,则推荐使用HashMap。
文章为原创,转载请标注出处:http://blog.csdn.net/rzleilei/article/details/51658938


 378
378


 被折叠的 条评论
为什么被折叠?
被折叠的 条评论
为什么被折叠?
 到【灌水乐园】发言


