


1、主从复制及主主复制的实现
主从复制
1.主节点配置
[root@centos8:~]#
hostnamectl set-hostname master;exit
1.修改配置文件及指定二进制文件路径。
[mysqld]
[root@master:~]#
vim /etc/my.cnf
server_id=18
log_bin=/data/mysql/logbin/mysql-bin
[root@master:~]#
mkdir -p /data/mysql/logbin
[root@master:~]#
chown -R mysql.mysql /data/mysql/logbin
[root@master:~]#
systemctl restart mysqld
[root@master:~]#
mysql
mysql> select @@server_id;
+-------------+
| @@server_id |
+-------------+
|          18 |
+-------------+
mysql> show master logs;
+------------------+-----------+-----------+
| Log_name         | File_size | Encrypted |
+------------------+-----------+-----------+
| mysql-bin.000001 |       156 | No        |
+------------------+-----------+-----------+
2.新建主从复制的账号并授权
mysql> create user repluser@'10.0.0.%' identified by '123456';
Query OK, 0 rows affected (0.03 sec)

mysql> grant replication slave on *.* to repluser@'10.0.0.%';
Query OK, 0 rows affected (0.01 sec)
2.从节点配置
1.修改从节点配置文件
[root@centos8:~]#
vim /etc/my.cnf
[mysqld]
server-id=28
read-only
[root@centos8:~]#
systemctl restart mysqld
[root@centos8:~]#
mysql
mysql> select @@server_id;
+-------------+
| @@server_id |
+-------------+
|          28 |
+-------------+
2.往二进制文件中写入以下数据并开启从节点复制。
mysql> CHANGE MASTER TO
    ->   MASTER_HOST='10.0.0.18',
    ->   MASTER_USER='repluser',
    ->   MASTER_PASSWORD='123456',
    ->   MASTER_PORT=3306,
    ->   MASTER_LOG_FILE='mysql-bin.000001',
    ->   MASTER_LOG_POS=156;
mysql> start slave;
Query OK, 0 rows affected, 1 warning (0.01 sec)

mysql> show  slave status\G;
*************************** 1. row ***************************
               Slave_IO_State: Waiting for source to send event
                  Master_Host: 10.0.0.18
                  Master_User: repluser
                  Master_Port: 3306
                Connect_Retry: 60
              Master_Log_File: mysql-bin.000001
          Read_Master_Log_Pos: 681
               Relay_Log_File: centos8-relay-bin.000002
                Relay_Log_Pos: 849
        Relay_Master_Log_File: mysql-bin.000001
             Slave_IO_Running: Yes
            Slave_SQL_Running: Yes
 ....省略.....
3.测试
1.master导入数据
mysql> source  hellodb_innodb.sql
Query OK, 0 rows affected (0.00 sec)

Query OK, 0 rows affected (0.00 sec)

Query OK, 0 rows affected (0.00 sec)

Query OK, 0 rows affected, 1 warning (0.01 sec)

Query OK, 0 rows affected (0.00 sec)
...省略...
2.slave进行查看
mysql> show databases;
+--------------------+
| Database           |
+--------------------+
| hellodb            |
| information_schema |
| mysql              |
| performance_schema |
| sys                |
+--------------------+
5 rows in set (0.00 sec)
主主复制
1.master1配置
1.修改主机名为master1
[root@centos8:~]#
hostnamectl  set-hostname master1;exit
2.修改配置文件启动项
[root@master1:~]#
vim /etc/my.cnf
[mysqld]
server-id=8
log-bin=/data/mysql/mysql-bin
auto_increment_offset=1
auto_increment_increment=2
[root@master1:~]#
mkdir -p /data/mysql;chown mysql.mysql /data/mysql/
[root@master1:~]#
systemctl  restart mysqld
3.显示出日志文件名和LOG_POS
[root@master1:~]#
mysql
mysql> show master logs;
+------------------+-----------+-----------+
| Log_name         | File_size | Encrypted |
+------------------+-----------+-----------+
| mysql-bin.000001 |       156 | No        |
+------------------+-----------+-----------+
1 row in set (0.00 sec)
4.创建复制账号及授权。
mysql> create user repluser@'10.0.0.%' identified by '123456';
Query OK, 0 rows affected (0.02 sec)
mysql> grant replication slave on *.* to repluser@'10.0.0.%';
Query OK, 0 rows affected (0.01 sec)
2.master2配置
1.修改主机名为master2
[root@centos8:~]#
hostnamectl  set-hostname master2;exit
2.修改配置文件启动项
[root@master2:~]#
vim /etc/my.cnf
[mysqld]
server-id=18
log-bin=/data/mysql/mysql-bin
auto_increment_offset=2
auto_increment_increment=2
[root@master2:~]#
mkdir -p /data/mysql;chown mysql.mysql /data/mysql/
[root@master2:~]#
systemctl  restart mysqld
4.往二进制文件中写入以下数据并开启从节点复制
mysql> CHANGE MASTER TO
  MASTER_HOST='10.0.0.8',
  MASTER_USER='repluser',
  MASTER_PASSWORD='123456',
  MASTER_PORT=3306,
  MASTER_LOG_FILE='mysql-bin.000001',
  MASTER_LOG_POS=156;
mysql> start slave;
Query OK, 0 rows affected, 1 warning (0.01 sec)

mysql> show slave status\G;
*************************** 1. row ***************************
               Slave_IO_State: Waiting for source to send event
                  Master_Host: 10.0.0.8
                  Master_User: repluser
                  Master_Port: 3306
                Connect_Retry: 60
              Master_Log_File: mysql-bin.000001
          Read_Master_Log_Pos: 691
               Relay_Log_File: master2-relay-bin.000002
                Relay_Log_Pos: 859
        Relay_Master_Log_File: mysql-bin.000001
             Slave_IO_Running: Yes
            Slave_SQL_Running: Yes
...省略...
5.显示出日志文件名和LOG_POS
mysql> show master logs;
+------------------+-----------+-----------+
| Log_name         | File_size | Encrypted |
+------------------+-----------+-----------+
| mysql-bin.000001 |       705 | No        |
+------------------+-----------+-----------+
3.master1往二进制文件中写入以下数据并开启从节点复制
mysql>  CHANGE MASTER TO
    ->   MASTER_HOST='10.0.0.18',
    ->   MASTER_USER='repluser',
    ->   MASTER_PASSWORD='123456',
    ->   MASTER_PORT=3306,
    ->   MASTER_LOG_FILE='mysql-bin.000001',
    ->   MASTER_LOG_POS=705;
mysql> start slave;
Query OK, 0 rows affected, 1 warning (0.00 sec)

mysql> show slave status\G;
*************************** 1. row ***************************
               Slave_IO_State: Waiting for source to send event
                  Master_Host: 10.0.0.18
                  Master_User: repluser
                  Master_Port: 3306
                Connect_Retry: 60
              Master_Log_File: mysql-bin.000001
          Read_Master_Log_Pos: 705
               Relay_Log_File: master1-relay-bin.000002
                Relay_Log_Pos: 324
        Relay_Master_Log_File: mysql-bin.000001
             Slave_IO_Running: Yes
            Slave_SQL_Running: Yes
....省略....
4.测试
master1新建表,
mysql> create table student (id int,name VARCHAR(20) );
Query OK, 0 rows affected (0.03 sec)
master2能查看
mysql> DESC student;
+-------+-------------+------+-----+---------+-------+
| Field | Type        | Null | Key | Default | Extra |
+-------+-------------+------+-----+---------+-------+
| id    | int         | YES  |     | NULL    |       |
| name  | varchar(20) | YES  |     | NULL    |       |
+-------+-------------+------+-----+---------+-------+
master2添加数据
mysql> insert student values(1,'xiaoqiang');
Query OK, 1 row affected (0.00 sec)
master1能够查看
mysql> select *from student;
+------+-----------+
| id   | name      |
+------+-----------+
|    1 | xiaoqiang |
+------+-----------+
1 row in set (0.00 sec)
2、xtrabackup实现全量+增量+binlog恢复库
提前准备:宿主机下载percona-xtrabackup-80-8.0.28-20.1.el8.x86_64.rpm,传给centos8,利用yum安装可以解决依赖关系,方便,不用rpm安装。
1.备份+增量备份
1.传送文件
[root@centos8:~]#
rz -E
rz waiting to receive.
2.yum安装xtrabackup
[root@centos8:~]#
yum -y install percona-xtrabackup-80-8.0.28-20.1.el8.x86_64.rpm
3.新建文件夹并备份数据。
[root@centos8:~]#
mkdir /backup/
4.第一次完全备份
[root@centos8:~]#
xtrabackup -uroot  --backup --target-dir=/backup/base
5.第一次修改数据
mysql> \u hellodb
Reading table information for completion of table and column names
You can turn off this feature to get a quicker startup with -A
Database changed
mysql> create database db1;
Query OK, 1 row affected (0.00 sec)
6.第一次增量备份
[root@centos8:~]#
xtrabackup -uroot  --backup --target-dir=/backup/inc1 --incremental-basedir=/backup/base
7.第二次修改数据
mysql> create database db2;
Query OK, 1 row affected (0.00 sec)
8.第二次增量
[root@centos8:~]#
xtrabackup -uroot  --backup --target-dir=/backup/inc2 --incremental-basedir=/backup/inc1
9.将数据备份到目标主机
[root@centos8:~]#
scp -r /backup/* 10.0.0.18:/backup/
[root@centos8:~]#
ll /backup
total 12
drwxr-x--- 6 root root 4096 May  6 13:35 base
drwxr-x--- 7 root root 4096 May  6 13:35 inc1
drwxr-x--- 8 root root 4096 May  6 13:35 inc2
2.还原
1.安装xtrabackup并进行第一次完全备份的还原
[root@centos8:~]#
yum -y install percona-xtrabackup-80-8.0.28-20.1.el8.x86_64.rpm
[root@centos8 ~]#xtrabackup --prepare --apply-log-only --target-dir=/backup/base
2.合并第1次增量备份到完全备份
[root@centos8:~]#
xtrabackup --prepare --apply-log-only --target-dir=/backup/base --incremental-dir=/backup/inc1
3.合并第2次增量备份到完全备份
[root@centos8:~]#
xtrabackup --prepare --target-dir=/backup/base --incremental-dir=/backup/inc2

4.复制到数据库目录,注意数据库目录必须为空,如果启动了数据库,需要停止数据库并删除数据库,
[root@centos8:~]#
systemctl stop mysqld
[root@centos8:~]#
rm -rf /var/lib/mysql/*
[root@centos8 ~]#xtrabackup --copy-back --target-dir=/backup/base
[root@centos8:~]#
chown -R mysql:mysql /var/lib/mysql
5.启动数据库并检查
[root@centos8:~]#
systemctl start mysqld
[root@centos8:~]#
mysql
Welcome to the MySQL monitor.  Commands end with ; or \g.
Your MySQL connection id is 8
Server version: 8.0.26 Source distribution

Copyright (c) 2000, 2021, Oracle and/or its affiliates.

Oracle is a registered trademark of Oracle Corporation and/or its
affiliates. Other names may be trademarks of their respective
owners.

Type 'help;' or '\h' for help. Type '\c' to clear the current input statement.

mysql> show databases;
+--------------------+
| Database           |
+--------------------+
| db1                |
| db2                |
| hellodb            |
| information_schema |
| mysql              |
| performance_schema |
| sys                |
+--------------------+
7 rows in set (0.01 sec)
3、MyCAT实现MySQL读写分离
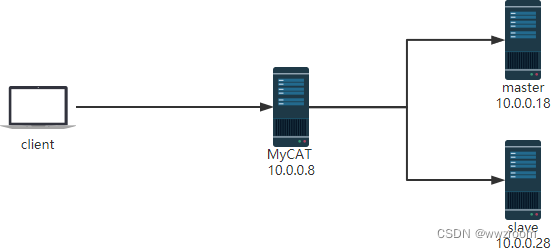
1.主从配置与第一题相同省略
2.mycat主机环境配置(内存大于2G,防止启动不了)
1.修改主机名
[root@centos8:~]#
hostnamectl set-hostname mycat;exit
2.安装Java环境
[root@mycat:~]#
yum -y install java
3.下载mycat解压并配置PATH变量
[root@mycat:~]#
wget http://dl.mycat.org.cn/1.6.7.4/Mycat-server-1.6.7.4-release/Mycat-server-1.6.7.4-release-20200105164103-linux.tar.gz
[root@mycat:~]#
mkdir /apps
[root@mycat:~]#
tar xvf Mycat-server-1.6.7.4-release/Mycat-server-1.6.7.4-release-20200105164103-linux.tar.gz -C /apps/
[root@mycat:~]#
echo 'PATH=/apps/mycat/bin:$PATH' > /etc/profile.d/mycat.sh
[root@mycat:~]#
source /etc/profile.d/mycat.sh
4.启动mycat并查看是否成功启动。
[root@mycat:~]#
mycat start
Starting Mycat-server...
[root@mycat:~]#
tail /apps/mycat/logs/wrapper.log
STATUS | wrapper  | 2022/05/06 10:10:48 | --> Wrapper Started as Daemon
STATUS | wrapper  | 2022/05/06 10:10:48 | Launching a JVM...
INFO   | jvm 1    | 2022/05/06 10:10:48 | Wrapper (Version 3.2.3) http://wrapper.tanukisoftware.org
INFO   | jvm 1    | 2022/05/06 10:10:48 |   Copyright 1999-2006 Tanuki Software, Inc.  All Rights Reserved.
INFO   | jvm 1    | 2022/05/06 10:10:48 |
INFO   | jvm 1    | 2022/05/06 10:10:49 | MyCAT Server startup successfully. see logs in logs/mycat.log
[root@mycat:~]#
vim /apps/mycat/conf/server.xml
修改端口号,密码
将注释的<property name="serverPort">8066</property><property name="managerPort">9066</property>复制,并粘贴到<property name="handleDistributedTransactions">0</property>前面,修改端口号为3306,
root用户密码修改为magedu


5.在master上创建mycat连接数据库的账号并授权
[root@master:~]#
mysql
mysql> create user root@'10.0.0.%' identified by '123456';
Query OK, 0 rows affected (0.00 sec)
mysql> grant all on *.* to root@'10.0.0.%';
Query OK, 0 rows affected (0.01 sec)
6.在客户端上连接并测试(mycat数据是虚拟数据库,是被指定的hellodb)
[root@centos7:~]#
mysql -uroot -pmagedu -h10.0.0.8 TESTDB
MySQL [TESTDB]> select @@server_id;
+-------------+
| @@server_id |
+-------------+
|          28 |
+-------------+
1 row in set (0.00 sec)
MySQL [TESTDB]> select * from teachers;
+-----+---------------+-----+--------+
| TID | Name          | Age | Gender |
+-----+---------------+-----+--------+
|   1 | Song Jiang    |  45 | M      |
|   2 | Zhang Sanfeng |  94 | M      |
|   3 | Miejue Shitai |  77 | F      |
|   4 | Lin Chaoying  |  93 | F      |
+-----+---------------+-----+--------+
7.停止从节点,MyCAT自动调度读请求至主节点
[root@slave ~]#systemctl stop mysqld
[root@centos7 ~]#mysql -uroot -pmagedu -h10.0.0.8
MySQL [(none)]> select @@server_id;
+-------------+
| @@server_id |
+-------------+
| 18 |
+-------------+
1 row in set (0.00 sec)
MySQL [(none)]>
8.停止主节点,MyCAT不会自动调度写请求至从节点
[root@master ~]#systemctl stop mysqld
[root@centos7 ~]#mysql -uroot -pmagedu -h10.0.0.8
MySQL [TESTDB]> insert teachers values(5,'wang',30,'M');
ERROR 1184 (HY000): java.net.ConnectException: Connection refused
9.查看通用日志
主节点
[root@master:~]#
tail -f /var/lib/mysql/master.log
2022-05-06T04:37:27.245557Z	   79 Query	select user()
2022-05-06T04:37:37.245654Z	   72 Query	select user()
2022-05-06T04:37:47.245537Z	   77 Query	select user()
2022-05-06T04:37:57.245553Z	   76 Query	select user()
2022-05-06T04:38:07.245696Z	   73 Query	select user()
2022-05-06T04:38:17.245559Z	   80 Query	select user()
从节点
[root@slave:/var/lib/mysql]#
tail -f /var/lib/mysql/slave.log
2022-05-06T04:40:17.246225Z	   66 Query	select user()
2022-05-06T04:40:27.246550Z	   62 Query	select user()
2022-05-06T04:40:37.246192Z	   69 Query	select user()
2022-05-06T04:40:47.246307Z	   67 Query	select user()
2022-05-06T04:40:57.246382Z	   64 Query	select user()
4、ansible常用模块介绍
4.1 Command 模块
功能:在远程主机执行命令,此为默认模块,可忽略 -m 选项
注意:此命令不支持 $VARNAME < > | ; & 等,可能用shell模块实现
注意:此模块不具有幂等性 ,虽然可以用但不是最优解
[root@ansible:~]#
ansible websrvs -m command -a 'hostname'    #-m 指定模块,-a 添加参数,命令用引号,作为整体,此处可以不加,但是ansible-console 中必须添加'hostname',否则执行不出来。
10.0.0.7 | CHANGED | rc=0 >>
centos7.9.wwzroom.org
10.0.0.18 | CHANGED | rc=0 >>
centos8.wwzroom.com
[root@ansible:~]#
ansible websrvs -m command -a "touch /data/ansible1.log"
#command是默认模块,可以省略 -m command

[root@ansible:~]#
ansible websrvs  -a "touch /data/ansible1.log"
[root@ansible:~]#
ansible websrvs  -a "rm -rf  /data/ansible1.log"
[WARNING]: Consider using the file module with state=absent rather than running
'rm'.  If you need to use command because file is insufficient you can add
'warn: false' to this command task or set 'command_warnings=False' in
ansible.cfg to get rid of this message.
10.0.0.7 | CHANGED | rc=0 >>
10.0.0.18 | CHANGED | rc=0 >>

[root@ansible:~]#
ansible websrvs  -a "ls -l  /data/ansible.log"
10.0.0.7 | CHANGED | rc=0 >>
-rw-r--r-- 1 root root 0 May 16 15:17 /data/ansible.log
10.0.0.18 | CHANGED | rc=0 >>
-rw-r--r-- 1 root root 0 May 16 15:17 /data/ansible.log
#注意此时用别名ll不能识别,使用基本命令模块不具有幂等性,因此使用时会有粉色得到警告,告知有对应的模块。command模块功能有限,不支持重定向,管道等语句,一些特殊符号也无法使用。
[root@ansible ~]#ansible websrvs -m command -a 'chdir=/etc creates=/data/f1.txt cat centos-release'   #chdir=/etc 切换到此文件夹下,
[root@ansible:~]#
ansible websrvs -a 'creates=/data/mysql mkdir /data/mysql'  #判断creates=/data/mysql文件夹是否存在,不存在就创建。存在就直接提示存在,不创建。
4.2 Shell 模块
功能:和command相似,用shell执行命令,支持各种符号,比如:*,$, >
shell模块是command模块的升级版,可以设置为默认的模块
1.打开配置文件
[root@ansible:~]#
vim /etc/ansible/ansible.cfg
2.去掉默认的模块注释,把command修改为shell
module_name = shell
不是服务,一次修改配置文件之后直接生效,不用重启。
注意:此模块不具有幂等性
[root@ansible:~]#
ansible websrvs -m command -a 'echo hello > /data/hello.log'
10.0.0.7 | CHANGED | rc=0 >>
hello > /data/hello.log
10.0.0.18 | CHANGED | rc=0 >>
hello > /data/hello.log

[root@ansible:~]#
ansible websrvs -m shell -a 'echo hello > /data/hello.log'
10.0.0.7 | CHANGED | rc=0 >>

10.0.0.18 | CHANGED | rc=0 >>
#command模块不支持重定向,因此知识显示出echo后面的所有内容,而shell模块支持,因此就可以执行重定向,生成文件,但仍然不支持别名,不如ll。
修改默认模块之后可以不用加上 -m shell
[root@ansible:~]#
ansible websrvs -a 'echo $HOSTNAME'   #使用shell模块,支持变量

10.0.0.7 | CHANGED | rc=0 >>
centos7.9.wwzroom.org
10.0.0.18 | CHANGED | rc=0 >>
centos8.wwzroom.com

注意:调用bash执行命令 类似 cat /tmp/test.md | awk -F'|' '{print $1,$2}' &> /tmp/example.txt 这些复杂命令,即使使用shell也可能会失败,解决办法:写到脚本时,copy到远程,执行,再把需要的结果拉回执行命令的机器
4.3 Script 模块
功能:在远程主机上运行ansible服务器上的脚本(无需执行权限),本机的脚本,在远程主机执行。
注意:此模块不具有幂等性
[root@ansible:~]#
vim test.sh
添加 hostname -I

[root@ansible:~]#
bash test.sh
10.0.0.8
[root@ansible:~]#
ansible websrvs -m script -a '/root/test.sh'
10.0.0.7 | CHANGED => {
    "changed": true,
    "rc": 0,
    "stderr": "Shared connection to 10.0.0.7 closed.\r\n",
    "stderr_lines": [
        "Shared connection to 10.0.0.7 closed."
    ],
    "stdout": "10.0.0.7 \r\n",
    "stdout_lines": [
        "10.0.0.7 "
    ]
}
10.0.0.18 | CHANGED => {
    "changed": true,
    "rc": 0,
    "stderr": "Shared connection to 10.0.0.18 closed.\r\n",
    "stderr_lines": [
        "Shared connection to 10.0.0.18 closed."
    ],
    "stdout": "10.0.0.18 \r\n",
    "stdout_lines": [
        "10.0.0.18 "
    ]
}
4.4 Copy 模块
功能:从ansible服务器主控端复制文件到远程主机
注意: src=file 如果是没指明路径,则为当前目录或当前目录下的files目录下的file文件
[root@ansible:~]#
ansible-doc copy     #查看帮助

#如目标存在,默认覆盖,此处指定先备份,src=跟源文件绝对路径,dest=跟目标绝对路径,修改名字为test.sh, 主为wwz,组为bin,权限为600,backup=yes保留原来文件
ansible websrvs -m copy -a "src=/root/test1.sh dest=/tmp/test2.sh owner=wwz group=bin mode=600 backup=yes"
#指定内容,直接生成目标文件
ansible websrvs -m copy -a "content='test line1\ntest line2\n' dest=/tmp/test.txt"
#复制/etc目录自身,注意/etc/后面没有/,拷贝的效率低,速度慢。
ansible websrvs -m copy -a "src=/etc dest=/backup"
#复制/etc/下的文件,不包括/etc/目录自身,注意/etc/后面有/
ansible websrvs -m copy -a "src=/etc/ dest=/backup"
4.5 Get_url 模块
功能: 用于将文件从http、https或ftp下载到被管理机节点上
常用参数如下:
url: 下载文件的URL,支持HTTP,HTTPS或FTP协议
dest: 下载到目标路径(绝对路径),如果目标是一个目录,就用服务器上面文件的名称,如果目标设置了名称就用目标设置的名称
owner:指定属主
group:指定属组
mode:指定权限
force: 如果yes,dest不是目录,将每次下载文件,如果内容改变,替换文件。如果否,则只有在目标不存在时才会下载该文件
checksum: 对目标文件在下载后计算摘要,以确保其完整性
		示例: checksum="sha256:D98291AC[...]B6DC7B97",
			checksum="sha256:http://example.com/path/sha256sum.txt"
url_username: 用于HTTP基本认证的用户名。 对于允许空密码的站点,此参数可以不使用`url_password'
url_password: 用于HTTP基本认证的密码。 如果未指定`url_username'参数,则不会使用`url_password'参数
validate_certs:如果“no”,SSL证书将不会被验证。 适用于自签名证书在私有网站上使用
timeout: URL请求的超时时间,秒为单位


范例:
[root@ansible ~]#ansible websrvs -m get_url -a 'url=http://nginx.org/download/nginx-1.18.0.tar.gz dest=/usr/local/src/nginx.tar.gz checksum="md5:b2d33d24d89b8b1f87ff5d251aa27eb8"'


1.本机下载nginx
[root@ansible:~]#
wget http://nginx.org/download/nginx-1.18.0.tar.gz
2.进行哈希运算,得到哈希码
[root@ansible:~]#
md5sum nginx-1.18.0.tar.gz
b2d33d24d89b8b1f87ff5d251aa27eb8  nginx-1.18.0.tar.gz
3.远程下载,放在/usr/local/src/之下,改名为nginx.tar.gz,运用哈希码进行校验,确保完整性。
[root@ansible ~]#ansible websrvs -m get_url -a 'url=http://nginx.org/download/nginx-1.18.0.tar.gz dest=/usr/local/src/nginx.tar.gz checksum="md5:b2d33d24d89b8b1f87ff5d251aa27eb8"'
4.6 Fetch 模块
功能:从远程主机提取文件至ansible的主控端,copy相反,目前不支持目录 ,如果要拷贝文件夹,可以先对文件夹打包,然后在进行拷贝。
[root@ansible:~]#
ansible websrvs -m fetch -a 'src=/var/log/messages dest=/data/log'
#从websrvs 拷贝文件,放到/data/log/文件夹之下,两个文件没名字分别为对应的ip
4.7 File 模块
功能:设置文件属性,创建软链接等
[root@ansible:~]#
ansible websrvs -m file -a 'path=/data/a.txt state=touch owner=wwz'
#在目标主机上创建a.txt文件,path=后跟目标路径和文件名,state=后跟具体操作命令, owner=指定主
[root@ansible:~]#
ansible websrvs -m file -a 'path=/data/test.txt state=absent' #删除文件
[root@ansible:~]#
ansible websrvs -m file -a 'path=/data/mysql state=directory'
#创建文件夹

[root@ansible:~]#
ansible websrvs -m file -a 'path=/data/mysql-5.7 state=directory'
[root@ansible:~]#
ansible websrvs -m file -a 'src=/data/mysql-5.7 path=/data/mysql-link  state=link'
#创建目录,然后生成软连接
[root@ansible:~]#
ansible websrvs -m file -a 'path=/data/mysql-5.7 state=absent'  #删除文件夹
[root@ansible:~]#
ansible websrvs -m file -a 'path=/data/mysql-link state=absent'

#递归修改目录属性,但不递归至子目录
ansible all -m file -a "path=/data/mysql state=directory owner=mysql
group=mysql"
#递归修改目录及子目录的属性
ansible all -m file -a "path=/data/mysql state=directory owner=mysql group=mysql recurse=yes"
4.8 stat 模块
功能:检查文件或文件系统的状态
注意:对于Windows目标,请改用win_stat模块
选项:path:文件/对象的完整路径(必须)
常用的返回值判断:
exists: 判断是否存在
isuid: 调用用户的ID与所有者ID是否匹配
范例:
[root@ansible ~]#ansible 127.0.0.1 -m stat -a 'path=/etc/passwd'
127.0.0.1 | SUCCESS => {
	"changed": false,
	"stat": {
		"atime": 1614601466.7493012,
		"attr_flags": "",
		"attributes": [],
		"block_size": 4096,
		"blocks": 8,
		"charset": "us-ascii",
		"checksum": "8f7a9a996d24de98bf1eab4a047f8e89e9c708cf",
		"ctime": 1614334259.4498665,
		"dev": 2050,
		"device_type": 0,
		"executable": false,
		"exists": true,
		"gid": 0,
		"gr_name": "root",
		"inode": 134691833,
		"isblk": false,
		"ischr": false,
		"isdir": false,
		"isfifo": false,
		"isgid": false,
		"islnk": false,
		"isreg": true,
		"issock": false,
		"isuid": false,
		"mimetype": "text/plain",
		"mode": "0000",
		"mtime": 1614334259.4498665,
		"nlink": 1,
		"path": "/etc/passwd",
		"pw_name": "root",
		"readable": true,
		"rgrp": false,
		"roth": false,
		"rusr": false,
		"size": 1030,
		"uid": 0,
		"version": "671641160",
		"wgrp": false,
		"woth": false,
		"writeable": true,
		"wusr": false,
		"xgrp": false,
		"xoth": false,
		"xusr": false
	}
}
案例:
- name: install | Check if file is already configured.
	stat: path={{ nginx_file_path }}
	connection: local
	register: nginx_file_result
- name: install | Download nginx file
	get_url: url={{ nginx_file_url }} dest={{ software_files_path }}
validate_certs=no
	connection: local
	when:,not. nginx_file_result.stat.exists
4.9 unarchive 模块
功能:解包解压缩
实现有两种用法:
1、将ansible主机上的压缩包传到远程主机后解压缩至特定目录,设置copy=yes,此为默认值,可省略
2、将远程主机上的某个压缩包解压缩到指定路径下,设置copy=no
常见参数
copy:默认为yes,当copy=yes,拷贝的文件是从ansible主机复制到远程主机上,如果设置为copy=no,会在远程主机上寻找src源文件
remote_src:和copy功能一样且互斥,yes表示在远程主机,不在ansible主机,no表示文件在ansible主机上
src:源路径,可以是ansible主机上的路径,也可以是远程主机(被管理端或者第三方主机)上的路径,如果是远程主机上的路径,则需要设置copy=no
dest:远程主机上的目标路径
mode:设置解压缩后的文件权限

范例:
1.将ansible上的压缩包拷贝到远程,并进行解压缩
[root@ansible:~]#
ansible all -m  unarchive -a 'src=nginx-1.18.0.tar.gz dest=/usr/local/src owner=wwz group=bin'    #copy=yes省略了,
2.在网上下载安装包,并进行解压,安装包主要不在ansible机器上,就要添加 copy=no
[root@ansible:~]#
ansible  all -m unarchive -a 'src=http://nginx.org/download/nginx-1.18.0.tar.gz dest=/data/ copy=no'
3.把远程主机上的包进行解压缩。
[root@ansible:~]#
ansible  websrvs -m unarchive -a 'src=/usr/local/src/nginx.tar.gz dest=/opt/ copy=no'
4.10 Archive 模块
功能:打包压缩保存在被管理节点
范例:
对于被控端的文件夹进行打包,仍然放在被控端。
ansible websrvs -m archive -a 'path=/var/log/ dest=/data/log.tar.bz2 format=bz2 owner=wwz mode=0600'
4.11 Hostname 模块
功能:管理主机名,不能对多台机器使用,因为同名,一次只能一台一台进行改名。
范例:
ansible node1 -m hostname -a "name=websrv"
ansible 10.0.0.18 -m hostname -a 'name=node18.magedu.com
4.12 Cron 模块
功能:计划任务
支持时间:minute,hour,day,month,weekday
范例:
#备份数据库脚本
[root@centos8 ~]#cat /root/mysql_backup.sh
#!/bin/bash
mysqldump -A -F --single-transaction --master-data=2 -q -uroot |gzip > /data/mysql_`date +%F_%T`.sql.gz

#创建任务
ansible 10.0.0.8 -m cron -a 'hour=2 minute=30 weekday=1-5 name="backup mysql" job=/root/mysql_backup.sh'
ansible websrvs -m cron -a "minute=*/5 job='/usr/sbin/ntpdate ntp.aliyun.com &>/dev/null' name=Synctime"

#禁用计划任务disabled=yes
ansible websrvs -m cron -a "minute=*/5 job='/usr/sbin/ntpdate 172.20.0.1 &>/dev/null' name=Synctime disabled=yes"

#启用计划任务
ansible websrvs -m cron -a "minute=*/5 job='/usr/sbin/ntpdate 172.20.0.1 &>/dev/null' name=Synctime disabled=no"

#删除任务state=absent
ansible websrvs -m cron -a "name='backup mysql' state=absent"
ansible websrvs -m cron -a 'state=absent name=Synctime
4.13 Yum 和 Apt 模块
功能:
yum 管理软件包,只支持RHEL,CentOS,fedora,不支持Ubuntu其它版本
apt 模块管理 Debian 相关版本的软件包
1.给ubuntun安装sl软件
[root@ansible:~]#
ansible 10.0.0.100 -m apt -a 'name=sl'

2.给centos安装sl,7可以用yum,8会报错,换用dnf即可
[root@ansible:~]#
ansible 10.0.0.18 -m dnf  -a 'name=sl'
[root@ansible:~]#
ansible 10.0.0.18 -m dnf  -a 'name=sl state=absent'  #卸载

3.一次安装多个包
[root@centos8 ~]#ansible 10.0.0.100 -m apt -a 'name=bb,sl,cowsay,cmatrix,oneko,hollywood,boxes,libaa-bin,x11-apps'
[root@centos8 ~]#ansible websrvs -m apt -a 'name=rsync,psmisc state=absent'

4.指定源地址路径安装
[root@ansible ~]#ansible websrvs -m yum -a "name=https://mirror.tuna.tsinghua.edu.cn/zabbix/zabbix/5.2/rhel/7/x86_64/zabbixagent-5.2.5-1.el7.x86_64.rpm"

5.查看包的状态
[root@ansible ~]#ansible localhost -m yum -a "list=tree"
4.14 yum_repository 模块
4.15 Service 模块
功能:管理服务
范例:
1.启动httpd,并设置开机自动启动
[root@ansible:~]#
ansible 10.0.0.18 -m service -a 'name=httpd state=started enabled=yes'
2.停止服务
[root@ansible:~]#
ansible 10.0.0.18 -m service -a 'name=httpd state=stopped enabled=no'
4.16 User 模块
功能:管理用户
范例:
#创建用户
ansible all -m user -a 'name=user1 comment="test user" uid=2048 home=/app/user1 group=root'

ansible all -m user -a 'name=nginx comment=nginx uid=88 group=nginx groups="root,daemon" shell=/sbin/nologin system=yes create_home=no home=/data/nginx non_unique=yes'

#remove=yes表示删除用户及家目录等数据,默认remove=no
ansible all -m user -a 'name=nginx state=absent remove=yes'

#生成123456加密的密码
ansible localhost -m debug -a "msg={{ '123456'| password_hash('sha512','salt')}}"
localhost | SUCCESS => {
"msg": "$6$salt$MktMKPZJ6t59GfxcJU20DwcwQzfMvOlHFVZiOVD71w."
}

#用上面创建的密码创建用户
ansible websrvs -m user -a 'name=test password="$6$salt$MktMKPZJ6t59GfxcJU20DwcwQzfMvOlHFVZiOVD71w."'

#创建用户test,并生成4096bit的私钥
ansible websrvs -m user -a 'name=test generate_ssh_key=yes ssh_key_bits=4096 ssh_key_file=.ssh/id_rsa'
4.17 Group 模块
功能:管理组
#创建组
ansible websrvs -m group -a 'name=nginx gid=88 system=yes'
#删除组
ansible websrvs -m group -a 'name=nginx state=absent'
4.18 Lineinfile 模块
ansible在使用sed进行替换时,经常会遇到需要转义的问题,而且ansible在遇到特殊符号进行替换时,存在问题,无法正常进行替换 。其实在ansible自身提供了两个模块:lineinfile模块和replace模块,可以方便的进行替换
一般在ansible当中去修改某个文件的单行进行替换的时候需要使用lineinfile模块
regexp参数 :使用正则表达式匹配对应的行,当替换文本时,如果有多行文本都能被匹配,则只有最后面被匹配到的那行文本才会被替换,当删除文本时,如果有多行文本都能被匹配,这么这些行都会被删除。
如果想进行多行匹配进行替换需要使用replace模块
功能:相当于sed,可以修改文件内容
范例
ansible websrvs -m lineinfile -a "path=/etc/httpd/conf/httpd.conf regexp='^Listen' line='Listen 80'" #替换行,实现修改端口号

ansible all -m lineinfile -a "path=/etc/selinux/config regexp='^SELINUX=' line='SELINUX=disabled'" #替换行,实现关闭selinux

ansible all -m lineinfile -a 'dest=/etc/fstab state=absent regexp="^#"'   #删除注释行
4.19 Replace 模块
该模块有点类似于sed命令,主要也是基于正则进行匹配和替换,符合条件的全部替换,建议使用
范例:
ansible all -m replace -a "path=/etc/fstab regexp='^(UUID.*)' replace='#\1'"
ansible all -m replace -a "path=/etc/fstab regexp='^#(UUID.*)' replace='\1'"
4.20 SELinux 模块
该模块管理 SELInux 策略
范例:
[root@ansible ~]#ansible 10.0.0.8 -m selinux -a 'state=disabled'
[WARNING]: SELinux state temporarily changed from 'enforcing' to 'permissive'.
State change will take effect next reboot.
10.0.0.8 | CHANGED => {
	"ansible_facts": {
		"discovered_interpreter_python": "/usr/libexec/platform-python"
	},
	"changed": true,
	"configfile": "/etc/selinux/config",
	"msg": "Config SELinux state changed from 'enforcing' to 		'disabled'",
	"policy": "targeted",
	"reboot_required": true,
	"state": "disabled"
}

[root@centos8 ~]#grep -v '#' /etc/selinux/config
SELINUX=disabled
SELINUXTYPE=targeted

[root@centos8 ~]#getenforce
Permissive
4.21 reboot 模块
[root@ansible ~]#ansible websrvs -m reboot
4.22 mount 挂载和卸载
功能: 挂载和卸载文件系统
范例:
#临时挂载
mount websrvs -m mount -a 'src="UUID=b3e48f45-f933-4c8e-a700-22a159ec9077" path=/home fstype=xfs opts=noatime state=present'

#临时取消挂载
mount websrvs -m mount -a 'path=/home fstype=xfs opts=noatime state=unmounted'

#永久挂载
ansible websrvs -m mount -a 'src=10.0.0.8:/data/wordpress path=/var/www/html/wp-content/uploads opts="_netdev" state=mounted'

#永久卸载
ansible websrvs -m mount -a 'src=10.0.0.8:/data/wordpress path=/var/www/html/wp-content/uploads state=absent'
4.23 Setup 模块
功能: setup 模块来收集主机的系统信息,这些 facts 信息可以直接以变量的形式使用,但是如果主机
较多,会影响执行速度
可以使用 gather_facts: no 来禁止 Ansible 收集 facts 信息
范例:
ansible all -m setup
ansible all -m setup -a "filter=ansible_nodename"
ansible all -m setup -a "filter=ansible_hostname"
ansible all -m setup -a "filter=ansible_domain"
ansible all -m setup -a "filter=ansible_memtotal_mb"
ansible all -m setup -a "filter=ansible_memory_mb"
ansible all -m setup -a "filter=ansible_memfree_mb"
ansible all -m setup -a "filter=ansible_os_family"
ansible all -m setup -a "filter=ansible_distribution_major_version"
ansible all -m setup -a "filter=ansible_distribution_version"
ansible all -m setup -a "filter=ansible_processor_vcpus"
ansible all -m setup -a "filter=ansible_all_ipv4_addresses"
ansible all -m setup -a "filter=ansible_architecture"
ansible all -m setup -a "filter=ansible_uptime_seconds"
ansible all -m setup -a "filter=ansible_processor*"
ansible all -m setup -a 'filter=ansible_env'
4.24 debug 模块
此模块可以用于输出信息,并且通过 msg 定制输出的信息内容
注意: msg后面的变量有时需要加 " " 引起来
范例: debug 模块默认输出Hello world
[root@ansible:~]#
ansible 10.0.0.18 -m debug
10.0.0.18 | SUCCESS => {
    "msg": "Hello world!"
}


 1292
1292


 被折叠的 条评论
为什么被折叠?
被折叠的 条评论
为什么被折叠?
 到【灌水乐园】发言


