1.编译安装nginx
1.安装编译包
[root@centos8:~]
yum -y install gcc pcre-devel openssl-devel zlib-devel
yum -y reinstall gcc pcre-devel openssl-devel zlib-devel
2.创建用户和组
[root@centos8:~]
useradd -s /sbin/nologin nginx
3.切换到/usr/local/src/
[root@centos8:~]
cd /usr/local/src/
4.下载源码包并解压
[root@centos8:/usr/local/src]
wget http://nginx.org/download/nginx-1.18.0.tar.gz
[root@centos8:/usr/local/src]
tar xf nginx-1.18.0.tar.gz
5.切换目录到 nginx-1.18.0/
[root@centos8:/usr/local/src]
cd nginx-1.18.0/
6.生成config文件并编译安装
[root@centos8:/usr/local/src/nginx-1.18.0]
./configure --help
[root@centos8:/usr/local/src/nginx-1.18.0]
./configure --prefix=/apps/nginx \
--user=nginx \
--group=nginx \
--with-http_ssl_module \
--with-http_v2_module \
--with-http_realip_module \
--with-http_stub_status_module \
--with-http_gzip_static_module \
--with-pcre \
--with-stream \
--with-stream_ssl_module \
--with-stream_realip_module
[root@centos8:/usr/local/src/nginx-1.18.0]
make -j2 && make install
7.修改安装文件的权限
[root@centos8:/usr/local/src/nginx-1.18.0]
chown -R nginx.nginx /apps/nginx
8.创建软连接(相当于配置path变量)
[root@centos8:/usr/local/src/nginx-1.18.0]
ln -s /apps/nginx/sbin/nginx /usr/sbin/
9.重点相关文件
[root@centos8:/usr/local/src/nginx-1.18.0]
ll /apps/nginx
total 0
drwxr-xr-x 2 nginx nginx 333 Jun 24 10:57 conf
drwxr-xr-x 2 nginx nginx 40 Jun 24 10:57 html
drwxr-xr-x 2 nginx nginx 6 Jun 24 10:57 logs
drwxr-xr-x 2 nginx nginx 19 Jun 24 10:57 sbin
10.查看版本
[root@centos8 ~]
nginx version: nginx/1.18.0
[root@centos8 ~]
nginx version: nginx/1.18.0
built by gcc 8.3.1 20191121 (Red Hat 8.3.1-5) (GCC)
built with OpenSSL 1.1.1c FIPS 28 May 2019
TLS SNI support enabled
configure arguments: --prefix=/apps/nginx --user=nginx --group=nginx --withhttp_ssl_module --with-http_v2_module --with-http_realip_module --withhttp_stub_status_module --with-http_gzip_static_module --with-pcre --with-stream --with-stream_ssl_module --with-stream_realip_module
11.复制同一版本的nginx的yum安装生成的service文件,进行修改,修改pid文件路径和配置文件路径。
[root@centos8 ~]
[Unit]
Description=nginx - high performance web server
Documentation=http://nginx.org/en/docs/
After=network-online.target remote-fs.target nss-lookup.target
Wants=network-online.target
[Service]
Type=forking
PIDFile=/apps/nginx/run/nginx.pid
ExecStart=/apps/nginx/sbin/nginx -c /apps/nginx/conf/nginx.conf
ExecReload=/bin/kill -s HUP $MAINPID
ExecStop=/bin/kill -s TERM $MAINPID
[Install]
WantedBy=multi-user.target
12.创建目录
[root@centos8:/usr/local/src/nginx-1.18.0]
mkdir /apps/nginx/run/
[root@centos8:/usr/local/src/nginx-1.18.0]
chown -R nginx.nginx /apps/nginx/run
13.修改配置文件
[root@centos8 ~]
vim /apps/nginx/conf/nginx.conf
pid /apps/nginx/run/nginx.pid;
14.通过service启动服务
[root@centos8:~]
killall nginx
[root@centos8:~]
systemctl enable --now nginx
[root@centos8:~]
ls /apps/nginx/run/
nginx.pid
conf:保存nginx所有的配置文件,其中nginx.conf是nginx服务器的最核心最主要的配置文件,其他的.conf则是用来配置nginx相关的功能的,例如fastcgi功能使用的是fastcgi.conf和fastcgi_params两个文件,配置文件一般都有个样板配置文件,是文件名.default结尾,使用的使用将其复制为并将default去掉即可。
html目录中保存了nginx服务器的web文件,但是可以更改为其他目录保存web文件,另外还有一个50x的web文件是默认的错误页面提示页面。
logs:用来保存nginx服务器的访问日志错误日志等日志,logs目录可以放在其他路径,比如/var/logs/nginx里面。
sbin:保存nginx二进制启动脚本,可以接受不同的参数以实现不同的功能
2.修改配置文件,创建电脑端网站并检验。
1.定义子配置文件路径
[root@centos8 ~]
[root@centos8 ~]
http {
......
include /apps/nginx/conf.d/*.conf;
}
2.创建pc网站配置
[root@centos8 ~]
server {
listen 80;
server_name www.magedu.org;
location / {
root /data/nginx/html/pc;
}
}
3.新建pc网站文件目录和网页文件
[root@centos8 ~]
[root@centos8 ~]
[root@centos8 ~]
4.编写脚本并生成证书
[root@centos8:/apps/nginx/conf.d]
mkdir ssl
[root@centos8:/apps/nginx/conf.d]
cd ssl
[root@centos8:/apps/nginx/conf.d/ssl]
vim certificate.sh
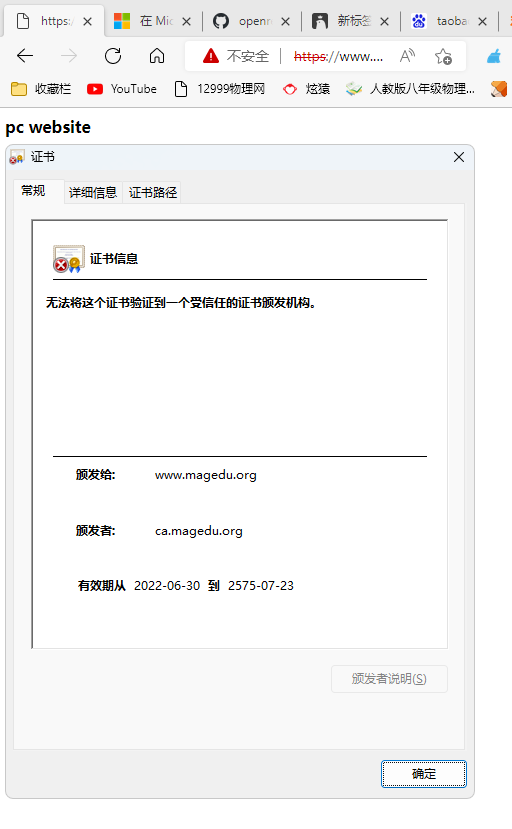
CA_SUBJECT="/O=magedu/CN=ca.magedu.org"
SUBJECT="/C=CN/ST=henan/L=zhengzhou/O=magedu/CN=www.magedu.org"
SERIAL=34
EXPIRE=202002
FILE=magedu.org
openssl req -x509 -newkey rsa:2048 -subj $CA_SUBJECT -keyout ca.key -nodes -days 202002 -out ca.crt
openssl req -newkey rsa:2048 -nodes -keyout ${FILE}.key -subj $SUBJECT -out ${FILE}.csr
openssl x509 -req -in ${FILE}.csr -CA ca.crt -CAkey ca.key -set_serial $SERIAL -days $EXPIRE -out ${FILE}.crt
chmod 600 ${FILE}.key ca.key
[root@centos8:/apps/nginx/conf.d/ssl]
bash certificate.sh
5.把服务器证书和ca证书两个文件合成一个文件
[root@centos8:/apps/nginx/conf.d/ssl]
cat magedu.org.crt ca.crt > www.magedu.org.crt
6.修改私钥文件名
[root@centos8:/apps/nginx/conf.d/ssl]
mv magedu.org.key www.magedu.org.key
7.修改配置文件并重启
[root@centos8:/apps/nginx/conf.d]
vim pc.conf
server {
listen 80;
listen 443 ssl;
ssl_certificate /apps/nginx/conf.d/ssl/www.magedu.org.crt;
ssl_certificate_key /apps/nginx/conf.d/ssl/www.magedu.org.key;
ssl_session_cache shared:sslcache:20m;
ssl_session_timeout 10m;
server_name www.magedu.org;
root /data/nginx/html/pc/;
}
[root@centos8:/apps/nginx/conf.d]
nginx -s reload
8.浏览器访问https://www.magedu.org/
3.创建手机端的网站并检验。
1.创建手机网站配置
[root@centos8 ~]
server {
listen 80;
server_name m.magedu.org;
location / {
root /data/nginx/html/mobile;
}
}
2.新建手机网站文文件目录和网页文件
[root@centos8 ~]
[root@centos8 ~]
[root@centos8 ~]
3.生成手机端文件证书准备
[root@centos8:/apps/nginx/conf.d]
cd ssl
[root@centos8:/apps/nginx/conf.d/ssl]
rm -rf ca*
[root@centos8:/apps/nginx/conf.d/ssl]
rm -rf mage*
[root@centos8:/apps/nginx/conf.d/ssl]
ll
total 12
-rw-r--r-- 1 root root 869 Jun 30 14:44 certificate.sh
-rw-r--r-- 1 root root 2266 Jun 30 14:50 www.magedu.org.crt
-rw------- 1 root root 1704 Jun 30 14:44 www.magedu.org.key
4.编写脚本,并生成证书
[root@centos8:/apps/nginx/conf.d/ssl]
vim certificate.sh
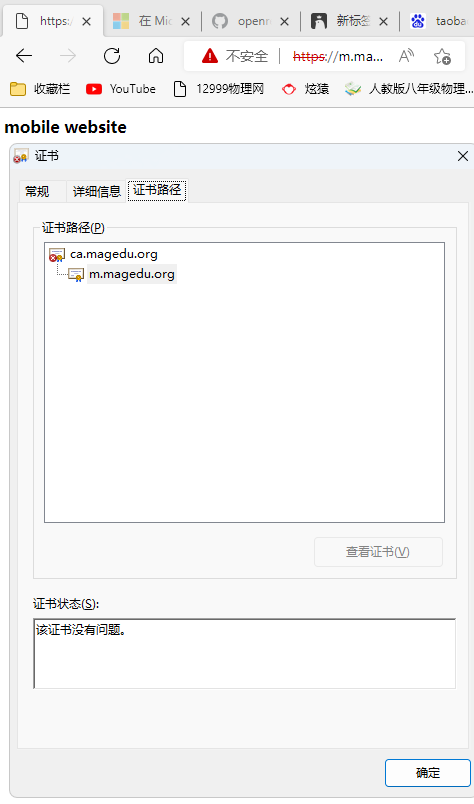
CA_SUBJECT="/O=magedu/CN=ca.magedu.org"
SUBJECT="/C=CN/ST=henan/L=zhengzhou/O=magedu/CN=m.magedu.org"
SERIAL=34
EXPIRE=202002
FILE=m.magedu.org
openssl req -x509 -newkey rsa:2048 -subj $CA_SUBJECT -keyout ca.key -nodes -days 202002 -out ca.crt
openssl req -newkey rsa:2048 -nodes -keyout ${FILE}.key -subj $SUBJECT -out ${FILE}.csr
openssl x509 -req -in ${FILE}.csr -CA ca.crt -CAkey ca.key -set_serial $SERIAL -days $EXPIRE -out ${FILE}.crt
chmod 600 ${FILE}.key ca.key
[root@centos8:/apps/nginx/conf.d/ssl]
bash certificate.sh
[root@centos8:/apps/nginx/conf.d/ssl]
cat m.magedu.org.crt ca.crt > m.magedu.org.pem
5.修改手机端配置文件
[root@centos8:/apps/nginx/conf.d/ssl]
cd ..
[root@centos8:/apps/nginx/conf.d]
vim m.conf
server {
listen 80;
listen 443 ssl;
ssl_certificate /apps/nginx/conf.d/ssl/m.magedu.org.pem;
ssl_certificate_key /apps/nginx/conf.d/ssl/m.magedu.org.key;
ssl_session_cache shared:sslcache:20m;
ssl_session_timeout 10m;
server_name m.magedu.org;
location / {
root /data/nginx/html/mobile/;
}
}
6.访问检测https://m.magedu.org/


 3367
3367

 被折叠的 条评论
为什么被折叠?
被折叠的 条评论
为什么被折叠?
 到【灌水乐园】发言


