


一 导航栏返回键统一处理
- 自定义NavigationController,重写push方法
/**
 * 拦截所有push进来的子控制器
 * @param viewController 每一次push进来的子控制器
 */
- (void)pushViewController:(UIViewController *)viewController animated:(BOOL)animated
{
//    if (不是第一个push进来的子控制器) {
    if (self.childViewControllers.count >= 1) {
        // 左上角的返回
        UIButton *backButton = [UIButton buttonWithType:UIButtonTypeCustom];
        [backButton setTitle:@"返回" forState:UIControlStateNormal];
        [backButton setTitleColor:[UIColor blackColor] forState:UIControlStateNormal];
        [backButton setTitleColor:[UIColor redColor] forState:UIControlStateHighlighted];
        [backButton setImage:[UIImage imageNamed:@"navigationButtonReturn"] forState:UIControlStateNormal];
        [backButton setImage:[UIImage imageNamed:@"navigationButtonReturnClick"] forState:UIControlStateHighlighted];
        [backButton sizeToFit];
        [backButton addTarget:self action:@selector(back) forControlEvents:UIControlEventTouchUpInside];
        backButton.contentEdgeInsets = UIEdgeInsetsMake(0, -20, 0, 0);
        viewController.navigationItem.leftBarButtonItem = [[UIBarButtonItem alloc] initWithCustomView:backButton];
        viewController.hidesBottomBarWhenPushed = YES; // 隐藏底部的工具条
    }
    // super的push方法一定要写到最后面
    // 一旦调用super的pushViewController方法,就会创建子控制器viewController的view
    // 也就会调用viewController的viewDidLoad方法
    [super pushViewController:viewController animated:animated];
}
二 手势滑动
- 禁止调用最前面控制器的手势
#pragma mark - <UIGestureRecognizerDelegate>
/**
 * 每当用户触发[返回手势]时都会调用一次这个方法
 * 返回值:返回YES,手势有效; 返回NO,手势失效
 */
- (BOOL)gestureRecognizerShouldBegin:(UIGestureRecognizer *)gestureRecognizer
{
    // 如果当前显示的是第一个子控制器,就应该禁止掉[返回手势]
//    if (self.childViewControllers.count == 1) return NO;
//    return YES;
    return self.childViewControllers.count > 1;  //简化写法
}
三 颜色设置
- 颜色须知
1> 每一种颜色都是由N个颜色通道组成
2> 常见的颜色通道
- A:alpha 透明度
- R:red 红色
- G:green 绿色
- B:blue 蓝色
3> 常见颜色 - 白色:全部通道满值
- 黑色:全部通道都是0(透明度除外)
- 灰色:RGB通道的值一样
一、32bit颜色
1> 颜色组成
1) 由ARGB四个颜色通道组成
2) 每一个颜色通道都占据8bit
3) 每一个颜色通道的取值范围是[0, 255] [0x00, 0xff] [0b00000000, 0b11111111]
2> 颜色的表示格式
1) 16进制格式(HEX格式)
* 绿色 #ff00ff00
* 黄色 #ffffff00
* 白色 #ffffffff
* 黑色 #ff000000
2) ARGB格式
* 绿色 255,0,255,0
* 黄色 255,255,255,0
* 白色 255,255,255,255
* 黑色 255,0,0,0
二、24bit颜色
1> 颜色组成
1) 由RGB三个颜色通道组成
2) 每一个颜色通道都占据8bit
3) 每一个颜色通道的取值范围是[0, 255] [0x00, 0xff] [0b00000000, 0b11111111]
2> 颜色的表示格式
1) 16进制格式(HEX格式)
* 绿色 #00ff00
* 黄色 #ffff00
* 白色 #ffffff
* 黑色 #000000
2) RGB格式
* 绿色 0,255,0
* 黄色 255,255,0
* 白色 255,255,255
* 黑色 0,0,0
三、12bit颜色
1> 颜色组成
1) 由RGB三个颜色通道组成
2) 每一个颜色通道都占据4bit
3) 每一个颜色通道的取值范围是[0, 15] [0x0, 0xf] [0b0000, 0b1111]
2> 颜色的表示格式
1) 16进制格式(HEX格式)
* 绿色 #00ff0
* 黄色 #ff0
* 白色 #fff
* 黑色 #000
2) RGB格式
* 绿色 0,15,0
* 黄色 15,15,0
* 白色 15,15,15
* 黑色 0,0,0
四 我的关注页面
xib连线
Label文字换行居中
- 设置Lines = 0
- 按住option+return实现文字换行
- 设置Alignment居中
- Button注意点
- button默认样式是System,这个样式下高亮状态颜色会变浅
- 需要设置样式为Custom
五 登陆注册功能
图片设置
- 对比设置image与设置backgroundimage
- 设置image效果:图片比较小,点击面积比较大
- 对比设置image与设置backgroundimage
图片拉伸(View→Mode)
- 默认为Scale To Fill
- 只要不带Fill的模式都不会拉伸,调至Center
- 调整快速登录图片标题位置
- 新建分类
- pch文件全局引用
- 重写layoutSubviews
Text Field设置
- 去除边框
- BoderStyle选择虚线边框
- Text Field后面一键删除功能
- Cleear Button选择Is always visible(永远显示)
- 帐号选择键盘
- Keyboard Type→Phone Pad
- 密码选择键盘
- Keyboard Type→Default(默认)
- 暗文模式:勾选Secure Text Entry
- 去除边框
登陆按钮做圆角样式
方法一
- (void)viewDidLoad {
[super viewDidLoad];
self.loginButton.layer.cornerRadius = 5;
//    self.loginButton.layer.masksToBounds = YES;
self.loginButton.clipsToBounds = YES;    //    另一种写法
}
方法二
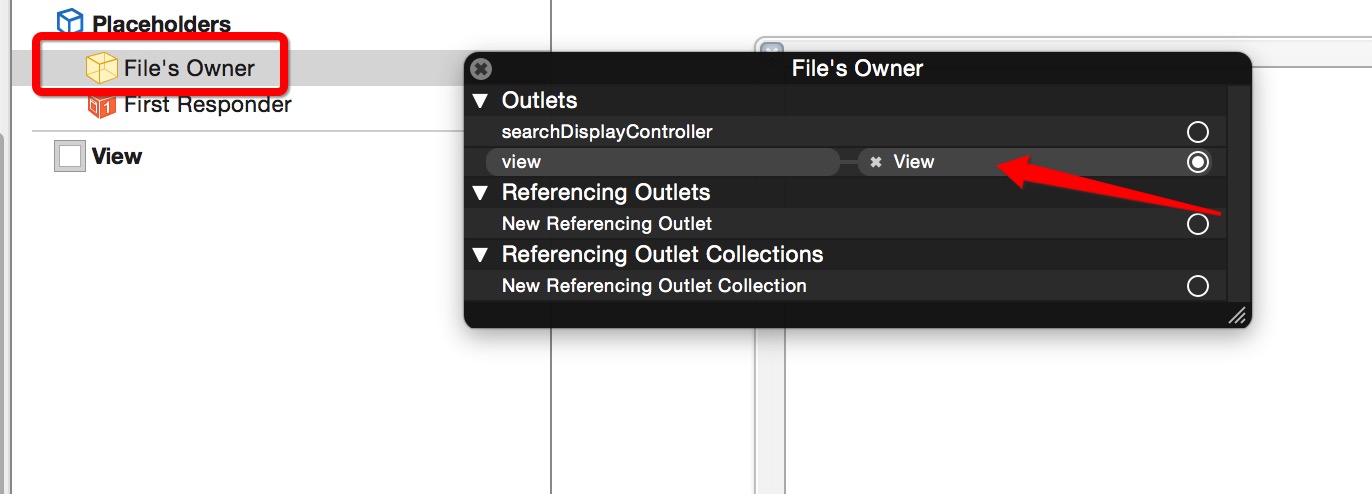
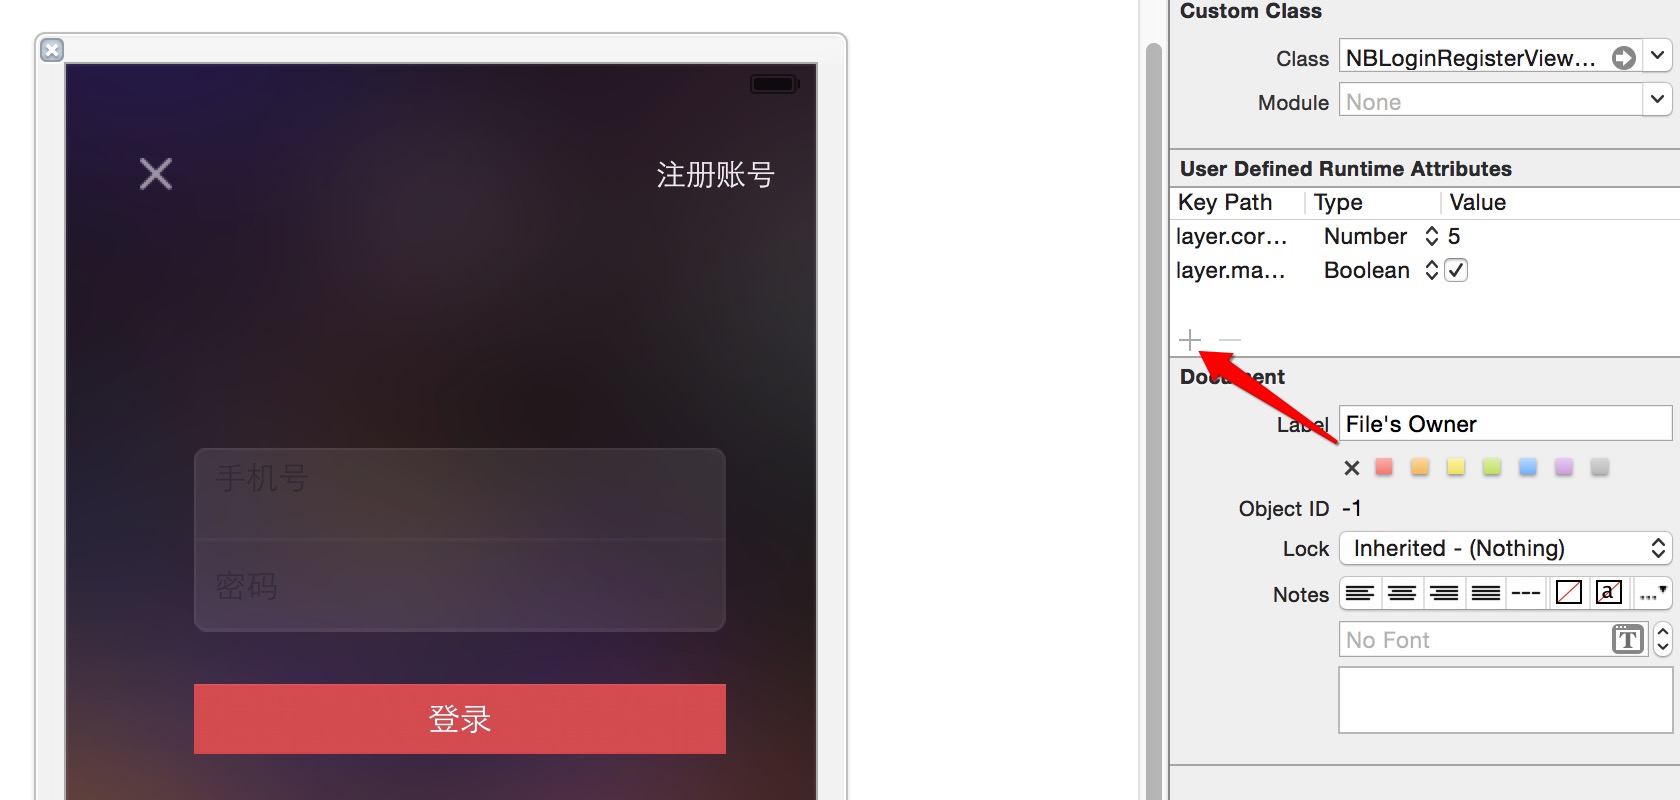
[self.loginButton setValue:@5 forKeyPath:@"layer.cornerRadius"];
[self.loginButton setValue:@YES forKeyPath:@"layer.masksToBounds"];
方法三
- 凡是kvc能解决的都可以通过这设置
点击控制器view退出键盘
-(void)touchesBegan:(NSSet *)touches withEvent:(UIEvent *)event { [self.view endEditing:YES]; }- 修改状态栏为白色
  - (UIStatusBarStyle)preferredStatusBarStyle
  {
    return UIStatusBarStyleLightContent;
  }
六 占位文字
- 自定义TextField
- (void)awakeFromNib
{
    // 文本框的光标颜色
    self.tintColor = [UIColor whiteColor];
    // 文字颜色
    self.textColor = [UIColor whiteColor];
    // 设置带有属性的占位文字(富文本)
    self.attributedPlaceholder = [[NSAttributedString alloc] initWithString:self.placeholder attributes:@{NSForegroundColorAttributeName : [UIColor grayColor]}];
}
富文本用法
不可变的属性文字
NSMutableDictionary *attrs = [NSMutableDictionary dictionary];

attrs[NSForegroundColorAttributeName] = [UIColor grayColor];
attrs[NSUnderlineStyleAttributeName] = @1;
attrs[NSUnderlineColorAttributeName] = [UIColor redColor];

self.attributedPlaceholder = [[NSAttributedString alloc]    initWithString:self.placeholder attributes:attrs];
可变的属性文字
NSMutableAttributedString *string = [[NSMutableAttributedString alloc] initWithString:self.placeholder];

[string addAttribute:NSForegroundColorAttributeName value:[UIColor redColor] range:NSMakeRange(0, 1)];
[string addAttribute:NSForegroundColorAttributeName value:[UIColor greenColor] range:NSMakeRange(1, 1)];
[string addAttribute:NSFontAttributeName value:[UIFont boldSystemFontOfSize:30] range:NSMakeRange(1, 1)];

self.attributedPlaceholder = string;
图文混排
NSMutableAttributedString *string = [[NSMutableAttributedString alloc] init];

// 第一段:placeholder
NSAttributedString *substring1 = [[NSAttributedString alloc] initWithString:self.placeholder];
[string appendAttributedString:substring1];

// 第二段:图片
NSTextAttachment *attachment = [[NSTextAttachment alloc] init];
attachment.image = [UIImage imageNamed:@"login_close_icon"];
attachment.bounds = CGRectMake(0, 0, 16, 16);
NSAttributedString *subtring2 = [NSAttributedString attributedStringWithAttachment:attachment];
[string appendAttributedString:subtring2];

// 第三段:哈哈
NSAttributedString *substring3 = [[NSAttributedString alloc] initWithString:@"哈哈"];
[string appendAttributedString:substring3];

self.attributedPlaceholder = string;
重写占位字符方法:
方法一
- (void)drawPlaceholderInRect:(CGRect)rect
{
// 占位文字画在哪个矩形框里面
CGRect placeholderRect = self.bounds;
placeholderRect.origin.y = (self.height - self.font.lineHeight) * 0.5;

// 文字属性
NSMutableDictionary *attrs = [NSMutableDictionary dictionary];
attrs[NSForegroundColorAttributeName] = [UIColor redColor];
attrs[NSFontAttributeName] = self.font;
[self.placeholder drawInRect:placeholderRect withAttributes:attrs];
}
方法二
// 占位文字画在哪个位置
CGPoint point;
point.x = 0;
point.y = (self.height - self.font.lineHeight) * 0.5;

// 文字属性
NSMutableDictionary *attrs = [NSMutableDictionary dictionary];
attrs[NSForegroundColorAttributeName] = [UIColor redColor];
attrs[NSFontAttributeName] = self.font;
[self.placeholder drawAtPoint:point withAttributes:attrs];
方法三:运行时
什么是运行时(Runtime)?
- 运行时是苹果提供的纯C语言的开发库(运行时是一种非常牛逼、开发中经常用到的底层技术)
运行时的作用?
- 能获得某个类的所有成员变量
- 能获得某个类的所有属性
- 能获得某个类的所有方法
- 交换方法实现
- 能动态添加一个成员变量
- 能动态添加一个属性
- 能动态添加一个方法
- (void)awakeFromNib
  {
 // 文本框的光标颜色
   self.tintColor = [UIColor whiteColor];
// 文字颜色
   self.textColor = [UIColor whiteColor];
 //    UILabel *placeholderLabel = [self valueForKeyPath:@"placeholderLabel"];
//    placeholderLabel.textColor = [UIColor redColor];
     [self setValue:[UIColor grayColor] forKeyPath:@"placeholderLabel.textColor"];

// 成员变量的数量
unsigned int outCount = 0;

// 获得所有的成员变量
Ivar *ivars = class_copyIvarList([UITextField class], &outCount);

// 遍历所有的成员变量
for (int i = 0; i<outCount; i++) {
    // 取出i位置对应的成员变量
    Ivar ivar = ivars[i];
    // 获得成员变量的名字
    NSLog(@"%s", ivar_getName(ivar));
}

// 如果函数名中包含了copy\new\retain\create等字眼,那么这个函数返回的数据就需要手动释放
free(ivars);
}
监听text点击
- 方法1:通过代理
- 自己成为自己代理,这种做法不推荐,因为delegate属性很容易被外界覆盖;
方法2:通过addTarget,方法最简单
// 通过addTarget监听文本框的开始和结束编辑
   [self addTarget:self action:@selector(beginEditing) forControlEvents:UIControlEventEditingDidBegin];
   [self addTarget:self action:@selector(endEditing) forControlEvents:UIControlEventEditingDidEnd];
方法3 :通知
- (void)awakeFromNib { // 通过通知监听文本框的开始和结束编辑 [[NSNotificationCenter defaultCenter] addObserver:self selector:@selector(beginEditing) name:UITextFieldTextDidBeginEditingNotification object:self]; [[NSNotificationCenter defaultCenter] addObserver:self selector:@selector(endEditing) name:UITextFieldTextDidEndEditingNotification object:self]; } // 移除通知 - (void)dealloc { [[NSNotificationCenter defaultCenter] removeObserver:self]; } - (void)beginEditing { [self setValue:[UIColor whiteColor] forKeyPath:@"placeholderLabel.textColor"]; } - (void)endEditing { [self setValue:[UIColor grayColor] forKeyPath:@"placeholderLabel.textColor"]; }- 方法4:聚焦失焦
/**
* 文本框聚焦时调用(弹出当前文本框对应的键盘时调用)
*/
- (BOOL)becomeFirstResponder
{
[self setValue:[UIColor whiteColor] forKeyPath:@"placeholderLabel.textColor";
return [super becomeFirstResponder];
}

/**
* 文本框失去焦点时调用(隐藏当前文本框对应的键盘时调用)
*/
- (BOOL)resignFirstResponder
{
[self setValue:[UIColor grayColor] forKeyPath:@"placeholderLabel.textColor";
return [super resignFirstResponder];
}
- 方法1:通过代理
七 注册页面
登陆和注册页面类似,2个可以互相切换
- 注意点:文字宽度不一样,切换时出现…
- 设置宽度约束,Button→Control→ Alignment设右对齐
- 另一方法设置Selected文字名称
- 注意点:Button→Type→system下,当Selected=YES背景会渲染蓝色;
- 换成Button→Type→Custom
- (IBAction)loginOrRegister:(UIButton *)button { // 修改约束 if (self.leftSpace.constant == 0) { self.leftSpace.constant = - self.view.width; button.selected = YES; // [button setTitle:@"已有帐号?" forState:UIControlStateNormal]; } else { self.leftSpace.constant = 0; button.selected = NO; // [button setTitle:@"注册帐号" forState:UIControlStateNormal]; } [UIView animateWithDuration:0.25 animations:^{ [self.view layoutIfNeeded]; }]; }- 注意点:文字宽度不一样,切换时出现…


 352
352


 被折叠的 条评论
为什么被折叠?
被折叠的 条评论
为什么被折叠?
 到【灌水乐园】发言


