


一 cell设置
- cell数据
- (UITableViewCell *)tableView:(UITableView *)tableView cellForRowAtIndexPath:(NSIndexPath *)indexPath
{
    XMGMeCell *cell = [tableView dequeueReusableCellWithIdentifier:XMGMeCellId];

    if (indexPath.section == 0) {
        cell.textLabel.text = @"登录/注册";
        cell.imageView.image = [UIImage imageNamed:@"setup-head-default"];
    } else {
        cell.textLabel.text = @"离线下载";
    }

    return cell;
}- 每组的间距调整
  self.tableView.sectionHeaderHeight = 0;
self.tableView.sectionFooterHeight = 10;- cell距离页面头部间隙过大,重写setFrame
- 通过frame.origin.y -= 25实现cell上移,但是整体不会上移,不建议这么做
- 通过设置内边距:
// 设置内边距(-25代表:所有内容往上移动25)
self.tableView.contentInset = UIEdgeInsetsMake(-25, 0, 0, 0);- 自定义cell初始化,cell创建时调用一次
- (instancetype)initWithStyle:(UITableViewCellStyle)style reuseIdentifier:(NSString *)reuseIdentifier
{
if (self = [super initWithStyle:style reuseIdentifier:reuseIdentifier]) {
self.accessoryType = UITableViewCellAccessoryDisclosureIndicator;
self.textLabel.textColor = [UIColor darkGrayColor];
// 设置背景图片
self.backgroundView = [[UIImageView alloc] initWithImage:[UIImage imageNamed:@"mainCellBackground"]];
}
return self;
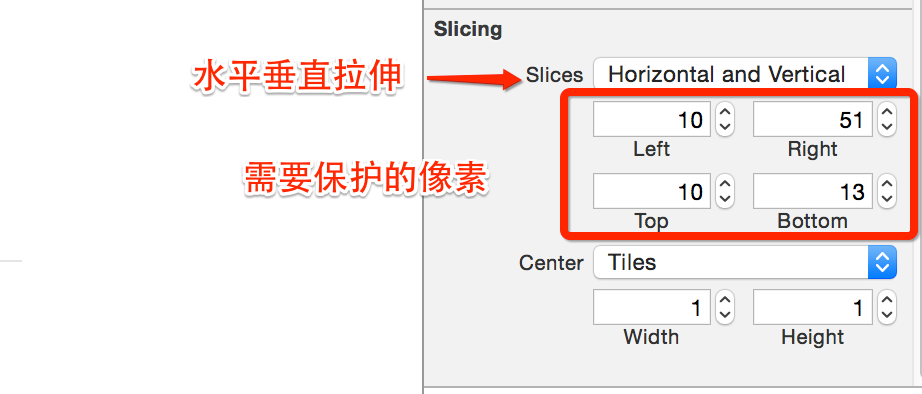
}图片拉伸设置
调整image和label间距
- 问题:下面label也会跟着调整,需要增加判断
- (void)layoutSubviews
{
    [super layoutSubviews];

    if (self.imageView.image == nil) return;

    // 调整imageView
    self.imageView.y = XMGCommonMargin * 0.5;
    self.imageView.height = self.contentView.height - 2 * self.imageView.y;
    self.imageView.width = self.imageView.height;

    // 调整Label
    self.textLabel.x = CGRectGetMaxX(self.imageView.frame) + XMGCommonMargin;
    //  self.textLabel.x = self.imageView.x + self.imageView.width + XMGCommonMargin;
   // 另一种写法 :
    //   CGRectGetMaxX(self.imageView.frame) == self.imageView.x + self.imageView.width
    //   CGRectGetMinX(self.imageView.frame) == self.imageView.x
    //   CGRectGetMidX(self.imageView.frame) == self.imageView.x + self.imageView.width * 0.5
    //   CGRectGetMidX(self.imageView.frame) == self.imageView.centerX
}
二 加载方块数据
- 自定义Footer,重写initWithFrame
- (instancetype)initWithFrame:(CGRect)frame
{
    if (self = [super initWithFrame:frame]) {
        // 请求参数
        NSMutableDictionary *params = [NSMutableDictionary dictionary];
        params[@"a"] = @"square";
        params[@"c"] = @"topic";

        // 发送请求
        XMGWeakSelf;
    [[AFHTTPSessionManager manager] GET:RequestURL parameters:params success:^(NSURLSessionDataTask *task, id responseObject) {
    [weakSelf createSquares:[NBSquare objectArrayWithKeyValuesArray:responseObject[@"square_list"]]];
     } failure:^(NSURLSessionDataTask *task, NSError *error) {

        }];
    }
    return self;
}
- 需要3个属性,建一个modal
@interface NBSquare : NSObject
/** 名字 */
@property (nonatomic, copy) NSString *name;
/** 图标 */
@property (nonatomic, copy) NSString *icon;
/** 链接 */
@property (nonatomic, copy) NSString *url;
@end- 九宫格方块实现
/**
 * 创建方块
 */
- (void)createSquares:(NSArray *)squares
{
    // 每行的列数
    int colsCount = 4;

    // 按钮尺寸
    CGFloat buttonW = self.width / colsCount;
    CGFloat buttonH = buttonW;

    // 遍历所有的模型
    NSUInteger count = squares.count;
    for (NSUInteger i = 0; i < count; i++) {
        // 创建按钮
        UIButton *button = [UIButton buttonWithType:UIButtonTypeCustom];
        [button addTarget:self action:@selector(buttonClick:) forControlEvents:UIControlEventTouchUpInside];
        [self addSubview:button];

        // frame
        CGFloat buttonX = (i % colsCount) * buttonW;
        CGFloat buttonY = (i / colsCount) * buttonH;
        button.frame = CGRectMake(buttonX, buttonY, buttonW, buttonH);
   }
}- 设置数据
// 设置题目
[button setTitle:square.name forState:UIControlStateNormal];
注意:设置图片,不只拿到image就行,需要用set…forState记录状态;
- 下载图片方法1:
[[SDWebImageManager sharedManager] downloadImageWithURL:[NSURL URLWithString:square.icon] options:0 progress:nil completed:^(UIImage *image, NSError *error, SDImageCacheType cacheType, BOOL finished, NSURL *imageURL) {
    [button setImage:image forState:UIControlStateNormal];
}];- 下载图片方法2:
[button sd_setImageWithURL:[NSURL URLWithString:square.icon] forState:UIControlStateNormal];- 子控件button重新布局
- (instancetype)initWithFrame:(CGRect)frame
{
    if (self = [super initWithFrame:frame]) {
        self.titleLabel.textAlignment = NSTextAlignmentCenter;
        self.titleLabel.font = [UIFont systemFontOfSize:14];
        [self setTitleColor:[UIColor blackColor] forState:UIControlStateNormal];
        [self setBackgroundImage:[UIImage imageNamed:@"mainCellBackground"] forState:UIControlStateNormal];
    }
    return self;
}

- (void)layoutSubviews
{
    [super layoutSubviews];

    self.imageView.width = self.width * 0.5;
    self.imageView.height = self.imageView.width;
    self.imageView.y = self.height * 0.1;
    self.imageView.centerX = self.width * 0.5;

    self.titleLabel.width = self.width;
    self.titleLabel.y = CGRectGetMaxY(self.imageView.frame);
    self.titleLabel.x = 0;
    self.titleLabel.height = self.height - self.titleLabel.y;
}
- 一个控件不能响应点击事件,原因可能有:
- 1> userInteractionEnabled = NO;
- 2> enabled = NO;
- 3> 父控件的userInteractionEnabled = NO;
- 4> 父控件的enabled = NO;
- 5> 控件已经超出父控件的边框范围
项目中由于没有设置父控件高度,所以点击没反应。
三 父控件footer加高度
- 计算父控件高度方法1:根据有多少列,计算高度
- 如果行数能被子控件数量整除,列数 = 总数 / 行数;
- 如果行数不能被子控件数量整除,列数 = 总数 / 行数 + 1;
  // 设置footer的高度
    NSUInteger rowsCount = count / colsCount;
    if (count % colsCount) { // 不能整除,行数+1
        rowsCount++;
    }
合成公式写法如下:总页数 == (总个数 + 每页的个数 - 1) / 每页的个数
   NSUInteger rowsCount = (count + colsCount - 1) / colsCount;
self.height = rowsCount * buttonH;- 方法2:拿到按钮的最高高度
self.height = CGRectGetMaxY(button.frame);注意点:设置FooterView与设置height前后顺序不一样,效果不一样,期望是先设置height,在设置footerView
- 解决方法1:重新设置footerView
    // 重新设置footerView
    UITableView *tableView = (UITableView *)self.superview;
tableView.tableFooterView = self;- 解决方法2:直接改contentSize
   UITableView *tableView = (UITableView *)self.superview;
tableView.contentSize = CGSizeMake(0, CGRectGetMaxY(self.frame));- button间加分割线
- 方法1: 添加很多高宽为1的view
- 方法2: 设置按钮宽度/高度减1,位置不变
- 方法3: 美工提供一个带边框的图片
[self setBackgroundImage:[UIImage imageNamed:@"mainCellBackground"] forState:UIControlStateNormal];四 点击按钮push
- 哪个按钮被点击
- 加1数组计算按钮位置
// 计算被点击按钮在子控件数组的位置
 NSUInteger index = [self.subviews indexOfObject:button];
XMGSquare *square = self.squares[index]; - 绑定tag
- 加1数组计算按钮位置
XMGSquare *square = squares[i];
button.tag = i;
XMGSquare *square = self.squares[button.tag];- 替换上述方法:封装button,一个button对应一个模型
- (void)setSquare:(XMGSquare *)square
{
    _square = square;

    // 数据
    [self setTitle:square.name forState:UIControlStateNormal];
    // 设置按钮的image
    [self sd_setImageWithURL:[NSURL URLWithString:square.icon] forState:UIControlStateNormal];
}- 点击按钮跳转webView
- 判断按钮点击url地址以“http”开头
- (void)buttonClick:(XMGSquareButton *)button
{
    if ([button.square.url hasPrefix:@"http"]) {
        XMGWebViewController *webVc = [[XMGWebViewController alloc] init];

        // 取出当前选中的导航控制器
        UITabBarController *rootVc = (UITabBarController *)self.window.rootViewController;
        UINavigationController *nav = (UINavigationController *)rootVc.selectedViewController;
        [nav pushViewController:webVc animated:YES];
  //  不关心控制器的位置,位置会变化
    //   [UIApplication sharedApplication].keyWindow;
    //   [[rootVc.childViewControllers lastObject] pushViewController:webVc animated:YES];
//        XMGLog(@"%@", rootVc.selectedViewController);
    }
}
五 网页显示
- 遵守UIWebView代理
@interface WebViewController () <UIWebViewDelegate>
@end
- (void)viewDidLoad {
    [super viewDidLoad];

    self.title = self.square.name;
    [self.webView loadRequest:[NSURLRequest requestWithURL:[NSURL URLWithString:self.square.url]]];

    self.webView.backgroundColor = XMGCommonBgColor;
    // 设置偏移量
    self.webView.scrollView.contentInset = UIEdgeInsetsMake(64, 0, 0, 0);
}- 前进后退箭头交互可否点击
#pragma mark - <UIWebViewDelegate>
- (void)webViewDidFinishLoad:(UIWebView *)webView
{
    self.backItem.enabled = webView.canGoBack;
    self.forwardItem.enabled = webView.canGoForward;
}
六 清除缓存
- (void)viewDidLoad {
    [super viewDidLoad];

    self.navigationItem.title = @"设置";
    self.view.backgroundColor = XMGCommonBgColor;

    [self.tableView registerClass:[UITableViewCell class] forCellReuseIdentifier:XMGSettingCellId];
    // 设置内边距(-25代表:所有内容往上移动25)
    self.tableView.contentInset = UIEdgeInsetsMake(XMGCommonMargin - 35, 0, 0, 0);

    XMGLog(@"%f", @"/Users/yonghuming/Desktop/课堂共享/顶部的cell.mp4".fileSize / 1000.0 / 1000.0);
// 手机上的磁盘缓存 == 从网络上下载的数据 + 写入的数据
// 手机上的磁盘缓存的数据类型 == 图片 + 多媒体文件
}
获取文件夹的大小,文件夹没有直接获取大小的方法
方法1:遍历文件夹下所有内容,计算相加
// 总大小
NSInteger size = 0;

// 文件路径
NSString *caches = [NSSearchPathForDirectoriesInDomains(NSCachesDirectory, NSUserDomainMask, YES) firstObject];
NSString *file = [caches stringByAppendingPathComponent:@"default"];

// 文件管理者
NSFileManager *mgr = [NSFileManager defaultManager];

// 获得文件夹中的所有内容
//    NSArray *contents = [mgr contentsOfDirectoryAtPath:file error:nil];
NSArray *subpaths = [mgr subpathsAtPath:file];
for (NSString *subpath in subpaths) {
    // 获得全路径
    NSString *fullSubpath = [file stringByAppendingPathComponent:subpath];
    // 获得文件属性
    NSDictionary *attrs = [mgr attributesOfItemAtPath:fullSubpath error:nil];
//     size += [attrs[NSFileSize] integerValue];
    size += attrs.fileSize;
}
XMGLog(@"%@ %f", file, size / 1000.0 / 1000.0);
方法2:引用遍历器/迭代器
  // 总大小
  NSInteger size = 0;

    // 文件路径
    NSString *caches = [NSSearchPathForDirectoriesInDomains(NSCachesDirectory, NSUserDomainMask, YES) firstObject];
    NSString *file = [caches stringByAppendingPathComponent:@"default"];

   // 文件管理者
   NSFileManager *mgr = [NSFileManager defaultManager];

   // 获得文件夹中的所有内容
   NSDirectoryEnumerator *enumerator = [mgr enumeratorAtPath:file];
    for (NSString *subpath in enumerator) {
       // 获得全路径
       NSString *fullSubpath = [file stringByAppendingPathComponent:subpath];
       // 获得文件属性
       NSDictionary *attrs = [mgr attributesOfItemAtPath:fullSubpath error:nil];
   //   size += [attrs[NSFileSize] integerValue];
        size += attrs.fileSize;
    }
XMGLog(@"%@ %f", file, size / 1000.0 / 1000.0);- 计算大小功能抽取分类,字符串做分类(方便)
- 适用计算文件夹大小,如果是文件,没法输出大小,需要加判断
- (NSInteger)fileSize
{
    // 文件管理者
    NSFileManager *mgr = [NSFileManager defaultManager];
    // 是否为文件夹
    BOOL isDirectory = NO;
    // 这个路径是否存在
    BOOL exists = [mgr fileExistsAtPath:self isDirectory:&isDirectory];
    // 路径不存在
    if (exists == NO) return 0;

    if (isDirectory) { // 文件夹
        // 总大小
        NSInteger size = 0;
        // 获得文件夹中的所有内容
        NSDirectoryEnumerator *enumerator = [mgr enumeratorAtPath:self];
        for (NSString *subpath in enumerator) {
            // 获得全路径
            NSString *fullSubpath = [self stringByAppendingPathComponent:subpath];
            // 获得文件属性
            size += [mgr attributesOfItemAtPath:fullSubpath error:nil].fileSize;
        }
        return size;
    } else { // 文件
        return [mgr attributesOfItemAtPath:self error:nil].fileSize;
    }
}- 封装一个清除缓存的操作,自定义cell
/** 缓存路径 */
#define XMGCacheFile [[NSSearchPathForDirectoriesInDomains(NSCachesDirectory, NSUserDomainMask, YES) firstObject] stringByAppendingPathComponent:@"default"]

- (instancetype)initWithStyle:(UITableViewCellStyle)style reuseIdentifier:(NSString *)reuseIdentifier
{
    if (self = [super initWithStyle:style reuseIdentifier:reuseIdentifier]) {
        self.textLabel.text = XMGDefaultText;

        // 禁止点击事件
        self.userInteractionEnabled = NO;

        // 右边显示圈圈
        UIActivityIndicatorView *loadingView = [[UIActivityIndicatorView alloc] initWithActivityIndicatorStyle:UIActivityIndicatorViewStyleGray];
        [loadingView startAnimating];
        self.accessoryView = loadingView;

        // 计算大小
        [[[NSOperationQueue alloc] init] addOperationWithBlock:^{
            // 计算缓存大小
            NSInteger size = XMGCacheFile.fileSize;
            CGFloat unit = 1000.0;
            NSString *sizeText = nil;
            // 文件大小显示格式
            if (size >= unit * unit * unit) { // >= 1GB
                sizeText = [NSString stringWithFormat:@"%.1fGB", size / unit / unit / unit];
            } else if (size >= unit * unit) { // >= 1MB
                sizeText = [NSString stringWithFormat:@"%.1fMB", size / unit / unit];
            } else if (size >= unit) { // >= 1KB
                sizeText = [NSString stringWithFormat:@"%.1fKB", size / unit];
            } else { // >= 0B
                sizeText = [NSString stringWithFormat:@"%zdB", size];
            }
            NSString *text = [NSString stringWithFormat:@"%@(%@)", XMGDefaultText, sizeText];

            // 回到主线程
            [[NSOperationQueue mainQueue] addOperationWithBlock:^{
                self.textLabel.text = text;
                self.accessoryType = UITableViewCellAccessoryDisclosureIndicator;
                self.accessoryView = nil; // 圈圈消失
                // 允许点击事件
                self.userInteractionEnabled = YES;
            }];
        }];
    }
    return self;
}- 取消cell选中时背景颜色
#pragma mark - <代理>
- (void)tableView:(UITableView *)tableView didSelectRowAtIndexPath:(NSIndexPath *)indexPath
{
    // 取消选中
    [tableView deselectRowAtIndexPath:indexPath animated:YES];

    // 清除缓存
    XMGClearCacheCell *cell = (XMGClearCacheCell *)[tableView cellForRowAtIndexPath:indexPath];
    [cell clearCache];
}- 模拟清除缓存操作
- (void)clearCache
{
    [SVProgressHUD showWithStatus:@"正在清除缓存" maskType:SVProgressHUDMaskTypeBlack];

    [[[NSOperationQueue alloc] init] addOperationWithBlock:^{
        [[NSFileManager defaultManager] removeItemAtPath:XMGCacheFile error:nil];

        [[NSOperationQueue mainQueue] addOperationWithBlock:^{
            [SVProgressHUD showSuccessWithStatus:@"清除成功"];

            self.textLabel.text = XMGDefaultText;

            // 禁止点击事件
            self.userInteractionEnabled = NO;
        }];
    }];
}
七 不同标识cell的共存
- 当有多个样式不一样的cell时,不方便cell循环利用,可以通过注册2或多个cell(cellID)
- (UITableViewCell *)tableView:(UITableView *)tableView cellForRowAtIndexPath:(NSIndexPath *)indexPath
{
    if (indexPath.section == 0 && indexPath.row == 0) { // 清除缓存的cell
        XMGClearCacheCell *cell = [tableView dequeueReusableCellWithIdentifier:XMGClearCacheCellId];
 //    [cell updateStatus];
        return cell;
    } else if (indexPath.section == 1 && indexPath.row == 2) {
        return [tableView dequeueReusableCellWithIdentifier:XMGThirdCellId];
    } else {
        UITableViewCell *cell = [tableView dequeueReusableCellWithIdentifier:XMGOtherCellId];
        cell.textLabel.text = [NSString stringWithFormat:@"%zd - %zd", indexPath.section, indexPath.row];
        return cell;
    }
}- 一旦离开缓存池,cell一些动画会自动停掉,想要不停动画,更新状态
- (void)updateStatus
{
    if (self.accessoryView == nil) return;

    // 让圈圈继续旋转
    UIActivityIndicatorView *loadingView = (UIActivityIndicatorView *)self.accessoryView;
    [loadingView startAnimating];
}


 被折叠的 条评论
为什么被折叠?
被折叠的 条评论
为什么被折叠?
 到【灌水乐园】发言


